Another New Hobby: Wire-Wrapped Jewelry

As if I didn’t have enough hobbies to keep me out of trouble.

I’m in Quartzsite, AZ, this January and although I originally had plans to camp out in the desert for the first half of the month, a variety of circumstances convinced me to take a booth at Tyson Wells’ Rock and Gem show. I’m selling (or trying to sell) aerial photos of desert campsites. (More on that in another post.) The east side of the show is full of rock vendors, many of which sell polished cabochons (or “cabs”) and finished jewelry.

Dictionary Definition of Findings
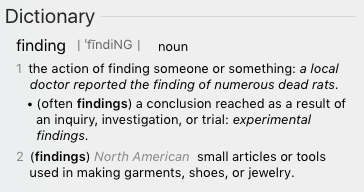
In case you’ve never seen the word “findings” used this way, check definition 2 here.

There are several ways to make a rock into a piece of jewelry. The most obvious is to drill a hole in it to fasten a hoop or use some other sort of findings. But a more artistic method is to use wire to wrap the stone securely and add embellishments. This is called wire-wrapping and there are a lot of examples of it here, especially during the rock shows at Tyson Wells and the bigger/better rock show at Desert Gardens nearby.

Kindling an Interest

Last year, my friend Rebecca came to town while I was here and introduced me to her friend John Heusler, a gemologist who has a booth each year at Desert Gardens. John not only cuts and polishes stones, but also makes jewelry. Dorothy Roubik-Ellenbecker, another jewelry maker, works for/with John and shares booth space. She makes beautiful wire-wrapped pieces with intricate wraps that are really a joy to behold.

I got slightly interested in wire-wrapped jewelry last year, but was busy doing a lot of other things. This year, I’m sort of trapped in my booth, especially on weekends when there’s a decent crowd at the show. I’ve been looking at a lot of different wrapped jewelry styles while I’m here and starting getting the idea that maybe making some of these was within my capabilities.

Getting Training

I talked to Dorothy and asked if she’d be interested in teaching me in the evening, when we’re both done booth sitting for the day. She agreed and set a date for Monday evening. I asked about books that might be helpful and she recommended skipping the books and going right to YouTube. So I did.

I discovered that there are a lot of how-to videos on YouTube about wire-wrapped jewelry. Search for yourself. I spent one evening watching about a half dozen of them, mostly by one artist. “Tried-and-Tested Wire-Wrapping Tutorial for Pendants” showed one basic technique and “Quick Wrap! Wire Wrapping Tutorial for Pendants” showed a quicker but less polished technique. Neither of them looked terribly difficult. I went to bed that night eager to get started.

Buying Materials and Tools

Fortunately, everything I needed was walking distance from my booth. Before I opened that morning, I went shopping for cabs. I bought two nice ones, then realized that since I was just learning, I should start with lesser stones. I found a booth selling some nice but apparently low quality ones for a lot less. I bought ten.

I closed up early (as I often do — seriously, how to people do 9 to 5 unless they’re busy the whole time?) and walked over to the booth where I could find tools and wire. Although the woman working there tried hard to sell me expensive square silver wire, I homed right into the silver-plated copper. I expected to make a lot of mistakes and didn’t want to screw up with expensive wire.

A comment about tools…

If you look at the two videos I linked to above, you’ll see that the woman who does the tutorials makes a point of saying that she uses regular tools — not special jewelry tools. Sure, you can use an Ace Hardware needle nose pliers and wire cutter to get the job done. But look closely at her work. Those ridges that make needle nose pliers so good for gripping also mark up the soft metal wire she uses to wrap the stones. I didn’t want those ridges on my stones so I bought the right tools.

Her husband was extremely helpful with the tools. They had a big selection with a variety of qualities. One video I watched discussed tools in some detail, so I knew what I needed to get started. He helped me find every one of them, including one that wasn’t displayed that he had to dig through stock to find. (He also recommended another tool, which I passed on but wound up buying the next day.) The tools weren’t expensive — they averaged $5 to $10 each. My initial investment in tools and wire was $35, which I didn’t think was bad.

In case you’re wondering what I bought, here’s a list:

  • Small chain pliers
  • Small flat pliers
  • Small round pliers
  • Wire straightener
  • Wire cutter
  • 18 gauge silver plated copper wire
  • 20 gauge silver plated copper wire
  • 22 gauge copper wire

First Tries

That evening, after dinner, I spread out my tools, pulled out some wire and a large teardrop-shaped labradorite cab, and got to work. I went with the quick wrapping technique in the second video I linked to above, using the 20 gauge silver wire. The biggest challenge was holding the cab and wire in place while I did the wire twisting required to hold it. I was almost surprised when I got the cab to stay in the cage I’d built for it. I then made and positioned swirls on the front of the piece with two of the leftover ends. I admit that I was kind of blown away by the results. The finished piece didn’t have the same polish as John or Dorothy’s work, but it sure wasn’t bad for a first try.

Labradorite Wrapped in Silver
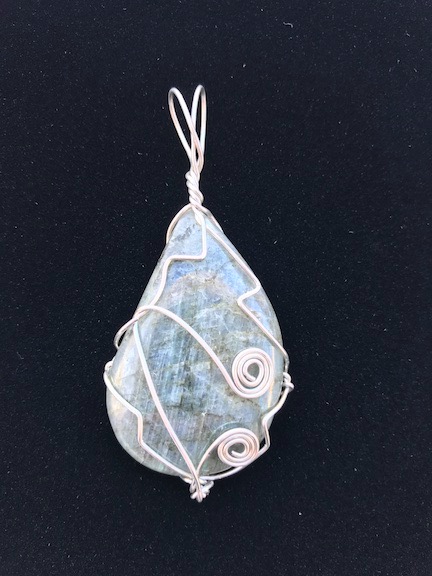
My first finished piece: labradorite wrapped in silver-plated copper.

A closer look at the piece, however, reveals its problems. The biggest problem, in my opinion, were the small burrs I’d created in the wire by rough handling. Simply said, I’d used my flat pliers too aggressively and had damaged the soft metal wire. There were burrs on the decorative bends, especially on the back. This could catch on fine fabrics like silk or nylon, making the piece pretty much unwearable. Unless Dorothy knew a way to fix it, it would never be more than a piece for show.

My wire twists aren’t as neat as they could be, either. Although my spirals are very good with minimal tool marks, the wire joins are clumsy. Surely Dorothy would have tips to fix that, too.

I decided to try the more difficult technique on a small piece of bacon agate that the vendor in the next booth had polished up and given me the day I arrived. I really think that the desire to do something useful with this pretty little stone is what helped fuel my interest in wrapping.

Bacon Agate wrapped in Copper
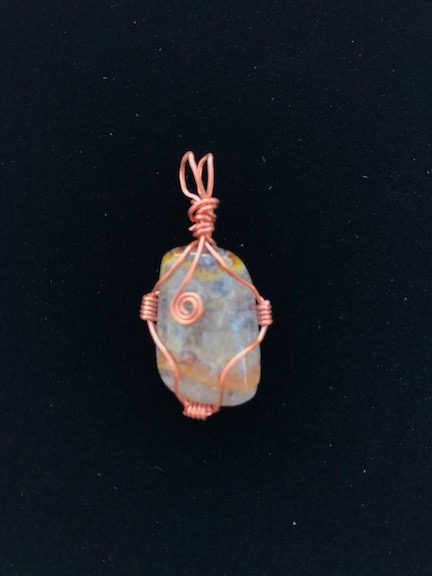
My second piece was a small bacon agate stone gifted to me that I wrapped in copper.

I chose the thinner, 22 gauge copper wire for the job. I thought (rightly, I believe) that the copper wire would go well with the colors in the rock and the small size of the rock meant I needed a thin wire. I followed the instructions in the video to the letter to create the tightly wrapped anchor points that would form the cage around the rock. I was very careful to avoid overworking the metal; this was a piece I wanted to wear and I didn’t want burrs. I purposely made the bail small and loose and added a single swirl to the front. When I was finished, I was very pleased with my work.

I sent photos to a few friends and put them on Twitter. I got some positive feedback, which made me feel good.

I watched a few more videos before I went to bed.

Additional Efforts

The next morning, I went back to the tool shop and bought three more tools:

  • “Micro” chain pliers – to get into tighter places
  • Nylon headed flat pliers – to prevent marring soft metal
  • Bailing pliers – to make nice bends

Speckled Agate wrapped in Silver
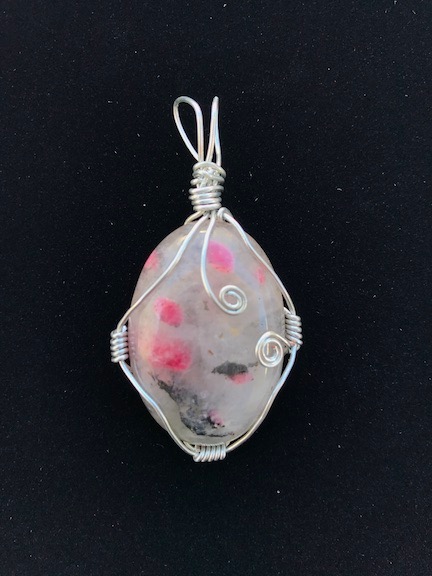
My third piece was an oval of some sort of speckled agate wrapped in silver-plated copper.

I chose another cab from my collection of cheap ones: an oval stone that combines a white quartz with black and pink rock specks. (No one seems able to give me the exact name for this stone, but I will keep trying to find out.) Again, I went with the more polished technique that used tightly wrapped anchor points to build the cage. I ended up with spirals that I positioned over the area that had no colored specks. I think it came out good, although I wish I’d made the upper spiral a little larger.

I had a nice elongated piece of rose quartz that was actually two-sided and decided to get fancy. I’d do a bevel mount with a thin wire to weave the bevel and hold the stone. I walked over to the findings booth and bought two more types of wire for my quickly growing collection:

  • 24 gauge silver plated copper wire (for this piece)
  • 28 gauge copper wire (for future use)

Then I went back to my booth and got to work. I started off well, using the 18 gauge silver-plated copper wire for the edges of the bevel. When I brought the ends up and around, I created a really pretty spiral finish.

Around this time, a woman I’d seen around the show came by my booth. She was on a bicycle with a small, white, curly-haired dog in the front basket. She’d caught sight of me working on the wire wrap as I sat at the table in my booth. She also does wire work. I told her I’d just started and showed her my pieces. (By that time, I’d also bought a small glass-fronted box to hold and display my work.)

We chatted for about 45 minutes. She complemented me on my work, pointing out how nicely I’d used the swirls to fill the white space on the stone with the pink and black speckles. She said that the labradorite piece I’d chosen was not a good one, showed me how to look for features in labradorite, and explained the importance of finding good stones by “cherry picking” them. She told me about a big booth on the other side of the show that had decent quality, inexpensive cabs, as well as where to find more wire in a shop in town. She pointed out that the swirls in one piece could move if they were caught on the wearer’s clothing and gave me a tip about preventing that. She also told me about some inexpensive wire-wrapping classes being held evenings at the QIA building not far away.

While we talked, I tried to work on the piece. The distraction is probably what screwed it up — I accidentally shifted one of the thick wire frames while trying to weave it to the opposite side. My wraps were okay — neither good nor bad — but I’d made one side much smaller than the other, thus screwing up the bevel.

I had to run out to the post office so I closed my booth early. On the way back, I stopped at Hardies Beads and Jewelry in town. They sell mostly beads and jewelry (as you might expect) but do have a good selection of wire-wrapping wire at the back of the store. I wound up spending about $32 on a selection of wires in colors and styles, including an interesting 21 gauge twisted silver wire and various thicknesses of antique copper wire. I now had just about all the wire I’d need to move forward with additional projects.

Rose Quartz wrapped in Silver
My fourth piece was an incredibly boring round piece of rose quartz that I dressed up with fancy twisted silver-plated copper wire.

That evening, I tried to fix the bevel piece but failed miserably. I took a few photos of the design (which I won’t share here) so I could remember what I liked about it, then took it apart. I tried two other wraps on that stone and gave up before putting much time into it. But rather than finish the day with a failure, I picked a round rose quartz piece and did a wrap on that using the new twisted silver wire with a narrower wire for the wrap points. The stone was extremely boring — I honestly don’t know why I picked it — but the fancy wire and swirls I added really dressed it up a bit.

So at this point, I have four completed pieces, three of which can be worn.

Next Steps

It’s Saturday morning. Before I open my booth for the day, I’ll stop by that shop with inexpensive cabs and buy a few interesting ones. I feel better qualified to choose them now that I know how I can work the features of the stone into my work.

After I open my booth, I’ll settle down with my little bin of cabs and tools and wire. I’ll pick out a cab and work up another piece. And maybe another after that.

And I’ll likely do a few others on Sunday.

On Monday evening, I’ll bring my collection to Dorothy for her critiquing. I hope she’ll be honest and frank. I also hope she can offer good advice on doing the wraps and twists I find difficult. And teach me how to do bevels!

It might take more than one evening. That’s fine. I’ve told her I’ll pay for her time, although I don’t think she expected that. (She is a professional; she should be compensated when sharing her expertise with a novice.) We’ll both be here at least until January 25, so we have time for a few lessons. I’ll post an update on my progress — if I make any!

Photography: The Right Place at the Right Time

It’s kind of like the stars needing to align just the right way to get the best shot.

Practice Makes Perfect
This reminds me of a podcast I was listening to in the car just yesterday on my way back to Wickenburg from Winslow. It’s an episode of Freakonomics radio which discusses practice as a way of becoming an expert at anything. If you’re interested in learning or getting better at a skill and like to understand the science behind how things work, I recommend “How to become Great at Just About Anything.”

A few weeks ago, a friend of mine — we’ll call her Jane — shared a photo on Facebook. She’s an amateur photographer turning pro and has begun to sell some of her work. Other work has appeared in various publications. I’ve known Jane since she first took a serious interest in photography and it’s no exaggeration to say that her work has come a very long way since those early days. Many of the photos she shares now are absolutely stunning. Practice makes perfect — or at least helps you get closer to perfect.

Anyway, the photo Jane shared that day was one of those where she caught the light on her subject just right. It was one of her best shots — in my opinion, anyway — and I complemented her. I also added the comment, “It’s all about being in the right place at the right time.”

I don’t remember her exact response, but it was something like, “It’s a little more than that.” I suspect that I’d offended her and I certain didn’t mean to. But I’ll stand by what I said and make an attempt to prove it with an example. I’ll also share some of my philosophy about photography.

What Makes a Photo Great

The way I see it, a photo can’t be truly great unless the photographer nails three components: subject, composition, and light.

Subject
The subject of the photo is what the photo shows. It should be something beautiful or notable or interesting in some way. Beautiful is pretty straightforward, although I agree that beauty is in the eye of the beholder. Notable is what I think about when using photography to document something, for example, the way a bridge cable attaches to a support or the design of a water fountain. (Yeah, I’m sometimes fascinated by silly things like that.) Interesting covers a lot of ground. The pattern of sand after a wave has come by is interesting. Paint peeling off a wall can be interesting, too. It’s part of the photographer’s job to make the subject something that speaks to us in some way, something that makes us stop and look and think. A good photographer can do that with just about any subject using the other two components.

Composition
Composition refers to the way the photographer arranges the subject and its surroundings in the camera’s frame. You may have heard of the Rule of Thirds and it’s a great thing to keep in mind when composing a photograph. But that doesn’t mean a photo can’t be great without following that rule. One of the differences between a good photographer and someone who haphazardly snaps dozens of photos in hopes that one will be good is that a good photograph can figure out where to stand and which lens to use (or how to set a zoom lens) and how to hold the camera to get the best composition more often than not. I should add here that a good photographer does not need to rely on cropping to get the right composition; she should be able to compose right in the camera. (One obvious exception to this rule is when a photo’s desired aspect ratio is unsupported by the camera; for example, a square photo would require cropping.)

Light
Of course, photography absolutely depends on light. Without light, there would be no photography — after all, that’s what the camera’s sensor (or film in the old days) records. What so many amateur photographers don’t understand is that there is good light and bad light. Natural light changes with the weather and time of day. Blue hour or twilight light is, as the name suggests, bluer and dimmer than daylight. Golden hour light tends to be redder and softer, casting longer shadows. Midday light is often harsh and bright, flattening out the scenery. Beyond that, light can be direct or reflected or shadowed — sometimes all in the same composition. A good photographer using natural light — for example a landscape photographer like Jane (and me) — understands the importance of light and makes a special effort to photograph the subject at the best time.

Get all three of these right and the photo will be great. Get two of these right — for example, subject and composition or subject and light — and the photo might be good, but it won’t be great. Get just one right and the photo won’t be very good at all. (We’ve all seen these — think vacation photos uploaded en masse on Facebook.)

Being a Serious Amateur
I call myself a “serious amateur” photographer and I don’t use that phrase lightly. I see it this way: An amateur is someone who snaps photos without bothering to try to make the photo great. Good is good enough. A serious amateur is someone who understands what makes a photo great and puts a conscious effort into trying to make great photos. Each shot, objectively reviewed, is a step (hopefully up) on the learning ladder. Good is never good enough.

The trick is to objectively assess how good you’ve covered each of these components. And that’s a Catch-22 in itself: if you’re not a good photographer, you likely won’t be able to objectively critique your own work. That’s part of how practice makes perfect. Keep trying, keep comparing, keep objectively trying to figure out what could be better in each photograph you make. If you’ve got a good eye and you’re honest with yourself, you’ll get better all the time.

Right Place, Wrong Time

This past weekend, I was up in the Navajo and Hopi Reservations in Northern Arizona. This is an amazing place for landscape photography, with the broad desert scrubland of the Painted Desert punctuated by deep canyons, flat-topped mesas, and towering buttes. The west end of the Navajo Reservation is where red sandstone formations laid down when oceans covered the Four Corners region meet and merge with dark brown lava flows emerging from the multitude of volcanic cones north and east of Flagstaff. That’s where an explorer with a vehicle capable of tackling rugged roads can find the Grand Falls of the Little Colorado River.

Grand Falls Terrain
Nothing better illustrates the way the two landforms come together at Grand Falls than a satellite image like this one. You can clearly see the reddish rock of the painted desert butt up against the lava flows. One flow forced a bend in the river around it; the falls come right after that bend and then cut into the rock joint, forming the Little Colorado River Gorge. (The Colorado River flows east to west here.) Want to study this for yourself? Use Google Maps to Search for Grand Falls, Leupp, AZ.)

As a subject for photography, the Grand Falls is a crap shoot. I’ve seen the falls completely dry without a single drop of water flowing over the long shelves of rock. While that might be interesting to some folks — geologists come to mind — I personally lack the skills to make it interesting enough to qualify as a great photo. I’ve also seen the falls with water thundering over its entire breadth and mist rising up into the sky. When the water is flowing it’s always reddish brown from sandstone silt it picks up along the way, thus giving it the nickname “chocolate falls” or “chocolate milk falls.”

So timing is vital when visiting the falls. It nearly always runs with spring runoff from the mountains far to the Southeast, so spring time is the best time to visit if you want to see water. It also may run from monsoon rain in July and August — depending on weather, of course. But it was January — too cold for runoff and no monsoon rains. We did, however, have a good rainstorm on Friday night. And my trip to the Hopi Reservation put me just over an hour away. It was worth a try.

I was lucky. The falls were at about half flow: certainly interesting enough for some photos. So I had a good subject.

I spent about an hour shooting from various points along its south shore. I would have crossed the river to shoot from the other side, but there’s no bridge and the crossing looked a lot muddier than I was willing to try, even in my big four-wheel-drive truck. My ability to compose my shots was limited by where I could stand to shoot and the lenses I had with me. Although the photos here are from my phone’s camera, I did have my Nikon and three lenses with me. To fit the entire falls into the shot, I wound up using my 10-24mm zoom lens. This gave me a huge amount of flexibility as far as framing was concerned. I did the best I could and believe I got some interesting compositions that showed off the geology with manmade objects to indicate the scale — after all, Grand Falls is actually taller than Niagara Falls. So I was relatively satisfied with my compositions.

Light was another story. I arrived at midday, which would have been horrible on one of those perfectly clear, blue sky days Arizona gets so often. But it wasn’t a perfect day. It wasn’t even a nice day. I’d driven through fog to get to the falls and the low clouds had lifted only a few thousand feet above me. The light was soft but colorless. The sky was gray. The air felt wet.

Now I know that lots of photographers like the kind of soft light that was all around me that day and I know it’s hard to make a bad landscape photo on a day like that, but it just doesn’t appeal to me. Still, you can’t adjust natural light; you have to take what Mother Nature delivers. So I did what I could. I got a bit excited when, about 30 minutes into my visit, the sun began shining down the canyon past the falls. I watched the soft sunlight creep up towards the falls, hoping it would give me the kind of spotlighting I’d seen downriver. I waited. I was at the right place — or as close to it as I could be — and I was willing to wait a while for the right time.

It didn’t come. The gap in the clouds closed up. Everything returned to the even flat light. I took a few more shots, got back into the truck, and left. The rain started immediately.

Grand Falls
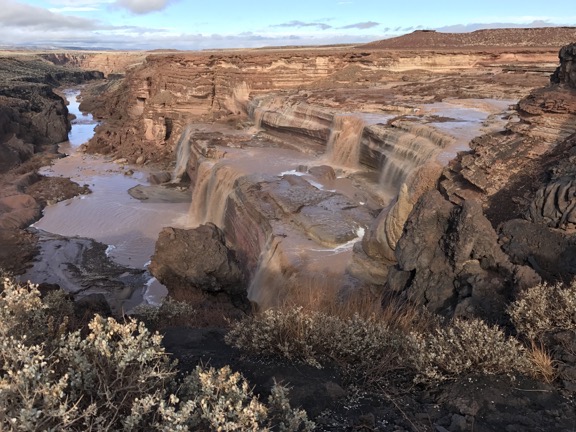
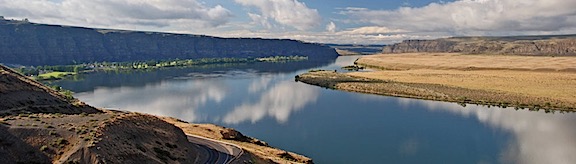
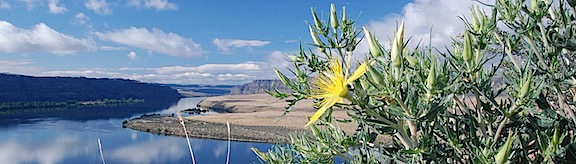
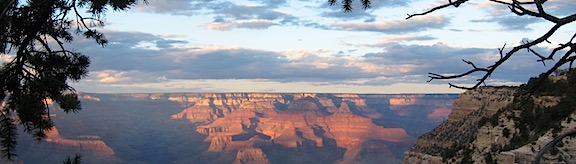
Here’s my favorite unedited cell phone shot from the visit. Note the sunlight on the canyon wall at the top left of the photo. I was waiting for that light to get to the falls, but it never did. The Nikon version of this shot shows a wider field of view and the composition is a bit better.

So did I get a great shot of the falls? I don’t think so. I did get a good shot, though. And, for a while, I was satisfied with that.

Right Place, Right Time

Until the next day. It rained (and snowed) again overnight and I figured there might be more water going over the falls. I was leaving La Posada in Winslow (where I was staying) and another trip to Grand Falls would only take me an hour or so out of my way. I knew that if I didn’t at least try it, I’d regret it forever. After all, how often do I get up to that area of Arizona with a sturdy vehicle and time on my hands?

There was some fog along the way, but not much. The sky was clearing and blue sky was poking out. There was definitely sunlight but it was filtered through lighter clouds. Soft yet bright light. It was still early in the day — not long after 9 AM — but long past golden hour. (I’m not sure whether golden hour would have been golden anyway; the clouds were still thick around sunrise.) As I drove the last 10 muddy, bumpy roads, plowing through puddles that would swallow a Smart Car, I wondered whether the angle of the sun would cast deep shadows across the falls.

Of course, that’s a whole other aspect of light. The angle of the sun determines where the shadows will be at various times of the day at various times of the year. It was winter, not long after solstice, so the sun was nearly as low in the southern sky as it would be. And it was morning, so it would be low in the southeastern sky. The falls faced southwest, with a canyon wall to the south. Would that canyon wall cast deep shadows at that time of the day? How long was I willing to wait there for the right light?

Turns out, I didn’t have to wait at all. The light was damn near perfect when I arrived. (Perfect as far as I was concerned, anyway.) The sky was an interesting mix of patches of blue with clearing clouds. The falls had about the same amount of water flowing over, which was okay.

Grand Falls
This is nearly the same composition, although for this shot I got down into a crouch to include some sunlight-illuminated plants in the foreground. (The crouch also allowed me to block the floating garbage patch at the base of the falls (ick!) with a rock formation.) The light was nice and soft and really added color to the shot. And because it was a soft light, the shadows cast by the wall of the canyon weren’t deep enough to screw up the exposure. This shot is also unedited, from my iPhone.

Is this a great photo? Some people might think so. I’m certainly pleased with it. But I can always do better. I just have to try.

But what it really illustrates is that it’s not enough to be in the right place for a good photo. You also have to be there at the right time. While I might not have been here at the “perfect” time to shoot a “perfect” photo, the timing of my second visit was much better than the timing of the first.


Related Posts:
I’ve written a bit about this before. Check out the following posts:

Snowbirding 2017 Postcards: At the Mascall Overlook

When I went hiking at Cottonwood Canyon on Thursday, I met another woman hiking with her dog. We stopped for a brief chat about hiking and photography — she had a DSLR camera with her, too. During the conversation, she mentioned an overlook she had stopped at while in the John Day Fossil Beds Monument, which is where I was heading. She didn’t know the name of it and her description was very vague but I believe I found it the next day: the Mascall Overlook. 

I arrived around mid day, just in time for lunch. The sky was mostly cloudy, but the sun was making its way through here and there. I was hungry and decided to have lunch first, so I hopped into the Turtleback and reheated some leftovers using my microwave powered by the onboard generator. (I can’t deny the convenience of this, despite the three minutes of generator noise.) Afterwards, Penny and I made the short walk to the Overlook and took in the scene. There’s a lot of geology going on here, most of which has to do with basalt lava flows around 15 million years ago — if I’ve got that right. The road in the photo cuts through what’s called Picture Canyon, which was created by the South Fork of the John Day River flowing though over years and years. 17 layers of basalt rock lay exposed inside the canyon.

It was an interesting place to stop for lunch in a few photos. Very quiet, yet not far from ranches and homes. I think that’s one of the things I like best traveling with the Turtleback instead of my old Mobile Mansion: I don’t have to worry about getting in or out of tight parking lots or narrow, dead end roads. I can go anywhere.

​​

Snowbirding 2016: Valley of Fire

A short overnight visit to a geologically interesting place.

Posts in the Snowbirding 2016 Series:
Introduction
The Colorado River Backwaters
Quartzsite
Wickenburg
Phoenix
Home
Back to the Backwaters
Return to Wickenburg
Valley of Fire
Death Valley
– Back to Work

When I left Wickenburg that Sunday morning, I was technically on my way to my late winter job in the Sacramento area of California. Indeed, I had to be in Sacramento to catch a 6:40 AM flight home on Friday to fetch my helicopter. But I’d planned the drive with enough time to make two stops along the way. The first was Valley of Fire State Park near Overton, NV.

Valley of Fire gets its name from the vibrant red rocks that jut out of the desert floor in this area of Nevada. It’s full of scenic overlooks, easy to difficult hiking trails, and plenty of interesting sandstone formations. In the right light, it’s quite photogenic. It’s also easy to visit. Only 50 miles from Las Vegas, it gets quite a few visitors on weekends — as I soon found out.

Camping with the Mobile Mansion

When I planned the trip, I didn’t realize it was a holiday weekend — since when is President’s Day right after Valentine’s Day? — and had half expected to be able to slide into a campsite inside the park that Sunday afternoon when weekenders left. I’d also been assured by a friend who’d been there weeks before that if all the campsites were taken, I could park my rig in “overflow parking.”

Wrong on both counts.

When I arrived in early afternoon after a long but pleasant drive up Route 93 from Wickenburg, the weekenders weren’t quite through with their weekends and the first come, first served campgrounds were marked “Full.” I managed to park my rig along the curb in a completely full Visitor Center parking lot and went in to talk to a ranger. She confirmed what I’d already learned on the Self-Pay Station signs: camping in designated sites only. But she was extremely helpful, offering suggestions for camping on Bureau of Land Management (BLM) land west of the park or Bureau of Reclamation land east of the park.

Since the Reclamation land was closer, I soon found myself backtracking out the park entrance I’d come in and then turning north along the main road there. In a few miles, I found the gravel road I thought she’d referred to and made a right onto it. I could see a few other campers out there, quite far from the road. Since I wasn’t interested in exploring with the mobile mansion behind me — it’s seriously difficult to turn that sucker around in a narrow space — I opted for the first “pull through” spot I could find: a narrow road that climbed up a hill with a relatively level spot on top. I approached it from the east after turning around in a wide area and parked with the Mobile Mansion’s big back window facing out toward the lake. When I got it level enough that I didn’t have to worry about it rolling back down the hill, I dropped the landing gear and disconnected it from my truck. Then I put out the slides, gave Penny some food and water, locked it back up with Penny inside, and headed back into the park.

Another free campsite, courtesy of our government.

I later discovered that the location the ranger had referred to was about a half mile farther down the road where there were literally dozens of RVs, some of which were even bigger than mine, parked. I was glad that I wasn’t among them, though — I know half of them would be running generators past dark; likely watching satellite TV instead of the stars. There was no one within a quarter mile of my site and the closest campers were in tents. I had no intention of ruining their quiet evening with my generator so it was all good.

Afternoon Photo Shoot

Closer Look at Valley of Fire
Want to learn more about what’s photogenic in the park? Start with this €4 ebook.

It was nearly 4 PM and the sun was low in the west when I got back into the park. I took the road north from the Visitor Center. I was very interested in hiking out to a formation called the Fire Wave, which was best viewed in the afternoon. My photographer friend Rebecca, who had been to the park recently, had recommended an ebook about the park: A Closer Look at Valley of Fire by Isabel & Steffen Synnatschke. That’s where I learned about the Fire Wave, which is pictured on the cover, and it was exactly the kind of scenery I like to shoot.

Of course, what had been described in the book as something off the beaten path had since gotten its own marked path. The parking lot there was completely full and there were people all over the place. Even if I could have parked, I doubted I could get the kind of scenery-only photos I wanted. On top of that was the authors’ note that the scene was best shot just after sunset and numerous signs that warned that anyone out on the trails after sunset was trespassing. So it seemed to me that a walk down to the Fire Wave that afternoon would be a frustrating waste of time.

I continued out to the end of the road, finding every single parking area completely full with day trippers who were out of their cars and climbing all over the rocks. While it’s nice to see families enjoying the outdoors together, I really wish I’d come on a weekday when it would likely be a lot less crowded. I turned around at the end of the road and headed back.

Red Rocks
I spent an hour shooting various rock outcroppings with various lenses from various positions. It was nice working alone, unrushed with plenty of time to experiment.

I wound up parking at an almost empty parking lot beyond the Fire Wave’s lot on the way back. From there, I struck out into the desert to the northeast with the thought of maybe coming up on the Fire Wave or an area like it from the other side. That didn’t pan out, but I did find some interesting rock outcroppings to photograph. I walked about a mile with Gaia GPS turned on in my phone to record my track. In addition to my phone, which I used to take a few photos for my Gaia track, I had my Nikon with me, along with three lenses. I got a chance to use my 10-24mm lens, which I rarely use, to take some really wide angle shots. As the sun got lower and lower, the shadows grew, giving the rocks a three-dimensionality they wouldn’t have when the sun was higher in the sky. The tricky part was keeping my shadow out of some of the shots. And I tried to tread carefully among the sometimes delicate rock formations to keep from crushing thin rock ridges beneath my feet.

Cactus with Red Rocks
Another wide angle shot, this one featuring a type of prickly pear cactus that would likely be in full bloom with large pink flowers within two months.

Selfie
I seldom share selfies — I usually don’t like the way they turn out — but was very pleased with this one.

On the way back to the truck, I stopped for a selfie with the park behind me. The battery in my camera’s remote was apparently dead — no real surprise there — so I did it the old fashioned way, with the camera’s self-timer. I was very pleased to get a good shot on the first try.

Sunset
Another beautiful desert sunset, reflected on the side of the Mobile Mansion.

I explored a bit more of the park before the sun set, trying to find a good place for a morning shoot the next day. Then I headed back to the Mobile Mansion. Penny, as usual, was glad to see me. We went for a walk and I watched the sun set. Later, while I was having dinner, I watched the flickering dots of nearby campfires through my big back window, marveling at how bright the moonlight was.

Morning Photo Shoot

I was up, as usual, before sunrise. My closest neighbors had started a campfire, likely to keep warm. I could see it flickering off in the distance. It reminded me of my days at the backwaters in January and early February.

I made a cup of coffee to go and grabbed a snack bar for breakfast. Then, as the sky brightened to the east, Penny and I were in the truck, headed into the park.

Stone Walls
I love the textures of the wood window frames and stone walls at the Cabins.

Although I’d read through the Valley of Fire book looking for ideas of where to go for that morning shoot, I decided, in the end, to keep it simple: I’d go to the Cabins, a trio of stone cabins built by the Civilian Conservation Corps (CCC) to house workers years ago. The book panned the Cabins as a photographic destination, claiming it wasn’t interesting unless they were lit from inside. I disagree. I was there before sunrise — trespassing? — and began shooting almost immediately. The first light on the cabins was extraordinary and I got more than a few interesting shots. I was the only one around and, again, it was a real pleasure to shoot on my own without having to deal with other photographers or tourists. (Honestly, I don’t understand why people go on photo excursions where they have to jockey with other photographers for a good spot to take a shot.) My only challenge was keeping an eye on Penny — and keeping her out of my shots.

Cabins in First Light
The Cabins at Valley of Fire, shot with a 10mm lens at first light. No, I didn’t retouch this (or any other image) here. It really was that red.

Grass and Rock
Yet another wide-angle close up. The light had already become too harsh by the time I shot this.

Afterwards, I drove farther into the park, retracing my route from the afternoon before. It was around 7 AM, the Visitor Center was still closed, and there wasn’t another soul in sight. I parked alongside the road in one of the numbered dips where the road crosses a wash, got out alone, and began hiking down a slot canyon. The sun hadn’t climbed high enough to illuminate the canyon walls and there were deep shadows. According to the book, the canyon would eventually end up by the Fire Wave. I didn’t get that far, however — the canyon was full of water about a quarter mile in.

I turned around and went back to the truck, then crossed the road and headed off to the west. By that time, however, the light had become bright and harsh — not good for photographing desert landscapes. It was time to go.

Hooking Up and Heading Out

After taking a drive through the west side of the park, Penny and I headed back to the Mobile Mansion. It was around 9 AM. People were just starting to come into the park.

After a quick drive farther down the road where I’d parked — mostly to scout it out for better sites for a future stay — I returned to my rig and began the relatively quick task of hooking it up to the truck and getting ready to move on. Although it’s big, I’ve learned over the years that if I don’t take a lot of stuff out of storage while I’m parked, it’s pretty quick to close up for travel.

By 10 AM, we were rolling back down the gravel hill and onto the pavement. We’d have to drive through the park again — it was the shortest route to I-15. I had to show my pay stub at the ranger station on the west side to exit. Then we were on our way to our next destination: Death Valley.

About the Header Images

A quick summary of where the current images were taken and who I was with.

You may not realize it, but I shot all of the photos that appear in the header on this site. There are currently more than 90 of them and they’re set up to appear randomly. Each time you visit this site or click a link to another page here, the image up top should change.

I noticed just the other day that although all images were shot within the past 10 years, the vast majority were shot when I was alone. That made me realize how much I traveled by myself, even when I was married, and how the places and things I saw were beautiful or interesting enough to capture an image of.

Anyway, here are the images, with summaries.

Alfalfa

Alfalfa

This was an alfalfa field near where I spent my summer in Quincy, WA. I think I shot this in 2008. Alone.

American Coot Family 1 & 2

American Coot Family

American Coot Family 2

I shot these two images at Quincy Lakes in Quincy, WA in 2008. Alone.

Bark

Bark

Birch Bark 2

I like photos that show texture. These close up photos of bark were shot at Quincy, WA in 2008. Alone.

Barn Roof, Wagon, and Waterville Farmland

Barn Roof

Barn Wagon

Waterville Farmland

These three images were shot on the Waterville Plateau near Douglas, WA, probably in 2009. I was with my wasband.

Basalt Cliffs

Basalt Cliff

I’m pretty sure this photo was shot while repositioning my RV from Washington to Arizona by way of Glacier National Park with my wasband — one of the last “vacations” we had together — in 2009. I think it’s at Palouse Falls.

BC Mountains Pano

BC Mountains Pano

This was shot from a cruise ship on an Alaska Cruise with my wasband in 2007. Our last day on board took us between Vancouver Island and the mainland.

BHCB

BHCB

This was shot at Quincy Lakes in 2008 or 2009. I assume BHCB is an abbreviation for the type of bird. Alone.

Birch Leaves

Birch Leaves

I liked the way the sun shined through these leaves in the late afternoon. Shot at Quincy near the golf course in 2008. Alone.

Blue Heron & White Heron

Blue Heron

White Heron

I was kayaking with my dog at Lake Solano in Central California in 2014 when I shot these photos of herons.

Bowman Lake

Bowman Lake

This was shot at Glacier National Park in 2009 while traveling from Washington to Arizona with my wasband.

Bryce and Bryce Dawn

Bryce

Bryce Dawn

These two photos were shot at Bryce Canyon in 2011. I’d gone there with a client in January on a photo flight for this 360 interactive panorama: Bryce Canyon in Winter, Utah, USA.

Cache Creek

Cache Creek 1

Cache Creek 2

Cache Creek 3

Cache Creek 4

These four images of Cache Creek were taken from my helicopter’s nosecam on an early morning flight up Cache Creek in Central California in 2014. I was alone.

Cascades

Cascades

This image of a ridge and cloud-filled valleys was taken from my helicopter’s nosecam on a flight between Wenatchee, WA and Hillsboro, OR in 2012. I blogged about the flight here and shared video from the flight here. It’s notable not only for the perfect weather and amazing scenery, but because it was my dog Penny’s first helicopter flight — 90 minutes long! And yes, that is Mt. St. Helens in the background.

Cherry Drying Cockpit

Cherry Drying Cockpit

This is a shot from a GoPro camera mounted in the back of my helicopter during a cherry drying flight. It was probably taken in 2011.

Close Up Wheat

Close Up Wheat

This closeup of wheat growing in a field in Quincy, WA was shot in 2009. I was alone.

Combine

Combine

This aerial shot of a wheat combine at harvest on the Waterville Plateau in North Central Washington was shot in 2011 during a flight between Wenatchee and Coeur d’Alene, ID. My friend Jim was flying his helicopter; I was on board with a camera.

Corn

Corn

I like patterns. This field of young corn plants in Quincy, WA was capture in 2009. I was alone.

Cows in the Road

Cows in the Road

I was on my way up to my old Howard Mesa, AZ place one bright winter day when I came upon these cows following tire tracks in the road. When I approached, they just stopped and stared. I took a photo before continuing, herding them along with my Jeep. I can’t be sure of the date, but I expect it was around 2003 or 2004. I was probably with my friend Jeremy.

Cracked Mud

Cracked Mud

I shot this alongside the road to Alstrom Point on the northwest end of Lake Powell in Utah. It was probably shot in 2008. I was alone.

Crescent Bar View, Yellow Flowers

Crescent Bar View

Yellow Flowers

I shot these photo of Crescent Bar in Quincy, WA in 2009 not long after drying a cherry orchard down by the river there. I was alone.

Dandelion

Dandelion

I shot this photo of a dandelion seed puff in Quincy, WA in 2008. I was alone.

Desert Still Life & Desert Wildflowers

Desert Still Life

Desert Wildflowers

I shot these photo of hedgehog cacti blooms and California poppies near Wickenburg, AZ between 2009 and 2011. It was probably on one or two Jeep outings and I was probably with either my wasband or my friend Janet.

Fern

Fern

Patterns and textures again. This was shot in Alaska sometime during a cruise with my wasband in 2007.

Float Plane

Float Plane

I shot this image of a float plane taking off at an Alaska port while on a cruise with my wasband in 2007. It was shot from the balcony of our stateroom.

Golden Gate Bridge

Golden Gate Bridge

This image of the Golden Gate Bridge was shot during a trip to San Francisco in 2011. Not sure if I was alone — isn’t that odd? — but I was probably there for a Macworld Expo speaking gig.

Glacial River Rocks

Glacial River Rocks

I shot this closeup of rocks in a river bed while on a trip to Denali National Park in 2007 with my wasband.

Golf Balls

Golf Balls

Attach a GoPro to the bottom of a helicopter with the lens pointing down. Then hover over a golf course green and drop hundreds of golf balls. This is what it might look like. Shot in late 2011 or early 2012. My client was dropping the balls.

Grand Canyon Sunset

Grand Canyon Sunset

I’ve been to the Grand Canyon countless times so I don’t know exactly when this was taken or whether I was alone. I know it was shot before the summer of 2011.

Gyro Cache Creek & Gyro Pattern

Gyro Cache Creek

Gyro Pattern

I learned how to fly a gyroplane in the spring of 2014. These two shots were made with a GoPro mounted on the mast. In the first shot, I’m flying up Cache Creek; in the second, I’m doing a traffic pattern at Woodland Airport. Both were shot in Central California.

Hay Bales

Hay Bales

I’m pretty sure this was shot on the road between Upper Moses Coulee and Waterville in North Central Washington in 2009. I was alone.

Helicopter

Heli Header

This is a photo of my helicopter right after sunrise parked out near my new home in Malaga, WA. I shot this in 2014; I was alone.

High Tension

High Tension

This was shot in 2008 near the Chief Joseph Dam near Bridgeport, WA. I was on a daytrip with my wasband.

Hopi House

Hopi House

Another trip to the Grand Canyon. I suspect I was alone when I shot this one, possibly on a day trip by helicopter with clients from Phoenix. Sometime between 2009 and 2011.

Houses

Houses

Here’s another straight down image shot with a GoPro from my helicopter. This was Peoria, AZ in 2011 or 2012. I was alone.

Inspecting Bees

Inspecting Bees

I set up a GoPro on a tripod to record a beehive inspection in 2013. That’s me in the picture; I was alone.

International

International

This is a closeup of an old International truck parked outside the bakery at Stehekin, WA. I was there with my wasband and another couple on a helicopter trip in 2011.

Juvenile Robin

Juvenile Robin

Shot in 2008 at Quincy, WA. I was alone.

Ladders, Side

Ladders Side

Patterns again. These are orchard ladders neatly stacked at an Orchard in Quincy, WA. Shot in 2008.

Lake Berryessa

Lake Berryessa

An aerial view of Lake Berryessa in Central California, shot with my helicopter’s nosecam in 2014. I was alone.

Lake McDonald Sunset

Lake McDonald Sunset

This was shot on a trip to Glacier National Park with my wasband in 2009.

Lake Pleasant

Lake Pleasant

Another nosecam image from my helicopter. This is a dawn flight over Lake Pleasant near Phoenix, AZ. I was alone.

Maine Coastal Town & Main Fog

Main Coastal Town

Maine Fog

I shot these during a trip to Maine to visit some former friends with my wasband back in 2008 or 2009.

Marble Canyon

Marble Canyon

Another nosecam image from my helicopter. I’m pretty sure I shot this one on my way back from a Bryce Canyon photo shoot with a client in 2011.

Mini-Stack

Mini-Stack

An aerial view of the so-called “mini-stack” of at I-17 and Route 101 in north Phoenix, AZ. Probably shot in 2011 or 2012.

Mission Ridge Pano

Mission Ridge Pano

I shot this photo from Wenatchee Mountain near Wenatchee, WA during a jeep ride to Mission Ridge with my friend Don in 2014. What an amazing day!

Monument Valley

Monument Valley

I’ve flown over Monument Valley dozens of times. Once in a while, there’s a camera on the helicopter’s nose. This was probably shot in 2011. I was either alone or with aerial photo clients.

Monument Valley Wide

Monument Valley Wide

I used to do multi-day excursions by helicopter to Arizona destinations that included Monument Valley. While my clients took tours, I’d explore on my own. This is Monument Valley from the overlook, shot in 2010 or 2011.

Moonset Sunrise

Moonset Sunrise

I used to camp out at a friend’s place overlooking Squilchuck Valley near Wenatchee, WA. This was one of the early morning views from my doorstep. I was alone.

North to the Future

North to the Future

I shot this in Girdwood, AK in 2008. I’d gone up there alone for a job interview. I got an offer but turned it down. Beautiful place.

No Wake

No Wake

I shot this with my 10.5mm fisheye lens at Lake Pateros, WA in 2008. I was with my wasband.

Orchard Still Life

Orchard Still Life

These are apples culled from the trees in Quincy, WA. Shot in 2008; I was alone.

Peacock

Peacock

This is one of the dozens of peacocks strolling around at the Lake Solano campground in central California. I shot this in 2014; I was alone.

Penny Kayak

Penny Kayak

This is one of the few images I didn’t shoot. I was on a kayak trip in the American River near Sacramento with a Meetup group and one of the other members shot this and sent it to me.

Petrified Wood

Petrified Wood

I’m not sure, but I think this was shot in Vantage, WA in 2008 or 2009. I was probably alone.

Phoenix

Phoenix

Another nosecam image, this time of downtown Phoenix. Shot in 2011 or early 2012; I was likely on a tour with passengers.

Poppies and Chicory

Poppies and Chicory

Another desert jeep trip near Wickenburg, AZ. I could have been alone, with my wasband, or with my friend Janet.

Poppies Plus

Poppies Plus

This wildflower closeup was shot on a trip to the Seattle area, possibly in 2007 with my wasband and his cousin.

Quail Mom

Quail Mom

A Gambols quail hen and her chicks, shot from my doorstep in Wenatchee Heights, WA in 2012. I was alone.

Rafting

Rafting

Put a GoPro in a head mount, get in a raft, and head down the Wenatchee River and this is the result. I was rafting with a bunch of friends in 2013.

Red Wing Blackbird

Red Wing BlackBird

Red Wing Blackbird 1

Red Wing Blackbird 2

I shot these at Quincy Lakes in Quincy, WA in 2008. I was alone.

Rocks Under Water

Rocks Under Water

I’m pretty sure I shot this in 2009 at Glacier National Park on a trip with my wasband.

Saguaro Boulders

Saguar Boulders Big

I shot this photo of saguaro cacti among sandstone boulders near Congress, AZ on a Jeep trip in 2009 or 2010. I was probably with my wasband.

Sand Dunes

Sand Dunes

This is an aerial shot of the sand dunes west of Yuma, AZ. This was probably shot in 2008 on a flight to the San Diego area with my wasband.

San Francisco

San Francisco

What a memorable flight! This was on a ferry flight from the Phoenix area to Seattle in 2008. Another pilot was flying my helicopter so I got to take photos. Low clouds over the coast forced us high over San Fransisco. Amazing views!

Sedona

Sedona

The red rocks of Sedona at Oak Creek. Shot in 2010 or 2011 while on a multi-day excursion with passengers.

Squilchuck View

Squilchuck View

The view from where I spent several late summers at Wenatchee Heights. This was probably shot in 2012.

Steam Train

Steam Train

This is an aerial shot of the old Grand Canyon Railroad steam train. I used to buzz that train with my helicopter any time I saw it from the air. This was probably shot in 2007. I was alone.

Stucco Scroll

Stucco Scroll

I shot this on a photo walk at the San Xavier Mission in Arizona with my wasband and a group of photographers.

Sunset

Sunset

I can’t be sure, but I think I shot this from Howard Mesa in 2006 or 2007.

Surprise Valley Drugs

Surprise Valley Drugs

I shot this in California during my 2005 “midlife crisis road trip.” I was alone. It was one of the best vacations in my life.

Helicopter Tail

Tail Header

An early morning shot of my helicopter parked out near my new home in Malaga, WA. Shot in 2014; I was alone.

Tetons

Tetons

Another shot from my 2005 “midlife crisis road trip.” This was at the Grand Tetons.

Turtle

Turtle

Shot while I was kayaking with my dog at Lake Solano in 2014.

Two Hillers

Two Hillers

I shot this at Brewster Airport in Brewster, WA on a day trip with my wasband in 2008.

Wheat Irrigation

Wheat Irrigation

Textures and patterns. What’s not to love about them? Shot in Quincy, WA in 2008. I was alone.

Yellow Headed Blackbird

Yellow Headed Blackbird

Yellow Headed Blackbird 2

I shot both of these photos at Quincy Lakes in Quincy, WA in 2008. I was alone.

Yellow Flower

Yellow Flower

A yellow flower. Probably shot somewhere in Washington state in 2011 or 2012. I’m sure I was alone.

Yellow Kayak

Yellow Kayak

Although my kayaks are yellow, this isn’t one of them. This was shot at Glacier National Park on a trip there with my wasband in 2009.