Digging Deep: Using Old Stones

My stone collecting obsession and how I’m trying to move forward.

Let’s get one thing straight from the get-go: I like rocks and always have. I’ve collected interesting rocks since I was a kid. You know — like when you’re out on a walk and you see one on the ground that catches your eye and it winds up in your pocket and later on your dresser.

Or when you’re on the beach with your family and you wind up picking up more rocks than shells and you keep them in a jar of water at home so they stay wet and shiny but become an algae-filled science experiment that disappears one day while you’re at school.

Or even in the school playground one afternoon in the 1970s when Steven Gaydos claims to have a moon rock and sells it to you for $2. (Yes, I was one of his suckers.)

Buy my jewelry!
After being encouraged (or nagged?) by too many other artist friends, I finally opened an Etsy shop to make it easy for folks to buy and for me to sell my finished pendants. It’s called MLGemstones. What I like about selling on Etsy is that it’s relatively easy to keep up-to-date — I can add pendants as I make them and remove them as I sell them — and Etsy does all the work to create for receipts and postage labels and calculate and pay sales tax.

Even when I got older and into a relationship, I collected pretty rocks. My future wasband did, too, which I always thought was natural. We’d go out in the desert and come back with a bunch of rocks. One day, while Jeeping out near Congress, AZ, we came upon a really nice, almost perfectly cubed piece of white quartz. It took three of us to get it in the back of the Jeep and it wound up in the front yard of our home. (It later disappeared; I don’t know if my wasband took it or someone looking at the house during the years it was for sale took it. I certainly had no use for it.)

Quartzsite Makes it Serious

Every year, when I lived in Arizona, I’d take at least one trip out to Quartzsite during the January rock shows. I exercised a lot of self-control in those days, but I did come home with rocks now and then. I had, by that time, seen the pattern of my rock acquisitions: find, bring home, set aside, lose, repeat. It made no sense to pay money for something I’d too quickly lose interest in.

After I moved to Washington state, I’d still go down to Quartzsite as part of my winter migration. And one year, I caught the rock bug bad.

Bacon Agate Pendant
It’s almost embarrassing to share this photo of my second pendant, but sometimes you need to look behind you to see how far you’ve come. I recently found this pendant (after misplacing it for a year) and plan to reframe it and wear it as a reminder of the rock that started it all.

It started with a rock seller giving me a nice, polished bacon agate cabochon. I had to do something with it. That’s when I started playing around with jewelry making. I was awful back then and never realized that I would get better. All I thought about then was that now that I had something useful to do with the rocks, it made sense to buy a few.

A few hundred, is more like it.

The Growing Collection

Kingman Turquoise
Kingman Turquoise with bronze is one of my best selling stones these days. I get these from a lapidary in Pennsylvania.

Since then — which was only two years ago this coming January — I’ve not only added to my collection, but I’ve begun displaying the stones in Riker boxes with felt inserts. Each box has a type of stone: jasper, agate, moss agate, jade/opal, turquoise/chrysocolla/azurite, etc. Each stone is meticulously inventoried with a tiny sticker on the back with its name, inventory number, and selling price. Yes, I now sell cabochons, too. I have become a rock dealer.

I get about half my stones in Quartzsite or Tucson every year. Honestly, I get better deals in Quartzsite so that’s where I mostly shop, starting as early as December.

I get another 45% of my stones from lapidaries — people who polish stones into the cabochons I use for my jewelry.

CabKing6
I bought one of these so I could polish local stones.

The final 5% are made in my shop. When I got rock fever bad enough, I bought a CabKing 6 cab making machine. I have a very large supply of local petrified wood and obsidian that I got in trade from a client. They both make very nice cabochons — when I have the time to polish them. Of course, once I got the machine, I started acquiring slabs of rock from all over the world so I could make my own cabochons. Unfortunately, I’ve been having trouble finding time to do that.

Selling Stones

My cabochons range in acquisition price from $1 to $20. I obviously sell them for more than that. I have them on display at venues where I sell my jewelry. I get a lot of rock lovers stopping by to look — some of them can spend 15 minutes or more at my booth looking and chatting with me. I enjoy sharing my knowledge and learning from some of them. And I love hearing their stories! I don’t even mind when they take up a bunch of my time and don’t buy anything. (The only thing I do mind is kids with dirty hands touching the tops of the display boxes. 🤯)

Fallon NV Wonderstone
This Fallon Nevada Wonderstone was one of the first “expensive” rocks I bought. I think I paid $15 for it. The pendant sold for $79 the other day.

Picasso Stone
This was the first Picasso stone cabochon I bought and I think it was the nicest. It sold last weekend.

Indian Blanket Jasper
This was one of the first 100 stones in my collection. I’ve since learned that square stones are a tough sell, but I suspect this one will eventually find a home.

Petrified Wood
I obtained this petrified wood cabochon long before I got about 100 pounds of local petrified wood in trade with one of my clients.

Ocean Jasper
I remember the day I bought this Ocean jasper cabochon and another very much like it in a Sacramento, CA bead shop. I paid too much (as I now know) but got my investment back (and more) when it sold last weekend.

Although the main reason I have the stones on display is to entice shoppers to have a custom pendant made from one of them — I can do it while they shop or have lunch — I also wind up selling a lot of stones. Just last February, I sold 20 stones over two days to a woman in Wickenburg, AZ — she came to my booth twice — and one day this past summer I sold 18 stones to a woman in Leavenworth, WA. These sales are good and bad. They’re good because I’m making money on inventory that requires no work other than cataloging and transporting. They’re bad because these folks often pick my best stones, leaving me with ones that aren’t quite as interesting or impressive. (Of course, that gives me an excuse to buy more.)

And then there are the folks who buy out my entire stock of one particular stone. I’ll see these folks at rock shows, like the one I do in Mesa, AZ every January. I discount all my cabochons by 20% to stay competitive with other rock sellers at the event. One day, a guy bought all of my K2 granite stones and the next day another guy bought all my bumblebee jasper stones. Fortunately, I went right back to Quartzsite the day after the show and was able to replenish my supplies.

Digging Deep

My stone inventory is listed by date and I still have a bunch of stones from my early days of collecting them. I’ve begun making a conscious effort to get these stones out of my inventory by making them into jewelry. And that’s what I’m showing off here: photos of stones I’ve had in my collection for over a year that I’ve finally made into jewelry.

It’s interesting to note that I started writing this blog post earlier this month when I began making these pendants. Since then, three of the five have sold. That tells me that even back when I first started collecting I had pretty good taste in stones.

Over time, I’ve learned what sells quickly and, when I get to Arizona, I’ll be stocking up on those stones. But I’ll also be on the lookout for some other beauties that I won’t be able to resist. When I find a stone I really like, I price it so high that no one wants to buy it so I can keep it as long as possible. But everyone seems to have their own idea of how much is too much and I often sell them to collectors anyway. That’s okay; it funds my future collections.

As for my current status, after buying and selling stones and pendants made from stones for nearly two years, I have 370 cabochons in my collection. Is it any wonder that rock lovers stop and stare when I have them laid out in my booth for everyone to see?

Booth Shot
My stones get their own table when I set up my jewelry booth at shows, like this Holiday Artisan Fair in Wenatchee last weekend.

Snowbirding 2019: The Tucson Gem & Mineral Shows

A quick overview of my experience with the craziness that is the Tucson Gem and Mineral Shows.

Posts in this series:
The Long Drive
At the Backwaters Campsite
In Mesa and Gilbert
A Quick Stop in Wickenburg and Forepaugh
Off Plomosa Road
• Camping at the Big RV Show
• A Trip to Organ Pipe with the WINs
The Tucson Gem & Mineral Shows
Wickenburg Gold Rush Days
• Constellation Park Interlude
• White Tank Mountain Park
Bumming It in Phoenix and Apache Junction
A Dose of Civilization
Return to the Backwaters

It rained almost all the way to Tucson from Organ Pipe National Monument. I got into the outskirts of the city before noon. I’d used Google Maps to direct me to a laundromat and it’s probably a good thing that I did. When I went into the camper to fetch my laundry, I saw that my roof was leaking.

Pots and Pans
I stripped the bed and set up pots and pans under the leaks atop a rubber-backed mat. My goal was to keep my bed dry.

It looked bad. Water was pouring in around the big skylight over the bed and through seams in the sealing slightly forward than that. My comforter was catching most of it. I moved quickly, fetching pots and pans out of the drawer under the stove and positioning them to catch the water. This was not a good situation, but I admit that I was surprised. I’d been in the camper in heavy rain before and had never had a leak.

That’s when I noticed that the skylight wasn’t fully closed. It was open just a tiny crack. I pulled it down the rest of the way and latched it securely. Could that have anything to do with the leaks?

Once the situation was under control, I brought my laundry in and sorted it into two washers. Then I went back out to pull my comforter out from under the pots and see how much water had soaked through. I was lucky; very little water had gone through to the blanket and sheets, which were pretty much clean. I brought the comforter into the laundromat and threw it in a dryer.

Then I went back into the camper with Penny and heated up a can of menudo for lunch. Nothing like hot soup on a cold day.

First Shows

Not my first time

I should clarify something here. This isn’t my first experience with the Tucson Gem and Mineral Show. I’d been to the show once before, in 1995. That’s the winter I lived in Yarnell, AZ to get away from the cold winters at home in New Jersey. My future wasband flew out to join me and the two of us drove down to Tucson, badly damaging my MR2’s front bumper in an accident along the way, to meet up with my future wasband’s cousin, Rick. Ricky believes that certain crystals have certain metaphysical properties that can make your life better. He was in Scottsdale visiting his aunts — really long story there — and met up with us to go to the gem and mineral shows. We were late (because of the accident) and he was pissed.

I honestly don’t remember much about that trip except a general feeling of being overwhelmed. I don’t know what shows we attended, although I don’t remember any of them being big. And I don’t remember what, if anything, any of us bought. I don’t think a trip could be any less memorable. Maybe it’s because I was still stewing over my accident and that nasty dent in my bumper.

After I had lunch, empty and repositioned the pots and pans under the leaks, and got my clean, folded laundry stowed into the dining area of my camper, I headed toward my first show. But before I tell you about that, let me tell you a little about the Tucson Gem and Mineral Shows.

Every year, from the last week or so in January to the second week or so in February, Tucson is basically taken over by at least 50 individual gem and mineral shows. They range from small shows in the lobby of a motel or the parking lot of a shop to huge, multi-tent shows spread out in big parking lots and expo centers. There’s an app to keep track of them, but it isn’t very well designed; it just tells you where each show is and lists each show’s vendors. You basically have to know which show you want to go to to make the best of the situation. I didn’t know where I wanted to go. And worse than that, I was driving a truck and pulling a 12-foot cargo trailer that I would have to park at each show.

Penny on the Table
While water dripped into pans on the bed, Penny’s bed was relocated to my dining table. She didn’t seem to mind.

But while I waited for my laundry to dry, I did some research with my friend Google. I knew I wanted to go to the show at the Kino Gem & Mineral Show because that’s where a friend of mine was showing his lapidary work. I also wanted to go to the JG&M Expo, which was a wholesale show. I had a list of possible shows and I separated them into areas. I figured I could hit at least two of them that first day, which was a Sunday.

So I headed to the Kino Sports Complex. I found a parking spot not far from the main area, near a few other large vehicles or trucks that were towing trailers. It was still raining on and off and there weren’t many people out and about. That’s probably why parking was so good for me. I put Penny in the camper and adjusted the pots and pans on the bed. The dripping had pretty much stopped, but I left the pots and pans in place. I made sure Penny had plenty of food and water and left her alone, locking the camper door behind me.

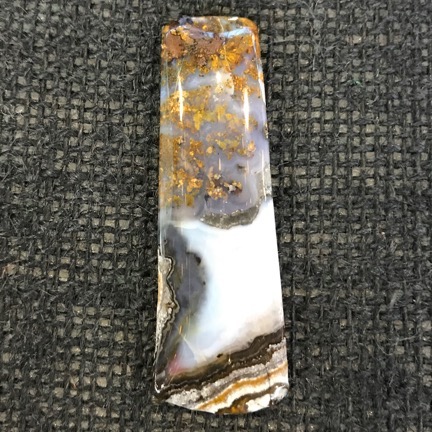
The Kino show was mostly smaller tents, although there were a few large ones with multiple vendors inside. Very much like what I’d seen in Quartzsite the previous month. The very first vendor I found was Nadri Gems, my source for about 90% of the cabochons I bought in Quartzsite. The guy I usually worked with was there, too, and he remembered me. (How could he not, considering I’d spent about $500 so far?) Knowing this would be my last chance to buy the kind of stones they sold, I filled a tray and made another big purchase. He took about $20 off the total for my purchase.

I walked around the rest of the show, looking at various merchandise. I bought some cord to fix a wind chime I have and a bunch of beads from another vendor who had been in Quartzsite and had already pre-qualified me for wholesale pricing. I was looking for turquoise and certain tools — that was my main reason for coming — and wound up buying a few small turquoise cabochons from a vendor in a big tent that had water running over the astroturf on the ground beneath the booths. (I was glad I’d worn my hiking shoes; the soles were thick enough to keep me above the floodwaters in various places I walked.) I got into a conversation with him about Sonoran Sunset, a stone that had been in high demand from my customers. He told me “there’s a guy set up behind the Howard Johnson who sells that.”

I kept walking around. A lot of the booths were closed because of the rain. I never did find my friend’s booth. There was just too much to look at but it was the same stuff over and over. After my long drive, camper leak situation, and laundry, my internal battery was down to 50%.

I went back to the truck, let Penny out for a run around the wet parking lot, and got into the truck with her. Then I told Google to take me to the next show, JG&M. I was very surprised to find that it was actually quite close by. In fact, I could have walked. Instead, I parked outside the gate where there was room for my rig and walked around the fence to the main entrance.

This was a huge show — actually three shows: Gem Mall, Holidome Show, and JG&M Expo — set up in multiple huge tents. I had to register and because I have reseller information, I could get a wholesale buyer badge. This is a huge benefit to me because it saves me the cost of sales tax. (The jewelry I make is taxed when I sell it.)

Inside the tents were mostly beads. Honestly — I don’t think I’ve ever seen so many beads in my life. All kinds of beads, all kinds of prices, all kinds of gimmicks and sales to get you to shop at one booth rather than another. There were “bead shows” in Tucson, too, but I couldn’t see any reason to go to them after seeing all the beads at this show.

I did wind up buying some beads. I had a blue opal cabochon that was blue and dark gray. I wanted beads to match it so I went from booth to booth and pulled out the cabochon to match. I eventually found what I was looking for at a price I was willing to pay and bought them. I didn’t buy much else, though. Other than beads and imports and finished fine jewelry for jewelry stores, there was nothing much else that interested me.

Well, on second thought, that isn’t really true. One guy did have leather necklaces with sterling clasps that I use for my pendants. Good prices. He also had some display items, including a “neck” that could hold seven chains. I stocked up on the necklaces and bought a neck.

Penny on the Bed
Penny waited for me nestled into my comforter, which I’d stowed on the dry side of the bed while in transit.

When I was finished there — understand that I really breezed through — I decided to try to track down the guy with the Sonoran Sunset. I asked Google to take me to the address of the Howard Johnson. For the first time, Google failed me. It led me to an address inside the local university property, nowhere near where I wanted to be. (Yeah, I know: operator error; garbage in, garbage out. But Google should know what I want!) I pulled into a parking lot and tried again. Fifteen minutes later, I was driving on a narrow road past a handful of small motels, including the Howard Johnson. There were tents set up just about everywhere, but because it was getting late — nearly 5 PM — and the weather was still iffy, many of them were closed. But I figured that since I’d come that far, I should go all the way. I found parking in a muddy lot nearby, left Penny in the truck, and went in search of the Sonoran Sunset seller.

And this is where it got weird.

You see, the motels had been rented out to gem and mineral dealers. They had stripped the furniture out of their rooms and set them up as little showrooms. So as I walked past the doors to the motel rooms, they were all open with their front window curtains pulled aside and set up as shops. One after another with cases of stones. No beds, no night tables, no furniture at all. Just display cases. In some cases, they’d even draped the walls with curtains so the rooms had absolutely no resemblance to a motel room.

I wandered around, past the rooms and tents that were open. I looked at a few things. I never did find the Sonoran Sunset guy. He was either set up in one of the closed booths or not there at all.

Casino Del Sol

By this time, it was getting late, my internal battery was down to 20%, and I was very interested in finding a place to camp for the night before it got dark. My WIN friends in Organ Pipe had mentioned Casino del Sol so I asked Google to guide me there. It choose a weird route through a few neighborhoods but eventually put me at the entrance to the parking lot for a hotel casino complex.

Understand that Arizona does not normally have gambling. Most native American tribes, however, do have gambling. I’m pretty sure this one was for the Tohono O’Odom tribe. I call it the Indian’s Revenge — they suck us in to gamble and make money to support their people. I’m not a gambler, but I have a certain affinity for casinos — one of my favorite ways to spend a day in Vegas is walking the strip, through as many casinos as possible to see how outrageous they have become.

Casinos, of course, usually make an excellent overnight parking spot for RVers. Not only do they have big parking lots and access to restaurants and other amenities, but they also have excellent security. I’ll take a casino parking lot over a truck stop (or Walmart parking lot) any night.

Casino del Sol took overnight RV parking to extremes. There had to be at least fifty rigs parked in one of the outer lots and some of them looked as if they had been set up there for a while. This wasn’t parking — it was camping. I later found out that they had a two-week limit for free RV parking. Two weeks! No wonder so many people were camped out there.

I parked on the other side of a parking lot divider from a motorhome. Penny and I got out just as the motorhome’s owners got out. “Do you mind me parking here tonight?” I asked. I’m pretty sensitive to people parking right next to me and wanted to make sure they weren’t.

“Oh no, not at all,” the woman said. That started a conversation about where I was from and what kind of dog Penny was. I asked about restaurants in the casino. I was thinking about prime rib again. “There are restaurants,” they told me. “But they’re expensive.” They told me about a certain special on a certain night of the week that was a good deal. I don’t remember the details because I knew I wasn’t going to be around. Then they got into a car with another couple and drove away in search of a cheap dinner.

After settling in Penny, I went in for dinner. The steak place, which was supposed to be really good, was closed on Sunday nights. (WTF?) I wound up having Chinese food and sushi. It was good. It was my first meal in a restaurant in over a week. While inside the casino, I discovered that there was another gem and mineral show there, To Bead True Colors/Colors of the Stone, although it was closed until 10 AM the next morning.

Back in the camper, I stowed the pots that had been collecting water earlier in the day. The leaks had stopped — but so had the rain. I put away my laundry and made the bed, which was remarkably dry. I got everything organized.

And then I went to bed.

Breakfast and the Casino Show

I made myself coffee in the morning and took Penny for a walk. Beyond the regular parking lot was a gravel and dirt area where even more people were parked with RVs. We walked between the two areas. Then I put Penny in the camper and went into the casino for breakfast and to check out the show.

I learned a lot at breakfast. I sat at a table for two in the outer part of the only restaurant that served breakfast and they sat another woman who was by herself at the table next to me. She was a jewelry maker from Toronto who came to Tucson every year. She used her budget to cover the cost of transportation, a room in an AirBnB, jewelry making classes, and tools and materials at shows. She was having breakfast before going to the show in the casino.

We chatted for quite a while. I realized that I had the wrong focus in Tucson. I shouldn’t be buying stones and other materials — I could get that cheaper in Quartzite in January. Instead, I should be focusing on educational opportunities and seeing demos of tools and equipment I might find useful for my work. I should be building skills and getting new ideas. She gave me some names and I jotted them down. It will completely change how I approach Tucson next year.

Words of Wisdom from an Unlikely Source

Some of the few actual words of wisdom I remember from 29 years with my wasband is this: “Any job is easy when you have the right tools.” (He used to say that when we watched “This Old House” or “Yankee Workshop” on PBS.) Every time I buy the perfect tool for a task, I think of that.

I have a shit-ton of tools now and lots of jobs that were impossible for me 10 years ago are now very easy.

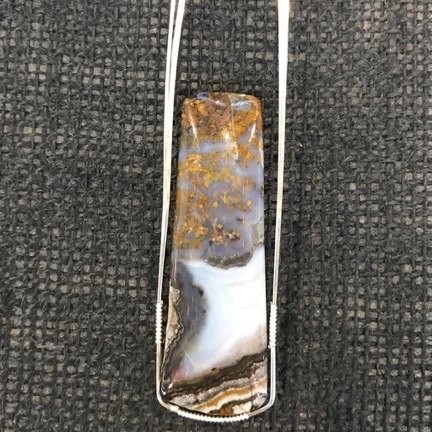
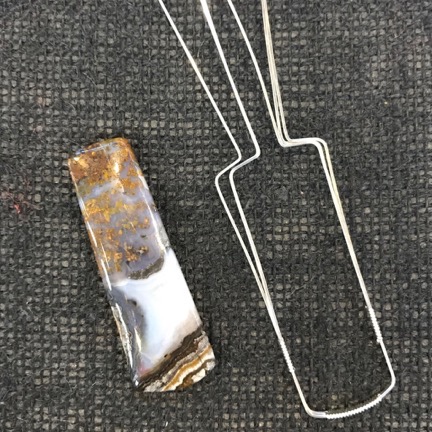
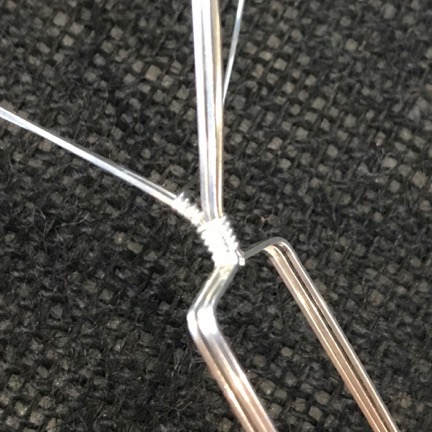
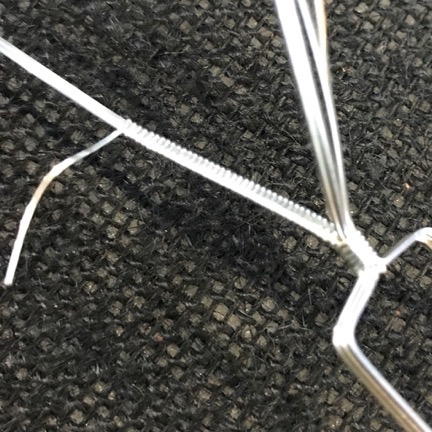
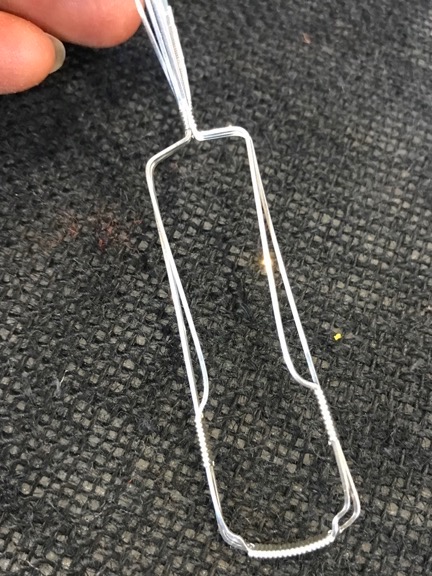
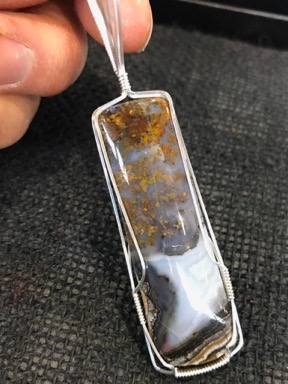
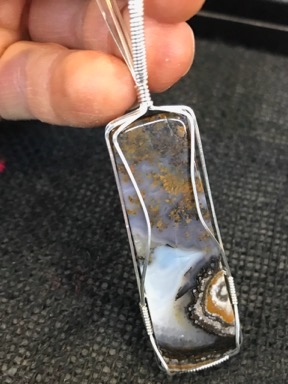
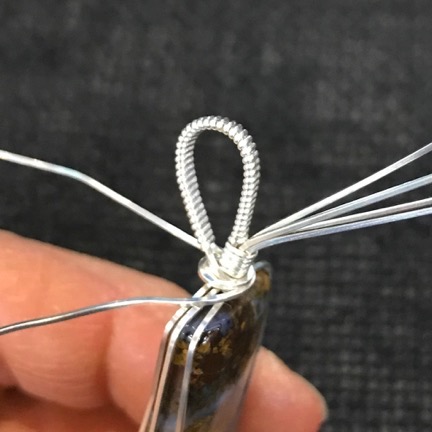
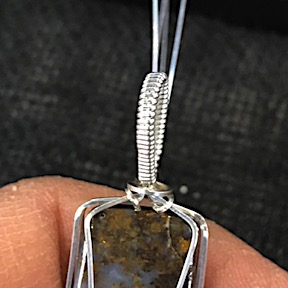
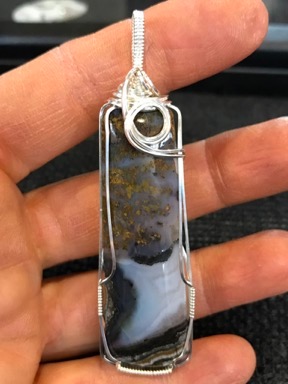
I got on the express line to sign up as a wholesale buyer for the casino show and, with my badge hanging from a lanyard, went in. This show had a lot more of what I’d come for: tools. I saw a few demonstrations and even got hands-on experience stamping metal the correct way (with the correct tool). I also learned the most valuable thing I learned in Tucson: how to quickly and effectively polish my wire framed pendants. (Hint: it involves a Dremel (or flex shaft) and a specific radial polishing wheel.)

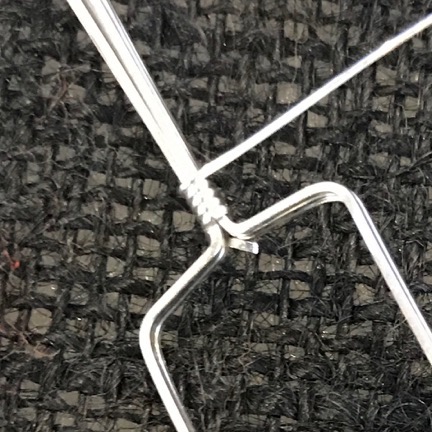
One of the booths sold the full range of Wubbers hand tools and had two women doing demos — they just happened to be the founder of Wubbers, Patti Bullard, who had designed all the tools, and her daughter. Their demos gave me some great ideas for new bracelets and chains; I bought three of their tools. (You can see Patti Bullard’s tool demos on YouTube.)

Bracelet Chain
In just 10 minutes, Patti Bullard showed me the basic skills I need to make bracelets and chains like these. I’ve since made a prototype of the beaded bracelet in copper.

I also found a booth selling precious metal clay tools — I’d decided to explore that when I got home — and bought a few items to make it easier for me to get started. There were lots of hands-on classes going on and I regretted not planning ahead and signing up for some of them.

Two More Shows

I was done before noon. I took Penny for another walk and pulled out with my rig, which I’d already prepped for traveling. My destination was the JOGS Tucson Gem and Jewelry Show at the Tucson Expo Center. Google Maps guided me. I ended up at a huge X-shaped building near the freeway. The parking lot looked crammed. Against all odds, I drove in, stopping by the valet parking station to ask where I might park. The guy was very friendly and pointed to an area with a few U-Haul trailers. I thanked him, squeezed into a narrow entrance to a disorganized dirt lot, and backed into a spot next to a U-Haul relatively close to the main entrance.

I went in, registered as a wholesale buyer, and walked into the show. The very first booth I saw was all tools — exactly what I had been looking for. Well, not exactly. The truth of the matter is that what I really hoped to buy in Tucson was a large jeweler’s anvil. Spoiler alert: I did not find one. But I did look at a lot of different tools for different jobs.

The rest of that show was about 60% beads and 20% fine jewelry for resale. There was another Nadri Gems booth — those guys are everywhere — and I bought two very nice azurite with chrysocolla cabochons. I bought some more beads. I bought some display pieces. Although I tried to do the building without wandering off path too much, I eventually failed, lost track of where I was, and had a senior moment: which way was out? Too many of those bead booths looked too much alike. I finally got back on track and headed for the exit.

There was a food court outside and I treated myself to Salvadorian food — a sort of thick-shelled soft taco with beans and chicken. Tasty.

I went back to the truck to stow my purchases and let Penny out for a walk. I liked my parking space and I knew that my next destination, which was closer to downtown Tucson, would probably not have such accessible parking. So rather than drive, I put Penny in the camper, locked it up, and called a Lyft.

I was headed for the Kent’s Tools Jewelry & Lapidary Tools and Supply “Show.” I put “show” in quotes because when I got there, the “show” consisted of one guy who made cabochons and did pretty basic wire work under a tent in front of the shop’s entrance. The shop, of course, was Kent’s Tools, which is like a candy store for anyone who is serious about making jewelry or working with stones. This shop has everything — although it was out of stock on the anvil I was looking for — with good prices and a knowledgeable staff. I bought some texturing hammers, a soldering tripod with screen, a metal stamp, some polishing wheels, a brass hammer, and a bunch of other things to outfit my shop at home. All my purchases fit in a big shopping bag. Lyft took me back to JOGS.

Another Night, Another Casino

At this point, I felt done. It was late afternoon and I’d bought most of what I’d come to buy. I didn’t feel capable of looking at another single bead and knew that any show I went to would have lots of them. So I decided to try Tucson’s other casino, Desert Diamond, for an overnight parking spot. It was near the airport and a lot closer to the freeway than Casino del Sol.

Desert Diamond
The Desert Diamond Hotel.

There were a lot fewer RVs parked at Desert Diamond, and that was okay with me. I found a parking spot on the edge of the lot, not far from an open area where Penny could run loose. Rather than go in for dinner, I decided to have a light meal in my rig and try to organize some of the things I’d bought.

I was asleep by 9 PM.

I the morning, I went into the casino for breakfast. I walked in through the nearby hotel entrance because it was chilly out and I didn’t want to spend more time outdoors than necessary. I got a real treat along the way. The hotel’s design and architectural details are reminiscent of Frank Lloyd Wright, making a pleasant walk through the space.

Hallway Door
The hallway outside the hotel’s conference rooms and the detail from a door between the hallway and casino. Nicely done!

Breakfast was okay. The only place open was the buffet, which was nearly deserted on that Tuesday morning. I had a fresh-made omelet, too much breakfast meat, and some yogurt with granola. I hate eating at buffets because I always eat too much — although I usually love the variety.

The Metal Bar

I had gotten the idea — okay, I got the idea from YouTube — that I could use a piece of railroad steel as an anvil. The trick, of course, was finding a piece of railroad steel that was only 1 to 2 feet long.

So after breakfast, I worked my phone. I called a handful of metal fabrication places in Tucson and hit what I thought was pay dirt at one of them: the guy I spoke to was pretty sure they had a piece of railroad steel somewhere “out in the yard.”

Of course, when I got there, no one knew who I’d spoken to or what I wanted. No one seemed interested in looking around the yard, either. One guy, trying to be helpful, showed me to an area where they stored rolled steel. They had these two inch square solid bars with rounded edges. I asked if they could be cut. “Sure,” he said. I saw that the price was 83¢/pound and wondered what a one-foot long bar would cost. More than $100? He laughed. Probably about $15.

Google Maps
Ugh! I missed my turn for I-10 heading westbound out of Tucson and Google Maps guided me in a convoluted U-turn. Operator error!

So I told him I’d take a foot. I went to the checkout area and chatted with them men there. One of them had a hobby of making guns and he showed me a few photos on his phone. A few minutes later, a man came in with a one-foot long piece of the solid steel bar. They weighted it: 14 pounds. With tax, it was about $13. I carried it out to my truck and stowed it behind the back passenger seat.

One Last Stop

I did have one last stop to make on my way out of town: an outlet mall just off the freeway. I needed a new pair of jeans and I like to wear Levis. So I hit the Levis store and walked out with two new pairs of jeans.

My next stop was a lunch date in Mesa, AZ. I hopped onto I-10 westbound and headed north.

First Impressions of Making Cabochons with the CabKing 6

As a ghost from my past used to say, any job is easy when you have the right tools.

One of the things that has been frustrating me lately in my jewelry-making endeavors is my inability to fine-tune the stones I acquire so they better meet my standards. For example, I bought a bunch of cabochons from a dealer in India and they all arrived with unpolished backs. While that’s acceptable if you plan to set the stones with something behind them, I don’t. I want the entire stone polished.

So I tracked down a local lapidary, Gary, who does it as a sort of retirement hobby. He polished the backs of the stones and charged me a nominal fee. It was neat to watch him do it on his cab making machine. But when I got another set of stones from another dealer and realized how much work they’d need to be usable, I realized that I’d soon become a nuisance to Gary.

Add to that a load of local petrified wood and obsidian that an orchard-owning friend of mine, Donn, was trying to unload. As is, no one would touch them — and I must have asked a half-dozen rock people. But with a little cutting and polishing, they might be salable — or at least usable in the jewelry I make.

And, of course, I was making fused glass cabochons in my kiln from repurposed wine bottles and they needed polishing to make them usable.

So it made sense to buy a cab machine.

At least that’s what I told myself.

It was a big expenditure and I sat on the fence for a few weeks before pulling the trigger. I needed a birthday present, I reasoned. There were only two things in the running: an inflatable Hobie pedal kayak that could accept a sail kit — yes, they do make things like that these days — or the CabKing 6 cabbing machine. Believe it or not, the CabKing was about $1,000 cheaper. I reasoned that I could use it for my jewelry business and, thus, write it off. That would reduce the cost by my current year tax rate — as if that really mattered. The fact that I needed a birthday present was enough to get me to buy it. (Maybe I’ll get that kayak next year.)

CabKing 6
The CabKing has 6 grinding/polishing wheels and other features that make it a great tool for making cabochons.

I should mention here that a lapidary friend of mine that I know from Quartzsite, AZ, John, told me not to buy the CabKing. He’s a Diamond Pacific dealer and that’s what he uses. He told me he could get me a deal on a comparable Diamond Pacific machine that had only been used about 10 hours in one of the stone-cutting classes he leads. But even with the discount, the machine would cost about $500 more. And I really liked the way the CabKing handled the water used to cool the stones as you grind and polish: it always puts fresh water on the wheels so there’s no chance of contamination from earlier stages in the grinding/polishing process.

Gary said the CabKing was a good machine but it had a tendency to splash a lot of water.

It came last week. So did some stones for tumbling and polishing. I played around with it. I was surprised about how easy it was to use to shape stones.

I had some trouble getting fine scratches out of my finished stones. I attended YouTube University for about an hour or two and watched a bunch of cab-making videos, including this good one. I soon realized that the scratches had to come out very early in the process — on my machine, by the time I’d run the stone through the third wheel, a 280-grit diamond resin pre-polish wheel. I took the stones back down to my shop and reworked them. The results were very satisfactory.

First Batch of Stones
This is the first batch of stones I polished: petrified wood, sodalite, and a mystery stone I got from a friend’s garden.

I found that the petrified wood I’d gotten from Donn polished up beautifully.

Yesterday evening, I gave it another go with five pieces of stone: rose quartz, hawk’s eye, local obsidian, local petrified wood, fused wine bottle glass. In the afternoon, the driveway in front of my shop is in the shade and, with a nice little breeze blowing, it can be quite cool, even if it’s hot in the sun. So I wheeled the machine out — I installed it on one of the many wheeled carts I have accumulated — put a stool in front of it, and got to work. Two hours later, I had five decent cabochons.

To show them off better, I made a little video this morning. Check it out:

I’m learning a lot about stones and how the hardness affects how easy they are to cut and polish. The hawk’s eye is a mix of soft (tan) and hard (dark gray) stone and I have to be careful not to press too hard on the soft side. It doesn’t polish very well. The rose quartz and petrified wood polish very nicely. The obsidian had imperfections that turned into pits in the finished surface. And the glass polishes nicely, although fuse lines in the glass appear almost as cracks in the finished piece.

I’m starting to wonder what basalt, which we have no shortage of here, would look like polished. (You can bet I’m going to try it.)

I bought some slabs of outback jasper, bumble bee jasper, and moss agate to work with. I figure that each of these small slabs should yield 2 to 3 cabochons. The bumble bee jasper, which is a soft stone, is pitted and I’ll likely try stabilizing it before cutting and polishing it. I’m hoping that process fills the pits with a clear epoxy that’ll make it possible to get a good polish. We’ll see.

Slabs
I bought these three slabs to try to make cabochons. I’m just hoping that my tile cutter can cut them into pieces without breaking them.

I think what I like most about this is how much I’ve learned about stones and lapidary work since January. (Yes, it’s just been since January that this became my latest hobby-gone-wild.) I love being creative in ways other than with words. I love being able to share nature’s beauty in a way that people can appreciate. And it’s nice getting paid to make the things I make.

Some Notes on My Jewelry Business

Surprisingly successful.

I started creating wire-wrapped jewelry back in January of this year. I’ve come a long way.

Getting Serious and Developing a Style

Labradorite Wrapped in Silver
My first wire-wrapped jewelry piece. Don’t laugh; I was proud of it back then. And I still think those are excellent swirls.

My first attempts were predictably amateurish. Cringe-worthy, in fact, when looking back on them. I learned from watching a few YouTube videos — which, in hindsight, I now realize were the wrong YouTube videos. But I had a lot of positive feedback from the people who saw my work, including some professionals. (I was in Quartzsite, AZ at the time and literally surrounded by rock hounds and lapidaries.) I realize now that they were probably just being nice. That early stuff was gawdawful, although I subsequently did manage to sell every single piece. (Go figure, eh?)

Montana Agate
Finishing this first piece in sterling silver was when I think I started getting serious. That was a really beautiful stone. It was one of the first pieces I sold.

In mid January, I got a lesson from a friend who is one of those professionals. Dorothy guided me to create my first piece in sterling silver. I think this was the point at which I realized that if I wanted to acquire nice stones, I needed to get serious about creating nice jewelry with them. The things I learned really helped put me on the right path.

At around the same time, I found another YouTube wire-wrap artist who showed me additional techniques, such as wire-wrapped bails, that I’d incorporate into my own work to develop my own style. That style now includes hand-formed swirls at the top of each piece, an occasional drop-down wire or two that end in tiny loops, and a pair of tiny loops at the back of the piece.

Since January, I’ve created well over 100 pieces of wire-wrapped gemstone jewelry, most of which are wrapped with silver. I’ve shifted slowly from the inexpensive stones I acquired in Quartzsite to more exotic, higher quality stones I get from gemstone dealers and at gem shows.

It’s All about the Stones

For me, it’s all about the stones. I’ve always liked beautiful stones but never had a reason to acquire them. Making jewelry gives me an excuse to buy stones. I put them on display in cases so I can look at them and choose one for my next piece. It seems silly to folks who don’t have a thing for stones, but if you do, I’m sure you know exactly what I mean.

Of course, these stones aren’t cheap and I really didn’t want to continue funding this — dare I say it? — obsession with stones. So I decided to try to sell my jewelry.

The Birth of ML Jewelry Designs

I did a few things pretty much all at once:

  • I came up with a company name. I needed a name so I could identify the company. I’m afraid I didn’t get very creative. I put about 10 minutes of thought into it. ML Jewelry Designs.
  • I registered a domain name. Honestly, I don’t know why so many businesses put their eggs in the Facebook basket. There’s nothing that gives a company more legitimacy than an address on the web. So MLJewelryDesigns.com was born.
  • I set up a Facebook page. (I later pretty much abandoned it when I decided that I’d had enough of Facebook. I did the same for my other company, Flying M Air, LLC.)
  • I set up a Twitter account for the company. I wanted a way to tweet only company news, including photos and links to new pieces.
  • I registered my business with the state. I knew I’d have to collect and pay sales tax.
  • I built a website with WordPress. What else was I going to use?
  • I started photographing my jewelry and adding it with descriptions to the website.
  • I set up WordPress to automatically tweet posts about new pieces.
  • I set up Square to accept credit card payments and, more importantly, an online store.
  • I designed and bought materials for unique packaging that included clear pillow boxes and card inserts.

All this took less than a week. Maintaining the website and online store to add jewelry pieces would take a few hours every week.

I got my first online sale within a week. It was to a Twitter friend who lived overseas. (Thank you, mdy!) As I packed up the piece, I found myself kind of sad to see it go. But I felt less sad when I saw the money in my bank account and placed another order for stones. It’s all about the stones!

Selling in Person

The one thing I knew for sure is that the photos of my work that I was putting online did not do the pieces justice. They look way better in real life. That was confirmed when I showed photos to several shop owners and got a lukewarm response. (I don’t do that anymore. I tell people I don’t have photos with me.) One of those shop owners saw them in person yesterday and was very impressed.

I knew that Pybus Public Market, a local shop/restaurant/farmer’s market venue on the Wenatchee waterfront, had “day tables” for vendors. The rates were affordable. Some friends of mine were already selling handmade furniture and other woodworking items there on Saturdays. I decided too see if I could get a table there.

AtPybus
My first table at Pybus Public Market. I now use a black tablecloth and have really improved my display.

It was remarkably easy, especially in the spring when there wasn’t much of a demand for space. I set up one Saturday for the first time. My table consisted of several jewelry display busts with pendants hung around them and black burlap-covered boards with the pendants on display. I had the stones on display, too, all priced so folks could buy stones to take with them or have me wrap for them.

And I sold three pieces of jewelry.

Now that might not seem like a lot, but I’m not making cheap stuff. My prices range from $49 to $59 for most pieces, with a few cheaper ones (clearance items and quick wraps for folks on a budget) and a few more expensive ones (especially lately with the high quality stones I’ve been acquiring). The cost of the table was cheap enough that if I sold just one piece, I’d be ahead of the game. I considered three a good day.

I came back other Saturdays with mixed results. None of the Saturdays were bad, but some were better than others.

After talking to other vendors, I decided to try Fridays. With the exception of one day that no one did well — they didn’t even charge our table fees that day — I did fine.

Saturdays got busier when the Wenatchee Valley Farmer’s Market started up outside. That didn’t necessarily mean more people were spending money indoors, though. It was hit or miss, but never a complete failure. It did start getting better when the Seattle weekenders started coming in.

When the Wednesday evening farmer’s market started last week, I started coming on Wednesdays, too. I sold two pieces the first time — and I had to leave at 2 because of weather. (I’m still cherry drying pilot.) I sold four this past Friday. And I sold five yesterday.

Although I sit there making jewelry as I chat with shoppers, vendors, and employees, I often sell more pieces than I can make in the same time. Sometimes the jewelry I’m making is a special order for someone who really liked a stone in one of my cases and wanted a jewelry piece made from it.

I get lots of complements from everyone who stops to look, even if they don’t buy. (After all, I know that not everyone is interested in wearing a pretty rock on a cord around their neck.)

And a shopper yesterday, as I gave her my usual spiel — “I buy the stones already cut and polished. I do all the wire work to make the pendants and earrings in sterling silver, copper, or both.” — said, “I know. My friend told me about you.”

Whoa. Word of mouth. How cool is that?

The Gallery

Of course, a better way to sell my jewelry was to have someone else sell it for me. So I continued looking for places that might take my work.

I quickly learned not to use the phrase “wire wrap” when describing my jewelry to a shop owner. And not to show photos. The best way to approach a shop owner was to go in when it wasn’t crowded with my case of finished pieces.

You see, I store all my pieces in a glass-topped jewelry display case when it’s not on display on the labeled board at Pybus. The case has dividers and each piece fits into a slot on black velvet. It looks neat and impressive.

Native Silver
This piece of Native Silver sold at the Two Rivers Art Gallery last week.

And that’s what I took into the Two Rivers Art Gallery when I went to ask if they’d display them — despite the fact that the manager told me they had no room for me when I called him on the phone. They were suitably impressed and they made room. I’ve got a whole shelf in a locked case in one of the front rooms. And last week, I got a check for the sale of two pieces of jewelry, including my most expensive piece (Native Silver), which sold for $89.

But I’m not done. I’m hoping to get my jewelry into a handful of other stores in the area and beyond. (If you’re reading this and am interested in helping me sell my work in your store, please get in touch.)

Looking Ahead

I’m always looking for ways to improve my display with the goal of increasing sales at events.

Jewelry on Display
Here’s my current display board with some of the cabochon cases in front of them. (And yes, it’s a terrible photo.)

Over time, I modified my display to include a bigger board, labeled hooks that included the name of the stone and the price (so people wouldn’t have to fumble with the tag or unnecessarily touch anything), and lights. There was an easel to lift and tilt the board without having to depend on boxes behind it. My selling junk (iPad, Square, packaging, etc.) is hidden behind the easel, leaving the table neat. The three gemstone display boxes, which have plexiglas tops, are unsnapped so they can be easily opened to remove a stone for inspection by someone who is seriously interested, while keeping kids and light-fingered passersby from touching or taking home souvenirs. Not perfect, but better.

I’m also looking into other venues, specifically one where artwork is displayed and sold. I have a lead on an “Artisan’s Booth” at the Grant County Fair in August and am still sitting on the fence about it. I suspect I’ll give it a try just to see what it’s like, even though I don’t think it’s the kind of crowd my work would appeal to.

I’d like to get into some events in a metropolitan area like Seattle where people are willing to spend more money.

Meanwhile, I’m buying more rocks. I can’t tell you how many complements I get on my selection of stones.

Shiva Shell
The second Shiva shell piece I made yesterday sold, too.

And since I’m starting to learn what sells best, I’m making sure I always have pieces using those stones in stock. Kingman turquoise, Shiva shell, rose quartz, lapis lazuli, and K2 are nearly impossible to keep in stock. On Thursday night, I made a Shiva shell piece and it sold on Friday. On Saturday, I made one and it sold before I was finished. I made a second one and it sold before I packed up. I have one on order for my best customer and need to make at least two more — one for the gallery and one for Wednesday at Pybus. So you can guess what I’ll be doing this evening — or this afternoon when the wind invariably kicks up. (What is it with the wind this year?)

Black Pyrite
This little piece of black pyrite came out a lot better than I expected it to and is currently my favorite piece.

I need to stress that I enjoy making the jewelry. I find it strangely relaxing and rewarding, especially when a piece comes out better than I expected it to. I’ve never felt so creative before. Artistic, even. And although I’m kind of sad to see a piece I really like get sold, I’m also thrilled every time I make a sale. I’m creating something visual (as opposed to the millions of words I’ve sold as a writer) that people want to buy. How cool is that?

So at this point, I think it’s safe to say that this is not just a passing phase for me. I feel invested and rewarded and even still excited about this work. I’m looking forward to continuing and improving my technique and style for years to come.

Creating Wire-Wrapped Jewelry, Step-by-Step

My five-step process.

I’ve been making (and tweeting about) the wire wrapped jewelry (my hobby gone wild) that I picked up this past winter in Quartzsite, AZ for about three months now.

I currently do one style of wire-wrapped jewelry; there are many. The work I do features multiple thicker wires bound together info frames using a thinner wire. My wire wraps are tiny and as close to “perfect” as I can get them. Another style, which I’d like to explore — possibly next year with a tutor — uses a single thicker wire, often hammered flat, to wrap the stone in a more freestyle look.

I thought I’d take a few moments to provide some basic how-to information to give readers an idea of what I do and what it entails. True to my how-to book author roots, I’ve broken it down into five steps. Here they are.

Step 1: Choose a stone and wire for the job.

Bull Canyon Agate
For this example, I chose a 57mm long Bull Canyon Agate cabochon. This is a little larger than most of the stones I use.

Wire Reels
I buy wire in bulk from RioGrande.com. For this project, I used 22 gauge square and half-round dead soft sterling silver wire.

I start by going into my collection of cabochons and choosing a stone I feel like working with. Maybe I have an idea I’ve come up with while doing something else during the day. Or maybe I want to try a wrap similar to one I’ve seen in a video. Or maybe I’ve realized that a certain color is missing from my collection of finished pieces and I choose a stone to fill in that gap.

For some stones, I get to choose which end is up. (Actually, I can do that for all of the stones, but certain shapes are easier to wrap when held in certain orientations; for example, teardrop shapes are best wrapped with the pointy end up, although I have wrapped them with the pointy end down.) I hold the stone in a variety of directions and decide which looks best.

Then I choose the wire. I use thinner wire for smaller stones because I don’t want the wire to hide the stone. I use more wires for thicker stones because I want the sides of the stones suitably covered. I use dead soft sterling silver wire for just about all the pieces I create now, although I do have some copper wire on standby if I feel like working with copper. (So far, all the pieces I’ve sold have been silver-wrapped, so I have to assume copper is less desirable.) I always keep 21 and 22 gauge square wire and 22 gauge half-round wire in stock.

By the time I’ve selected the stone and wire, I already have an idea for the style of wrap I’m going to do.

Step 2: Create the frame.

Started Frame
For this frame, I created three anchor wraps and made tight bends so the stone would fit snugly.

Open Frame
Here’s the same frame after making the bends at the top. A stone like this is tough because not only do the corner bends need to fit the stone exactly, but the top bends need to meet exactly in the middle.

The stone is held in place by a frame. Creating the frame normally entails using half-round wire to secure the thicker wires together in anchor wraps and then bending the thicker wires into a shape that will completely surround the stone.

The number of anchor wraps I do varies depending on the size of the stone and the style of the wrap, although I normally do two to four of these wraps. For example, if I’m working with a small oval or teardrop shape, I can probably get away with just two anchor wraps, one near each side of the bottom of the stone. If I’m working with a larger or odd-shaped cabochon, I’ll use more anchor wraps.

The bends must exactly match the stone. This is probably one of the trickiest parts, especially when dealing with odd-shaped stones. If I put a bend in the wrong place, I have to straighten the wires and then rebend them.

Step 3: Complete the frame and create the bail.

Closing Up the Top
I use the half-round wire to close up the top with tight wraps around all six wires.

Starting the Bail
Then I separate out the two back wires and wrap them separately to start the bail.

Wrapped Bail
I continue wrapping until I have enough wrapped wires to create the bail.

Completing the frame means closing up the gab at the top of the frame with wire wraps. This is probably the most difficult part of the process; the finished frame has to be the exact size and shape of the stone.

Sometimes I’ll finish the frame with the stone taped inside it using masking or painters tape. But as my skills improve, I’m able to finish the frame without the stone in place.

Once the frame is closed I usually follow up by wrapping two of the six or more wires sticking out the top and bending them back to create the bail. Sometimes I finish the bail then, before the stone is secured; other times, I wait until after I’ve secured the stone to finish it.

Step 4: Secure the stone and (if necessary) complete the bail.

Starting to Secure
In this example, I’ve begun bending the front of the frame to hold the stone before inserting the stone. Doing this makes it easier for me to do the bends without scratching the silver wire.

This step is crucial and can be tricky. I need to get the stone into the frame and then carefully bend the frame wires so they hold the stone in place.

The hard part is making sure the bends are the same on both sides of the stone; if the stone’s shape is symmetrical, it’s important (at least to me) to have symmetry in the wires that hold it in place. The harder part is making these bends without scratching the metal with my tools. I use my thumbnail a lot as a tool — it won’t scratch metal — and it’s really screwing up my thumbnails.

Front Back
Here’s the front and back of the piece once the stone has been secured. Although I concentrate my efforts on the front, which is what most people will see, I try to make the back even, too.

Once the stone has been secured, front and back, I can finish the bail (If I haven’t done so already) by securing the tail end either with half-round wire or one or two of the loose frame wires.

Finishing the Bail Finished Bail
In this example, I’ve finished off the bail by using the two loose ends of the bail wires and wrapping them around the top of the piece. I then trimmed off the excess and tucked them into the back of the frame.

Step 5: Add decorative flourishes, trim off excess wire, and tuck in all wire ends.

At this point, I have a stone secured in a wire frame with a bail and four or more frame wires poking out the top. I need to take those wires and creatively finish them off.

This is where the swirls at the top of each of my pieces come from. There are all kinds of things I can do. I like draping the wire around the base of the bail or creating loops in front of the bail, but I occasionally bring the wire down into the piece and finish with a loop.

I cut off all wire beyond what I need and finish the cut edges, which could be sharp, by tucking them into the metal work or creating tiny loops. After some final adjustments, the piece is done.

Finished Front Finished Back
Here’s the finished piece, front and back. I don’t usually leave the wire ends visible in the back of pieces, but for this piece, I wanted a little extra security for the stone.

It Takes Time

It takes me from one to three hours to make a piece of jewelry.

I don’t rush. I’d like to do it in 90 minutes or less, but I still sometimes have trouble with steps 3 and 4 above. I’ve learned that some shapes of stones are easier to work with than others and when I want to do a piece quickly, I work with an easier stone.

I’ve also learned that the more I try to get experimental, the more likely I am to struggle. Still, if I don’t try new techniques, I won’t improve my skills and learn what works and what doesn’t work.

Try It!

This blog post isn’t enough info to try it for yourself; you really need to see it done to do it. If you can’t get one-on-one instruction like I did, you can try videos on YouTube. Although an earlier post on this topic linked to one or two wire wrap jewelry videos there, I’ve since found a better artist: OxanaCrafts. The work she does, although often a lot more ornate than I do or like, is quite similar to what I do and I’ve gotten a lot of ideas from watching her videos. I credit her for the neatly wrapped bails I’ve been doing in almost all of my recent pieces. But while her work seems to feature the actual wire work, I prefer to feature the stones. That’s the main reason my wraps are simpler than hers — and my stones are usually a lot more interesting.

Want a good basic tutorial? Try this one: Quick Beginner Wire Wrap. Just keep in mind that a single anchor point, as she uses in this video, probably won’t work for larger or thicker stones.

If you want to give it a go, remember that there are certain tools and wires that you’ll need to get started. You might find them at your local craft store; I got my start using silver plated copper “hobby wire” which I’ve seen in Michael’s and Hobby Lobby. Tools are important; don’t be tempted to use standard pliers you might get at the local hardware store. The ridges carved into these tools will mar the wire.

Nice cabochons are a little tougher to find; I get many of mine from gemstone dealers and rock and mineral shows. I choose my cabochons individually — and pay for them accordingly — but you can often buy them in lots. If you don’t care what your stones look like and just want cheap stones, this will probably work for you; try eBay. But if you care and don’t mind paying for quality, you’ll find that it’s worth the effort to find the stones you want.

A great source of quality wire, tools, and even cabochons to get you started is RioGrande. That’s where I buy my wire and I can’t say enough nice things about them. (Thanks, Dorothy, for recommending them!) I’m not sure if they sell the cheaper craft wire, although I know they do sell better quality silver, gold, and even platinum.

If you do try it — or if you have already created your own wire-wrapped jewelry pieces — please use the Comments for this post to share a link to your finished work. I’d love to see it.

Support My Jewelry Making Habit!

But you know what I’d really like? I’d really like it if you visited ML Jewelry Designs and picked out a piece of jewelry for yourself or a loved one. You can support my jewelry-making (and stone collecting) habit while getting a truly unique piece of wearable, handmade art. Many thanks to blog readers who have already done so!

And if you want this piece, you can find it here in my online store. But don’t wait; all of my pieces are one-of-a-kind and when this one is gone, it’ll be gone for good.