Read up; this will tell you everything you need to know.
In this series:
– Part 1: Read this First
– Part 2: Save Up
– Part 3: Start Young
– Part 4: Choose a Reputable Flight School
– Part 5: Check Your Attitude at the Door
– Part 6: Study Hard
– Part 7: Stay Slim
– Part 8: Be Willing to Travel
– Part 9: Pay Your Dues
– Part 10: Network
– Part 11: Don’t Bite the Hand that Feeds You
more to come…
I’ve been blogging since 2003 and have been writing about my experiences as a helicopter pilot since the very start. A lot of what I’ve written covers the commercial side of flying helicopters — flying for hire. I’ve also written about the helicopter job market; that post, now about three years old, remains one of the most-read posts on this blog, with dozens of comments that help make it even more valuable for blog readers.
Along the way, I’ve been accused of “shooting people down,” “destroying people’s dreams,” etc., ad nauseam. That is not my purpose. I like to see people achieve their dreams, but I am a realist. I believe that people can achieve their dreams if they work hard and smart and do the right things to make it happen.
 After all, I did it. I’m a woman (which, sadly, does matter in this particular field) from a middle-class family with absolutely no aviation background. I waited until I was in my late 30s to start flight training, doing it more as a hobby than a career change. I covered the cost of training to get my private and then commercial ratings. When I realized I was hooked, I set a goal of flying helicopters at the Grand Canyon. I achieved that goal in 2004, working as a seasonal pilot for one of the tour operators there. Now my goal is to get a job as an ENG or movie pilot. I’m working on that and believe I can achieve it.
But what are the right things to do if you want to build a career as a helicopter pilot? That’s what this multi-part post will attempt to address.
Who Needs to Read This
If you are a man or woman at least 16 years old with a serious desire to become a helicopter pilot, this post might be for you. Answer these questions honestly:
I want to become a helicopter pilot because:
(A) I love to fly and want to do it as much as I can.
(B) I think helicopters are cool and being a helicopter pilot would really impress my friends.
(C) I want a job earning $80K or more a year.
I’m sure I can fly a helicopter because:
(A) Well, I’m not really sure, but I think a good instructor can teach me.
(B) I can fly helicopters on my flight simulator.
(C) It looks pretty easy.
The most important thing to learn about flying helicopters is:
(A) It’s all important, from basic maneuvers to FAA regulations.
(B) Being able to do autorotations.
(C) Knowing how to fly like the pilots in the movies.
Helicopters are:
(A) Utility aircraft designed to perform missions that airplanes can’t.
(B) Like airplanes but without wings.
(C) Built for fun.
If you knew that the “right” answer to each of these question was A, there’s definitely hope for you. You might have the right attitude to be a helicopter pilot. And that’s important because, as I’ll discuss, attitude is vital to success.
If you honestly picked B or C for any of the answers, you need to think a bit harder about a career as a helicopter pilot. You likely have some misconceptions about what flying helicopters is all about. Why not stop by your local medevac base or helicopter charter company office and chat with some of the professional pilots there? Don’t chat with folks at a flight school — they’ll simply tell you anything you want to hear. Talk to the folks who are actually flying helicopters for a living. They’ll give you the facts and set you straight.
Who Doesn’t Need to Read This
This post is for people who want to build a career as a helicopter pilot. In other words, they want to fly helicopters for a living.
If you just want to learn to fly helicopters — as a hobby or just another skill — you don’t need this advice. Just go find a flight school and sign up. That’s what I did. I never intended to fly professionally. I just got hooked and then needed to be paid to fly in order to keep flying.
If you’re thinking about flying helicopters for a hobby, be aware that it is a very expensive hobby. It’ll cost about $10K to get your private helicopter pilot certificate. Flight time in the cheapest helicopter you can find will cost at least $180/hour and likely much more. Ownership is even more expensive — especially if you don’t fly more than 100 or so hours a year. Even home-built helicopters are costly to acquire and operate.
I’m not trying to talk you out of it — I’m just pointing out the facts. I know quite a few private helicopter pilots, most of whom own their own helicopters. They’re all rich guys. All of them. I am the poor kid on the block; I need paying passengers to fly.
And if you’re interested in helicopter ownership, be sure to read this.
The Advice
In the next part of this series, I’ll start providing my advice. While you might be tempted to skip one or more of the parts, don’t. Every single one will provide vital information you’ll need to succeed. Read them all; post your questions as comments on the appropriate post. I’d love to see a good discussion start — something that’ll really help you and others achieve your goals.
Oh, and by the way. I think the information you’ll find here applies to getting started in a career as any kind of pilot — even fixed wing.

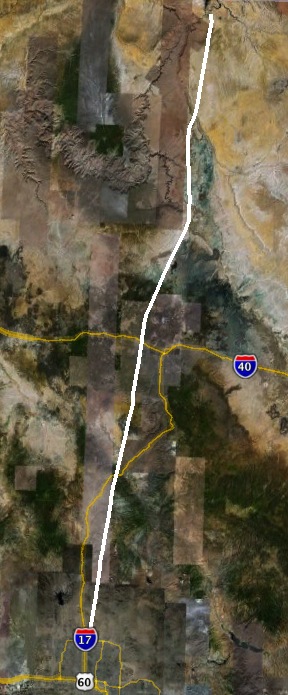 The purpose of the flight was not to make the video. The purpose of the flight was to get from Phoenix to Page as quickly as possible. My clients paid for two hours of flight time; every minute past that was being paid for out of my pocket. I flew nearly a straight line, as shown in this Google Earth plot created from actual GPS points. (I sometimes run a
  I admit I wasn’t looking forward to the gig. The two photographers claimed to weigh 242 pounds (converted from kilos) and I knew they likely weighed more fully dressed and carrying camera equipment. I calculated the weight and balance as soon as I had this information and discovered that I’d have to strip all non-essential equipment out of the helicopter to lighten it up so we could take enough fuel for 2 hour flight segments (plus FAA-required reserves). Anything that was left on board would have to be shifted from under my seat to under the seat behind me, just to shift weight backwards. Having two fatties — yes, including me — up front would make us front-heavy. Having two fatties on the left side would make us heavy on that side. But even after adding 15 pounds of weight for each of them, I confirmed that’d be in balance with 2/3 fuel or less on board.
 Using
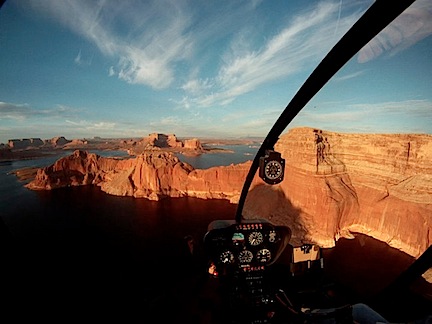
Using  What fascinated me was the way the light changed throughout the flight. At first, it was partly cloudy. Then the sun slipped behind the clouds and it was cloudy. Then the sun began to break through, speckling the mountainsides with light. This still image, captured from the video, gives you an idea of what I mean. The light changed numerous times over the two-hour period of the flight — at one point, clouding over completely only 1,000 feet above me — giving the illusion that the flight was conducted over multiple days.
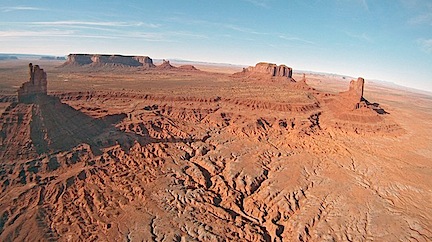
 One of the highlights of the flight was crossing the red rock cliffs west of
  When I got to the empty expanse of the Navajo Reservation, I dropped down and flew low over the ground. There were few homes in the hundreds of square miles and only a handful showed signs of life. In the video, my helicopter’s shadow is clearly visible: small when I’m flying higher and larger when I’m flying lower. The video makes it seem as if I’m going much faster during this portion of the flight, but I’m not. I managed to keep a steady 100-110 ground speed for most of the flight. It’s just an illusion: the closer the camera is to the ground, the faster I seem to be flying.
 My flights are spread out over the entire year, with February, March, September, and October my busiest months. LogTen Pro created this graph for me so I could visualize it.
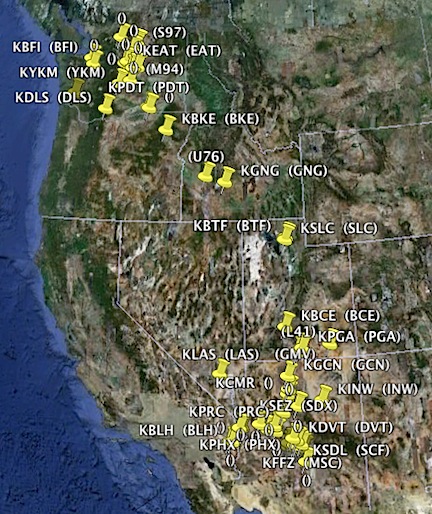 I landed at 52 different places in Arizona, California, Nevada, Utah, Idaho, Oregon, and Washington. 16 of these landing zones were off-airport, although two of them were official helipads registered with the FAA. These numbers do not include about a dozen off-airport landing zones I used during one mine survey job in March; it just wasn’t worth logging them all. This Google Earth map shows where they were, using data from LogTen Pro. (Seriously: isn’t this cool?)