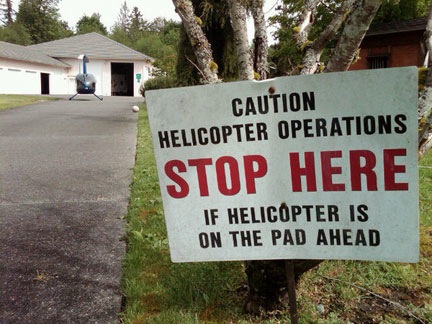
Or why a one-hour helicopter flight took four hours.
Seattle weather sucks. I can’t say it any other way.
I arrived there last Thursday and experienced rain every single day while I was there. A helicopter flight to Bremerton for breakfast was switched to a much closer destination simply because low clouds made it impossible to get to Bremerton. In a helicopter, for pete’s sake.
By Sunday, I’d had enough. I hooked up the RV and crossed the Cascade mountains to the east side. The Columbia River Valley is [usually] much drier. I set up camp in my usual spot at Colockum Ridge Golf Course and opened all the RV windows to let some fresh, warm, dry air in.
The Mission: Get My Helicopter to the East Side of the Cascades
Of course, my helicopter was still in Seattle. As it ages, parts are starting to fail. This year, it was (so far) the auxiliary fuel pump (again), the muffler (cracked), the upper bearing (worn out), and the engine support do-dad (drooping). Add to that the cost of overhauling the magnetos and I was looking at about $10K of repairs. In the past two months.
So don’t anyone ask me why it costs so much to fly a helicopter.
The repairs were finished on Tuesday afternoon. Although weather was still an issue in Seattle, I needed the helicopter on the east side. My contracts don’t start until June 10 or so — pushed back because of unseasonably cold weather — but there was a slight chance I might be able to pick up a week’s worth of work farther south if the helicopter was available.
So on Wednesday morning, I boarded a Horizon Airlines flight in Wenatchee (EAT) for Seattle (SEA). My friend Don, who’d graciously hosted me and my RV the previous week, picked me up at the airport, let me buy him lunch, and dropped me off at Seattle’s Boeing Field (BFI). After chatting in the office for a while and checking the usual dismal weather, I met with the mechanic, gave the repairs a quick look, preflighted, and took off.
First Attempt
It was about 1 PM and the clouds were low. In the hilly terrain along the I-90 corridor, I managed to keep my altitude at 300-500 feet above the ground with the cloud bottoms a comfortable distance above me.

The view shortly before I decided to turn back. Unfortunately, my point-and-shoot Nikon insists on focusing on raindrops.
But I didn’t get very far. As I moved eastward over I-90, visibility started to deteriorate. I wasn’t much past Renton’s airspace when I saw a thick rain shower ahead of me over the Interstate. I’d been taught at the Grand Canyon that if you can see through it you can fly through it. I couldn’t see through this one. And I wasn’t anywhere near the pass I’d have to slip through to get over the Cascades. Obviously, this wasn’t the way to go.
I doubled back, calling in to Renton’s tower to get permission to transition along the east side of their airspace. I figured I’d head south — possibly as far at the Columbia River — and go around the mountains. That would turn a 45-minute flight into a 2-1/2 hour flight (at least). But as I traveled south, I could see that the visibility situation was worse than the weather radar indicated. I got past Auburn and knew I couldn’t complete the flight at that time.
I had two choices:
- I could return to BFI and hang around in the mechanic’s office and wait until the weather got better. I had no transportation there, so I’d be stuck there. If I got stuck there all day, they’d eventually kick me out and I’d have to either fly out or get a cab to a motel and return the next day for departure.
Don’s Heliport, photographed with his helicopter on the “pad” on a nicer day.
I could fly to my friend Don’s private helipad in Auburn. He’d already told me I could do that if I needed to. There I’d find a comfortable place to hang out with friends and both a television and wifi to check the weather. I’d also be able to draw on Don’s weather local experience to determine the best time to make another attempt. If an overnight stay was required, they had a nice guest room.
Which would you pick?
The trouble was, Don’s heliport — although logged into the FAA airport database — was not on my GPS. I’d only flown in once with him — as a passenger. I knew some of the landmarks. But I also knew that it was completely surrounded by tall trees and impossible to see until you were literally right on top of it. So I had to go hunting. In the rain. I figured I had about a 50% chance of success.
I did eventually find it. It took about 10 minutes. On the ground, Don heard me and quickly pulled his truck and trailer out of the landing pad. He’d just gotten it out of the way when I spotted it. I circled around to make the steep approach. I came in a bit too slow and steep, but I made it work. Not bad for the first landing.
We checked the weather together and decided I should wait a few hours. I accompanied them on a few errands. It was raining the whole time. We got back and checked the weather again. Radar showed a huge storm system moving northwest from the other side of the Cascades. My buddy, Jim, who had started a cherry drying contract in Mattawa, would probably be flying. We looked at the Washington State Department of Transportation Web site traffic Web cams in the passes. We checked Duats and got information for Stampede Pass, which was not far from the pass on I-90 that I’d be crossing. Conditions changed by the minute.
Second Attempt
Finally, at 6 PM, I decided to try again. I said my goodbyes, started up the helicopter, and climbed up through the trees. The scene from up there was surreal. Wispy patches of thin clouds rose here and there from the tops of the tall pines. To the west and south, the sun had broken through the low clouds, illuminating the ground with rays of light. To the north, I could clearly see the Seattle skyline. To the east, however, things weren’t as rosy. There were scattered rain showers and patches of fog.
My initial plan had been to follow Route 18 to I-90, but Route 18 led right into a thick rain shower. So I punched Bandera (4W0) into my GPS and took a route that was southwest of 18, heading east northeast. I hit I-90 just before it made a sharp turn into a canyon. The clouds were very low there and I’d have to fly about 200 feet over the freeway to enter the gap. While there was a chance that the ceilings could rise right beyond that point, it was impossible to tell from my position a mile or so away. And I was still 7 miles from Bandera, which was still several miles from the pass. The likelihood of getting through there without hitting wires was slim to none.
Another crappy photo, but it should give you an idea of those wispy clouds coming up through the trees.
I turned around and retraced my route to Don’s place. To the south, there was a lot of bright sunlight. I was pretty sure I could go that way and follow the Columbia River around the mountains. But the flight would take 2-1/2 hours and I’d have to stop for fuel. Sunset was at 8:45 PM. It was already 6:30 — too late to make the attempt.
Of course, I’d forgotten to mark Don’s place as a waypoint on my GPS, so I had to hunt for it again. I found it a bit quicker and made a much better approach and landing. I was there for the night.
I’d been gone 30 minutes.

My first two attempts on a Seattle sectional chart. Red is my first try, blue is my second.
Third Attempt
I woke to fog. We checked the weather on the Internet and on television. We also called another pilot who lived nearby and had a better view of the sky to get her input. By then, I was so sick of checking the weather that it ceased to have meaning for me. After all, few of our sources gave me the information I really needed: how high were the could bottoms above the ground? What was the visibility in the mountain passes? A direct flight to Quincy from Auburn was less than 100 nautical miles. Although I couldn’t make a direct flight, my goal was to make it as direct as possible.
You need to understand here that this isn’t the first time I’ve had to take the helicopter across the Cascades. It was going to be my seventh. Weather had been an issue on four of those previous flights, but never this bad. I just wasn’t willing to accept it.
So when the fog cleared and our contact a few miles away reported ceilings of about 500 feet, I decided to try again. Don topped off my fuel tanks with another 15 gallons of fuel. I said goodbye again, started up, and climbed back up through the trees.
This is the nicest bit of weather I came across. This shot was taken about 15 miles south of Auburn at 9:18 AM.
Up top, I was surrounded by poor visibility. I could probably see 3 miles, but not much more. I was certain that I’d be wasting my time if I tried for the I-90 passes again. So I headed south toward Portland, OR. As I flew, the weather improved.
As I flew, I never lost hope of getting across the mountains another way. Although my general direction was south, I kept trying to find passages that would take me more to the east. I followed one particular valley for quite a while, climbing ever so slightly along the way. Then my way was blocked by clouds touching the tops of the tall pines all around me. Discouraged, I turned around to backtrack out of the valley.
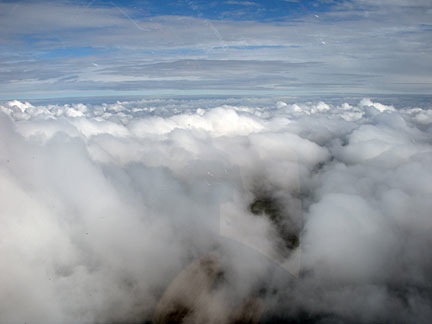
View from above the clouds. I was probably heading westbound when I took this shot after aborting my first canyon passage. 9:30 AM
A big hole in the clouds opened up, revealing blue sky. I pulled pitch, pulled the cyclic back, and climbed out at about 1200 feet per minute. Above the low clouds, the view was disheartening. The cloud tops varied in height and another layer of clouds seemed to meet them on the horizon to the east. The bright, snow-covered top of Mount Rainier seemed to taunt me, shining in the sun less than 30 miles away. On a previous westbound flight, I’d flown above the clouds just north of the peak, dropping down into a valley on the west side to complete my flight. It didn’t look as if I’d be as lucky to find a path back through the clouds on the east side that day so I wasn’t about to attempt it.
I caught sight of a lake to the west of my position through another big hole in the clouds. I dumped the collective and glided down at 1700 feet per minute, banking right and then left to dodge clouds on my way down. Safely under the clouds again, I continued south.
Eventually, I hooked up with Route 12, another of the roads that crosses the Cascades. I followed it eastbound in a pleasant valley dotted with homes, farms, and lumber mills. The clouds overhead were low but mostly broken, so there was plenty of sunshine — enough to turn off the heat and crack the air vent. I tracked my position on the sectional chart. White Pass was at 4500 feet. If I could get through that, I’d be able to follow the road to Yakima.
I passed the last town in the valley and the road began climbing into the mountains. I climbed with it. Then I decided to take a chance above the clouds again. I climbed up through a big hole, reaching 6,000 feet before coming out on top of the lowest layer. The clouds were taller here, some of them starting to show signs of convective activity. Although I was atop many of them, I had to fly around others. My GPS assured me that the road was beneath me, but I couldn’t see it. I also couldn’t see Mount Adams, which I knew was very nearby. The clouds were thick to the east. I knew that to an onlooker, I probably looked like a tiny speck of red among the giant puffy clouds and rocky peaks around me.
And that’s when I scared myself. I flew into a sort of box canyon of clouds. The only way out was back the way I’d come and down. I dumped collective and pulled the cyclic over. Within a moment, I was banking hard to the right at at least a 60° bank angle, descending at 1000 feet per minute. Adrenaline rushed into my system, making my entire body feel the dire emergency situation I was in. In less than 15 seconds, I was clear of all danger, but it would be at least 30 minutes before that adrenaline rush was completely gone.
I won’t do that again.
I flew back to that nice little town with the initial thought of landing there at its airport and waiting for the weather to improve. But I realized what an idiotic idea that was. The weather there would not improve soon enough and the town was too small to have a motel or even fuel at its airport. So I continued on my way, backtracking along Route 12, westbound through the valley.
At Randle, there was a road that cut south through the mountains. It looked like it might be a shortcut to the Columbia River Gorge east of Portland. I still had half tanks of fuel so I figured I’d give it a try. Soon I was flying through a spectacularly beautiful little valley, over a rushing river. Every once in a while, I’d catch sight of the paved road between the tall pine trees. The road climbed and I climbed with it.
Then the inevitable — a wall of clouds right behind a ridge. I circled, looking for the road, wondering which way it went. The neat thing about mountain roads is that they’re usually built on the easiest path to cross mountains. That’s what makes them so good as navigation tools when you need to fly a helicopter over some mountains.
When I spotted the road, I was surprised to see that it was covered with deep snow. It was obviously closed for the winter. I followed it slowly to the top of the ridge to take a peek over. If the land dropped down behind it and the clouds stayed high, I could continue. But if there was another ridge blocked by clouds behind this one, I’d have to go back. Again.
I was lucky. The ridge was the highest point on the road. The land fell away beyond it and the road fell with it. I popped over the top only 50 feet from the treetops and descended into a valley on the other side.
I punched Hood River into my GPS. I’d need fuel somewhere and Hood River seemed as good a place as any to get some. It was still 40 miles out. I flew directly toward it, put off by the amount of cloud cover all around me. I’d been hoping for clear skies in the Columbia River area but I wasn’t going to get them.
A crappy, over-the-shoulder shot of Mount St. Helens. (You try taking decent photos while flying a helicopter.)
At one point, I saw Mount St. Helens over my right shoulder. It was covered with fresh snow.
Eventually, I changed my fueling destination to The Dalles. I hit the Columbia River abeam Hood River and followed the Columbia eastbound. I landed at The Dalles, called Don to assure him I was okay, and went inside to use the bathroom while the FBO guy fueled my helicopter.
I thought the worst of it was over. I even said that to the FBO guy before starting up again. But although the worst of it was over, there was still weather ahead. Unfortunately, I hadn’t taken the time to check the weather again while at The Dalles. So the low clouds and heavy rainstorms I had to fly through for the next hour or so were an unpleasant surprise.

As this SPOT Messenger track shows, my route from Seattle to Matawa was anything but direct.
It was cloudy but not raining when I landed in Mattawa to visit with my friend Jim. He and his wife drove me to a local restaurant where I could get something to eat and drink. We wound up spending at least 2-1/2 hours there, talking about flying and drying cherries and politics. As I was getting ready to leave, it started drizzling. Jim, who’d flown 2-1/2 hours the day before, smiled and thanked the rain gods. If the rain kept up, he’d fly again later in the day.
From Mattawa, it was only 20 minutes back to my base in Quincy. I overflew what looked like an AStar drying cherries on the north side of Mattawa. (Why he was drying while it was raining was beyond me.) In Quincy, I landed on a concrete pad at the ag strip across from the golf course where I’m camped out. The clouds were thickening in the area. I hitched a ride to the campground, got my truck, and put the padded blade covers on the helicopter.
It was good to get back to my comfy RV and Alex the Bird. I slept very well that night.


 I told her I was unfamiliar but had a good airport diagram. I told her I was going to the Million Air FBO and had a pretty good idea of where it was. She cleared me to land when I was still a few miles out.