
The basics of cross-country flight planning for helicopters.
– Flight Planning
– CG
– Weight
– Hover Charts
– Ground School
Recently a reader of this blog wrote to suggest that I cover cross-country planning as a blog topic. I searched my archives and found that I already had. My post, “Flight Planning,” goes into a great deal of detail about the process I use to prepare for Part 135 charter flights, which require a complete flight plan. But that’s probably not what this reader was talking about. I think he was more interested in the nuts and bolts of creating a flight plan.
This weekend, I have to make three relatively long cross-country flights:
- Wickenburg, AZ (E25) to Page, AZ (PGA) – 189 nm direct
- Page, AZ (PGA) to Salt Lake City, UT (SLC) – 232 nm direct
- Salt Lake City, UT (SLC) to Seattle, WA (BFI) – 601 nm direct
I’ve flown the route from Wickenburg to Page and back numerous times. I’ve done Salt Lake CIty to Page once and Seattle to Salt Lake City once. I figured I’d use the PGA to SLC flight, which I’ll be doing alone, as an example of how I plan a flight.
Weather
A few days before the scheduled flight, I start checking the weather along my route. I use the National Weather Service’s NOAA Web site for weather information. After all, the NWS is the source of all the weather data for the United States. That’s where the Weather channel and Duats and the FAA get raw weather data. Although each weather reporting organization may interpret it slightly differently, it’s all based on the same stuff. And the NWS site doesn’t bombard me with obnoxious advertising.
A lot of folks use the Aviation Weather link to get aviation weather information. I don’t — at least not a few days out. Remember, I’m flying a helicopter. I’m 500 – 1000 feet off the ground. I don’t care much about upper level disturbances, the jet stream,or icing in clouds. I’m not getting anywhere near that stuff.

The graphic weather forecast for Page on the morning this post was written.
What I’m interested in is forecasted conditions for the departure and arrival airports, as well as any cities in between. So, in this case, I would check out the weather forecast for Page, Salt Lake City, and possibly Richfield, which is roughly halfway between the two. I’ll pay close attention to the forecast for my day of travel, as well as the day before and after.
What I see today is relatively poor forecasted conditions for Saturday, the day of my flight, with chance of rain or snow at each location. Not what I want to see, but remember, it’s a forecast. It will probably change. I have to hope it gets better.
Route
Next, I plan out my route. Although I listed straight-line distances at the beginning of this piece, I seldom fly in a straight line. Instead, I try to find a route that’s a compromise between a straight line — which, out in the desert, usually means doing a lot of flying in the middle of nowhere — and following roads — which is where people will be if I need help.
Now I need to make it clear that unless there’s a road going the way I need to go, I’m not going to follow roads to get from Point A to Point B. I don’t want to go out of my way — at least not too far. Helicopters are expensive to fly and I’m not made of money. The time budget for this trip is 2 hours — that’s what the client paid for — and I’ll need all of it and then some. So what I want is a compromise that puts me near roads for part of my trip.
I plan my route with charts. World Aeronautical Charts (WACs) are very handy for long cross-country flight planning. But sectionals offer more detail.
Of course, I cheat. I use SkyVector.com. It puts the charts onscreen and enables me to do some very basic flight planning — mostly distances and directions. As the site warns — probably with the advice of lawyers — it’s not for navigation or preflight use. But I use it for preliminary planning. It really helps me get a good idea of where I need to go.

The pink line at the bottom is the direct route from Page to Brice; the red and blue lines are my two options for continuing northbound without overflying 10,000 foot mountains.
In this case, I’m seeing that a direct flight from Page (PGA) to Bryce Canyon (BCE) would take me 57 nm mostly over remote, high desert terrain, climbing from about 4300 feet to over 7000 feet. No major mountain ranges to cross along the way — and that’s good.
From there, I can follow the East Fork of the Sever River and the road beside it northbound between a pair of mountain ranges topping out at over 10,000 and 11,000 feet, then follow a pass that’ll hook me up with Highway 89. This map shows it as the red route. That’s the way I flew last time and the only drawback I recall was the rough air in that pass.
The other option is to continue on almost the same heading to Panguitch (U55), which will hook me up with Highway 89. I can then follow that northbound between two mountain ranges topping out at 11000 feet, staying slightly lower in overall altitude and sticking with a well-traveled road. This map shows it as the blue route.

My planned route, roughed out on SkyVector.
I continue this process for the entire trip. This one’s pretty easy; I’ll be following Route 89 most of the way. When I get to the outskirts of Salt Lake City, I’ll be following I-15. This turns my 232 nm trip into a 259 nm trip and adds at least 15 minutes of flight time. But I’ve minimized my flying time over the middle of nowhere without detouring too much out of my way. The WAC charts I pasted together here from SkyVector screenshots give you an idea of what the entire route looks like. I can also see that my flight without wind could be as long as 2-1/2 hours. My helicopter’s endurance is just 3 hours, so I need to consider the possibility of needing a fuel stop if I hit headwinds. Fortunately, there are plenty of airports with fuel along the last 50 miles of my route.
By the way, the main benefit to following a road when you enter busy airspace and don’t know the local reporting points is that you can state your position to ATC in relation to the road. For example, “Helicopter Zero-Mike-Lima is ten miles south over I-15” is a very definite location.
Once I get a rough outline of the course, I go into detail with sectional charts. I buy them as needed for my cross-country flights. I’ll check to be sure there’s no special airspace or weird activity (think gliders and ultralights) along the way. I’ll also look for charted power lines — not that I’ll remember them when the flight time comes. I’ll make a cheat sheet of airport names, designators, elevations, and frequencies so they’re easy to enter into my GPS for added navigation assistance during flight.
Although I don’t usually mark up my local charts (Phoenix sectional and terminal area chart), I don’t mind taking a highlighter to the Las Vegas and Salt Lake City Sectionals I’ll use for this trip. I’ll also have a Salt Lake City terminal area chart on hand. Before I start my flight, I’ll fold them all neatly to expose the route. With just one hand to fiddle with charts, it’s much easier to prepare before lift off.
Destination Information
On this particular trip, I’ll be landing at Salt Lake City Airport, a Class Bravo airport I’ve never landed at before. I’ll need to know where on the airport I’ll be landing so I don’t sound like a complete idiot when I talk to the tower.

The airport diagram for SLC. General aviation is handled in the southeast corner, not far from the I-15 freeway.
I could pull out my Airport/Facilities Directory and look up the airport, but that green book is already stowed in the helicopter for the trip. So instead, I’ll hop online to the FAA’s AeroNav Services (formerly NACO) web site. Once there, I’ll click the link for Free Digital Products and then click d -TPP and Airport Diagrams on the page that appears. (Note that you can get a PDF of the page(s) for a specific airport from this site, too.) I’ll use links and search to get the Airport Diagram for SLC, which will be downloaded as a PDF. I can print it out for future reference and put it with my charts.
I’ll also go to AOPA Airports and get information for SLC. I’m interested mainly in FBOs. I was told to go to Million Air, so I want its location, frequency, and phone numbers. AOPA Aiports also shows a zoomed in satellite image of the FBO’s location, making it easy to mark on the airport diagram.
While I’m at the AOPA Airports site, I’ll also jot down the phone numbers for the AWOS or ASOS systems along my route. I’ll program these into my cell phone. This way, if I need up-to-date weather information for a specific airport, I can get it by simply calling. This has come in handy in the past in marginal weather conditions. I have quite a few airports stored in my computer and phone.
Note that I always get airport frequency information from FAA sources: up-to-date charts or the Airport/Facilities Directory. No online database that isn’t maintained by the FAA is guaranteed to be accurate. There’s nothing worse than trying to land at a towered airport and having the wrong frequency for it. I’ll also update my Garmin 420‘s database before this flight. I have an annual subscription, but I often skip updates because they’re such a pain in the butt to install.
Final Planning
I’ll keep watching the weather all week. If it starts to look like its getting worse, I’ll start thinking about rescheduling my trip. In all honesty, the only thing that would stop me from doing the flight would be winds in excess of 40 miles an hour (possible, but not likely), low clouds (definitely possible), or freezing rain (possible). Although I mostly fly in great weather here in the desert, I’ve flown in ugly weather, too. A fair weather pilot should not be flying for hire.
The day before the flight, I’ll call Million Air and tell them to expect me. I don’t have to do that, but it’s better than just dropping in. They’ll also give me some insight about where to land/park. I’ll note it on my airport diagram.
The day of the flight, I’ll check the weather again. This time, I’ll use Duats.com. I’ll punch in my flight plan airports and let Duats tell me the official aviation weather and notams and give me a more precise (official) flight plan that factors in the wind.
Could I do it by hand? Yes, if I had to. But I don’t so I don’t.
I’ll also make my fly/no fly decision.
I’ll file a flight plan via Duats. I might forget to open it when I take off, though. I often do when I fly by myself. But I have a Spot Messenger that broadcasts my location to a Web site that my husband monitors. I think that’s better flight following than I could get from the FAA without climbing to 12,000 feet. (Keep in mind that I don’t have oxygen and the R44 vibrates like a coin op motel bed at altitudes above 9500 feet.)
That’s About It
That’s all there is to it. The longer the flight, the more variables to consider. This is a pretty short one. The flight from Salt Lake City to Seattle is another story. Lots of variables there. My co-pilot on that trip will plan and fly the entire route. I’ve already looked at the route he suggested and it seems fine to me. I’ll just follow along on the chart.
The main thing that makes this different from planning for an airplane flight is the altitude issue. Airplanes climb several thousand feet over terrain. Mountains don’t get in their way; they’re above the mountains. Helicopters generally don’t fly that high, so we often look for routes that take us around obstacles like 11,000 foot mountain ranges. We also have the luxury of being able to land almost anywhere if we have a problem


 Things seem different lately, and I’m not sure why. I’ve begun getting fan mail from readers of my articles in
  The result, as you can see here, is likely the best portrait of me that I’ll ever see.
 Anyway, I didn’t see the photo until the May 2009 issue of the magazine came out. I was thrilled with it. I wrote to Jeff to ask if I could have a copy to use elsewhere. I also asked a few other questions. He answered the other questions, but didn’t send the photo. I thought perhaps the magazine had said no, so I let it go.
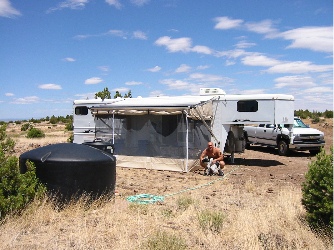 But then we got the horses and decided we wanted to be able to go camping with them. So I bought a 35-foot horse trailer with living quarters. For those of you who aren’t familiar with the concept, the trailer has stalls for the horses in back — mine held three. It also had a sort of closet for storing saddles and other tack. The other half of its length was dedicated to living space for people. It had a queen sized bed, sofa, sink, two-burner stove, good-sized refrigerator, and full (although tiny) bathroom. All this stuff was crammed into a very small space. We added a screened-in room to expand our living space. This photo shows what it looked like parked on our Howard Mesa property with the screen room attached. I lived in this space every other week in the summer of 2004 when I flew at the Grand Canyon. Sadly, we rarely used the camper as it was designed — to take our horses camping with us.
 In 2006, I sold the horse trailer and purchased a Starcraft Antiqua hybrid camper. To me, this was the best of both worlds: a hard-sided camper with the usual amenities (kitchen, bathroom, dining area, sitting area, bedroom) plus the outdoorsy feeling of tent camping. I bought this primarily because I thought we were going to go “on the road” with the helicopter in the summer of 2007. I’d do
  Floor plan. The layout of the RV is likely to determine what amenities it has. If you’ve never shopped for an RV — or haven’t done it lately — you will be amazed at what they can cram into a space. For example, the RV I selected is 36 feet long and 8 feet wide. Yet it has a private bedroom, private bathroom, kitchen, dining area, living area with sofa and recliners, and desk. In many cases, it does this with slide outs. You drive along, park, and push a button to expand your living space.
 Being the picky person I am, certain elements of the floor plan were very important to me. I wanted to be able to access the refrigerator and bathroom without having to expand all the slides. For example, suppose I’m cruising down the road in the middle of nowhere and need/want a cold drink. I can pull over, climb into the RV, and grab one out of the fridge. And even take a leak in a bathroom I know is clean. I also wanted what’s called a “side aisle bath” — a bathroom with all components in the same little room. Other floor plans actually put the bathroom sink in the bedroom. I didn’t want that. And finally, I wanted working space that wasn’t the same place I ate. That means I needed a desk or space for a desk. An RV with a good desk is hard to find and I was perfectly willing to pull out a recliner or even a sofa to put in my own desk. But the model I wound up with actually had a good, usable desk and even had drawers (see photo below). So as far as floor plan is concerned, what I bought is pretty darn close to “perfect” — for me.
 Features and Amenities. Every RV manufacturer and design has its own set of features and amenities. For example, a toy hauler includes a garage-like space in the back. A family model RV might include a separate bedroom — and even an additional half bathroom! — with bunks for the kids. Many luxury RVs have surround sound entertainment systems with wide screen televisions that rise out of a panel or fill an entire wall space. Some units have electric fireplaces. You can find kitchens with two refrigerators and bathrooms with bathtubs. Dining can be in a booth or table and chairs. Sofas can become second beds. Bedrooms can have televisions, closets can be cedar-lined, cabinets can have washer/dryer hookups. The list goes on and on. Just when you think you’ve seen it all, you walk into an RV with yet another feature you didn’t think you’d ever see in an RV.
 For us, less was more — on the inside, anyway. All the RV dealers in the world can assure us that an electric fireplace is a good feature because it gives off heat using the campground’s electricity rather than onboard propane. I can remind them all that we do a lot of off-the-grid camping where there is no campground electricity. A fireplace was a feature we simply didn’t want — yet it appeared in more than half the RVs we looked at! I was extremely pleased, therefore, when we found the unit I’d buy and saw that instead of a fireplace (see photo of typical configuration), there was an empty cabinet.
 On the outside, however, I wanted some of the newer modern features that were not available in the 2009 model I almost bought. At the top of the list was an electric awning — something I could roll out or back in with the push of a button. (If you’d manually rolled in an awning in your pajamas in the middle of the night when the wind kicked up as many times as I have, you’d understand why.) A remote control to deploy the slide outs was also useful when setting up the RV by myself, as I’m likely to do this summer. Ditto for electric stabilizer jacks and “landing gear.” And it seemed to make a lot more sense to have all hookups (except electricity) and sewer dump/flush controls in one place rather than scattered all over the side of the RV. These features were the primary reason I went with the 2010 model rather than the 2009 (which actually had more cabinet space in the kitchen).
 Quality and Price. Quality and price really do go hand in hand. You get what you pay for. A low-end fifth wheel that you might be able to pick up for $25K is simply not going to be as sturdy or well-built as a top-of-the-line fifth wheel that’ll cost you nearly $100K.
 In my case, I wanted good quality but knew I couldn’t afford — or, more accurately, were not willing to spend enough for — the best. So the very first part of my search was to determine which brands were below my quality needs or above my budget. This should be the first step in anyone’s search for an RV; you can waste a huge amount of time looking at units that simply won’t work for you because of insufficient quality or expensive price. I also cut from the mix any manufacturer what was in bankruptcy or had gone out of the business. 2008/09 killed a lot of them. That limited us to about ten different brands by three different manufacturers. Mountaineer is a mid-range Keystone product. Montana by Keystone is one step above it and I could have made that step if I found one I liked. Heartland’s Big Horn and Big Country were also in the running.
 The Mountaineer I bought won on all three factors:
 I started calling some of the RV dealers I’d met with over the past few months — I kept all their cards — to see if they had the same model available. One, in Quartzsite, said he had a 2010. I told him I’d consider driving out to take a look if we could agree to a price over the phone. I told him about the 2009 I were prepared to buy. He asked me to make an offer. I did. He came back with a slightly higher offer that was still below retail. We were there by 2 pm and I had all the papers signed by 4:30 PM.