Jewelry Making: A Hobby Gone Wild

An update on my wire-wrapped jewelry endeavors.

By now, the folks who know me well know that my jewelry making hobby has blown up into something resembling an addiction. Indeed, it’s difficult for me to pass up a shop or website that offers gemstone cabochons (cabs, to those of us who work with these things) for sale without taking a look — and likely buying ones within my budget. I’ve now got a collection of about 4 dozen cabs in various shapes and sizes made of a stunning selection of stones. They’re almost all polished to a reflective shine. Just gorgeous.

The weird thing about this is that I’ve been going to Quartzsite, AZ where I bought about half the cabs I have now, for more than 20 years and saw cabs for sale every single year. It wasn’t until I realized what I could do with them that I began buying them. And when I started getting kind of good at turning them into jewelry, the draw became irresistible. I’ve since found a good supplier on Easy who sells decent quality stones at a reasonable price. I’ve bought two dozen from them in the past two weeks.

More about Cabochons

A cabochon, in case you’re wondering, is:

a gemstone which has been shaped and polished as opposed to faceted. The resulting form is usually a convex (rounded) obverse with a flat reverse.

Nevada Dendritic Sage Agate Wrapped in Silver
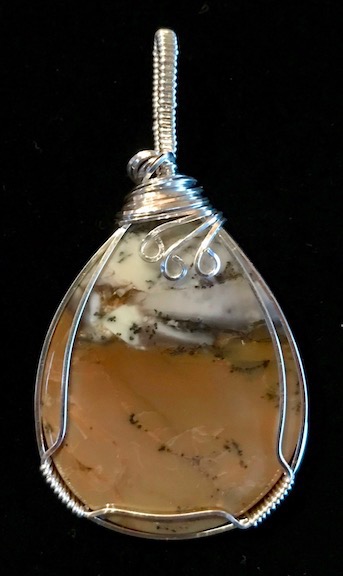
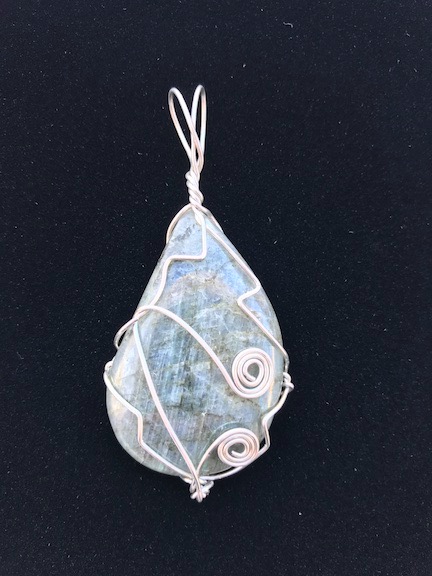
Nevada Dendritic Sage Agate wrapped in sterling silver. I don’t think you can make a bad piece of jewelry out of such a nice stone — if you let the stone show.

Lapidaries create cabs by cutting stones into slabs, then cutting those slabs into shapes and polishing them with wheels of varying grits. I’ve seen guys do this and it looks like a ton of work. A good lapidary can produce beautiful cabs by finding the best features in a slab and featuring them in a finished cab. Those are the cabs I look for when I’m shopping.

Cabs range in size from very small — maybe 10 mm long — to quite large — over 50 mm on a side. I prefer them 30 to 45 mm long and 15 to 30 mm wide. Smaller than that and they’re tough to work with; larger and they make heavier pieces than I like.

Although I do like working with odd-shaped pieces, it’s a bit more challenging to get them properly wrapped. My skills aren’t quite reliable enough yet to tackle them successfully. So I stick with ovals, teardrops, and elongated pieces. I’m just starting to get the hang of dealing with square corners.

Turning Cabochons into Jewelry

There are basically three ways to turn a cab into a piece of jewelry:

  • Drill a hole in it and use that to secure a finding or beading string. Drilling a hole in a stone basically turns it into a bead. I don’t do this. I don’t like the idea of drilling into a beautiful stone or using a hole to secure it in jewelry. That’s my opinion. I’m sure a lot of beaders would disagree. Sorry. (I should add here that when working with very small stones, I think beading is the way to go. I may use gemstone beads as accents in future pieces; I’m still thinking about it.)
  • Use wire wrapping to secure the stone into the jewelry piece. This is what I do. There are several styles of wire-wrapping; the style I use is rather intricate, although I have experimented with simpler styles. I usually use 20 to 22 gauge square or round wire wrapped with 22 gauge half-round wire to create a custom frame for a stone, build a bail, and secure the stone into the frame. Then I use the excess frame wire to create accents with loops and swirls.
  • Cut and solder metal to create jewelry mounts for stones. This is another nice way to turn a cab into jewelry — especially if the cab’s reverse side is marred or unfinished. This is both harder and easier than wire-wrapping. It’s harder because you need good metal cutting and soldering skills. But, in a way, it’s also easier because you can work with virtually any size or shape cabochon and get good results.

I’ve begun work on a blog post providing more detail on how I make my pieces. The only thing I need to finish it are step-by-step photos. It won’t be enough to teach you how to do it, but at least you’ll see what I do. There are some good videos on YouTube to get you started if you want to try and I’ll link to the ones I think are best in that blog post.

The Metals

K2 Granite wrapped with Silver
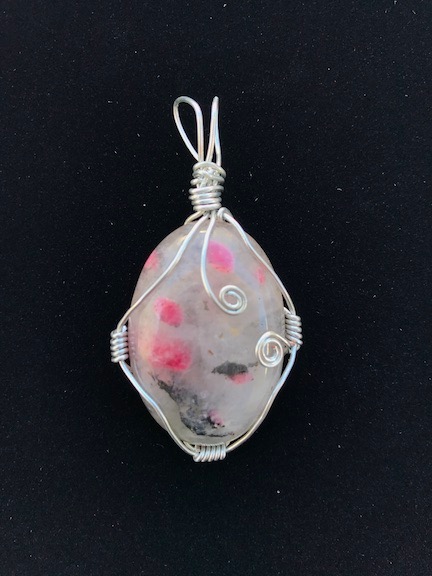
This is K2 Granite — yes, from the mountain K2 — wrapped in sterling silver. The colored specs are natural. I’d score this a 5 out of 5; it’s currently my favorite piece.

Lately, I’ve been working almost exclusively with sterling silver, although I have worked with copper and silver plate in the past. (When getting started, it’s a good idea to work with cheaper metals.) My friend Dorothy sat down with me when we were both in Quartzsite in January and showed me how she makes her jewelry. That was the first time I worked with sterling silver. She stressed the importance of tight, even wraps and put me on the right track in a search for perfection. Every time I finish a piece, I give it an objective score of 1 to 5, with 5 being the best. I’m always shooting for 5s but am happy with 4s. I learn a lot from 3s and usually disassemble anything that scores lower than that.

Dorothy also taught me to save every single bit of silver that gets cut away from the piece. When my little plastic container is full, I can send it back to the silver supplier for credit on the purchase of more silver. At $16.60 per ounce (today’s price), those trimmings can really add up.

My Progress

I’ve come a long way since I started creating wire-wrapped gemstone cabochon pendants back in January. In fact, I look at some of the pieces I created back then, remembering how proud I was of them, and cringe.

My First Pieces
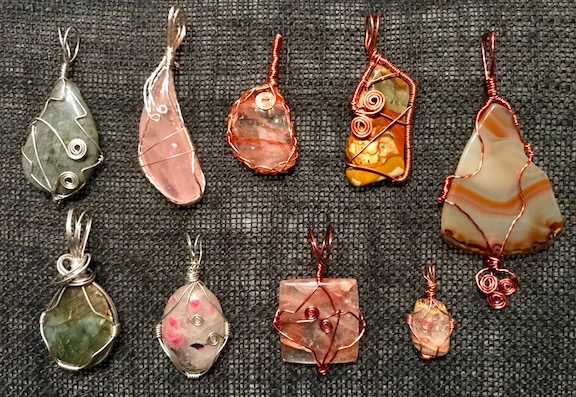
My first pieces, prepped for sale. I’ll be selling these for just $10 each — a fraction of what I charge for my later pieces.

Why cringe? Well, most of them are terribly crude and generally immature. All those swirls — what was I thinking? This is the kind of jewelry a teenager would wear. That’s okay, but I’m not interested in making jewelry for teenagers.

Now compare those pieces to my most recent work here (and in closeups above):

Recent Wire-Wrapped Jewelry Pieces
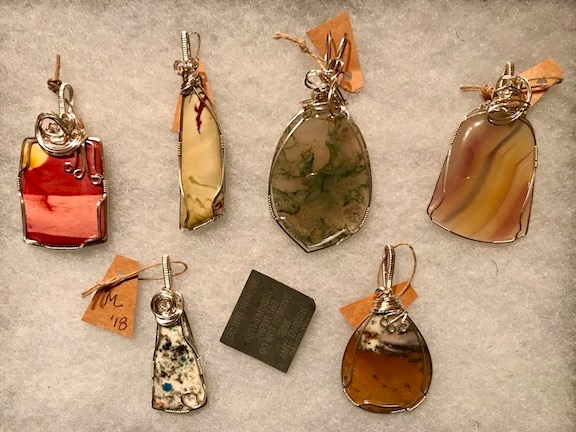
Here are some of the pieces I created in the past week, all tagged and ready for packaging for sale. They range in price from about $40 to $50 each and are sold on a leather necklace with a hand-formed clasp.


If you like videos, try this one. It’s a show and tell for four recent pieces. (I really need to get a better setup for future videos.)

I think these designs are more finished looking and mature. (Maybe it’s just a matter of taste, though.) Not only am I using better cabochons, but I’m also wrapping them with sterling silver, although I haven’t completely given up on copper yet.

And yes, I am selling them. There’s a website where new pieces appear as they are finished: www.MLJewelryDesigns.com. There are links there to an online store. Selling them makes me happy and sad. Happy because other folks value what I do but sad because I hate to see them go.

I’ll also be at a kiosk/table at Pybus Public Market on three upcoming Saturdays, including this Saturday, March 31. I figure I’ll sit there for the day and make new pieces — maybe even some custom ones from unwrapped cabochons I’ll have on display and for sale. If you’re around, I hope you’ll stop by.

But if you’re not in the area, please do visit my online store and treat yourself or a loved one to a unique gift. I sure could use a cash inflow to feed my hobby with stones and silver wire!

Another New Hobby: Wire-Wrapped Jewelry

As if I didn’t have enough hobbies to keep me out of trouble.

I’m in Quartzsite, AZ, this January and although I originally had plans to camp out in the desert for the first half of the month, a variety of circumstances convinced me to take a booth at Tyson Wells’ Rock and Gem show. I’m selling (or trying to sell) aerial photos of desert campsites. (More on that in another post.) The east side of the show is full of rock vendors, many of which sell polished cabochons (or “cabs”) and finished jewelry.

Dictionary Definition of Findings
In case you’ve never seen the word “findings” used this way, check definition 2 here.

There are several ways to make a rock into a piece of jewelry. The most obvious is to drill a hole in it to fasten a hoop or use some other sort of findings. But a more artistic method is to use wire to wrap the stone securely and add embellishments. This is called wire-wrapping and there are a lot of examples of it here, especially during the rock shows at Tyson Wells and the bigger/better rock show at Desert Gardens nearby.

Kindling an Interest

Last year, my friend Rebecca came to town while I was here and introduced me to her friend John Heusler, a gemologist who has a booth each year at Desert Gardens. John not only cuts and polishes stones, but also makes jewelry. Dorothy Roubik-Ellenbecker, another jewelry maker, works for/with John and shares booth space. She makes beautiful wire-wrapped pieces with intricate wraps that are really a joy to behold.

I got slightly interested in wire-wrapped jewelry last year, but was busy doing a lot of other things. This year, I’m sort of trapped in my booth, especially on weekends when there’s a decent crowd at the show. I’ve been looking at a lot of different wrapped jewelry styles while I’m here and starting getting the idea that maybe making some of these was within my capabilities.

Getting Training

I talked to Dorothy and asked if she’d be interested in teaching me in the evening, when we’re both done booth sitting for the day. She agreed and set a date for Monday evening. I asked about books that might be helpful and she recommended skipping the books and going right to YouTube. So I did.

I discovered that there are a lot of how-to videos on YouTube about wire-wrapped jewelry. Search for yourself. I spent one evening watching about a half dozen of them, mostly by one artist. “Tried-and-Tested Wire-Wrapping Tutorial for Pendants” showed one basic technique and “Quick Wrap! Wire Wrapping Tutorial for Pendants” showed a quicker but less polished technique. Neither of them looked terribly difficult. I went to bed that night eager to get started.

Buying Materials and Tools

Fortunately, everything I needed was walking distance from my booth. Before I opened that morning, I went shopping for cabs. I bought two nice ones, then realized that since I was just learning, I should start with lesser stones. I found a booth selling some nice but apparently low quality ones for a lot less. I bought ten.

I closed up early (as I often do — seriously, how to people do 9 to 5 unless they’re busy the whole time?) and walked over to the booth where I could find tools and wire. Although the woman working there tried hard to sell me expensive square silver wire, I homed right into the silver-plated copper. I expected to make a lot of mistakes and didn’t want to screw up with expensive wire.

A comment about tools…

If you look at the two videos I linked to above, you’ll see that the woman who does the tutorials makes a point of saying that she uses regular tools — not special jewelry tools. Sure, you can use an Ace Hardware needle nose pliers and wire cutter to get the job done. But look closely at her work. Those ridges that make needle nose pliers so good for gripping also mark up the soft metal wire she uses to wrap the stones. I didn’t want those ridges on my stones so I bought the right tools.

Her husband was extremely helpful with the tools. They had a big selection with a variety of qualities. One video I watched discussed tools in some detail, so I knew what I needed to get started. He helped me find every one of them, including one that wasn’t displayed that he had to dig through stock to find. (He also recommended another tool, which I passed on but wound up buying the next day.) The tools weren’t expensive — they averaged $5 to $10 each. My initial investment in tools and wire was $35, which I didn’t think was bad.

In case you’re wondering what I bought, here’s a list:

  • Small chain pliers
  • Small flat pliers
  • Small round pliers
  • Wire straightener
  • Wire cutter
  • 18 gauge silver plated copper wire
  • 20 gauge silver plated copper wire
  • 22 gauge copper wire

First Tries

That evening, after dinner, I spread out my tools, pulled out some wire and a large teardrop-shaped labradorite cab, and got to work. I went with the quick wrapping technique in the second video I linked to above, using the 20 gauge silver wire. The biggest challenge was holding the cab and wire in place while I did the wire twisting required to hold it. I was almost surprised when I got the cab to stay in the cage I’d built for it. I then made and positioned swirls on the front of the piece with two of the leftover ends. I admit that I was kind of blown away by the results. The finished piece didn’t have the same polish as John or Dorothy’s work, but it sure wasn’t bad for a first try.

Labradorite Wrapped in Silver
My first finished piece: labradorite wrapped in silver-plated copper.

A closer look at the piece, however, reveals its problems. The biggest problem, in my opinion, were the small burrs I’d created in the wire by rough handling. Simply said, I’d used my flat pliers too aggressively and had damaged the soft metal wire. There were burrs on the decorative bends, especially on the back. This could catch on fine fabrics like silk or nylon, making the piece pretty much unwearable. Unless Dorothy knew a way to fix it, it would never be more than a piece for show.

My wire twists aren’t as neat as they could be, either. Although my spirals are very good with minimal tool marks, the wire joins are clumsy. Surely Dorothy would have tips to fix that, too.

I decided to try the more difficult technique on a small piece of bacon agate that the vendor in the next booth had polished up and given me the day I arrived. I really think that the desire to do something useful with this pretty little stone is what helped fuel my interest in wrapping.

Bacon Agate wrapped in Copper
My second piece was a small bacon agate stone gifted to me that I wrapped in copper.

I chose the thinner, 22 gauge copper wire for the job. I thought (rightly, I believe) that the copper wire would go well with the colors in the rock and the small size of the rock meant I needed a thin wire. I followed the instructions in the video to the letter to create the tightly wrapped anchor points that would form the cage around the rock. I was very careful to avoid overworking the metal; this was a piece I wanted to wear and I didn’t want burrs. I purposely made the bail small and loose and added a single swirl to the front. When I was finished, I was very pleased with my work.

I sent photos to a few friends and put them on Twitter. I got some positive feedback, which made me feel good.

I watched a few more videos before I went to bed.

Additional Efforts

The next morning, I went back to the tool shop and bought three more tools:

  • “Micro” chain pliers – to get into tighter places
  • Nylon headed flat pliers – to prevent marring soft metal
  • Bailing pliers – to make nice bends

Speckled Agate wrapped in Silver
My third piece was an oval of some sort of speckled agate wrapped in silver-plated copper.

I chose another cab from my collection of cheap ones: an oval stone that combines a white quartz with black and pink rock specks. (No one seems able to give me the exact name for this stone, but I will keep trying to find out.) Again, I went with the more polished technique that used tightly wrapped anchor points to build the cage. I ended up with spirals that I positioned over the area that had no colored specks. I think it came out good, although I wish I’d made the upper spiral a little larger.

I had a nice elongated piece of rose quartz that was actually two-sided and decided to get fancy. I’d do a bevel mount with a thin wire to weave the bevel and hold the stone. I walked over to the findings booth and bought two more types of wire for my quickly growing collection:

  • 24 gauge silver plated copper wire (for this piece)
  • 28 gauge copper wire (for future use)

Then I went back to my booth and got to work. I started off well, using the 18 gauge silver-plated copper wire for the edges of the bevel. When I brought the ends up and around, I created a really pretty spiral finish.

Around this time, a woman I’d seen around the show came by my booth. She was on a bicycle with a small, white, curly-haired dog in the front basket. She’d caught sight of me working on the wire wrap as I sat at the table in my booth. She also does wire work. I told her I’d just started and showed her my pieces. (By that time, I’d also bought a small glass-fronted box to hold and display my work.)

We chatted for about 45 minutes. She complemented me on my work, pointing out how nicely I’d used the swirls to fill the white space on the stone with the pink and black speckles. She said that the labradorite piece I’d chosen was not a good one, showed me how to look for features in labradorite, and explained the importance of finding good stones by “cherry picking” them. She told me about a big booth on the other side of the show that had decent quality, inexpensive cabs, as well as where to find more wire in a shop in town. She pointed out that the swirls in one piece could move if they were caught on the wearer’s clothing and gave me a tip about preventing that. She also told me about some inexpensive wire-wrapping classes being held evenings at the QIA building not far away.

While we talked, I tried to work on the piece. The distraction is probably what screwed it up — I accidentally shifted one of the thick wire frames while trying to weave it to the opposite side. My wraps were okay — neither good nor bad — but I’d made one side much smaller than the other, thus screwing up the bevel.

I had to run out to the post office so I closed my booth early. On the way back, I stopped at Hardies Beads and Jewelry in town. They sell mostly beads and jewelry (as you might expect) but do have a good selection of wire-wrapping wire at the back of the store. I wound up spending about $32 on a selection of wires in colors and styles, including an interesting 21 gauge twisted silver wire and various thicknesses of antique copper wire. I now had just about all the wire I’d need to move forward with additional projects.

Rose Quartz wrapped in Silver
My fourth piece was an incredibly boring round piece of rose quartz that I dressed up with fancy twisted silver-plated copper wire.

That evening, I tried to fix the bevel piece but failed miserably. I took a few photos of the design (which I won’t share here) so I could remember what I liked about it, then took it apart. I tried two other wraps on that stone and gave up before putting much time into it. But rather than finish the day with a failure, I picked a round rose quartz piece and did a wrap on that using the new twisted silver wire with a narrower wire for the wrap points. The stone was extremely boring — I honestly don’t know why I picked it — but the fancy wire and swirls I added really dressed it up a bit.

So at this point, I have four completed pieces, three of which can be worn.

Next Steps

It’s Saturday morning. Before I open my booth for the day, I’ll stop by that shop with inexpensive cabs and buy a few interesting ones. I feel better qualified to choose them now that I know how I can work the features of the stone into my work.

After I open my booth, I’ll settle down with my little bin of cabs and tools and wire. I’ll pick out a cab and work up another piece. And maybe another after that.

And I’ll likely do a few others on Sunday.

On Monday evening, I’ll bring my collection to Dorothy for her critiquing. I hope she’ll be honest and frank. I also hope she can offer good advice on doing the wraps and twists I find difficult. And teach me how to do bevels!

It might take more than one evening. That’s fine. I’ve told her I’ll pay for her time, although I don’t think she expected that. (She is a professional; she should be compensated when sharing her expertise with a novice.) We’ll both be here at least until January 25, so we have time for a few lessons. I’ll post an update on my progress — if I make any!