Creating a Photo Calendar with InDesign

An overview of how I did it and the results.

This year, I decided that I needed an affordable yet memorable holiday gift to send out to all my customers and the folks I do business with. I wanted this gift to be an in-your-face-all-year-long item. That means it had to be something the recipients would want to keep and refer to.

A calendar seemed to fit the bill.

Now every year, I get sample calendars with my company name on it from various printers who print promotional items. They’re usually pretty boring; certainly not the kind of calendar you’d want to use all year long. Clearly, I had to do better than that.

The solution was a custom calendar using the photos I’ve taken over the years to show off the places I fly to and my helicopter. The challenge was to make a professional-looking, attractive calendar that was cost-effective to print.

iPhoto’s calendar printing option was the obvious choice for creating the calendar. It offers several different formats, many of which would meet my needs. What did not meet my needs, however, was the price: $19.99 per calendar. Since I figured I’d need at least 50 of them, that was far more than I wanted to spend.

My husband suggested MagCloud, which I’ve been using for other print-on-demand needs. At first, I didn’t think it would work out. After all, MagCloud produces stapled magazines sized just under 8-1/2 x 11. But then I held a sheet of paper up to the Robinson Helicopter calendar on my wall. And guess what? It was the same size.

So I decided to go with MagCloud for printing.

At that point, it looked as if I’d be creating a 28-page calendar from scratch. Not something I looked forward to. But I did a Google search for 2010 InDesign Calendar Template, which directed me to the 2010 InDesign Calendar Template by Juliana Halvorson on the Adobe Web site.

I downloaded it and discovered that it was almost what I needed. The template assumed a landscape orientation. I wasn’t sure if MagCloud would accept the document created that way. So I modified the template to make it portrait orientation and rotated all the calendar grids. A few adjustments to the margins and bleeds (which I initially got wrong) and it was a good starting point for my own project.

First up was reviewing the holidays. Juliana had included several extra religious and “Hallmark” holidays that just weren’t appropriate for a general use calendar. I removed them. I also changed the wording of some holidays — for example, changing Thanksgiving Day to just plain Thanksgiving.

Then I needed to redo the thumbnail calendars for the previous and next month that appear on each calendar page. The type was just too small. That turned out to be a time-consuming chore, as I had to basically reformat each little calendar individually. But it was worth the effort; the numbers are now far more readable.

Here’s a little movie of the calendar’s pages. You’ll need QuickTime to view it.

Then the big task: finding the images I needed in my calendar — 12 full-page images and about 16 smaller ones — cropping them for the right proportions, saving them as TIFFs, and dragging them into my working file. It took me two full days to get the job done. In the end, it was very tedious and I just couldn’t wait to finish it.

Since the calendar’s pages had to be in multiples of 4, I had to stretch my 26 page document to 28 pages. That also meant filling in 2 more pages with something. I decided to put information about Flying M Air’s services, along with thumbnail images from the big pictures.

Once completed, I created the PDF MagCloud needed to print my calendar. The first upload (which took 4 tries on my miserably slow Internet connection here in Wickenburg) resulted in an error. I’d gotten the bleed measurements wrong. I fixed them and (fortunately) did not need to adjust the layout. Two hours later, after about 8 upload attempts, the file was online. The preview looked good.

I ordered the free proof and am now waiting for it to arrive. If it passes muster — and I’m about 95% sure it will — I’ll order about 50 copies to give as holiday gifts to clients and friends.

In the meantime, I’ve “published” the calendar so others can preview and (hopefully) buy their own copies. There is one caveat, however. Because MagCloud publishes magazines and not calendars, if you buy from MagCloud, you’ll have to punch your own hole in the top of the calendar.

I’ll be doing a lot of hole-punching next week.

Video Flight with a Tyler Mini Gyro

New client, new equipment.

September 2010 Update:
Flying M Air is now the proud owner of a gyro-stabilized Moitek video camera mount, which is available to aerial photography clients. Learn more about this mount here.

I got the initial call about a month ago. A videographer from the east coast had to shoot aerial video footage of two properties in the Mesa/Chandler area of Arizona. Was I available?

There was more to it. The videographer was looking for someone who could fly 20 to 40 knots sideways so he could get point of view (POV) footage out one of the rear doors (which would be off, of course). He planned to use a Tyler Mini Gyro and would likely be dangling his legs out the helicopter door while shooting. He had his own harness and had worked with R44s before. This, however, was his first experience with the Tyler mount.

I met him at Falcon Field in Mesa, AZ last Tuesday. We met at the Heliponents ramp. I knew Barry from Heliponents from a shoot he’d done at Monument Valley about two years before. He’d been flying either a JetRanger or a LongRanger helicopter and they’d put a full-blown Wescam ball with counterweight on his ship. I’d been based at Monument Valley, at the Goulding’s airstrip to provide helicopter flight services for aerial photographers at the valley for a few days. We chatted briefly. I remembered him; he remembered me.

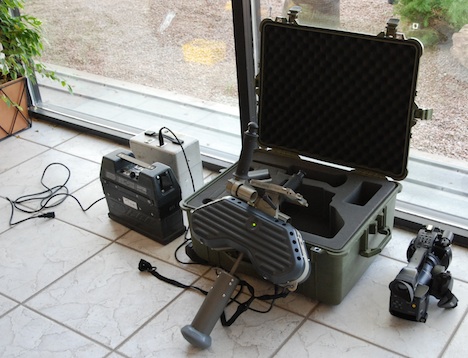
Tyler Mini Gyro

The Tyler Mini Gyro and its packing case, along with its run-up battery and the camera used with it. The mount can support much larger cameras.

Heliponents has a Tyler Mini Gyro that it leases out by the day. This $30K+ device is kind of like a monopod with a heavy duty, gyro-stabilized mount on top. There are springs in the monopod base, which is short and designed to sit on the user’s lap or between his legs in use. A large battery box provides 28 volt power. There are two adjustable handles to hold the entire thing. The camera goes on top. The two main parts — base and tripod leg– get tied off to the photographer or aircraft so it can’t fall out during flight.

I should mention here that I’ve done some work with video and gyros and wrote a lot about it here. We’d used a much smaller mount from Blue Sky Aerials called a Micro Gyro Mount. Our conclusion was that the best solution would have three gyros. This Tyler mount, although much more difficult to work with in a tight space, had three gyros. I was very interested in seeing the results.

My Client, in the helicopter

Here’s my client, posing for a photo before we started up and took off.

Barry and my client got the system set up. Barry ran up the gyros using one battery pack but planned to send us on our way with another, fully charged pack. I pulled both back doors off the helicopter. My client climbed into his harness. We brought the equipment out to the helicopter and wedged my client into the seat behind mine with it. We secured the big battery on the floor, then tied off my client and his equipment to the helicopter. He put his seatbelt on, too. I shot this photo before climbing in to start up. A while later, we were headed southeast, toward the first of two targets. I’d prepped in advance by converting the addresses to GPS coordinates using GoogleMaps, so we didn’t waste any time looking for the spot. We were on point within minutes of taking off.

The first site was difficult, with lots of high tension power lines. We needed to get footage of a golf course and two different clubhouses. My client likes sweeping, point-of-view shots, which meant I needed to do a lot of sideways flying while he shot straight out. The area was too confined to do any fast flying, but we did the best we could. One of the better series, which we repeated several times, had me flying sideways from north to south with the late afternoon sun at our tail. I’d start relatively high, off property, and come down lower as I flew in, breaking off near the clubhouse. The whole time, I was monitoring Falcon Field’s frequency, since we were right on the edge of its airspace.

We made quite a show for the folks on the ground, which is unfortunate. The video is supposed to just show the place from the air — but not with people gawking or waving (or perhaps shaking their fists?) at the camera.

For me, it was great, challenging flying. Sure, there are challenges in the other kinds of work I do, but aerial photo flying with a professional photographer who isn’t afraid to tell me exactly what he needs me to do is the most challenging of all. It forces me to really work for my money and it gets me in “the zone” — that place where I become one with the helicopter. And there’s nothing more rewarding than doing precision flying to complete a pass and having my client complement me when I’m done.

Of course, I have to admit that it was also easy. There was very little wind — less than 5 mph — and my single passenger weighed roughly what I do. The temperature was in the 80s, so density altitude was not an issue. I had no trouble flying sideways or even maintaining a lengthy, completely motionless, out-of-ground-effect hover. I couldn’t have asked for better precision flying conditions.

After spending at least 30 minutes over that property, we broke off to do the second property, which was farther south, in Phoenix Mesa Gateway (formerly Williams Gateway) airspace. As I was making contact with the controller, my client realized that the power cord had pulled out of the camera and the gyros had spun down. We flew lazy circles around the property for a good 10 minutes, giving the gyros a chance to spin up again. Then it was back to work shooting a clubhouse and some sports facilities. I think a shuffleboard competition was going on because the courts were full. The shiny court surfaces reflected the colors of the flags that flew on poles above them. And we realized that the folks waving to us from the pool might just be good footage to meet the marketing requirements of the videos.

We left Gateway’s space, then returned to our first property to redo a bunch of footage. We weren’t quite sure when the gyros got disconnected, so we redid most of it. Then we headed back to the airport. We’d flown over an hour on the mission; I’d also be billing for about a half hour or ferry time from my base in Deer Valley. (I’d like to note here that if I were still based in Wickenburg, I probably wouldn’t have gotten the job at all; no one wants to pay more for ferry time than mission flight time.)

Back at Heliponents, my client didn’t waste any time reviewing the shots he’d taken on a small video monitor he’d brought along. Most of them were great. He was very pleased. And I felt the kind of pride I usually feel when I realize that my helicopter and I form an important part of a photography client’s equipment.

As for the Tyler Mini Gyro, it costs roughly the same as the Blue Sky Aerials Micro Gyro Mount to rent (when you factor in shipping) and has the additional benefit of being available locally. I’m not sure, but it might be easier to use, too. While I think it’s overkill for my own little HD video camera, it’s a good match for the camera this client used or even larger models. I’m hoping I have an opportunity to recommend it to clients in the future.

At the Right Place at the Right Time

I tag along on a mystery tour — of the Kolb Studio living quarters.

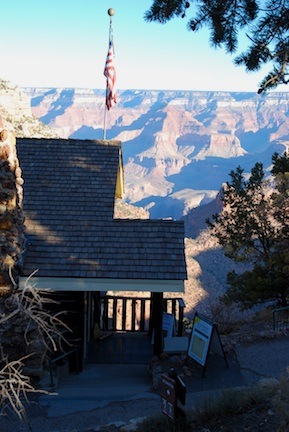
Outside Kolb Studio

The public entrance to Kolb Studio, which clings to the rim of the Grand Canyon.

If there’s any such thing as “luck” I think it has to do with being at the right place at the right time. People who are truly lucky can recognize such an alignment and take advantage of it.

Like I did yesterday.

I was in the Kolb Studio at Grand Canyon Village. The Kolb Brothers were the original photographers of the Grand Canyon. They shot more images of tourism at the South Rim — there are 60,000 negatives in the archives — than anyone else. They also made a movie of their boat trip down the Colorado River through the Canyon and it played daily at their studio for over 45 years, making it the longest running movie in the world. That’s what the Ranger told us, anyway.

Today, the Kolb Studio is known primarily as a bookstore and art gallery. The old movie screening room which is on the second level down, has been converted into a gallery. Last time I was at the Canyon, the gallery was closed for some reason. This time, when I stood at the top of the steps to look down into it, I saw that they were packing up artwork to ship it back to the artists.

But as I stood on that upper landing, a young, thin, female ranger walked by, followed, like a mother duck, by a long string of tourists. There must have been about 15 of them. They were walking purposely down the stairs, past the barrier that had been erected to keep people out. I asked one of the last people, “Is this a tour?”

“Yes. Go to the desk to see if you can join us.”

I knew that if I went to the desk, even if they said yes, I’d be too late. So I just followed them.

Mind you, I had no idea what the tour was about. I had time to kill and it was clear that these people were going someplace I’d never been before. I wanted to go with them.

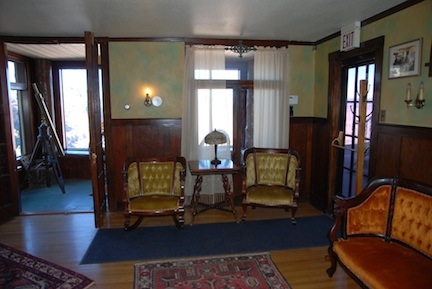
Kolb Sitting Room

The sitting room in the living quarters at Kolb Studio. Beyond this is a “sunroom” with windows looking over the canyon.

I’d hit the jackpot. It turned out to be a tour of the Kolb Studios living quarters — the home of the Kolb Brothers.

Emory and Elsworth Kolb were given a piece of land at the edge of the canyon by Ralph Cameron who owned Bright Angel Trail and a bunch of other land on the rim. This was back in the early 1900s and Bright Angel Trail was a toll road. The Kolbs were given the land with the stipulation that they were to collect the tolls when Cameron wasn’t around. The Kolb brothers built their studio — first a tent, then a wooden frame building — on the edge of the cliff. A window on the building looked out over the start of the trail. The Kolbs would snap photos of the groups of mule riders going down. Then one of them would run all the way down to Indian Gardens, which is 4-1/2 trail miles and 3,000 feet down, where there was water. He’d develop the glass plates, make prints, and run all the way back up to the studio. When the riders returned, the photos were ready for purchase.

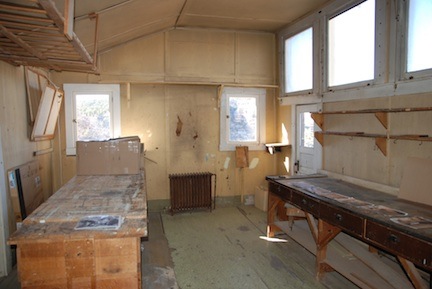
Inside Kolb Studio

Inside the actual photo studio. The window on right right is the one they took photos of mule riders through.

There’s a lot more history to the Kolb brothers, but I’m not about to retell it here. Check out the PBS documentary about them or look them up in Wikipedia to learn more.

The more interesting thing is the house. It was built with its top floor level with the canyon rim. Subsequent floors were added below that. So the house literally clings to the side of the cliff. And it looks as if it were built over time by people who cared more about functionality than architecture.

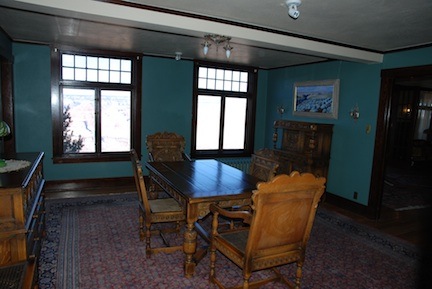
Kolb Dining Room

The dining room at the Kolb Studio living quarters. Those windows look right out over the Grand Canyon.

But inside — wow. A perfect example of early 1900 homebuilding. The house I grew up in was built in 1901, so I know the style. Plaster walls, wood floors, molding. And all the windows looked right into the Grand Canyon.

The ranger led us though about a dozen rooms, including the sun porch, sitting room, kitchen, bedrooms, dining room, and, of course, studio and darkroom. (The darkroom was added after water became available at the Rim.) We were invited to take photos — even through the window the Kolb Brothers had used all those years ago. It was fascinating and a real treat for me.

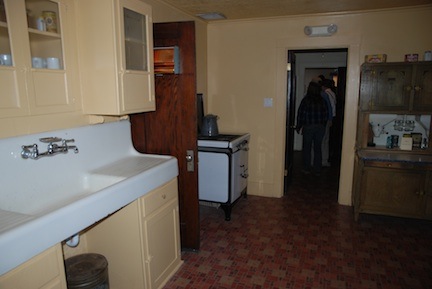
Kitchen at Kolb Studio

The kitchen at Kolb Studio.

Let’s face it: I come to the Grand Canyon at least two dozen times a year. I’ve seen all the usual things. I’ve taken photos from the rim trail and every single rest stop or parking area on the rim. I’ve visited all the shops and eaten in all the restaurants and stayed in all of the hotels. I’m at the point where I’m almost bored when I come here. Almost.

When I finished the tour, the first thing I did was call Mike to tell him. I think he was jealous. Heck, I’d be if he’d gone without me!

Shots from the Edge

Two photos from yesterday’s hike.

Yesterday afternoon, I hiked up Doe Mountain, a mesa west of Sedona, AZ. The mesa has sheer rock walls on all sides except the northwest — that’s where you’ll find a 8/10 mile trail that climbs nearly 400 feet to the mesa top. The top is almost completely flat with stubby trees, bushes, yucca, and various types of cactus and desert grasses. It’s an amazing place at any time of day; simply walk to the side of the mesa with the view you want, sit down on a rock, and suck it all in.

I went up there around 3:30 PM; sunset was around 5:30 PM. It took nearly an hour for me to do the hike. I can hike on flat terrain or downhill all day long, but make me climb and you’ll be waiting for me. I was by myself, so I didn’t hold anyone back. When I got to the top, I was hot and thirsty.

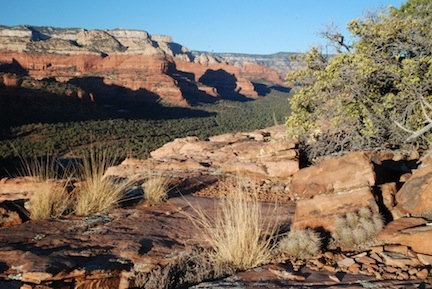
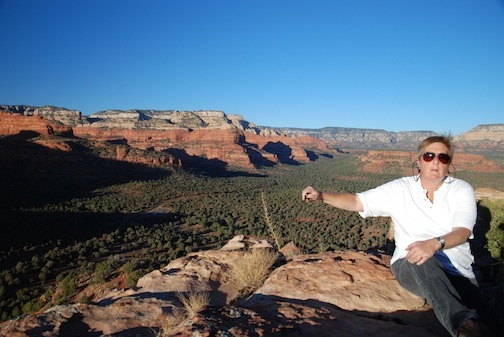
I wandered around as the light continued to soften and redden. I found an excellent spot for photos on the north side of the mesa and shot the two you see here. These are unedited.

From Doe MountainI’ve been experimenting quite a bit with foreground/background combinations. This shot of grasses, rocks, and trees with the red rocks in the distance behind them really called out to me. The foreground elements are on the mesa top. About 10 feet beyond them is a sheer cliff with a drop of 300-400 feet. The green trees you see beyond that are full-sized pinon and juniper pines. The red rock cliffs are several miles away. This one’s a “keeper” that I’ll likely put in my Photo Gallery. (That’s also why it’s so small here; I don’t share larger images unless they’re watermarked.) The only reason it’s not there now is that I haven’t had time to examine it closely and remove any optical imperfections due to dirt on the sensors. (It’s a never-ending battle against dust here in Arizona.)

Maria in SedonaThis second shot is a self-portrait. I broke my third wired shutter release and there’s no way I could have used the self-time for this. So I used the camera remote. Of course, the sensor for the remote is on the camera’s right side (when looking at the front) and I was sitting at the left. Hence the stretched out arm and rather cranky look on my face. It’s a dopey picture and I look like an idiot. I guess that’s why I like it.

Oh, and I was about 5 feet from the edge of the cliff in this shot.

More from this trip in future posts. I’ll have better WiFi in Page.

It’s All in the Preparation

What it takes to conduct a 6-day helicopter excursion.

On Sunday, I begin the fourth and final 6-day Southwest Circle Helicopter Adventure I’m conducting for calendar year 2009. The trip is the culmination of months of preparation, most of which happens in the weeks and then days leading up to the trip itself. I thought it might be interesting to some reader to see what goes into it.

A Year in Advance

I make hotel reservations for the weeks of the planned excursions a year or more in advance. I have to do this to ensure that I get rooms for my guests (and myself, in many cases) at some destinations.

The most troublesome destinations are Monument Valley, the Grand Canyon, and Lake Powell, in that order.

Zero Mike Lima at Monument Valley

Zero-Mike-Lima at Monument Valley.

In Monument Valley, we stay at Goulding’s Lodge, which overlooks the valley from the west. It’s not a big place and it has lots of historic significance. It’s also very popular with bus tours. That means it fills up quickly and early. I normally reserve a room with a king bed and a room with two queen beds. If the trip is sold, my guests get first choice based on preferences selected when the excursion is booked. Sometimes, however, I have to get two identical rooms. The other room is for me; there’s no where else within walking distance — I won’t have any ground transportation there — to stay.

At the Grand Canyon, I usually try to book rooms at Bright Angel Lodge (rim cabins with or without views), Thunderbird Lodge (standard rooms with or without views) or Kachina Lodge (standard rooms with or without rooms). I try in that order because, in my opinion, those are the best value rooms. Lots of people want to stay at El Tovar. I think it’s overrated. Sure, its historic — so is Bright Angel — but the rooms are small and cramped, just as you might expect in a 104-year-old hotel. They’re also very expensive — the more spacious rooms cost far more than the budget I’ve set aside for overnight accommodations. And although the hotel is right on the rim — so are the other three I listed — very few of the rooms have any kind of view of the canyon. Bright Angel offers a more rustic, historic experience steps away from the rim. Thunderbird and Kachina are more modern and motel-like but are also more comfortable. And let’s face it: when the sun goes down at the Grand Canyon, there isn’t much to do. A comfortable room is important.

As for me, I go with what I consider the best value on the rim: a half-bath room at Bright Angel. Sure, the shower is down the hall and there’s no television, but you can’t beat the location or price.

At Lake Powell, my guests stay at the Lake Powell Resort. It’s a huge resort complex right on the lake, with views, private patios, pools, a hot tub, restaurants, etc. I get lakeview rooms for my guests. They’ll spend nearly 24 hours at the resort and I want them to be comfortable. I don’t stay there, though. It’s too expensive and too far from the helicopter for me. Lately, I’ve been staying at the Days Inn across from WalMart. Less expensive, clean, and it has wifi.

Of these three hotels, I have to pay for the rooms at the Grand Canyon and Lake Powell up front. That means thousands of dollars in prepaid hotel expenses. I think of it as an investment. And when the excursions sell, I’m ready.

The remaining two nights — one in Sedona and one in Flagstaff — are usually relatively easy to book with at least a month’s notice. I don’t book them until an excursion is booked.

One last thing I do after booking: I modify the Southwest Circle Availability page on the Flying M Air Web site to clearly indicate what dates are available.

On Booking

Lookout Studio at the Grand Canyon by Maria Langer

One of my favorite subjects is Lookout Studio in the early light. (You can click it to see a larger version in my Photo Gallery.)

When an excursion is booked, I start by sending a package of materials out to my guests. The package includes a bunch of brochures, as well as a preferences questionnaire. They fill in the questionnaire with their preferences for rooms (for example, 1 king or 2 queen beds?), tours (for example, Antelope Canyon or Navajo Tapestry boat tour at Lake Powell?), and other options.

When I get the questionnaire, I start working the phones. I confirm and, if necessary, attempt to change existing hotel reservations. Sometimes I might have booked a non-view room at the Grand Canyon, for example, because that’s the only thing that was available at booking; I may be able to change it to a better room. I make new reservations for Sedona and Flagstaff. I also make reservations for tours. I book rental cars and rooms for me.

As I do all this, I’m entering dates and times and details into iCal, which I use for scheduling. This builds an itinerary for my guests. I’ll send them a PDF version of the itinerary for their approval. They may have some changes — perhaps they want to do their helicopter tour over the Grand Canyon a little later in the day to enjoy more time in Sedona that morning — and I’ll make them, if I can, when they tell me.

A Month Before

In the middle of each month, I look at the excursions scheduled but not booked for the following month. Then I work the phones again to cancel the hotel reservations I made for those dates.

Although I can cancel with as short a notice as two or three days, I’ve realized that it’s not a good idea to wait until the last minute. Not only can forget to do it, but I’d prefer to have the prepaid expenses refunded back to my credit card as soon as possible. Besides, with a month or less advance notice, I’m not likely to be able to get the rest of the excursion — other rooms and tours — booked satisfactorily. It’s best to just throw in the towel for those dates. I update the Web site to remove those dates so folks don’t try to book them.

Canceling all those dates takes the better part of a morning. There are a lot of dates in the systems and the reservation clerks don’t understand why. I have to explain it to them. I also have to make sure they only cancel the dates that need to be cancelled.

Accounting for the refunds is a nightmare. I have to match them in my accounting records by date. Although the hotels don’t usually make mistakes, sometimes they do. And it’s a real pain in the butt to fix them.

A month before a booked excursion is also when I take the 50% deposit from guests. I confirm with my guests that we’re still moving forward — this deposit is not refundable. I’ve never had anyone back out at this stage of the game.

Once I have the deposit, I send out the luggage, hats, and other goodies I’ve promised my guests. I provide the luggage so I know it’ll fit in the aircraft. They’re Totes wheelie bags. Admittedly, they’re not the best quality, but they’re lightweight and they will last for the entire 6-days of the trip, as well as through any baggage handling the airlines subject them to on the way to or from Arizona.

If my guests have requested dinner at El Tovar during their stay, this is also when I make reservations. You can make them as far in advance as a month; if you want until the last minute, you’re likely to be eating at 5 PM or 9 PM. I try to book for either a specific requested time or right after sunset.

A Week Before

I reconfirm all reservations about a week before a booked excursion. This takes about a half day.

I also fine-tune the itinerary and do a final check to make sure it’s correct and resolve any problems I might have found.

If my guests are flying in and I haven’t gotten their flight information, I call or e-mail them to get it. I also send them instructions for finding the Terminal Three helispot at Sky Harbor Airport if I’ll be picking them up there. I can’t leave the helicopter unattended there, so they’re responsible for finding me.

I also begin my daily weather checks, just to keep an eye on storm systems, temperatures, and wind forecasts. I’ll be checking the weather along the route every single day for the next two weeks.

Three Days Before

I take the final 50% deposit three days before the excursion. This is also when I do all the paperwork that goes into the guest package:

  • Receipt for payment.
  • Welcome letter.
  • Printed itinerary.
  • Sedona and Flagstaff street maps.
  • Grand Canyon walking tour, shopping, and dining brochures.

I create the flight manifests and weight and balance calculations for each leg of the helicopter flight. This is required by the FAA to be on board the helicopter during the flight.

The Day Before

The day before the trip, I go through the helicopter and pull any item that I won’t need to have on board for the flight. I reorganize the under-seat storage bins so it’s easy to find what I need. The seat behind me will be for luggage — mine underneath and theirs secured on top. I make sure the bungee I’ll need to secure the luggage is on board.

I’ll also add the items I need for a long cross country flight. I usually bring along 4 quarts of the W100+ oil I use — I can definitely expect to add at least one quart during the trip, but I sometimes need more. The oil is hard to find, so it’s better to have enough with me than to have to hunt for it. And for our flight over Lake Powell, I need life jackets, so I bring those along, too. And I stow the manifests I’ve created. I don’t need to consult them in flight, but they must be on board, so I put them in my Hobbs book under my seat.

I also make sure the helicopter and its windows are clean, that my spray bottle for cleaning the windows is full, and that my rags are clean. I do a thorough pre-flight, which I’ll mostly repeat the next day before the flight.

The Trip

On the first day of the trip, I meet my passengers at the predetermined airport. After introductions and hand-shaking, I give them a complete and thorough passenger safety briefing, pointing out things like the fire extinguisher and the location of first aid and survival equipment (under my seat). I load up their luggage — mine is already under that back seat — and secure it. Then I help them aboard, make sure they know how to operate the seat belt and doors, and close their doors securely for them.

Then we’re off. I won’t go into the trip details; you can read about a typical itinerary here.

As we fly, I tell them what I know about the terrain we fly over. I know the routes by heart — I’ve flown over them enough — but I still have occasional surprises: wild horses, a herd of antelope, mild turbulence where I don’t expect it, etc. I share just about everything I see with my passengers — they’re probably sick of listening to me by the end of their trip.

Lower Antelope Canyon by Maria Langer

In Page, my guests visit Upper Antelope Canyon. If I have time, I scramble into Lower Antelope Canyon with my camera and tripod. (You can click it to see a larger version in my Photo Gallery.)

At each destination, I have two goals: get my guests to their tour or other activity on time and handle the luggage. Every day’s activity is different and may have free time around it. I need to get people where they need to be and make sure they know how to get around — especially back to the hotel — for the day. Once I set them loose, I won’t see them until the next morning when we meet for departure.

I’m in charge of their luggage. At most destinations, our rooms are not ready for us when we arrive. That means I Have to either check or carry around the bags but be back for check-in time. When I check in my guests, I get a key to their room and bring their luggage in. I leave the key and, on the first day, I leave the welcome package.

I do this every day. The goal is for my passengers to enjoy a scenic helicopter flight to their destination, worry-free transportation to the central area, and time on their own for tours and other unscheduled activities. Anytime after check-in time, they can go to the hotel’s front desk, give the clerk their name, and get their key. Their bags are already waiting for them.

Heck, why can’t I find a vacation like this?

I also handle any arrangements for parking the helicopter, such as getting fuel, putting on the blade tie-downs, preflighting for the next day, and cleaning the windows.

The next day, I meet my passengers at the predetermined time. Although they usually bring their luggage with them, I can fetch it if they want me to. Then we head on out for the day. Some days, there’s an activity in the morning; other days, we just go to the airport and fly out to our next destination.

We do this for six days with five overnight stops.

Sedona by Maria Langer

I made this photo in Sedona during one of my excursions. (You can click it to see a larger version in my Photo Gallery.)

To be fair, I usually have most evenings and early mornings to myself. Once the bags are stowed in guest rooms — always by 4 PM — as long as the helicopter has been tended to, I’m free. I hike at Sedona and the Grand Canyon, do photo flights for other folks at Lake Powell, relax and blog at Monument Valley, and stroll around town and enjoy Thai food in Flagstaff. I take a lot of photos. I blog. This coming trip, I hope to work on a novel.

I have a huge amount of responsibility — these folks have paid thousands of dollars for a dream vacation. It’s my job to make sure it doesn’t turn into a nightmare. I take that responsibility very seriously. What I’ve found is that by doing everything I can in advance, the trip goes much more smoothly. And the more trips I do, the more smoothly each one goes — although I admit that the first one back in 2006 was the smoothest one of all.

When It’s All Over

On the last day of the trip, I return my passengers to the starting airport and see them off. If they liked the trip — and they always do — I get a nice tip. Then I bring the helicopter back to base, clean it out the best I can, and put it away.

The trip is expensive, but so is flying the helicopter. I’ve recently introduced what I call “a la carte pricing,” to reduce some of the sticker shock. Instead of paying for the whole package up front, guests can simply pay for flight time and my overnight costs. Then they’ll be responsible for taking care of all the other arrangements — hotels, tours, ground transportation, etc. — for themselves. That would certainly take a huge weight off my shoulders. But unless the guests want to skip overnight stops and tours, it won’t save them any money. My margins are tight; I don’t make much on each trip. I seriously doubt whether they could do it for less without sacrifices.

To my knowledge, I’m the only helicopter operator in the country offering these trips. After reading what it takes to conduct one, can you get an idea why? If that’s not enough to explain it, consider this: each time I take the helicopter away for six days, that’s six days that I can’t do any other for-hire flying — other than the occasional photo flight at Lake Powell. So my revenue stream is basically turned off for those six days. Not many helicopter operators would be willing to take a helicopter offline for six days at a time.

If you’re wondering why I don’t just fly back to base each night, consider this: it costs more to fly the helicopter for an hour than it costs to stay overnight at any of the destinations. And since we’re always at least an hour — and as much as three hours — away from base, it simply doesn’t make sense to go home every night.

Don’t get me wrong: I’m not complaining. I love doing the trips. I love sharing my knowledge of Arizona with my guests — especially folks from out of state.

And who could complain about an all-expenses-paid trip to five of Arizona’s most popular destinations — by helicopter?