The hard part is done. Finally.
As regular blog readers know, I decided to do all — or at least most — of the wiring in my new home. Although this might seem like a daunting task, it really isn’t a big deal once you get an idea of what you’re doing and gather together the right tools for the job.
The Basics
 I learned 90% of what I needed to know from an electrical wiring book I bought last year, Ultimate Guide: Wiring, 7th Edition. This book explains the basics and has lots of wiring diagrams to help ensure that I get it right. I’m a visual person and can easily match what I see in the diagrams.
If you don’t know much about wiring, here’s the gist of it: Every home has a number of circuits, each of which runs to one or more devices such as outlets and light fixtures. Normally, circuits serve a certain area — for example, my bedroom’s outlets and ceiling fan/light has a circuit and my bathroom has another.
Each circuit has a specific amperage or strength of electric current; 15 amps and 20 amps are most common, although some circuits have 30 amps (such as my dryer and water heater), 50 amps (such as my range), and 60 amps (such as my heat pump/furnace). The type of wire you use depends on the amperage of the circuit. For example, a 15 amp circuit needs 14 gauge wire while a 20 amp circuit needs 12 gauge wire. (For wire gauge, the smaller the number, the thicker the wire.)
U.S. electrical code, which forms the basis of state electrical code, has certain requirements. For example, I’m required to have two 20 amp circuits in my kitchen for the outlets and they have to be GFCI-protected. The bathroom needs a dedicated 20 amp GCFI-protected circuit. There are a lot of little rules like that, some of which are obvious and some of which aren’t. The Wiring book I have covered most of what I needed to know; friends with experience wiring their own homes filled in the gaps.
The Plan: There is No Plan

Here I am, dressed for a typical day of work: Layers of clothes to keep warm, tool belt so all my tools are handy, and kneepads for working on the floor.
When a home is designed by an architect or engineer, the plans include a wiring diagram. In my situation, I didn’t have this luxury. I designed my home so I had the complete freedom to design the electrical system, too. But rather than sit down and make a written plan, I did it all on the fly. After all, I was also the electrician.
This seems to confuse some people. In fact, one of my Facebook friends advised me not to post so much about doing my electrical work because he said the local inspectors could find out.
News flash: the local inspectors know. In Washington state, you can get an electrical permit as an owner/builder. Although the inspectors hold you to the same standards as a regular electrician, you are permitted to do all the work yourself. In fact, you’re required to — you’re prohibited from paying a non-electrician to do the work for you. So although I could have a friend come by and help me run wire — which sometimes required two people to do — I could not pay that friend. (I don’t think a few beers or half a rack of ribs at the end of the day is considered payment.)
At first, I was at a loss on how to proceed. It’s very daunting when you have no experience and face what looks like a huge task. But a friend told me to simply indicate on the walls where I wanted outlets and lights to go. I could do this by writing on the studs or nailing in the blue boxes that hold device wiring. Then I’d connect the boxes with the appropriate type of wire for the circuit I needed to run. Finally, when I was done, I’d run a “home run” of wire from the first device on the circuit back to the circuit panel downstairs.
And this is pretty much what I did. I went through my home, one room at a time, and nailed in the boxes. Then I strung them together in logical groups and ran the home runs.

This is probably the most complex box in my setup. It has switches for three separate circuits: a three-way switch for the light over the entrance downstairs, two switches to control the wall sconces in the living room (three on each switch), and a three-way switch to control the light in the hallway. One circuit is 20 amps; the other two are 15 amps each.
Of course, I made lots of mistakes along the way. Most were silly mistakes, like running the wrong kind of wire or putting an outlet in a dumb place and having to move it. I got good at removing wire staples and those blue boxes. I can’t think of any serious mistakes — other than what the inspector found; more on that in a moment — but then again, maybe I’ve blocked them out of my mind.
I worked at a leisurely pace, doing it in my free time. I admit that I wasn’t very motivated. For a while, I didn’t expect to make the next big steps on my project — namely insulation and drywall — until late in the spring. And having no heat upstairs as winter arrived made it even less appealing to get the work done.
But in early December, I took advantage of Home Depot’s Black Friday appliance deal and bought all five appliances for my home: washer, dryer, dishwasher, range, and refrigerator. I put off delivery as long as I could — 90 days. And then, a week later, I finalized my kitchen design with the folks at Home Depot and ordered my cabinets. After Christmas, I ordered my countertops — yes, granite!
Sometime right after Thanksgiving, after getting some very good news from my divorce lawyer, I decided to forego my planned winter trip to California and Arizona — I don’t call my current home a “mobile mansion” for nothing — and, instead, finish up my new home as quickly as I could. I had the heat pump/furnace installed and dove into the electrical work I needed to do. (I also hired a plumber to do the rough in for my water lines and drains — I’m so glad I didn’t do that myself as I’d originally planned.) If you’re a regular reader, you may have seen my walk-through video, shot last week.
A Little Help from My Friends
There were three difficult (for me) parts of the project that I needed help with:
- Attaching the ceiling fan fixture boxes to the ceiling in the living room and bedroom. My ceilings are high — they range from 10 to 20 feet with the ceiling fans at about 15 feet. Although I had a scaffold to climb on, my fear of heights kicked in without the guardrails around the scaffold top. (The design of the rail makes it impossible to install it on my scaffold when both six-foot units are stacked. My living space has a high ceiling, but not that high.) My friend Don came to the rescue, hanging all three boxes and running wire to two of them. He would have done all three but I ran out of the necessary wire. I managed to get my wits about me enough to run the final 50 feet. Don also helped a few days later when I needed to run ceiling outlets in my garage bays for future garage door openers and he cut the hole in my living room floor for a floor outlet.
- Setting the fixture boxes for my deck and garage bay lights. Part of this was my fear of heights again; another part was just not knowing exactly how to do it. My friend Tom came to the rescue, climbing a ladder out on the unfinished deck, drilling through my metal building, and screwing the boxes into place. I helped by handing him tools and making the rear supports out of scrap wood that had to be cut to size. Later, I did all the wiring for these boxes. The trick, I learned, is not to look down when standing on a stepladder perched on a piece of plywood on the frame for a deck 10 feet off the ground.

I don’t think I could have run this heavy 6/3 wire from my kitchen island to my circuit panel in the garage ceiling without Pete’s help.Running the home runs for my range, water heater, and dryer. These three circuits required extremely thick wire. Although I was able to come up with a good route and drill all the holes needed to bring the wires to the panel, I simply lacked the physical strength to get the wires through the holes on the last 20 or so feet of the run. Pete came to the rescue, stopping by after a day of snowboarding up at Mission Ridge. In less than an hour, we’d pulled the wires into place. He also volunteered to make a slight adjustment on one of my doors that he thinks might get sticky over time.

I also got help and moral support from other friends:
- Bob helped me back in September when I needed to set up my electric meter and circuit panel.
- Barbara came by a few times to keep me company and help me run wire. She was a huge help when I had to get the 4 gauge wire run for the heat pump/furnace.

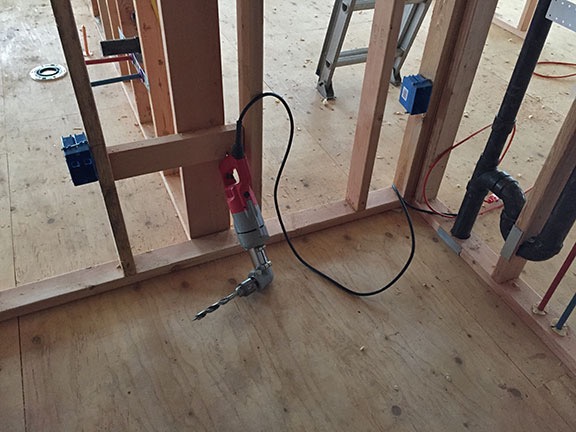
Mike’s most excellent (and powerful) angle drill. Yep, this is the one that nearly crushed my finger the other day.Mike came by with a pizza one day and stuck around to help me run a few home runs from the kitchen area to the circuit panel. Mike is also the guy who loaned me his excellent angle drill. I can’t tell you how many times I used this drill — and how glad I was to hand it off to him at dinner yesterday.

I still can’t believe how many great friends I have here.
I also have to thank the folks at Dick’s Heating and Air Conditioning. Not only did they do a great — and unusual — install of my HVAC system’s heat pump/furnace, helping to warm the place, but they graciously left behind their man-lift. I drove that darn thing all over my garage, using it as a platform for drilling holes in the floor joists and running wires in them. It also came in handy to run a few of the home runs. The plumber made use of it to lay in the drains under my third garage pay. And I expect that both the insulation and drywall guys will use it on the big wall between my living space and RV garage. Don’t worry, Ken! I’ve been taking good care of it, keeping it warm, dry, and charged.
Inspection
My electrical inspection was yesterday and I did a lot better than I expected. I’m not sure what the inspector liked more: the way Tom and I had set up the light fixture boxes for my deck or the Ken Burn Jazz CD music coming out of my shop’s stereo — he commented on both of them.
Of course, it wasn’t perfect. (Wouldn’t that be sweet! And amazing!) There were just three corrections needed, two of which required some wiring changes that I got done yesterday after the inspector left:
- My refrigerator, which I’d put on its own 15 amp circuit at the advice of a friend who had done the same, needed to be on one of my two kitchen circuits. That was kind of a bummer because that’s how I’d originally planned to do it. Running the extra circuit had been a bit more work that I didn’t need to do. I ran some 12/2 wire from the last countertop outlet to the refrigerator cubby and removed the 14/2 wire for the home run. Total time to fix: 30 minutes.
- My over/under counter lights and kitchen exhaust fan, which I’d put on the kitchen circuits, were not supposed to be on those circuits. I ran the lights from my loft circuit and the exhaust fan from one of my living room circuits. In each case, I needed less than 10 feet of wire and the fix took about 30 minutes.
- I hadn’t provided grounding pigtails as necessary throughout the wiring job. (What this means: Because all the circuits are grounded, each device needs a bare or green wire to attach to it. Any time there are more than two sets of wires in a box or two devices to be installed in the box, they need to be connected with a grounding wire attached to them. This is done with a green wire nut.) I knew this and I’d done about 80% of them before inspection, kind of hoping the inspector wouldn’t notice the ones that were missing. I think that if I’d done 90% of them, I would have gotten away with it. (I did plan on doing them all properly for the final wiring job.) I started going through my home, box by box, checking and fixing this problem as I found it. It takes less than 5 minutes to fix one of these. All I have left is the deck and the ceiling fans. (Reminder: don’t look down.)
I figure that I can call today for a re-inspection and the inspector will come out on Friday to approve of my work. In the meantime, he approved me for insulation, meaning that I can get the place insulated but not drywalled. If he approves on Friday, I can drywall, too.
What’s Next

In this example from the box inside the door to my front deck I’m going to have three switches. On the left will be a three-way switch that controls the five lights on the north deck; the other switch will be in my bedroom by that door. In the middle will be the spotlights for the front deck, which I consider my “entertaining deck.” On the right will be the switch for the small light beside the door, which will offer a dimmer alternative to the spots. My deck will be an important part of my living space. Note the three bare round wires and three black power wires — one for each switch.
The insulation guys get to work on Thursday — yes, tomorrow! If I get the approvals I need, the drywall guys, who work for the same company, will come in right after them. The same company will texture and paint the walls and ceilings — not sure exactly when because I have a trip coming up.
The wiring is far from done. So far, only the hard part is done. My home is full of blue boxes nailed to the walls and ceilings with wires and green wire nuts sticking out of them. I have to go through and change all of those to outlets, switches, light fixtures, and ceiling fans. I don’t think they need to be inspected again, but who knows? I take things one step at a time.
Meanwhile, outside my circuit box is a bunch of wires just hanging out of the wall. Eventually, they need to be brought into the panel and attached to circuits. My friend Tom will help me do a few of those today so I can have power upstairs.

I ordered six of these wall sconces for my living room.
I’ve started buying light fixtures: flush-mount sconces for the living room, bathroom, and deck; ceiling fans for the living room and bedroom, track lights for the hallway and kitchen, hanging pendants for over my breakfast bar. They’ll go in when the drywall and painting is done.
The kitchen cabinets arrive February 16 and, with luck, can be installed that week. The appliances arrive at February month-end. Once they’re installed, the countertop people will come and measure for their template; I expect the countertop to be delivered and installed in March.
And then there’s the bathroom…
But now I’m looking too far ahead. I need to remember: one step at a time. It’s amazing how it all falls together when you can make it happen.
And yes, I’m enjoying this project immensely. It’s so rewarding to see something you dreamed up become a reality. It’s great to have a hand in the actual work and to be there for every step of the way.
Despite the occasional difficulties and hurdles, and despite the sore arms and fingers from pulling wire and working with wire nuts, it’s an experience I will cherish forever.