The Great Loop

I read a book about a trip I’d like to take.

Although it’s still very much winter here in North Central Washington State, my mind has been somewhat consumed with boating these days.

If you’re a regular reader of my blog, you may remember the post I did some years ago about an ill-fated trip to a friend’s house out in the San Juan Islands. (It was an ill-fated post, too. The friend I wrote about seemed to take great offense at what I’d said about him and another friend apparently read between the lines and thought I was blogging about her. My response to both: Really?) In the post, I mentioned my friend’s boat, which I really liked, and how I wanted to get a similar one.
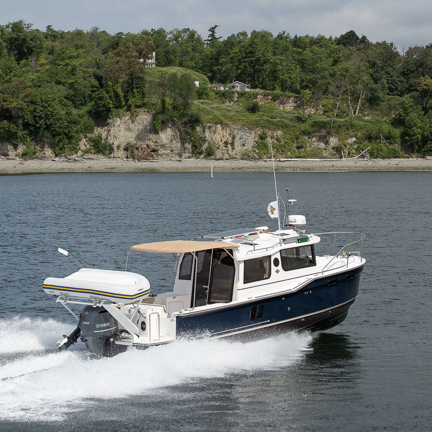
Ranger Tug R-27
Spending four winters in a row in a truck camper has really prepared me for long-term living on a boat this size. It’s basically my camper on a boat.

Over time, I discovered the 27-foot Ranger Tug that I have my eye on. This boat has all the comforts of home — well, at least all the comforts of my truck camper — in a towable package. That means I could store it in my garage between long trips out on the Columbia River, Lake Chelan, Roosevelt Lake, the San Juan Islands, and the Inside Passage. I could even take it south for the winter — imagine spending December and January on Lake Havasu in Arizona?

I also began thinking of other adventures where I could take such a boat. I immediately thought of the Intracoastal Waterway up the east coast of the US. And then maybe up the Hudson River. And the Erie Canal to the Great Lakes. And wouldn’t it be amazing if I could find some way down the Mississippi back to the Gulf of Mexico and around the Florida Keys back to my starting place?

What I had just imagined was something that actually existed and had been accomplished by many people: the Great Loop.

The Great Loop

Per the America’s Great Loop Cruiser’s Association website,

The Great Loop is a circumnavigation of the eastern U.S., and part of Canada. The route includes the Atlantic Intracoastal Waterway, the New York State Canals, the Canadian Canals, the Great Lakes, the inland rivers, and the Gulf of Mexico. “Loopers” take on this adventure of a lifetime aboard their own boat.
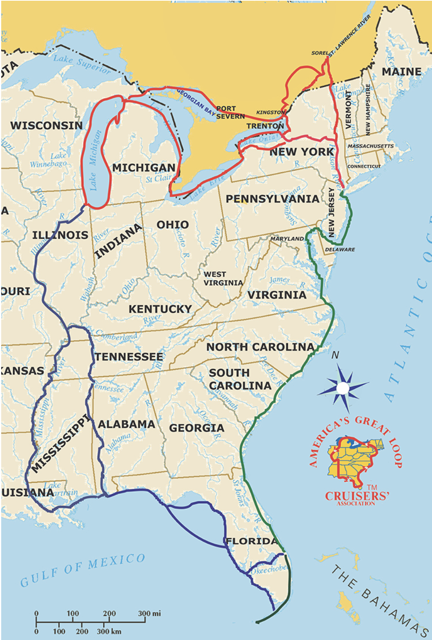
Great Loop Map
Here’s the map of the route. Note that there are two ways to get from the Hudson River to the Great Lakes, two ways to get through the Great Lakes, two ways to get from Illinois to the Gulf of Mexico, and two ways to navigate Florida. This makes it possible to do the trip a number of different ways.

The website has a wealth of information about this roughly 6,000 mile journey, including many resources for learning about the route and points of interest along the way. Honestly, the website can tell you a lot more about the Loop than I can; I’ve only begun exploring it.

A Challenge, An Adventure

If you know me well, you should know that I live for challenges. I’ve had three successful careers (so far) for a reason: I get bored easily. After an initial start in the business world as an auditor and financial analyst — what was I thinking? — my writing hobby turned into a career as a freelance writer. When that generated a bunch of fun money, I learned to fly helicopters, bought a helicopter, and turned that into a career as a helicopter pilot. These days, I’m keeping myself amused by learning jewelry skills and techniques, but I can’t really call that a new career — at least not yet. (Maybe in a few years?)

In each case, it was the challenge that drove me, even if I didn’t realize it. I always want to learn and do new things. I want to get good at them. When I can actually earn a living doing them, I’m rewarded and motivated to do and learn more.

Taking a boat on a 6,000 mile trip on rivers, oceans, canals, and lakes — now that’s a challenge.

I’ve always been a bit of an explorer. I bought a Jeep to explore the desert on the ground. I’ve used helicopters to explore the desert, mountains, canyons, lakes, rivers, coasts — you name it — from the air. In the past, I’d done boating trips with a focus on exploration: a rafting trip down the Colorado River through the Grand Canyon, a house boating trip on Lake Powell, small boat trips on the Hudson, East, Harlem, Colorado, and Columbia Rivers, a 12-day cruise up the inside passage on a small boat. Imagine how much I could explore on a Great Loop trip!

Of course, there are hurdles to jump. Getting the boat and learning to pilot it safely and effectively is the first big challenge. Learning what I need to know to plan and execute a long boat trip is another. This isn’t something I would do without proper preparation. But as I research the things I need to know, I realize that it’s definitely doable. A real goal for my post-retirement years.

Reading First Person Acounts

I started my research about six months ago, before I went south for the winter. I searched for books about the Great Loop. There are a lot of them. It seems that many people who do this journey like to write books about it.

There are different ways to do the trip and a lot of them depend on the size and style of the boat you’re doing it with. I wanted to read books written by people kind of like me — not super rich, motoring in a smallish boat. (Yes, 27 feet is considered small for this trip.) A lot of the books out there were by couples in giant yachts and I didn’t want to read those. Chances are, I’d have a budget for the trip, which meant I wouldn’t be able to spend every single night along the way at a full-service marina. I’d have to boondock (the RVing word) or lie at anchor (the boating phrase) for at least half the nights. So I wanted to read books by people who had similar experiences to what I might have.

I sampled a few books in Kindle format and wasn’t very impressed. One of the drawbacks of this age of self-publishing is that anyone can do it — even if they can’t write. One book sample read like an infomercial for the book, with lots of repetition and apparently no editing. Another was similarly uninteresting to me, although I can’t remember why. But a third…well, I thought that had promise. I bought it and read it yesterday.

A Book Review
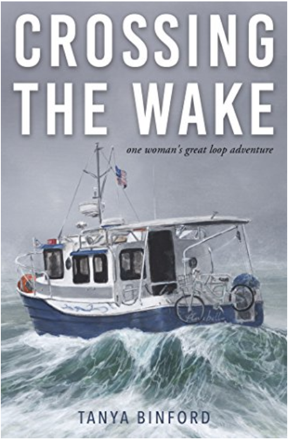
Crossing The Wake
Here’s the book I read first about motoring the Great Loop.

Crossing the Wake: One Woman’s Great Loop Adventure by Tanya Binford is almost the kind of book you might expect. The subtitle tells you that the book is about a woman’s trip doing the Great Loop and hints that she’s doing it alone (which she mostly did). I tend to shy away from women’s books because I have trouble identifying with the themes they usually include: the trials of motherhood, dealing with sexual discrimination, and fighting male dominance. This book, fortunately, didn’t have much of that — although it certain had more than enough for me. Unfortunately, as I discovered while turning page after virtual page, it didn’t really have what I wanted to read, either.

You see, although the author wrote this book about her journey, it read more like a catalog of fears, challenges, and social activities than a travelog. With virtually no boating experience, she decided she wanted to do the trip. To prepare, she moved from the Arizona desert to the coast of South (I think) Carolina and bought her young adult son a boat. Over and over again, she tells the reader how little confidence she had in her skills while she let her son do the piloting. She shares many anecdotes about needing the help of a man to do one thing or another. Yet she buys one boat after another to learn what she needs to know and build her skills. That’s admirable, but I don’t believe she had the skills she needed when she finally started the trip.

The first part of the book explains what she was doing for a living — she was a psychiatric registered nurse who was able to meet with patients through video calls (this was before the pandemic) — with side stories about some of her patients, co-workers, and bosses. It also covers some of her preparations, with lots of details of the (mostly) men who helped her and the (mostly) women who worried about her doing the trip on her own.

The second, longer part of the book was about the actual trip. Here’s where the definition of “solo” gets hazy. You see, although she was alone on her boat for most of the trip, she also traveled among other “Loopers” who she would see, on and off, throughout her trip. The book is one story after another about meeting this couple/boat here and that couple/boat there and having “docktails” and dinner and shore trips with all these people. It was a social report. There were very few details, especially in the first part of the trip, about navigation, points of interest, or the traveling itself. When she did try to give details, she fell short or used incorrect names. (It’s New York Harbor, not Hudson Bay (which is in Canada); the New York Thruway, not the New York Expressway and the Tappan Zee Bridge, not the Tappen Zee Bridge. These are the things I caught because I know them; how many other mistakes did she make?)

Along the way, she confirmed, over and over, that she was in way over her head on this trip, lacking either confidence or skills that she really should have had. And if that wasn’t bad enough, halfway through the book/trip she admits that the autopilot and radar don’t work properly. (I cannot, for a minute, imagine taking a boat on a 6,000-mile solo trip without an autopilot, let alone drive a boat in unfamiliar water in fog without radar yet the author did both.) Yes, she survived the trip, but I felt that she struggled with her own shortcomings to do so.

What did I want from the book? I guess I just wanted more details about the trip itself. More about navigation, overnight stops (other than to name them), unusual boating/navigation rules/situations. She did provide some of this, but not nearly as much as I wanted. Instead, I was treated to her stories about her bullying her mom on part of the trip, men who made passes at her, and her emotional turmoil when another boater she’d had a fling with found another non-boating woman and married her.

And frankly, I found her side story about a patient who had killed herself when she (the author) left her job to start the trip disturbing and unwelcome.

If the author happens upon this blog post and reads it, I’m sorry to be so brutal. But I’ve filed this book with most of the other “women’s books” I’ve come across. I probably should not have read it.

Did I get anything out of the book at all? Yes. I learned that a woman with very little experience driving a boat slight smaller but similar in style to what I want to buy completed the trip by herself.

If she could do it, so could I.

Making Plans

So I’ve set this up as a new goal for myself: motor the great loop before I turn 65. I have just over 5 years to:

  • Get back in shape. I’ve let myself go a bit and that’s causing aches and pains that I simply should not have at my age. Time to slim back down, get more exercise, and prep for being able to walk a very narrow gunwale.
  • Buy a suitable boat. That Ranger Tug is looking good, but I do have a friend trying to talk me into something else, so I’m not 100% sold on it yet.
  • Spend a lot of time on the boat to become an expert on handling it. This might sound weird, but to me, flying a helicopter in most conditions is like driving a car. I’d like to get like that behind the wheel of a boat. Practice — especially practice in challenging conditions like wind, currents, and rough water — makes perfect.
  • Spend some time with a boat mechanic. The goal is to learn the basics of what might break and how I can fix it — or at least enable to limp to a marina for a real fix.
  • Learn everything I need to know about navigation on the Great Loop’s waterways. There’s a lot to learn — including navigation on Canadian waterways.
  • Prepare the boat for a very long trip. That includes a last-minute tuneup of the engine and other systems and packing the gear I’ll need (and leaving behind the gear I won’t).
  • Get the boat to a starting point, launch it, and get under way. Whether I do this alone or with a travel companion depends on what’s going on in my life when the time comes to start.
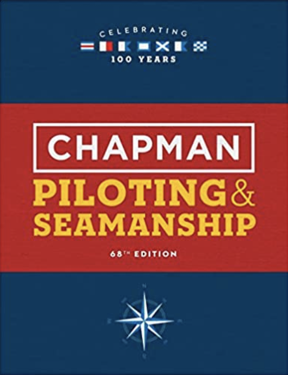
Chapman Piloting & Seamanship
Chapman Piloting and Seamanship is the bible for learning about boating in the United States. I’ve got this book in print and in Kindle format and have been reading various chapters to immerse myself in boating information.

A lot of this actually ties in nicely with a related goal: getting my boat captain’s license. I’d like very much to be able to make a bit of income with this boat since it’ll cost so much to acquire and operate. (But still not as much as a helicopter.) Even if I make enough to cover my personal boating costs, I’ll be very happy. But to legally do that, I need the proper boat captain’s license, which requires experience on the water, training, and passing scores on a test. I’m already beginning to study for all that.

But whether I become a boat captain or not, motoring the Great Loop is a set goal. Let’s see if I can do it.

Leaving a Parked Helicopter with the Engine Running

An explanation of something I said in one of my recent YouTube videos.

I recently published a video on the FlyingMAir YouTube channel where I flew from my cherry season landing zone to my house. I was going to do a much longer flight that day with a friend and, when I reached the helicopter, I realized I’d forgotten my iPad, which I use with Foreflight for situational awareness and detailed airport information in flight. Faced with a choice of taking 20 to 30 minutes to drive back home and get it or just making the one minute flight up to my house on my way to pick up my friend, I went with the quicker option.

In the video, as I’m coming in for landing, I lament that a helicopter isn’t like a car and I can’t just keep it running while I go inside the house. I never explained why. A helicopter pilot — and even an airplane pilot — should know, but I forget sometimes that my video audience isn’t always directly involved in aviation. I got several questions — and a good story — in the video comments about leaving an unattended helicopter with the engine running. I thought I’d take a moment to share and expand on what was said in those comments.

First, Understand How a Helicopter Flies

The main danger of leaving a helicopter running while unattended is the possibility of it become airborne enough to move and crash. Never fear — if it does get airborne at all, it’s not going to fly away by itself. It will crash and likely pretty damn quickly. More on that in a moment.

Dynamic Rollover
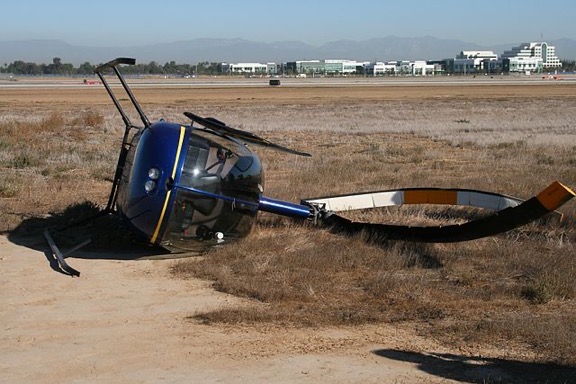
The usual outcome of a helicopter trying to take off by itself is something like dynamic rollover, which is shown here. The helicopter gets hooked on something on the ground and rolls over. (This photo by John Murphy is from Wikipedia and used under the Creative Commons Attribution-Share Alike 2.0 Generic license. (Thanks, John, for sharing photos to help bloggers illustrate things like this.))

For a helicopter to get light on its skids and airborne, it needs a two main things:

  • Rotor RPM. The main rotor(s) must be spinning. Theoretically, a Robinson can fly at 80% RPM plus 1% RPM per thousand feet of density altitude. So at my house on a warm summer day, I’d estimate 83% RPM would be enough to fly, although we always fly at 100% RPM (unless there’s some sort of in-flight problem that makes this impossible, in which case, we’d land as soon as possible). For this reason, it’s never a good idea to leave the rotors spinning at anywhere near 100% RPM unless the pilot is at the controls, paying attention and ready to fly.
  • Collective Pitch. The collective control in the pilot’s left hand changes the pitch on the rotor blades the same amount (collectively) when it’s pulled up. With the collective full down, the blades are “flat” (or close enough for argument’s sake) and should not be able to get the angle of attack they need to produce lift. (And yes, the collective does look quite a bit like a compact car’s parking break lever.)

It’s the pilot’s responsibility to throttle down to an appropriately low RPM when on the ground. A Robinson’s cool-down RPM is between 60% and 70%; far too low for the helicopter to fly. When I flew at Papillon years ago, we’d just throttle down to the stop, which I think left us at around 70% RPM (but don’t quote me on that; it’s been 16 years). There are a few reasons why a pilot might not do this, but we don’t need to split hairs here because all of those reasons involve a pilot staying in the cockpit.

All the helicopters I know provide safety controls to prevent the collective from creeping up by itself. This is usually in the form of a collective friction lever (or possibly knob?) that the pilot should secure as part of her shutdown process. It becomes automatic. You set down, you throttle down to a cool-down or idle RPM (depending on your needs), and set the friction. Half the time, I don’t even remember doing it, but when I look down, it’s set.

So Is It Safe to Leave the Engine Running without a Pilot on Board?

Doing both of these things — reducing RPM and securing the collective in a full down position — should prevent a helicopter from misbehaving when parked when the engine is running. And lots of pilots will actually walk away from a helicopter with the engine running. Let me elaborate.

Suppose I was sitting in the helicopter with the engine running and I realized I needed something out of the back seat storage area. I need to get out to fetch it. Would I shut down?

The answer is no. I’d start by confirming low RPM and secured collective. Then I’d take off my headset and seat belt, open my door, climb out, open the back door, fetch what I needed, close the back door, and get back into my seat. During that entire time, I’d be well within reach of the controls if I started to hear or feel something weird going on.

Likewise, when I worked at Papillon, they’d routinely land a Bell 206L in the Native American village of Supai at the bottom of the Grand Canyon. The pilot would throttle down and secure the collective, then get out, walk around the front (never back!) of the helicopter, open the luggage compartment, and pull out luggage for the departing passengers. (That was back in 2004; I have no idea if they still do this but assume they do. It makes sense given the possibility of restarting difficulties without a ground support crew/equipment.)

Meanwhile, up at the Grand Canyon South Rim base, if a pilot needed to use the bathroom between flights, he’d have to wait until another pilot came down and sat in his seat until he returned. No passengers would be loaded during this time. This was a smart safety measure that some folks might consider overkill. I don’t.

A friend of mine who owned an R44 started up his helicopter on the ramp of his home base airport, which, at the time, I believe was Salinas in California. As he was warming up the engine, he realized he was missing a chart. Rather than shutting down, he simply left the helicopter empty, idling on the ramp, while he went to the on-airport pilot shop and bought the needed chart. He got into a ton of trouble with airport management when an airplane pilot complained about it. Friend or not, I think he exercised poor judgement when he did that.

The Story in Comments

One of my YouTube channel’s commenters, George Reynolds, had this to say about my video:

Not like a car, leaving the engine running. Reminds me or a true accident report where the pilot landed beside a house to impress a friend and got out, leaving the 3 forestry workers in the helicopter with the engine running. One of them thought the “handbrake” ought to be applied and the consequences was a wreck, but fortunately no injuries….

My first thought was OMG, what a story! It’s a perfect example of what can happen when a pilot fails to properly brief his passengers.

Going back to my original situation, if I had a responsible adult passenger in the front seat when I landed at my house, I’d throttle down, secure the collective, and advise the passenger to leave the controls alone, especially the collective, which should not be raised under any situation. Then I’d feel comfortable enough leaving the engine running.

What Could Happen

George’s story sent me to the NTSB database to look for the accident in question. I searched using all kinds of key words based on his story: handbrake, brake, house, passengers, pulled collective. I did not find a single story that matched.

But I did find others. Here are a few summaries; emphasis added:

Accident report LAX97FA149 on April 7, 1997 in Los Angeles, CA tells this story:

The pilot exited the helicopter to escort a deplaning passenger. The student pilot rated passenger was left sitting in the helicopter with instructions not to touch the controls. While the pilot was standing nearby, the helicopter began bouncing up and down in a resonant mode. The pilot ran back to the helicopter and pulled the fuel flow control lever into the cut-off position. The helicopter yawed to the right and settled back on the deck. Investigation revealed the full down position of the collective was spring loaded to keep tension against the control lock. An inspection of the helicopter revealed that the collective was not down and locked, nor were the frictions tightly applied. The manufacturer reported instances in which the collective lock was not seated properly, and consequently, the collective became released while the engine was running. If the lock slips off collective, the spring’s tension could force the control to move upward. No malfunction or failure was found with the engine or rotor systems.

So either the pilot hadn’t locked the collective or the collective lock had released due to a known design flaw.

Accident report LAX07CA034 on November 11, 2006 in Boulder City, NV says:

The helicopter rolled over after the pilot exited with the engine running and rotors turning to disconnect and move the auxiliary power unit (APU) to a secure location. The pilot left the helicopter running at 100 percent because he was charging the battery. The pilot’s back was to the helicopter when he heard the engine sound change. He turned around, and saw the front skids lift off the ground. The helicopter started to move in a backwards direction, and rolled over and went down an embankment.

Sorry, folks, but this is a stupid pilot trick, plain and simple. Never leave the helicopter at 100% RPM when there’s no pilot at the controls.

Accident report LAX01FA252 on July 21, 2001 in Los Angeles, CA reports:

The pilot got out of the helicopter with the engines running and the rotors turning to check on the security of a cabin door, and the unmanned helicopter began moving on the helipad and rolled over. The pilot had completed a nightime, helicopter, air taxi flight, and was preparing to depart the elevated helipad to reposition the helicopter to the operator’s base. After deplaning his passengers the pilot returned to the cockpit and was preparing to depart when he noticed a door unsecured indication on the instrument panel for the left cabin door. The passengers had deplaned through the right-hand door and the left door annunciation had not been on during the inbound flight. He thought one of the passengers might have released the left door latch inadvertently while preparing to deplane. He idled the engines and exited the cockpit to check the door. He reclosed the door and returned to the cockpit; however, the door open annunciation came on again. He recalled leaving the cockpit “2 or 3 times” to deal with the door and said he was “frustrated with it.” He did not recall retarding the engine power control levers to ground idle before leaving the cockpit the final time. While out of the cockpit, the wheel-equipped helicopter started to move as the pilot was returning to the cockpit. He recalled it was moving toward the edge of the helipad. He returned to the cockpit; however, before he could regain control there was a confusing sequence of events and the next thing he knew the helicopter was on its side. The pilot reported there were no mechanical discrepancies with the helicopter up to the time of the event. He remarked that it was very light [weight] with no one else on board. On the deck of the helipad there was a tire skid pattern consistent with a dynamic rollover event. The engine power control levers were found in the “fly” position.

I really feel for this guy. Something is acting up, giving him grief, and he’s frustrated. Unfortunately, that can also make you sloppy. I don’t know much about Sikorsky S-76 helicopters and nothing about the “fly” position, but I have to think that a helicopter should be set to “fly” when the pilot intends to fly. Maybe someone reading this can fill in more details? Since the chances of me ever flying an S-76 are very slim, I’m not interested in researching it.

Why This Matters

I’m a student in the School of Thought that says the more you know about what could happen, the better equipped you are to make smarter safety-related decisions.

In my video, my landing zone was good, there was little or no wind, the collective friction on my helicopter works fine, and I could have throttled all the day down to 60% RPM if I wanted to. The chances of the helicopter moving an inch while I was in my house were nearly zero.

Nearly.

There’s always a chance that something unexpected will happen. Having lost one helicopter already, I’m not interested in losing another. So I do what I think is safe, even if other folks think it’s overly cautious.

If the folks in the four accident stories I shared here had been students in the same School of Thought I’m in, their stories wouldn’t need to be shared.

Western Washington Wander 2020: The Blacksmithing Weekend

Two days of heating and hammering metal.

I have been interested in blacksmithing — heating and hammering metal to shape it — for a while now. In a sense, it’s related to the metalsmithing work I do with my silver and copper jewelry, but rather than cold working relatively small pieces of soft (annealed) metals, blacksmithing involves hot working larger, harder metal: steel. So last month, when the Tacoma Metal Arts Center announced the Blacksmithing Weekend course in the Seattle area, I immediately signed up for it and then began planning my vacation around it.

And that’s why I was in Eatonville on Saturday morning after a terrible night’s sleep, following Google’s directions to a five-acre farm with a huge shop on the outskirts of town.

The Setup

Mike on YouTube

Mike has a YouTube channel to provide information about the equipment he makes. He’s also interested in doing tutorials. If you’re reading this because you searched for “blacksmithing,” be sure to check out his YouTube channel, Mathewson Metals, and give him feedback about what you’d like to see. Oh, and please do subscribe; that’ll help motivate him to make more content.

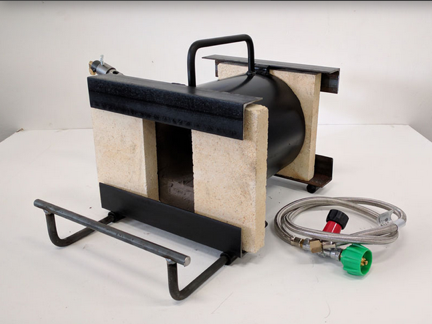
The class was taught by Mike Mathewson of Mathewson Metals. Mike has been blacksmithing for years and has done all kinds of work, from the small projects we created over the next two days and tools to much larger furniture and architectural installations. He’s also the inventor and manufacturer of several different simple, affordable, propane-powered forges, one of which was in use for the whole weekend.

Forge
This is the MetalSmith Propane Forge that we used in class. You can see a video of it in action here.

The class was conducted on one side of his 48 x 72 foot shop building, with the big sliding door on that end wide open to let in lots of air. (The air wasn’t anything we could call fresh, though, since the wildfire smoke situation only worsened over the weekend.) He had the one forge set up as well as several anvils and vices, with dozens of hammers in all shapes and sizes to choose from. He used an amazingly quiet Jet metal saw to cut the 3/8 inch mild steel rods we used for our projects and I watched it in awe nearly every time he ran it. He had lots of other equipment that we didn’t use, like an old Little Giant power hammer and various cutting and finishing tools. The place was a bit of a mess outside our work area; he had only been in the space a little more than a year and he was still figuring out the final organization he wanted. He spent a lot of time organizing while we worked on our own, staying nearby in case we had questions or needed help.

Because of COVID-19, class size was limited to four students. We started with three: me, Travis, and Gary. Gary made a phone call while I went back to my rig to get a flannel shirt. When I returned he was apologizing and saying goodbye; his wife was ill and he needed to get back home. So that left two of us for the class, which was fine with me.

Travis already had a forge and anvil and a bunch of other equipment at home. He was serious about learning blacksmithing and wasn’t moving forward with his self-taught skills. I hoped he’d get an “aha moment” that helped him break through whatever was blocking him in his own shop.

Of course, I wasn’t very serious at all — I just wanted to try it out — so if there were any situations where we had to work one at a time, I usually let Travis go first. As the weekend wore on, we developed a good working rhythm when we had to share a tool; while I heated my piece, he’d work on his and then we’d switch positions. Very efficient. I’m not sure if it would have gone that smoothly with three of us.

The Projects

Mike has obviously taught this many times before. He’s a good, patient teacher who explains everything clearly before we start work. He uses visual aids when necessary to illustrate processes. He is encouraging and never tells you when you get something wrong — unless neither of us did? Instead, he points out a way you can do it better or easier to guide you on the right path.

Nail Hook
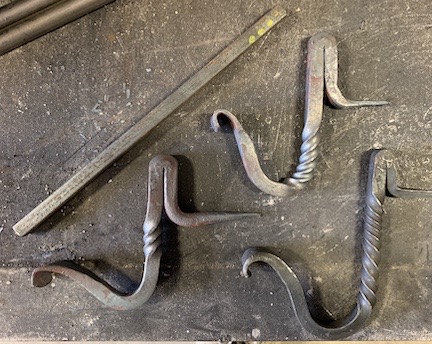
Here’s the nail hook project. From left to right: bar we started with (this is actually Gary’s, which he never did more than mark with dots to identify as his), my version, Travis’s version, and the model we were going for. I made my nail part too long so I made my twist a lot shorter — too short? — and ended up with a sort of wimpy hook.

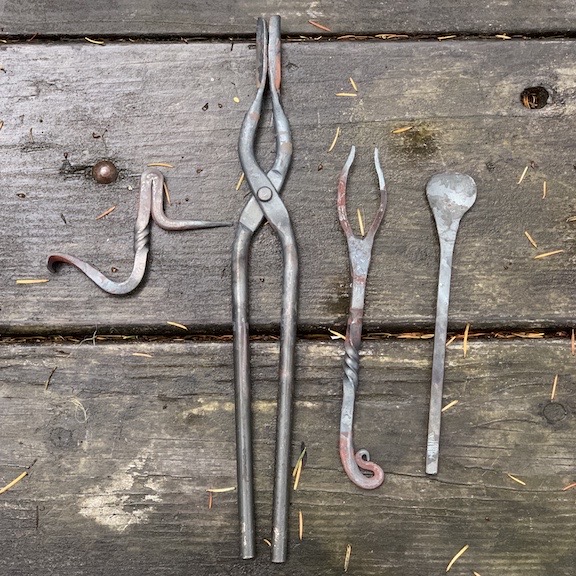
We did four projects, all of which were made from varying lengths of round or square 3/8 inch mild steel rod: a nail hook, a pair of blacksmithing tongs, a fork, and a spoon. Each project taught and gave us an opportunity to try or practice specific skills. For example, the nail hook got us to hammer one end into a point, hammer the other end into a paddle, twist the rod, and then bend the rod in a variety of ways. The blacksmithing tongs had us create two rectangular paddles, bend the paddles to be able to grip 3/8 inch steel rods, bend the rods into a scissors shape, and then rivet a pivot point between them. You’d start a project thinking “how the hell am I going to be able to make that?” and Mike would break it down, step-by-step until you were done.

I have to admit that I was surprised that I was able to “keep up” with the class — especially given that my classmate already had some experience and I had none. Well, that’s not actually true. A lot of my silver/copper forming techniques did apply to the steel work. I think that’s what allowed me to give most of my shapes a decent form and not embarrass myself.

My Blacksmithing Projects
My four projects. They need to be wire-brushed to take the fire scale off.

The class ran two full days — 10 AM to 6 PM — with just 30 to 45 minutes for lunch. In that time we finished three of the projects and had gotten a good start on the last one, the spoon, which only required that we finish it to match the fork. Travis will probably finish his up this coming weekend; mine will likely remain as is forever.

Fringe Benefits

Pigs
A look over the fence at the pigs, which were actually quite large and didn’t stink.

A fringe benefit for me at the class is that Mike kindly let me park in his yard overnight, so I didn’t have to scramble (again) for a place to stay. He had me back into a space near his pig yard, then moved the two pigs out so I wouldn’t be bothered by their grunting. The space behind my rig was perfect for my pups to go out and take a pee first or last thing in the day.

Blackberries
There were a ton of huge, fresh blackberries along the road in front of Mike’s house.

We also went for walks out on the road in front of his home. The first walk is when I spotted the blackberries, which were mostly ripe and ready for picking. I ate a few right off the bushes. Later, I asked for permission to pick them and filled an empty clamshell container (previously holding a pound of fresh dates) with the nicest blackberries I’d ever seen. I’ve been eating them with breakfast since then.

On to the Next Destination

When class was over, it was time for me to bug out. I had planned to stay at Dungeness Recreation Area near Port Angeles that night. It was over two hours away by car. I detest driving in unfamiliar areas at night, so the last half hour or so was brutal for me. We made it by just after 8 PM and I was very happy to back into a campsite in the forest.

Two Jewelry Classes

I take the camper to Tacoma to learn more about making jewelry.

Note: I actually wrote this and much of the post after it about my new cargo trailer back in early October while I was still traveling. I can’t tell you how many blog posts I start writing and don’t finish. This one’s done. I’ll try to get the other one done this week, too.

Last September, I took a 3-day intensive beginner metalworking class at the Tacoma Metal Arts Center in Tacoma, WA. It was an amazing experience that really transformed the way I think of making jewelry. I learned a bunch of metal working skills and how to use new (to me) tools that would take me to the next level in my work: cutting, soldering, texturing, shaping, and polishing sheet metal using jeweler’s saws, shears, torches, flex shafts and attachments, dapping blocks and punches, rolling mills, texture plates, and burnishing tools. I left class with the basic tools I’d need to practice what I’d learned.

Getting Serious about Jewelry Making

Over the winter, I decided to get serious about making jewelry. I paid a contractor friend to frame in a 12 x 24 foot space in my absurdly large garage so we could make an insulated shop for me. That would give me a climate controlled space to work on jewelry projects. While I was in Arizona over the winter, I shopped for the tools and equipment I’d need to set up a full-blown annealing/soldering station and jeweler’s workbench. When I returned from Arizona, I ran the wiring in the new shop and my friend returned to put in the insulation and drywall while I fastened T1-11 paneling to the two outside walls facing into the garage. Then I painted the inside of the room and added some trim around the windows. I installed the two glass-paned doors last week with another friend. The room is large and bright from its two windows and four track light setups, with an 8-foot ceiling and 288 square feet of loft space above it that I’ll likely never use.

Durston Rolling Mill
Swanstrom Disc Cutter
Bench Shear
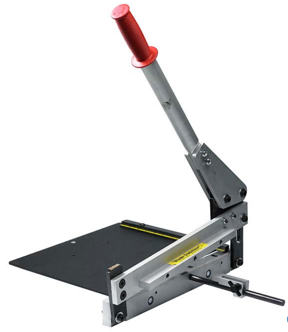
Some shop tools purchased from Rio Grande earlier this year: a Durston Agile 110 Rolling Mill, a Swanstrom Round Disc Cutter, and a Precision 12″ Bench Shear. (Catalog photos not to scale; the disc cutter is actually quite small.)

With the help of the folks at Rio Grande — my primary supplier of metals — I purchased a few rather costly quality tools: a Durston rolling mill, a Swanstrom disc cutter, and a PepeTools ring bender. I also acquired a set of dapping blocks/punches and a metal shear almost as good as a true guillotine style cutter. I moved my jeweler’s bench into my new space, putting it right beneath one window where I’d get plenty of natural light. I built a solid workbench for the corner where I bolted down the rolling mill. Then I moved in the rolling storage cabinets I’d been collecting for years, set up one as my soldering station, another as my rock storage and jewelry photography studio, and a third as storage for the display and packaging equipment I’d accumulated. Half the room is set up as a jewelry studio while the other half is my regular workshop with the big workbench I built several years ago, my tool chest, and the rolling cart I’d converted into a storage and charging area for my power tools. My table saw, miter saw, tile saw, and Cabking cab making machine remain in the garage, on the other side of the wall. (The room is big, but not that big.)

Now, in addition to the sterling silver and/or copper framed gemstone cabochon pendants I’ve been making for a while, I also make textured and etched silver and copper earrings, soldered silver and copper stack rings, hammered bangle bracelets, silver plated “spoon rings,” and novelty keychains. This gives me a full range of products to offer customers when I show and sell my jewelry. I make these items in my shop and make my cabochon pendants when I go to shows.

This summer, however, I realized that I was ready for more.

Classes at the Tacoma Metal Arts Center

The Tacoma Metal Arts Center (TMAC) offers a variety of jewelry classes. Although I wanted to take the three-day course again with a different instructor to polish my skills and learn things from a different person, the dates and times it was offered did not work with cherry season, which requires me to be at home every day for three months — roughly June through August. There were a few one-day classes in September and October that looked interesting, but I wasn’t interested in coming to Tacoma for just one day. And then I saw the two one-day classes offered on the weekend of October 12 and 13: Molten Magic and Possibilities of Precious Metal Clay.

Molten Magic’s description was as follows:

Ruth [the instructor] will show you how to cut a shape from copper sheet for your project, then you will cover it with texture through the molten magic of melted silver! The result is a wonderfully rich surface texture of ridges and waves. Then, you will learn how to apply an iridescent patina with a torch by flame painting the surface.

Possibilities of Precious Metal Clay was described as:

PMC (aka Precious Metal Clay). Create fine silver jewelry from a clay: this material works like earthen clay so it can be shaped and formed, textured and refined and then fired. The result is precious metal in pure silver. Once it is finished into silver you can polish it or apply a patina for that vintage look.

These two seemed perfect for me. I was interested in taking my sheet metal work to the next level and fusing silver and copper sounded very interesting. As for PMC, I had actually bought some of the stuff and a bunch of tools to work with it but because of its cost, I was hesitant to get started. This would give me the information I needed to try it with confidence — or realize that it wasn’t really for me.

I signed up and planned to spend the weekend, camping out in their back parking lot in my truck camper as I had done the year before. Not only would I save on overnight lodging, but I could bring Penny the Tiny Dog along.

Molten Magic

Although I’d been hoping to get to Tacoma the evening before Saturday’s class, a big project at home kept me busy until 4 PM. By the time I prepped the camper, it was 6 PM and sunset was less than 30 minutes away. I try hard not to drive in unfamiliar places at night, so I didn’t depart until 5:30 AM the next day. Of course, I still had to drive in the dark over Blewett Pass, which I seldom drive. It wasn’t light until I got to Snowqualmie Pass.

Mushrooms
To give you an idea of the variety of food items Metropolitan Market offers, he’s a shot of some of the mushrooms they had for sale that day.

Traffic was light and I got there early. So I kept driving and stopped at Metropolitan Market, a supermarket that is so posh it makes Whole Foods look like a Smart and Final. I parked in the lot, got out to visit the restroom and buy some snacks, and then took Penny for a walk down the adjoining residential street. Then it was back to the TMAC, where I drove into the alley behind the place and backed the truck into the narrow parking area, trying (and failing) to use up only half the width of the space. The back gate was locked (as I knew it would be), so I got Penny set up in the camper with food and water, locked it up, and walked around front to the main entrance.

I was the first student to arrive. I met the instructor and chatted with her for a while. She must have thought I was a nut, talking to her as if I’d known her for years. I do that. The second of four students arrived before the 10 AM start time. The third arrived loudly 20 minutes late, after class had already begun. The fourth never arrived.

The instructor, Ruth, did not have a very structured teaching style. It was all very casual. There would be no specific project. Instead, she told us about the techniques we’d be using, handed out sheets of copper and scraps of sterling silver, and encouraged us to practice on the copper scraps in a bin near the rolling mill. Then she took us back to the polishing and soldering stations and demonstrated how to clean off the metal with wheels on three bench grinders there and then use heat from a torch to oxidize the copper enough to get different colors and patterns. She showed us how to melt silver onto the copper, including how to somewhat control how the silver melted by using heat to guide it across the copper.

Then she let us go to it.

There were three soldering stations and three of us so it worked out well that the fourth person hadn’t shown up. We each played with the sample copper for a while. One of the scrap sheets I’d taken had been run through the rolling mill and had a pattern on it. I managed to get shades of orange and pink on it. Later, I’d turn it into a pair of twisted metal earrings suitable for sale. (Yes, I can make jewelry out of scrap metal.) My silver melting wasn’t quite as interesting. I couldn’t come up with a suitable shape, so I’d traced a plastic spoon. No matter how I looked at it, it looked like a spoon. And I didn’t like the way I melted the silver on it.

Meanwhile, my two companions were working on nice projects. I felt uninspired. And disappointed. You see, I had already played with “fire painting” copper so it wasn’t new to me. The only thing I’d learned was that you could polish off the color to start over — I normally used “pickle,” which is an acid that removes oxidization — and that it was possible to melt sterling silver with the same little butane torch I used to solder and anneal.

Ruth spent a few minutes showing us how we could create a chain for a pendant using sterling silver wire and jump rings that she provided. I liked the chain on the sample piece she’d brought along, but it had been created with 14 gauge wire and she’d give us thinner 16 gauge wire. I played around with it for a while but didn’t like what I was doing.

File Painted Pendant
Here’s the pendant I made in class. I finished it with a leather necklace and added a pair of matching earrings. They sold as a set on the first day I displayed them in my booth.

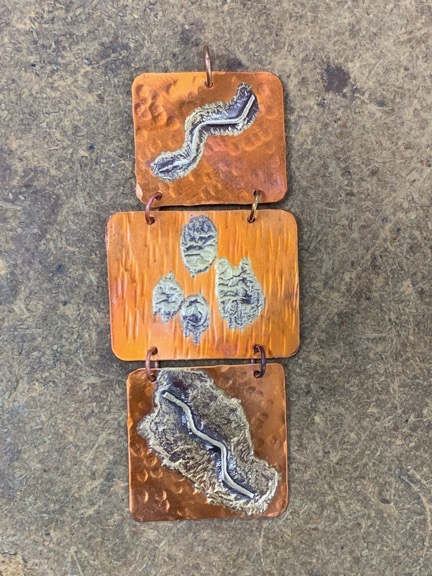
Then I got an idea for a pendant that would consist of three textured copper panels, each of which had silver wire melted on it. I’d join them together with jump rings. So I cut some of the copper sheet and went at it with two different hammers. Then I took some of the wire she’d given us to make a chain and made a zigzag pattern with it. I made tiny dots with more wire. I melted the wire to the copper without allowing the zigzags to get completely molten so they were fused onto the copper without losing their shape. I polished off the oxidation and then used the torch to apply just a tiny bit of color. I liked the result. I fetched some copper jump rings from my camper, colored them a bit with the torch, and put the whole thing together. Funky, but I liked it.

By this time, the day was pretty much over. Amy, the owner, came in to do some paperwork and she took photos of what we’d made. I felt that I made a respectable showing; everyone seemed to like the pendant and earrings. My companions had created more things than I had, but I didn’t mind. I had some ideas and that’s all I needed.

More at Metropolitan Market

After class, I went back to the camper — I’d checked on Penny at lunchtime — and put Penny on her leash. We walked the mile or so to Metropolitan Market. I parked Penny at the outside dog parking area where an Australian Shepherd was waiting for her human. I bought some things for dinner from their extensive prepared food area, remarking to the person behind the counter that if I lived nearby I’d be 300 pounds and flat broke.

Penny and I shared a gelato — I scooped some of mine out into the lid of the container for her — and walked back. Then we climbed into the truck and drove to a local U-Haul place that filled propane tanks. One of my tanks was completely empty and the other was only 1/4 full. I did not want to run out of gas overnight. That done, we returned to our parking spot and I backed all the way in so my back door was only a few feet from the back gate.

I heated my dinner in the camper’s oven — I wasn’t plugged into power and hadn’t brought along a generator so the microwave was useless — and worked on some earrings while I waited for it to finish heating. After dinner and another quick walk with Penny, I stretched out on my bed to read.

I slept well. During the night, I was treated to a rainstorm. The only thing I love more than hearing rain on my camper’s roof is hearing it on the metal roof of my home.

The Iliad and The Odyssey

I was up at 5:30 the next morning. I lounged in bed for a while, like I do at home, and then got up, threw on a pair of sweatpants, and made my coffee. I did a little web surfing at the table while I had my coffee. Before I knew it, it was 7:30. I made breakfast and ate it as Penny came down off the bed to let me know she was ready to go out.

I put the leash on her and we walked down the alley. There was a Bartell’s pharmacy about two blocks away and it looked like the kind of place that might have a refrigerator case. I really felt like having some orange juice. They had every sugar or alcohol drink in that case except real orange juice.

We crossed the road to a coffee shop. They didn’t have orange juice either. But they had a nice staff that let me bring Penny in so I bought a latte and caught up on Twitter at a table near the window while Penny ate a dog biscuit and a nearby dog watched her.

At one point, a young guy came over and complemented me on how well behaved my dog was. That got us into a conversation about dogs in public and how the owners really needed to keep them under control. I pointed to the other dog. “That’s a well-behaved dog,” I said.


This is the edition recommended by my friend.

I noticed that he was reading The Iliad and asked him if he was reading it for a class or if he was just reading it. He told me that he’d always wanted to read the classics and figured he’d start with the first one. (At that point, I found myself wishing he was about 20 to 30 years older and single — I felt the same way about reading the classics but needed a bit more motivation to actually do it.) I had recently explored reading a specific translation of The Odyssey that a friend had recommended. I told him about it and looked up the translator’s name for him. He said that was next on his list and he’d look for that version. I think he really will.

Possibilities of Precious Metal Clay

By that time, it was 9:45 and I was running the risk of being late for class. So Penny and I hurried back. I put her in the camper and went into class. I arrived at about the same time as one of the previous day’s students, Ellen. Two other students joined us. Again, there was a no-show.

This instructor, Meredith, had a more structured approach — but not much more. She spent some time talking about PMC — what it is, how it works, etc. She sent around examples of her own work — some of it with problems she pointed out as examples of what can go wrong. She handed out 9 gram packets of PMC3, bunches of 10 standard playing cards (which are used to gauge thickness for rolling), tiny pieces of plastic needlepoint grid (for a simple texture, a small sheet of foam (for creating our own textures), and long pins with masking tape flags on the end (for cutting clay). She seemed a bit disorganized; she’d forgotten to bring along work surfaces for us. Instead, we’d be rolling out the clay on the same teflon surfaces we’d use to dry it on. All the other tools were laid out in piles on unused benches and workspaces.

And then she let us go to it, again, without a specific project.

I guess wanting a specific thing to make is something that affected me more than my companions. I suspect that it’s because I’m pretty new to art — so new that I usually don’t provide a straight answer when people ask me how long I’ve been making jewelry.

Although I’m a visual person when it comes to learning, I’m not visually creative. (My creativity has always come with words; I have always been a writer.) Show me how to make something specific using a set group of techniques or skills and I’ll make it. Then, as I make it over and over, the creativity comes out. You can see that in my silver framed jewelry. Dorothy taught me how to make a pendant in her style using her materials and tools. The more pendants I make, the more my materials, tools, and final products differ from hers. I look at a stone and I think about how I could make an interesting pendant from it. The idea clicks and I make something creative and new. But when it all comes down to it, I’m just doing the same thing over and over, with minor twists that make something new.

Although Ruth had provided a project idea — the sample pendant she’d made for the course description — I hadn’t been interested in duplicating that. And Meredith did provide many examples of what we could do with PMC, but there were too many. I guess I was expecting her to walk us through the process of creating some of these things rather than giving us an overview of how to make them and then answering questions to help us complete our own personal products.

My problem was that I lacked ideas.

I made two textured pieces that could be earrings or charms. It took only minutes to do, even with the custom texture I created in the foam I’d been provided. I was interested in creating a bead and had picked out a small piece of cork clay to form a bead around. I had a few false starts — you have to surround the cork with clay before applying a texture (duh). My mistake was choosing such a small piece of cork; it meant that I was working with a very tiny object. But the damn clay is so expensive that I can’t imagine using it to make anything large. And we’d only been provided with 9 grams of the stuff so I was afraid to use too much right from the start.

Around lunchtime, Meredith set out a timeline for the rest of the class. All of the pieces had to be fired for about 45 minutes in a kiln. It took 30 minutes to ramp up the kiln to 1470°F. After that, we’d have to brush, tumble, and burnish our pieces, which would take at least another 15-30 minutes. With the class ending at 4 PM, that meant we’d need to get everything in the kiln by 2:30 at the latest.

I decided to use the rest of my clay to make a rectangular pendant with shapes adhered to it. This would enable me to practice “gluing” pieces together. What I made was ugly, but it did let me practice techniques. I worked and fine-tuned my pieces until 2:15 and laid them all out on the heating pad with the others to dry.

Compared to everyone else’s work, mine was pitiful. I didn’t even take a photo of them.

Meredith loaded the main kiln, which she’d brought along with her, and, while the kiln was coming up to temperature, talked to us a little about kilns. She’d brought along a smaller kiln designed for enameling that also worked with PNC and wound up firing that up for a few more pieces. Then we waited, asking questions and looking at more examples.

Finally, it was done. Meredith opened the kiln shortly after it was finished firing, opening and closing the door at short intervals to cool it slowly. She pulled out and quenched our pieces in a bowl of water. As I expected, they were all covered with a white film. She had us brush them off with a brass brush that put scratches in my pieces. I was pleased to see that none of them had any problems, although none of them had gotten any nicer.

Then she prepped the tumbler and dropped all of our pieces in. We cleaned up our workspaces while we waited. The owner, Amy, had come in and we shopped. TMAC is an excellent source of jewelry making tools and equipment at reasonable prices. I bought a small hand drill and two silver hallmarking stamps (.925 and .999FS).

Out of the tumbler, my pieces still had a lot of white residue on them. Meredith told us to burnish them with steel. I found a suitable tool and went to work on one of the pieces. The silver shine popped out. So now it was ugly and shiny.

Of course, I’m half joking here. Although my work wasn’t anything to be proud of, I had learned quite a bit about working with PMC and am no longer afraid to play with the 30 grams I bought earlier this year. I’m hoping to get my tiny desktop kiln running again; it’s the perfect size for this kind of work.

I just need some ideas.

After Class

Although I’d originally planned to spend the night in Tacoma, it was early enough to get a start for my next destination: Yakima. I needed to pick up a cargo trailer that I’d be converting into a mobile jewelry studio.

But I think you’ve read enough here. I’ll cover that in another blog post.

Helicopter Flight: Central Washington Geology Tour, Part 2

A cockpit POV video from the FlyingMAir YouTube Channel.

COME FLY WITH ME as I take Central Washington University geology professor and star of “Nick on the Rocks” Nick Zentner on a helicopter tour of the area between Mission Ridge in Wenatchee and Malaga, which is just down the river, with a focus on geology. Nick talks about the geology of the area and explains how the land under our local airport and my home were formed. I show him some landslides he’s never seen and give him a unique view of Saddle Rock. This is part 2 of a two-part series, cut short when one of the cameras died in flight.

Some videos referenced in this video:

Points of Interest Discussed:

About Me and the Helicopter

  • I have been flying for about 20 years. My nearly 4,000 hours of flight time is in Robinson R44, Robinson R22, and Bell 206L (Long Ranger) helicopters.
  • The helicopter is a 2005 Robinson R44 Raven II — the same one that appears in the photo at the beginning of the video. You can learn more about them here: https://robinsonheli.com/r44-specifications/ I own this helicopter. It is the third helicopter I’ve owned since 2000.
  • My helicopter has ADS-B Out and is picked up by radar facilities. You can see my track for recent flights on Flightradar24: https://www.flightradar24.com/data/aircraft/n7534D This is a great site for tracking any almost any flight, including the airlines.

About Nick Zentner

  • Nick has an MS in Geology and has been teaching at Central Washington University since 1992.
  • In 2015, Nick received the prestigious James Shea Award, a national award recognizing exceptional delivery of Earth Science to the general public.
  • You can learn more about Nick on his website: http://www.nickzentner.com/

  • You can watch Nick on the Rocks episodes here:
  • https://www.youtube.com/playlist?list=PL18y1vgsGPLbl3wrSZwUyvkAiUJHZTS5Y

About the Video

  • The video was recorded with a pair of GoPro Hero 7 cameras (https://amzn.to/2Lxyzwl), one of which is connected to the helicopter’s intercom system with an NFlightCam audio cable (https://amzn.to/31syLTm). Both cameras record audio, but I dialed down the helicopter sound to about 25% of normal volume so it wouldn’t be annoying.
  • The video was edited on a Macintosh using Screenflow software. Learn more about it here: https://www.telestream.net/screenflow/overview.htm
  • The intro music is by Bob Levitus, famed “Dr. Mac.” You can find him here: http://www.boblevitus.com/

I try to drop cockpit POV videos every Sunday morning and “extras” with more info about owning and operating a helicopter midweek. (Some channel members get early access to some of these videos.) I also host occasional livestreams with Q&A chats. Subscribe so you don’t miss anything new! And tell your friends. The more subscribers I have, the more motivated I am to keep producing videos like this one.

Any Amazon links on my channel are affiliate links (https://amzn.to/32PLHTD). If you click one of them and buy something, Amazon sends me a few pennies. Enough pennies make a dollar. Enough dollars buy new equipment. It doesn’t cost you anything so I hope you’ll shop with one of those links. Thanks.

Still reading? Thanks! Maybe you’ll consider buying something from my Etsy store to help support this channel? Start here: https://www.etsy.com/shop/FlyingMAir

Or better yet, to support this channel on an ongoing basis, consider becoming a member. This link will get you started: https://www.youtube.com/channel/UCLGD_GbGsS6YKK_Ekx0QMqQ/join