Pups in a Helicopter

A FlyingMAir YouTube channel “extra” featuring 7-month-old Lily & Rosie.

Here’s a little extra video featuring my two seven-month-old puppies, Rosie and Lily. They flew with me on a long cross country flight from Malaga, WA to McMinnville, OR and we made a precautionary landing due to weather at this minuscule airport in Woodland, WA. I shut down the helicopter and left them to take a pee; they realize they’re alone and start getting worried about it before they settle down. Happy ending, of course. This was their second time in a helicopter.

You can see all of the videos for this flight here:
Part 1: https://youtu.be/pgKDciGP4eA
Part 2: https://youtu.be/CmupuFDXa4Q
Part 3: https://youtu.be/vyveMEm_MhQ
Pups in a Helicopter: https://youtu.be/eEVq9sRlJK8 (this video)
Part 4: https://youtu.be/3KXR_D3SliA
Part 5: https://youtu.be/eghRyzhPigg

My Thoughts on YouTube’s Mid-Roll Ads

I think I respect my viewers a lot more than other creators respect theirs.

I’m officially what’s referred to as a YouTube Creator. That’s someone who regularly creates content for publication on YouTube, a platform that gets thousands, if not millions, of new videos a day. Much of that is junk but a lot is actually good, valuable content. And some is really high quality, useful/entertaining material. I like to think that my content falls into that middle category — better than junk but not as good as the really high quality stuff. I do what I can with the materials and skills I have. And unlike other Creators there, this isn’t my full-time job and I don’t have a bunch of corporate sponsors feeding me cash. I set priorities in my life and YouTube content creation isn’t at the top of that list.

And now for a shameless plug…

If you like helicopters and/or flying and want to watch videos about helicopters/flying without a lot of hype, I hope you’ll try my channel, FlyingMAir. Many of the videos put you in the cockpit with me as I fly around and talk about what I’m seeing and doing. If you like it, subscribe and tell your friends.

That said, I am fortunate enough to be allowed to monetize my channel. I have 63,000+ subscribers (as I type this), a number that has been climbing steadily for the past few years. I’m not sure if the requirement is 1,000 subscribers or 10,000 subscribers for monetization, but I’ve met it. That means that I get a teeny tiny cut of whatever YouTube gets for placing ads before, after, and possibly during my content.

How teeny? It’s currently hovering around $3 per 1,000 views. So yeah — when 1,000 people watch one of my videos, I currently get about $3. Not exactly a wealth building opportunity for me. Sunday’s video, which has been out for 48 hours as I’ve typed this, has earned me about $5. (Thanks, viewers!)

Of course, one of the reasons this number is so low is because I only allow three kinds of advertising on my content and I allow them in only two places. Yes! Creators can specify what kinds of ads appear and when they appear! There are five kinds and three locations and this image from one of my video’s settings pretty much explains them:

YouTube Ad Types and Locations
This is how I normally set options for my videos.

YouTube’s advice — which apparently lots of Creators heed — is to turn on all ad options. YouTube wants the opportunity to sell ads everywhere, even though it does not display ads on all videos. (It’s about 60% for mine and I only make money on my videos when ads are displayed on them.)

My school of thought is this: I need ads on my videos to monetize them. (Yes, I know I’ve got Memberships and Patreon set up for my channel but not everyone can or wants to chip in with real money. Honestly, without monetization, I would not be motivated to create content regularly.) But I don’t want ads to ruin the viewing experience. So where can I put them to be the least obnoxious? The answer is before and after the video using ads that don’t obstruct or interrupt the content. That’s the settings you see above.

Some of my older videos might have Overlay ads and Sponsored cards selected, so don’t be surprised if you see some of those for content published before mid 2019. I don’t think I have During video turned on for any videos. And that’s what this post is about: mid-roll ads that appear during the video.

I’m a big YouTube viewer. I don’t have regular TV in my home. No cable or satellite, no antenna to pick up local broadcasts. I have whatever my smart TV or laptop can pick up through a wicked fast fiber Internet connection: Netflix, Amazon Prime, YouTube, and a variety of other channels I subscribe to or get for free like PBS, Lynda.com, and the Great Courses. I use YouTube to learn new things — even things I don’t need to know — and get ideas. To keep my brain going.

And, as a YouTube viewer, there is one thing I absolutely cannot stand: mid-roll ads. You know what I’m talking about. The ads that appear suddenly and without notice, sometimes in the middle of an onscreen sentence, disrupting the video with something you absolutely do not care about.

Mid-roll ad announcement
This “card” appeared in my YouTube Studio dashboard about a month ago and is still there.

Until recently, mid-roll ads were only available on videos 10 minutes long or longer. But recently, YouTube announced to creators that the ads were now available to videos 8 minutes long or longer. And oh, by the way, this feature will be turned on by default for all your new videos unless you change it by a certain date. (I immediately changed it for my channel.)

I need to point out something important here. Creators who enable mid-roll ads have the ability to specify points where the ads may appear. So say a Creator has made a video that shows a 4-step process with cuts between each step. Logically, a good place to put a mid-roll ad would be at one of those cuts. This is less intrusive in the content. But what I’ve seen lately as the number of mid-roll ads grows on YouTube is that Creators aren’t bothering to set up ad locations. They’re just letting them appear wherever YouTube puts them. The ultimate in annoying for viewers.

To me, allowing mid-roll ads to interrupt your content in such an annoying way is the ultimate way to tell your viewers that you don’t give a damn about their viewing experience. The only thing that matters to you is the fractions of pennies of ad revenue you’ll get by allowing that ad to appear.

And I think there’s something seriously wrong with that attitude.

I’ll admit it here: I’ve begun leaving comments on videos with disruptive ads asking the Creator to turn off mid-roll ads. And I think you should, too.

Of course, there is a way to get rid of all ads on YouTube — and it doesn’t necessarily hurt Creators. You can sign up for YouTube Premium. My understanding is that for $11.99/month, in addition to adding features to YouTube, it also removes ads from content. If you watch enough YouTube, you might find it worthwhile. I don’t watch that much YouTube and I’d rather see my money go directly to a Creator via Membership or Patreon support.

The only thing I’m really left wondering about is this: because I have disabled some YouTube ad options — rather than turning them all on as YouTube recommends — am I triggering some sort of penalty that keeps my videos out of search results? Is there some under-the-hood activity in the bowels of YouTube that will punish me for not flooding my videos with ads by simply limiting the number of potential new viewers? That’s something I’ll likely never know.

Cross-Country Helicopter Flight from Malaga to McMinnville, Part 2

Another cockpit POV video from the FlyingMAir YouTube channel.

Join me for the second 20 or so minutes of my cross-country flight from my summer base in Malaga, WA to McMinnville, OR. In this flight, I cruise from Ellensburg, WA over the Cascade Mountains near White Pass, dodging low clouds that force me to wander off my desired course. Along the way, you’ll see remote forest and grasslands, rocky cliffs, snow-covered ridges, and even Mount Rainier, off in the distance. I had three cameras rigged up for this video and I switch from cockpit cam to nose cam with occasional inset views of me looking at the camera. Audio is from direct connection to the intercom so you can hear me talk — no radio calls in this video — plus dialed down volume of the helicopter’s engine/rotor noise.

Important Note: This video is being released as a Premiere on Sunday, August 9, 2020 at 7:30 AM Pacific time. That means you can’t see it until after that time. If you tune in for the Premiere, you’ll be able to join a live chat with other viewers (and me) to comment on the video and ask/answer questions. It’s actually a lot of fun. If you view anytime after that, you’ll just see the video, although I believe the premiere chat comments might be visible on the Web.

You can see all of the videos for this flight here:
Part 1: https://youtu.be/pgKDciGP4eA
Part 2: https://youtu.be/CmupuFDXa4Q (this video)
Part 3: https://youtu.be/vyveMEm_MhQ
Pups in a Helicopter: https://youtu.be/eEVq9sRlJK8
Part 4: https://youtu.be/3KXR_D3SliA
Part 5: https://youtu.be/eghRyzhPigg

I should mention here that “cross-country” in the world of aviation is any long flight. For airplanes, it’s 50 miles or more; for helicopters, it’s 25 miles or more. This is only part of a 178 nautical mile trip.

How I Use a Rotary Tumbler

It’s for a lot more than just making shiny rocks.

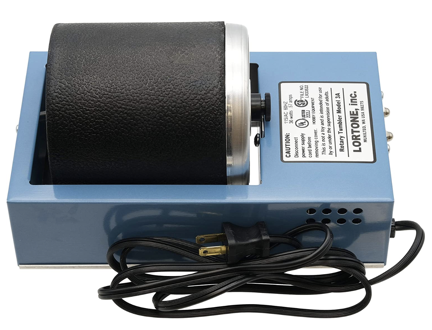
Lortone 3a Tumbler
This is a real workhorse and probably the bestselling tumbler out there. I think everything else is an imitation.

One of my most-used plug-in (as opposed to hand) jewelry making tools is a model 3A Lortone rotary tumbler. This is most commonly bought as an educational “toy” for kids — indeed, that’s how it’s categorized on Amazon.com. The idea is that kids can go rock hounding, put a bunch of rocks in this tumbler, and, a while later, have a bunch of shiny rocks to show off to family and friends.

Making Shiny Stones

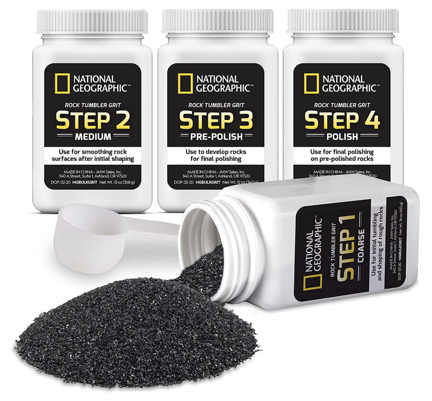
Tumbling Media
National Geographic makes it easy by selling the four grits you need in a package. (I buy my grits from a lapidary shop.)

Polishing rocks is why I bought mine about 3 years ago. I bought it as a kit, with everything I needed to get started. It’s a good thing I did. While some folks seem to think that the tumbler does all the work, it’s the variety of grits you need to use as tumbling media to grind down the rough edges of the rocks and eventually bring them to a high polish.

The process takes about four weeks, during which time the tumbler operates pretty much nonstop. (This isn’t something you want running inside your house or apartment, folks.) Every week or so, you dump out all the rocks, water, and grit — but not down the drain! It can permanently clog your plumbing! — wash the rocks and tumbler thoroughly, and add the rocks and the next higher grit with water back to the tumbler. Then another week of rattling around in the rubber barrel before you repeat the process again. And again. If you have the right rocks (or combination of rocks) and do everything right, you wind up with randomly shaped shiny rocks after about a month of tumbling.

Interested in working with stones? You should check out Kingsley North, which sells all kinds of rough and polished rock and the equipment for working with it, including tumblers. You can get a good deal on a Lortone 3A rock tumbling kit there.

(If you’re really interested in rock tumbling, here’s a great article on RockTumbler.com: Rock Tumbler Instructions.)

I first ran mine with a combination of rose quartz (pink) and sodalite (blue) stones, got excellent results, and gave the stones away to kids shopping with their parents or others at venues where I sold my jewelry. It was a big hit. But because it took so long and because I have so much else going on in my life, that’s the only batch I did. I put the tumbler away.

Burnishing Polished Metal

As I learned more about jewelry making and started branching out to metalworking, I learned that tumblers like mine with different media could be used to burnish polished metal.

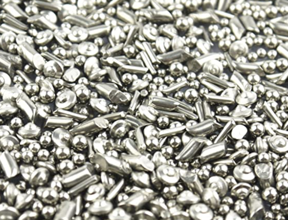
Stainless Steel Shot
An example of stainless steel shot like what I use for burnishing metal in my tumbler.

The media used for this process is stainless steel shot, which can be bought by the pound. It ain’t cheap, but it’s completely reusable. I use just a pound of it in my 3-pound tumbler. I add water and a bit of burnishing compound — although I’ve been told that a few drops of Dawn detergent does the same thing. I throw in the jewelry to be burnished, close up the barrel, shake it up a bit, and then put it on the tumbler for up to an hour. The jewelry that emerges is amazingly shiny — it I polished it properly to begin with. Whenever I do a batch of new jewelry, I throw in my rings and bracelets for a quick and easy refreshing.

Of course, I can’t do this with any jewelry that contains stones. Although some stones may survive, many others would not. It’s not worth taking a chance.

“Honing and Highlighting”

This past winter, I took a bunch of jewelry making classes in Tucson, AZ. One of the instructors told us about a product she uses to finish “antiqued” metal jewelry: Hone & Highlight.

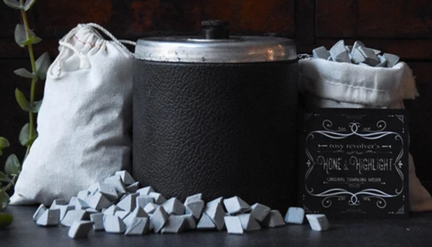
Hone & Highlight
Yes, I lifted this artistic product photo from the Hone and Highlight website. I hope they don’t mind; I’m doing it to send them customers.

I tracked it down online. Hone and Highlight is a silicon carbide with ceramic tumbling media that gently rubs the chemically blackened metal to remove the color from high points and roughen up the metal just enough to give it a satin finish. You add it with the jewelry to be finished to a tumbler barrel, cover it with water, and add 2 drops of Dawn dish detergent. Then tumble for up to 24 hours.

(And no, I don’t know why everyone says to use Dawn but they do. They never say Palmolive or suggest some sort of generic. They always say Dawn. I buy Dawn.)

What I like about this product is that it gives my “antiqued” jewelry a consistent finish that I really like. It also keeps my hands clean. I’ll be frank: using a polishing pad to rub liver of sulfur off jewelry is a tedious, messy task that seldom gets consistent results. This never fails me. Best of all, I can do jewelry in batches, which makes good use of my time (and tumbler).

Again, I can’t use it with any jewelry that includes polished stones. Who knows what might happen to the stones?

Three Jobs, One Barrel?

I soon realized that with three different jobs I wanted to do with my tumbler, each job requiring different media, it might be handy to have more than one tumbler barrel. So I started shopping around for one.

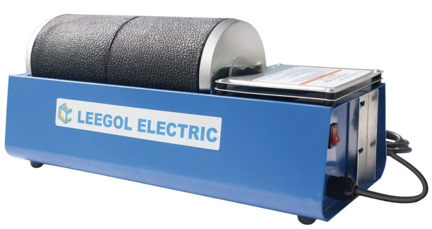
Junky Tumbler
Spoiler alert! This is junk. Don’t buy it.

My search led me to Amazon (where else?). They had Lortone 3A tumbler barrels, but they weren’t cheap. They also had a Leegol 2-barrel tumbler with a very similar design. With a coupon, it wound up being cheaper than two Lortone barrels (without the tumbler). It seemed like a good deal — after all, I could be tumbling rocks in one barrel (keeping in mind that it ties up my tumbler for a full month) while burnishing or honing metal in another. So I bought it.

It arrived non-functional with a broken spare belt. I fiddled with it and got it running. But what interested me more was the fact that the barrels seemed to be compatible with my Lortone 3A. They had cheesier inner lids, but they worked. I had the extra barrels I wanted. And since I didn’t have any need to run two barrels at a time, I kept using the Lortone.

Leegol Fails the Test

Fast forward to this week.

I started wondering if I could make beads by using my tile saw to cut local obsidian slabs I had into roughly consistently sized rectangles, tumbling them for a polish, and then drilling them. This would be a project that took time and the sooner I started, the sooner I finished. So I got out my tile saw, cut a thick slab into strips, and then cut the strips into flattened squares. I grabbed all that, set it up in an empty tumbling barrel with the proper grit and some water, and put it on the double-barrel tumbler. I figured that I’d let it run around the clock (as it needed to for the rocks) and, if I needed to do another job with another barrel, I could add it to the running tumbler platform without disturbing the rocks or firing up the Lortone.

Makes sense, eh? Good use of equipment.

And it actually worked out like that, at least for a few days. I made some jewelry earlier this week and put it into a barrel with the honing media for about eight hours. Rocks and bracelets tumbled side by side. I pulled the bracelets off when they were “done” and the rocks kept rolling.

Until sometime Wednesday night.

On Thursday morning, when I went downstairs to let my pups out, the rock tumbling sound I’d become accustomed to hearing from my garage was oddly quiet. I checked. The tumblers motor was running but the barrel wasn’t spinning.

I plugged in the Lortone and got the rocks moving again.

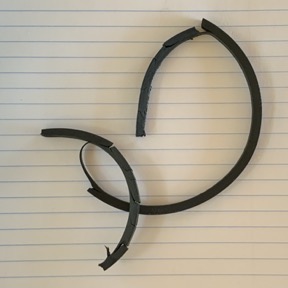
Broken belt
This belt lasted fewer than four days.

Later, I brought the new tumbler upstairs and took it apart. The rubber belt had broken into several pieces. And the spare was broken, of course.

My lesson: You get what you pay for.

(Which is something I’ve known for a while but periodically choose to forget.)

I ordered new belts for the tumbler. They come in packs of 12, likely because they’re so crappy they don’t last more than a week each.

Today I ordered spare belts for my Lortone, too. It’s more than three years old and still on its original belt.

Early August Check In

What I’ve been up to lately.

I know I haven’t been blogging much lately — other than to share my YouTube videos — and I apologize. I know a lot of folks come here to see what I’m up to and not necessarily to see big helicopters land in clouds of dust.

But regular readers should know why I’m not blogging: I’m keeping busy doing other things. Here’s a rundown of what I’ve been up to.

Cherry Drying

One thing I’m not doing lately is drying cherries with my helicopter. We haven’t had measurable rain here since June 28 and that’s the last day I flew.

This is both good and bad.

The good thing is that my helicopter is inching ever closer to the Hobbs meter number that will force me to bring it in for over haul. As I type this, I have 88 hours left until I must stop flying it.

If you watched my livestream video about helicopter operating costs, you’ll know that this required maintenance will cost about $250,000 (not a typo). I’ve been saving, but not that much. So I’ll have to go into debt to pay for that overhaul. (I hate being in debt.)

But because I’m hardly flying it at all, I realized that I can simply put the helicopter away for the winter and save those 80+ hours for next year’s cherry season, thus putting off the overhaul for a whole year. I should be able to save a bunch more money for it, thus reducing the loan I’ll need. It will also Eliminate the stress I’d feel trying to operate a helicopter tour/charter business when virus-related issues — social networking, the economy, etc. — might make it hard to bring in the extra cash I’ll need to keep up on the loan.

That’s the good side of this issue.

The bad side is that I like flying, especially when I can send someone an invoice when I’m done. Although I’ll get a few more flights in before I put the helicopter away — after all, I do have that YouTube channel to feed — it won’t be much.

Fortunately, all of my cherry drying contracts include a daily standby fee, so even if I don’t fly, I’m bringing in money to cover my personal and business costs.

Of course, the standby fee means I have to be on standby, available to fly 7 days a week during daylight hours. So since May 29, when my season started, I’ve been pretty much hanging around at home — or at least the Wenatchee area. (I guess a lot of folks are in the same boat with the virus running rampant throughout the country.)

During the busiest part of the season, when I had the most acreage to cover, I had four pilots helping me cover it. They left one-by-one as orchards were picked and there was less and less acreage to cover. The last one left about 2 weeks ago. Today I’m covering 34 acres by myself.

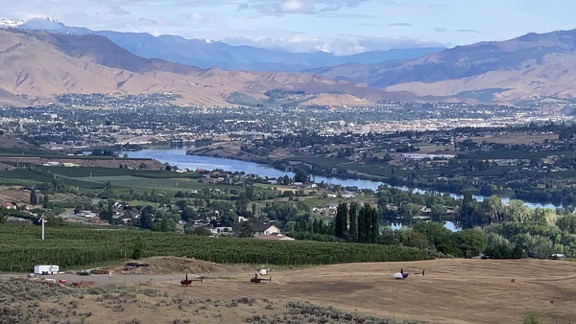
4 Helicopters
Here’s the view from my deck back on June 16; you can see four helicopters (including mine) parked in a cleared cherry orchard. The fifth helicopter was based in Quincy, covering one of my contracts there.

Starting tomorrow, I’ll have just one orchard of just 17 acres to cover until August 23. Even though the standby for just 17 acres is pretty low, I’ll stick around until all the cherries there are picked.

Cherry Driving

No, that’s not a typo. I spent a week driving cherries from an orchard to the packing house.

One of my clients was looking for someone to drive a pickup truck pulling a trailer full of cherry bins from their orchard to the packing house about 15 miles away. They knew I had experience pulling heavy trailers — after all, I lived near their orchard in my old 36-foot fifth wheel for several seasons in a row — so they offered me the job. I had nothing else that I had to do, I had to stay in the area, and I didn’t mind making a few bucks and learning about another part of the business. So I said yes.

The truck was a 2004 Ford F350 4WD diesel pickup remarkably like my old green truck (RIP). The trailer was a dual axel with 4 wheels per axel flatbed with a gooseneck hitch that had been customized to hold eight stacks of plastic cherry bins.

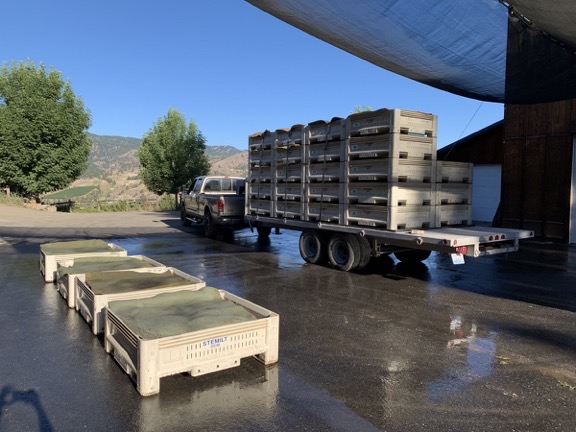
Cherry Trailer
Here’s the rig I drove, nearly loaded, parked at the orchard’s loading area. Shade and mist help keep the area cool. Each bin of cherries is hosed down and then covered with a water-soaked foam pad to help keep them cool.

Cherry bins measure roughly 4’w x 4’d x 1’h and hold about 300-340 pounds of cherries. For the first bunch of runs, they stacked the bins 5 high so I was carrying 40 bins or 13,000+ pounds of cherries. This turned out to be the challenge: controlling speed for the first 8 miles of the drive to the packing plant, all of which was downhill.

Of course, before I left I also had to strap down those bins, which required tossing coils of ratchet tie-down straps over the tops of the bins and fastening them on the other side. It would not be good if I took a curve too quickly and the bins tumbled off.

One off my clients went with me for the first run so I’d know how to do it. I almost immediately got into trouble. The roads in the orchard are narrow and twisting and there was a hairpin curve I had to negotiate. I was so focused on the curve that I didn’t register the loose gravel in the middle of it. When I braked to slow (from about 10 mph), the wheels locked up and I came very close to sliding off the road into someone else’s orchard.

Oops.

Backing up uphill with 13,000+ pounds behind me on loose gravel wasn’t easy. I threw it into 4WD and had to use a foot on the brake while I pressed the accelerator to actually start backing up. I only needed to go back about 5 feet and managed to do it. Then we made the curve and were on our way.

I did not make that mistake again.

It took 45 minutes to get to the packing plant and they were stressful minutes. The setup had the braking distance of a freight train so I had to go very slowly any time there was a chance I might have to stop.

But then I was pulling into the delivery entrance and stopping at the entrance check point. I unfastened the tie downs while they took sample cherries and did a bunch of paperwork. Then on to the offloading area, where a team of forklifts took those 40 cherry bins off in less than three minutes. (And no, that’s not an exaggeration.)

On most trips, I came straight back, but on a few trips I needed to pick up (and strap down) empty bins or bins full of the foam pads they use to help keep the cherries cool in transit. Either way, the trailer was so light that I was able to get back in 30 minutes.

I made three runs the first day and two runs each of the next six days. I started at 8 AM — three hours after the pickers started because it took that long for them to fill 40 bins of cherries — and was usually done by noon — two hours after the pickers had finished and gone home. (They can’t pick cherries when it gets hot out and that week was very hot.) Although most loads had 40 bins early in the week, by the end of the week I was taking 44 bins (4 stacks of 5 and 4 stacks of 6). That’s nearly an extra ton. I got pretty good at controlling speed and handling the load and had no mishaps.

Along the way, I learned a lot about packing cherries. I think that was the best part of the experience; learning new things.

Cherry & Blueberry Picking

Like every year I’ve been up here during the summer — including years before I actually moved here — I always manage to get out for some cherry and blueberry picking.

I pick cherries after the growers have picked, “gleaning” what the pickers missed. I actually picked a lot more this year than I usually do, starting early with rainier cherries in an orchard near my home and, more recently, at the same orchard where I did my cherry driving. The key is to get to the orchard within a few days of picking; if you wait too long, the cherries are so far past prime they’re not worth picking.

Blueberries
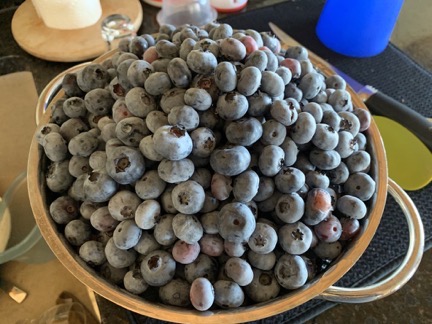
My first batch of blueberries.

I pick blueberries at the same orchard where I did my driving gig. The orchard owners have about 400 blueberry bushes that they don’t harvest commercially. Instead, they invite friends to come pick when they like. The season lasts well over a month — the blueberries on a bush don’t all ripen at the same time like cherries or other tree fruit do — so I can go weekly and bring home enough to freeze and still eat blueberries all week. I usually bring a friend and chat while we’re picking.

I bring my pups along on these outings. Like Penny, they enjoy running around the orchards, sniffing for mice and other rodents. It’s good to get them out someplace other than home where they don’t need to be on a leash.

Getting Out On the Water

Amazingly, I’ve only been out on the water three times so far this summer, but all three trips were real wins.

The first outing was in my own little boat with two friends. I blogged about that here, so I won’t repeat any details.

The second was paddling with my friend Cyndi and her dog. This was Lily and Rosie’s first time out on a kayak and, at first, they didn’t know what to make of it. I had life jackets on both of them and had them tethered to the kayak with expanding leashes and it’s a good thing I did! Lily took two dives into the water and Rosie took one. In both cases — their first times swimming! — their life jackets gave them plenty of floatation and I was able to reel them in with the leash as they swam back to me. We paddled around the estuary at the confluence of the Wenatchee and Columbia Rivers. The water was high so there were lots of channels to explore. We even got a chance to stop on a beach where Rosie surprised me by swimming out to my friend Cyndi who called her from the shallows.

Paddling
Here we are, paddling in the estuary. By this point, the girls knew the drill and stayed on board.

Fish
Here I am with Cyndi, holding up the six fish we caught.

The third trip was with Cyndi and her husband Matt on their fishing boat. I woke up at 2:45 AM so I could meet them at 3:30 for the hour+ drive to Pateros. We were on line at the boat ramp at 4:45 AM and joined the crowd of salmon fishers near the mouth of the Okanogan River upriver from Brewster by 5. I can’t believe how close the boats were to each other, trolling along on silent motors, pulling one sockeye salmon after another out of the river. We hit our limit of two sockeyes each by 8 AM and spent some time trying for chinook, which requires a different line setup and technique. After a half hour with no luck, we called it quits. I was happy! I took my two fish home and filleted them, freezing three large fillets and leaving a fourth for dinner. I also cooked up the bones for fish broth and made myself a nice salmon chowder with garden veggies and the trimmings from my filleting work.

Gardening

My garden is bigger and more productive than ever this year. This spring, I finally pulled out the last pallet planter I’d built, replacing it with one of the plastic cherry bins I’d bought as raised garden beds. That brings the total count to 11. (I have one more bin to install, but I need to do some deconstruction on a flower bed to fit it in; that’s an autumn project.)

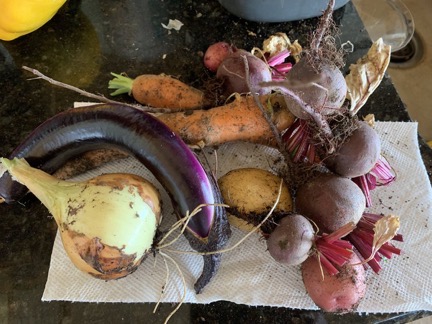
Veggies from my Garden
Here’s one evening’s side dish, brought in from the garden. I washed and chopped all of these, then roasted them with herbs in the oven. Delicious!

What did I plant? Let’s see. Broccoli, Brussels sprouts, onions (2 kinds), beets, radishes, scallions, tomatoes (3 kinds), asparagus, potatoes (3 kinds), sweet potatoes (2 kinds), peppers (4 kinds), eggplant (2 kinds), horseradish, spinach, carrots, strawberries, zucchini (2 kinds), yellow squash, pattypan squash, cucumbers, delicata squash, cantaloupe, watermelon, pumpkins, corn (2 kinds), green beans. Well, I didn’t plant the green beans — they planted themselves and have been doing so for the past four years.

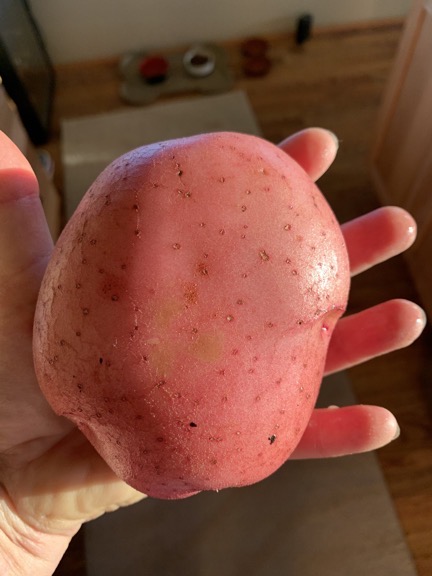
Potatoes
Have you ever seen a red potato this big? That’s my hand under it — and my hands aren’t small. I pulled it out of my garden last week.

I’ve been harvesting a little of almost everything and planting more beets, carrots, scallions, and radishes any time a bed empties and onions every time I pull a row. The only veggies I buy at the supermarket now is salad greens and broccoli (because it’s all done now). Everything else comes out of the garden and, frankly, I can’t keep up with production so I’m giving a ton away.

The 11 chicks I got in April are just getting ready to start laying. I just started an egg subscription service for neighbors: $10/month gets you a dozen eggs delivered to your doorstep once a week — if you give back the cartons. When I have all 16 chickens producing, I’ll be getting a dozen eggs a day and will need to do something with them. There’s only so much quiche a person can eat.

Cooking

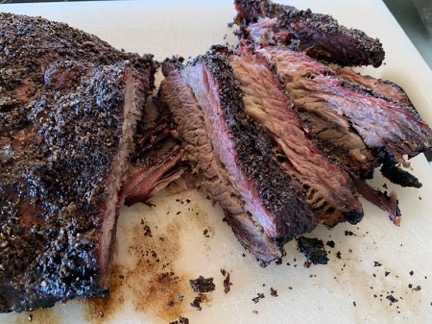
Brisket
I finally found a brisket recipe I felt able to follow — with some modifications — and made this. Not bad for a first try.

Like most of the folks stuck at home this summer, I’ve been doing a lot of cooking. Some of it is an attempt to use up some of the produce coming from my garden or the orchards and blueberry patch where I pick fruit. Others are attempts to make something I’ve always wanted to try making.

Cake
The cake tasted even better than it looks, but what was I thinking?

When I make something that freezes well, I portion it out, vacuum seal it, and put it in my garage freezer so I always have a quick meal available on those days I don’t feel like cooking. I made a blueberry zucchini cake recently and wound up giving nearly all of it away to neighbors and friends. What was I thinking when I made a cake that big?

Other Stuff

I’ve also been making and selling jewelry, although not as much as I’d like. I think I’ll save that for another blog post.

I’ve also been doing a lot of video editing for my YouTube channel, but I’ll whine about that in another post, too.

But these are the main things I’ve been up to this summer. When the weather is nice, I’d rather do stuff outside than sit in front of a computer typing up a blog post and that explains why I haven’t blogged so much.

I will try harder to blog more in the future. I find that my blog posts are the best way I can remember the things that went on in my life years after these things happen. My blog is my journal and I really do need to stick with it.