Do the math, think it through.
Yesterday, I got a phone call from a Groupon representative. He’d been trying to reach me for about a week and had left two voicemail messages, which I ignored. Yesterday, he reached me at my desk while I was working on the finishing touches for my latest book.
Groupon, in case you don’t know, is an up-and-coming business that has combined social networking with discounts. The idea is that they get a group of people to buy into a special discount offer. The people prepay for whatever it is they’re buying and get vouchers to redeem. They then take the vouchers to the merchant and get the products or services that were in the special offer.
Groupon makes its money by taking a cut of the amount it collects for the merchant: 30 to 60%. To feature a merchant offer, the merchant must discount its products or services by at least 50% off regular price. This can be a real attractive deal for people who want to save money.
There are Groupon clones popping up all over the place these days; Living Social is one that called me several months ago. Oddly, I got a call from yet another one yesterday as well.
Groupon’s Sales Pitch
Groupon cons businesses into signing up with them by pointing out that it’s risk-free advertising for the business. Indeed, it doesn’t cost a thing to list with Groupon. The cost comes when they start selling for you. So you’re only paying for results.
Yesterday’s Groupon guy pointed out that they have hundreds of thousands of subscribers in the Phoenix area, so my special offer would reach all of them. For free! According to him, this was great exposure for my business. People who bought Groupons would undoubtably come back for more of my great service. Even if someone didn’t take advantage of the Groupon offer, they’d learn about my business. According to him, it was win-win.
I’d already given this a lot of thought, so I was prepared. I let him do his whole sales pitch. Hey, if he’s going to interrupt my day, I may as well put him to work. It’s a good thing I did. Because along the way, he made it clear that he had no idea about the negative impact of a Groupon offer on my business.
He asked me what Flying M Air‘s most popular trip was. I told him it was my hour-long Phoenix Tour, which sells for $495 for up to three people. He asked how many helicopters we had and how many flights we could do in a day. I told him one and asked how many hours there was in a day.
As part of his pitch, he told me that Groupon normally wants 50% off the amount it collects for the offer. But because he “realized that there are a lot of costs associated with operating a helicopter, such as fuel and pilots,” they would take only 30%.
Fuel and pilots.
Doing the Math
It was right about then that I grew tired of the conversation. I could do the math; he didn’t even know what numbers to plug in. All he saw was a sweet deal for Groupon: $495 x 50% x 30% = $74.25 per voucher sold. Multiply that by, say 250 vouchers, and Groupon pockets over $18K — just by making a phone call and doing a bunch of things that are likely handled by its computer systems. Cha-ching! On to the next business!
On the flip side of that, I’d be pocketing $173.25 per voucher sold. For an hour of flight time.
To understand just how bad a deal this is for me, let’s talk a little about my actual costs. I won’t go into deep detail here; instead, I’ll just talk about my three biggest direct operating expenses. No, fuel is not number one and pilot expense doesn’t even make the list.
- Reserve for Overhaul. Think of this as part of my maintenance expense. Every 2200 hours of flight time or 12 years, a Robinson helicopter has to go back to the factory (or authorized service center) for an overhaul. For my model of helicopter (R44 Raven II) that currently costs about $218,600 plus any required upgrades or other non-covered items. Let’s do the math: $218,600 ÷ 2200 hours = $99.36 per hour.
- Fuel. You might get sticker shock at the fuel pump for your car or truck, but try filling up with 100LL at the local airport. On my most recent trip, I paid anywhere from $4.50 to $5.65 per gallon of 100LL. The helicopter burns about 16 gallons per hour. Using a conservative average of $5 per gallon, let’s do the math: $5 x 16 = $80 per hour.
- Insurance. Think your car insurance is costly? Try insuring a helicopter for commercial operations. Last year’s insurance bill was $14,950. I fly about 200 hours a year. Let’s do the math: $14,950 ÷ 200 = $74.75 per hour.
Now let’s add all these numbers up: $99.36 + $80.00 + $74.75 = $254.11 per hour.
This does not include the routine maintenance that’s required to keep the helicopter safe and legal, such as oil changes, 100-hour inspections, and annual inspections. It doesn’t include the unexpected repairs like the starter and ring gear, auxiliary fuel pump, upper bearing, and countless other components that needed repair or replacement in the six years I’ve owned the helicopter. It doesn’t include hangar rent, charts and other documents required by the FAA, office expenses, or advertising expenses. It doesn’t include monthly loan payments for the helicopter — which is twice as high as my mortgage. This amounts to thousands of dollars every year.
And no, it doesn’t even include a salary for the pilot — me.
But we’ll put all that other stuff aside for a moment and go with the three biggest direct operating expenses summarized above. They add up to $254.11 per hour. The Groupon deal would pay me $173.25 per hour-long flight. That means that on every flight, I’d lose at least $80.86. Multiply that by, say 250 vouchers sold, and I’d lose at least $20,215.
And again, this doesn’t include the other direct and indirect operating expenses of my business. Add those and this loss number would likely increase by at least 50%.
The Non-redeemer Argument
When I pointed out on in Twitter in basic terms how bad a deal this would be for me, one of my Twitter friends responded:
But you factor in those who pay and never cash in the coupon, no?
Many businesses do this. Groupon was very careful not to suggest this was a possibility, although most Groupon proponents say to expect at least 20% no shows.
But look at it this way: if you paid $10 for a $20 voucher toward a meal at a restaurant across town, using that voucher might not be very high on your priorities list. Over time, you might forget you have it or even lose it. No big deal. It’s $10 out of your pocket.
But if you paid $247.50 for a $495 helicopter flight, how likely are you to forget about it? Very unlikely. I sell gift certificates every year at Christmas time. They all expire at the end of March. Around mid-March, my phone starts ringing. By month-end, I’ve done all the rides paid for at Christmas time. People who are looking for discounts don’t forget expenditures that large. I’m sure I’d redeem at least 95% of the ones sold on Groupon.
The Return Customer Argument
Another Twitter friend said:
The hope with Groupon is that the resulting customers would be repeat customers at the full price in the future.
Indeed, that’s what Groupon is suggesting. They’re pushing themselves as a means of advertising. They seem to think that once the customer knows about your business, they’ll keep coming back for more.
I think that in most cases — and certainly in the case of my business — this is simply not true.
Look at it this way: the people who subscribe to Groupon’s service are willing to spend time every day reading e-mail messages from Groupon that summarize the daily deals. These are people who are very interested in saving money. They’re buying because of the 50% off deal — not because they want the product or service. True — that Groupon voucher will get them in the door. But are they likely to come back and pay regular price for the same goods or services in the future? When they know that they could wait around and probably get another Groupon deal for the same product or service there or elsewhere in the future? I seriously doubt it.
As if to re-enforce this notion, a Twitter friend said:
So your saying to not take advantage of the deal that is offered?
I replied:
Yes, that’s what I’m saying. I’m saying to STOP using Groupon unless you want to HURT a business.
To which he replied:
This could get into a lengthy conversation so I’ll just drop it now. I’ll just say that I wish I could always afford to pay retail.
This confirmed my suspicion: that Groupon users are only interested in buying at discount. This particular Twitter user likely has no intention of being a regular customer for any Groupon merchant. He’s just in it for the deals.
And how many repeat customers do they honestly think a helicopter charter operator would get among the kinds of people who buy only when prices are 50% off? How many helicopter tours of Phoenix does a person need? And that’s my lowest price item — if these people were only willing to open their wallets for $247.50, would they do the same for a $795 Moonlight Dinner Tour or a $1,095 Sedona Tour or Day Trip? If I had 1% repeat customers I’d be shocked.
A helicopter operator friend of mine saw the harsh reality of a Groupon deal. He runs a flight school and offered introductory flights at $69 (regular price $225), with the thought that buyers would come back and take flying lessons. He had to “beg” Groupon to stop selling them when they reached 2,600 vouchers sold. True, he’s operating smaller, less expensive equipment than I am, but even if his intro flight times are only 30 minutes, he’s still losing money on every flight — all 2,600 of them. He goes on to say:
A huge number of customers telephoned the office to ask if they could buy the $69 intro lesson deal directly from us. We tried gently to explain that we weren’t quite sure how we were going to serve 2600 customers and that adding a 2601st would not help. We then offered them the $225 standard intro lesson price, which is already discounted to some extent. Nobody was interested at that price. So unless we can figure out how to sell them 2nd, 3rd, and 4th lessons at $69, perhaps this will be the first and last flight for nearly all of these folks.
And how many of these people are going to shell out $8K or more for a private pilot license?
As another Twitter friend said:
Good for you – from what I can tell Groupon can be a disaster for small businesses.
I’ve seen reports of small busiensses that went under after doing Groupon. Losing $$ on large volume of one-timers isn’t good.
What if I’d done it and sold 2,600 vouchers? I shudder to think about it.
The Exception: Fixed Cost or High Margin Businesses
Of course, this is just my business and another one similar to it. Clearly, businesses that have fixed costs or high profit margins can afford to get only 25¢ or 35¢ on the dollar for their products or services.
One guy who contacted me the last time I wrote about Groupon or Living Social has a rock-climbing business. He already has the equipment and the storefront. His operating costs don’t change based on the number of people who show up to use his facility. The extra few dollars per person he received through his deal could actually help him make ends meet. People paid $8 for a $16 service; he got $3.60 per voucher. He told me he expected 20% to 40% no shows and was happy with his deal. Of course, he only sold a few hundred.
Restaurants might also do well, since they often have high profit margins. (What does it really cost to make a latte?) But at least one restaurant owner suffered badly after a Groupon deal, primarily though larger crowds than she could handle, people using multiple Groupon vouchers to pay for an entire meal, and gratuities to servers based on the discounted amount rather than the full price (which didn’t make the staff very happy at all).
I wonder how many others have had similar experiences but just haven’t blogged about it.
Fiddling with “Regular” Price
Of course, one way to guarantee that you make money on every item sold is to fiddle with your “regular” price and make sure your profit margin is high enough to cover the discount and Groupon cut. Yes, I mean inflating your retail price.
I admit that I tried this last year. My problem was that in order to get hotel concierges to book flights for their guests with me, I had to give them a 20% commission. My margins really are small — I’m not just blowing smoke here. If I paid them 20%, I wouldn’t make any money at all. And hotel guests are definitely not return customers. So in order to make enough to pay them the commission and earn a little money (but still not as much as the concierges would), I raised my prices. This turned out to be a mistake because it (1) made me too expensive for the average customer and (2) made my services more costly than my competition’s. So this season, my prices returned to normal and I simply cut the commissions I’d pay the hotel concierge staff.
But you have to wonder how many businesses are making Groupon — and other deep discount deals — work by inflating their prices. And what does that do for them — and the consumer?
Basic economic theory proposes that the more expensive something is, the fewer people will buy it. (As I saw, raising prices turned off “retail price” customers, thus reducing the total amount of business.) There comes a point where the additional unit revenue for the higher prices won’t make up for the unit sales lost because of higher prices. If the only customers are those buying at a discount, the net effect is a reduction in revenue.
Let’s look at an example. Suppose an item costing $20 normally sells for $75 for a $55 per unit profit. The merchant sells an average of 100 units a week for a total profit of $5,500.
To ensure a profit when selling through Groupon, the merchant raises the “regular” price to $100. For each item sold through Groupon, the merchant gets $25 so he’s making $5 profit from them. Regular retail customers are paying $100, so he’s making $80 profit from them. At the Groupon price, he could sell 1,000 units in a week, but his retail sales drop to just 20 units a week because his competition sells the same item for a lower price. Total take: $5,000 from Groupon sales + $1,600 from retail sales = $6,600. Looks good, right?
Now suppose the Groupon deal is over and there are no more discounted sales. He’s still selling just 20 units a week for $1,600 in profit. Not so good anymore, is it?
Of course, these are just numbers pulled out of thin air. You can play what-if forever and never get an accurate indication — until you try it.
Deep Discounts Hurt Consumers, Too
As more and more businesses inflate their prices to cover the costs of discounts and special offers, the average prices of goods and services rise. Ironically, this means that the consumer’s thirst for deep discounts could be causing overall price increases that make items unaffordable without the discount.
Think of my Twitter friend wishing he could afford to pay retail. He later tweeted:
It would be nice if prices were just fair and coupons didn’t exist. Making purchasing decisions would be simple.
News flash: coupons aren’t going to go away if people keep using — and relying on — them.
In addition, the demand generated by oversold vouchers can exceed the merchant’s ability to redeem them. Overcrowded restaurants, out-of-stock items, long delays in scheduling — I still wonder how my friend will schedule 2,600 intro flights, given that each one requires at least 30 minutes of ground school and 30 minutes of flight time. Not only is this a nightmare for the merchant, but it certainly does not make for good experiences for customers.
What consumers don’t seem to realize is that their thirst for deep discounts can be fueling a market trend that is, over the long term, destructive.
- Businesses desperate for sales and willing to take a loss on deep discount sales will fail when repeat business does not materialize at regular prices. This means fewer businesses and less competition in the market.
- Businesses that manipulate regular prices to ensure profit on deep discount sales will inflate retail prices beyond what many consumers are willing to pay. This means less affordable products and services.
- Business that oversell deep discounted products or services may fail to provide products and services timely or satisfactorily. This means a lower level of service.
How does any of this benefit the consumer?
Crap Offers to Get Customers in the Door
Of course, the really savvy businesses will try to use Groupon as a means to get customers in the door by offering nearly worthless items at a discount. Another one of my Twitter friends alluded to this:
I signed up for Groupon and not impressed. Feels like daily spam with nothing of value.
Could it be that some businesses are getting wise to the pitfalls of using Groupon? Could it be that the ones that aren’t desperate for customers are keeping clear?
Why I’m So Passionate about This
As you’ve probably figured out by reading between the lines, I’m angry about this Groupon thing. (And not just Groupon; all of its copycat companies, too.) It took me a while to figure out why.
- Groupon is misleading business owners. Groupon pushes itself as a marketing tool that you pay for only when you get results. But a true marketing tool would get long-term results, not one-time results.
- Groupon is extremely expensive. Don’t just look at the 50% commissions on the sale price. Instead, look at the whole cost, which is 75% of the retail price. Offering a Groupon deal is the same as giving customers 75% off.
- Groupon is making a lot of money — far more than its clients. Is it right that any advertiser should make more on a business’s products or services than the business itself?
It bothers me that so many small businesses are being hurt by Groupon-like deals. In many cases, these are companies that are cash-starved and desperate for revenue. The idea of selling a 1,000 vouchers at $50 each — $50,000 cash up front! — is extremely appealing to these people. They don’t think about what it will cost them to redeem these vouchers: products, equipment, services, employees, scheduling. They don’t think about how crowds and word of the discount might affect their relationship with current customers.
And Groupon doesn’t do a thing to enlighten them about the potential drawbacks.
It also bothers me that so many consumers who are obviously clueless about the costs of running a business will snap up these Groupon deals with no intention of becoming loyal customers — paying retail, imagine that! — of any Groupon merchant. Don’t they see how they’re potentially hurting the businesses they visit with their Groupon voucher? Don’t they care?
And finally, it bothers me that Groupon called me three times before finally making contact, told me they wanted to “feature” me on their site, and had no idea about how my business operates or what my services cost. It bothers me that later the same day, a Groupon copycat company also called me and tried to reel me in on the same deal with the same lack of knowledge. Or that yet another copycat company called me months ago, also trying to sucker me in. Blood-sucking leeches doesn’t seem so far off-base.
The Final Straw
What really got me angry yesterday, however, was an article I read online called “Groupon gripes: Are daily deals headed for disaster?.” In it, the author discusses the problems that Groupon causes for businesses. He admits that many businesses “don’t even break even.” Yet he finishes up the article by encouraging consumers to take advantage of Groupon deals:
Skeptical as I may be, the limited funds in my bank account make me a consumer first and an observer second. As companies line up to split prices in half and make them even easier for consumers to find, I’ll be there right alongside soaking up the deals. I did, after all, milk AllAdvantage for triple digits before the goons running the place depleted their venture capital and shuttered the place for good.
In other words, if this ship’s going down, I’m raiding the buffet before hitting the lifeboats. Join me for an oyster?
Or: Fuck the businesses and the economy that they fuel. Suck up all the cheap deals you can while the businesses stupid enough to offer them are still around.
Not exactly the kind of insightful commentary I expect from a journalist.
And the Winner Is…
As one of my Twitter friends said:
“The only one who wins with Groupon is Groupon itself.”
I couldn’t agree more.
One more thing: If you plan to comment on this piece with some sort of defense of Groupon or its copycats, be prepared to back up your opinion with facts. If you’re a business owner and it helped you, share some real numbers about profits/losses, repeat customers, and how you benefited. If you’re a consumer, share some experiences about saving money, positive redemption, and becoming a repeat customer. Simply throwing opinions that aren’t backed by facts isn’t going to convince me or anyone else.

 So instead of giving my guests their Phoenix Tour and heading up the Verde River on Day 1, we took a shorter route to Sedona that overflew Lake Pleasant and stayed within several miles of the I-17 corridor. I figured I’d save the scenic flight for when visibility was better. I also expected visibility to be better in the Sedona area and was very surprised that it was not.
 The flight to the Grand Canyon on Day 2 wasn’t anything special — except for that white haze that persisted, even up on the Coconino Plateau. Very odd for Arizona. It wasn’t blowing dust, either — the wind wasn’t strong enough for that. Just an ugly haze.
 Day 3 dawned gray but with plenty of visibility. I even got out and snapped a few
 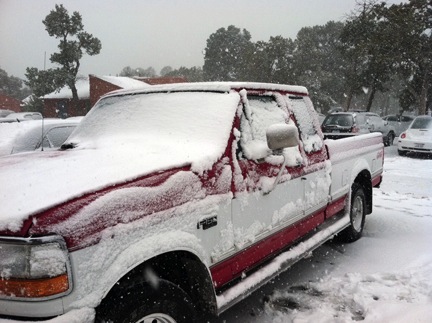 I felt bad for my guests. They’d spent a lot of money on this trip and now they were stuck at a scenic place with no scenery and no helicopter flight to get them to their next destination. So I became their driver for the day. After realizing that the truck was not likely to make it to Desert View (on the east end of the park) before the roads were cleared, we stopped at the Visitor Center and the Geology Museum before heading into Tusayan (the tourist town outside the park) for lunch. The plan was for them to see the IMAX movie across the street next.
 But that plan failed miserably. When I got to the airport, I found the helicopter’s right side — the side facing the weather — completely iced over. The main rotor hub, the tail cone, and the tail rotor were all coated with ice. Even the skids looked frozen to the ground. And, of course, there was a good helping of snow in the fan scroll (again!) and even some inside the air intake port. The temperature had dropped by 10°F and it was now below freezing. It would not warm up again that day. The helicopter was officially grounded.
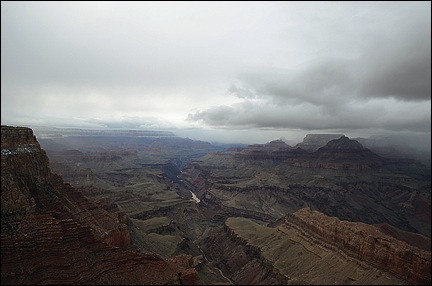 I wound up driving them to Page. The trip should have taken just over 2 hours, but since the weather was clearing enough to see into the canyon, we made several stops along the way. We arrived in Page at 8 PM. I checked them into their room, made sure they were set for the next day’s boat ride, and checked into my room at the Day’s Inn.
 Now what I needed was a thaw — temperatures above 32°F. I must have called the AWOS number for GCN a dozen times before 10:30 AM on Day 4. Then I climbed into my redneck truck and made the trek down to Grand Canyon Airport. It took 2 and a half hours with just one stop to snap
  The flight was, for the most part, smooth. I ran the video camera (as you might expect) and captured some good footage over the Little Colorado River Gorge and along the Echo Cliffs. I set down on a helipad at Page Municipal Airport at 3 PM.