
So that’s why they sent me a copy!
Last spring, as I was finishing my packing and preparing to leave my Wickenburg home for good, a box arrived in the mail from Pearson Education. I’d been writing for Pearson’s Peachpit imprint since 1995 and assumed the box contained copies of my latest book about Mac OS X, translated into other languages. Of course, all my other books had already been packed and I was bummed that I couldn’t pack this latecomer with the others.
The Mystery
 But when I opened the box, I was very surprised to see that it wasn’t a translation of one of my books. It was an absolutely beautiful 1240-page hardcover book about art by Marilyn Stokstad and Michael W. Cothern titled simply, Art History (Fifth Edition). A quick look on Amazon.com showed me that the book would cost nearly $200 to buy. That wasn’t difficult to believe. The book was beautiful.
I’ll be the first to admit that I have only a passing interest in art history. But paging through this book while trying to figure out why it had been sent to me, I realized that I was holding the definitive guide to the history of art — a book that covered art history as far back as prehistoric times. It was chock full of gorgeous full-color photos. Everything the average person could want to know about the history of art worldwide was in this amazing textbook.
But why the heck had it been sent to me?
I didn’t know the authors and I didn’t write textbooks. I had never voiced an interest in art history to anyone I knew. There was no note with the book. Nothing at all to explain why I’d gotten it. I wound up assuming that someone at Peachpit had sent it to me as a gift — I’d been getting quite a few little gifts from friends who sympathized with my divorce ordeal.
I packed the book carefully in one of the last boxes I sealed up. It would look nice on the coffee table in my next home. And maybe — just maybe — I’d have time to read some of it when I settled down again.
A Partial Solution
This morning, I got two email messages, each referring to permission to use one of my photos.
One message was from a woman named Evi, who I vaguely remembered from the past. In this new message, she told me she needed to “re-clear the rights to use the below picture” for a new edition of Stokstad’s Art, A Brief History. I scrolled down and saw one of my photos of the Grand Canyon.
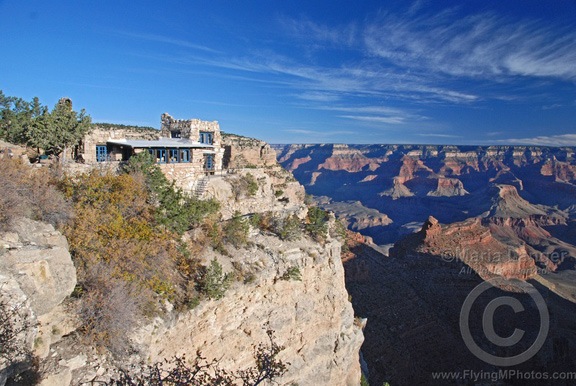
I shot this image of Lookout Studio after dawn one day in October 2008, most likely while I was on one of Flying M Air’s Southwest Circle Helicopter Adventures (which I stopped offering when I permanently moved out of Arizona).
It was very important, Evi told me, that my rights be extended to Pearson, the US publisher. The other message was from Pearson and included a permission form. (Pearson has forms for everything.)
 I looked up the book on Amazon.com and found a 640-page paperback book titled Art: A Brief History (5th Edition). Although I’d never seen the book before, it did get the wheels turning in my head. I did another Amazon search on the author’s name and found the book discussed at the beginning of this blog post — the book I’d received out of the blue at least nine months ago.
And then I remembered a bit more about my email exchange with Evi. It had been about two years ago. Her company had bought — actually paid — for the rights to use the photo. Somewhere along the line, I must have also requested a copy of the book. Months later, I got the check from the UK-based company drawn on a US bank, cashed it, and promptly forgot all about it.
Is it possible that they used my photo in such a big, beautiful book? Or did they use it in the shorter paperback she mentioned in her email message?
But the dates didn’t jive. The paperback book was published in December 2011. Surely it hadn’t been that long since all this transpired.
And if it was in that 640-page paperback book, then why had they sent me the 1240-page hardcover book?
Without asking for details — which I really don’t think is worth the bother; after all, this poor woman has thousands of pictures to get permissions for — the only way to know is to look through the book they sent me to see if my photo is in there. Of course, that box is still packed and still in storage. I likely won’t unpack it until later this summer, at the very earliest.
Permission Granted
I’ll definitely be giving them permission to use my photo again. And I won’t charge them a fee this time. I’m hoping that the photo did appear in the bigger book and that I get a copy of the smaller book once it’s revised.
Needless to say, I’m tickled that my work appeared in such wonderful volumes. Photography is just a hobby for me; to have my work recognized and used — with permission — in such a way really makes me happy.


 Pour enough water over slow-cooker contents to barely cover them. In the slow-cooker I’m using, that was just over 3 cups.