Chickens Again, Part I

Getting started with a new batch of chickens.
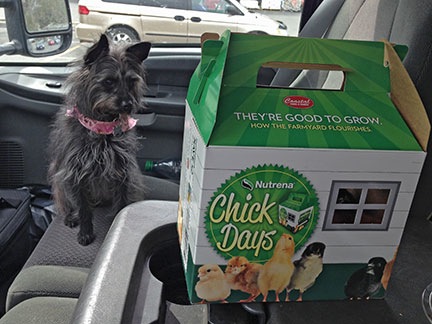
Penny with Chicks
Penny suspected trouble when I got into the truck with this little box.

A few weeks ago — just a few days after returning from my 2-month California trip, in fact — I bought 8 chicks. I set them up in my shed, in the stock tank I’d bought last year for my poor man’s hot tub.
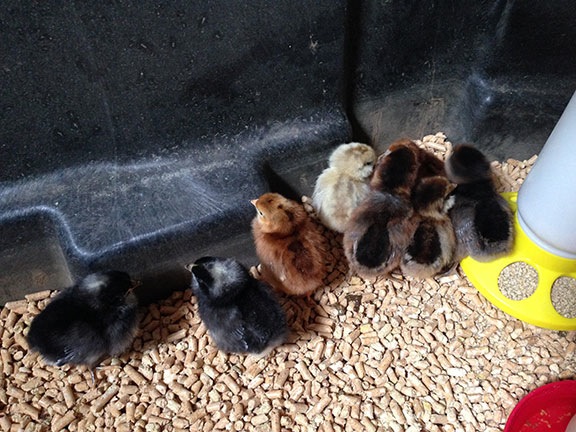
Chicks in my Shed
My little chickies, huddled together in their nursery.

I’d had chickens before, in Arizona. They’re a lot of fun and you really can’t beat fresh eggs. Because I knew I’d have chickens again, when I moved to Washington, I took along most of my chicken-rearing equipment: feeders, waterers, and heat lamp. That saved me a bunch of money when it came time to get these started. And the stock tank in the shed really beats the cardboard boxes I used to use in my garage to get the chicks started.

The Chicken Yard

Of course, they couldn’t stay in the shed. Eventually, they’d need a chicken coop and a fenced-in yard. Like Wickenburg, this area has coyotes and I’d have to protect the chickens from them. It also has large hawks, eagles — including Bald Eagles — and owls, so a net across the top would be vital. I wanted the chicken yard to be large enough to accommodate all the chickens and, with the real possibility of free-range egg sales, even more chickens in the future. And although I only wanted to build it once, I didn’t want it to be permanent. (I’ve come to realize that I don’t want anything in my life to be permanent because nothing really is. But that’s a philosophical discussion best saved for another blog post.)

I explored many options. “Hog panels” looked good, but the only ones available in the area were very large and very costly. Someone suggested a dog kennel and even sent me to Costco in search of one that seemed like a good deal. But they were out of stock and I was running out of time. I needed the chickens out of the shed before I headed south for a few days on personal business.

Gardening with a Backhoe
Jeff cleared a space for my shed and garden and left a pile of bunchgrass and weeds in the area just north of the garden patch.
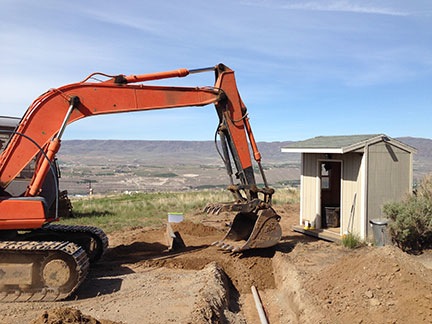
Covering Conduit
After he moved my shed and dug a trench, I ran conduit for my temporary electric and water lines to keep them off the driveway and he covered it back up.

Meanwhile, Jeff, the earth-moving guy, was preparing the pad for my future home. He had a honking huge backhoe and an i-beam that he used to scrape the ground. I wanted a garden and I wanted my shed moved to the other side of the driveway. (Originally, I figured I’d sell the shed when my building was done, but I realized it would make a great place to store garden tools so I decided to keep it.) I realized that Jeff could give me a good head start on my garden prep with that i-beam and I set him to work on a small area near where I wanted the shed. He dug out the few sagebrush there and scraped the ground clear of bunchgrass, leaving it piled up in an area north of the garden. He even dragged my shed to its new position — it was built on skids — and got it level for me. And dug a trench so I could run power and water for my RV and shed under the driveway so the cords and hose would not be run over by construction vehicles this summer.

When he left, I looked at my future garden location and the spread-out, uprooted bunchgrass beside it. The chickens wouldn’t mind all that grass. And it would be nice to have them next to the garden so I could let them in to eat bugs. Without even intending to, Jeff had chosen the spot for my chicken yard.

I wound up buying 150 feet of 5-foot tall “horse fence” at the nearby Coastal Farm and Ranch store. I wanted 6-foot fencing so I’d have plenty of room to walk around under the net, but this was on sale for a good price and it’s not as if I’ll be hanging out in there with the chickens. I also bought a few 6-foot T-posts. I already had a T-post driver and a bunch more T-posts that a friend had given me.

But I began realizing that I’d have a problem when I got the roll of fence home. It was too heavy for me to lift. I couldn’t even push it out of the truck bed. Clearly, I’d need help.

Assembling the Fence

Help came in the form of my friend, Mike. He’d come up from California with his helicopter towed behind his motorhome. After dropping off the helicopter at the airport, he rolled down my driveway and greeted me with a big hug.
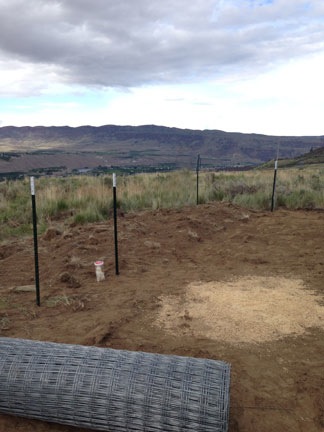
Fence Under Construction
Some of the T-posts in the ground around the future chicken yard; the roll of fencing was very heavy.

After getting a tour of the place — building pad, “lookout point,” apiary, chicks in shed — we talked about the things I needed to do. I mentioned the chicken yard and the fence, never even thinking about asking him for help. That’s when he offered to help me.

I’m not an idiot. When someone offers to help me with a difficult task, I say yes! We got to work right then and there.

The work went surprisingly well. Within about 2 hours, we had completely fenced in a 9 x 25 foot area beside my future garden, leaving only a 4-foot wide doorway for a gate. Although it wasn’t perfect, it was a lot better than I expected it to look.
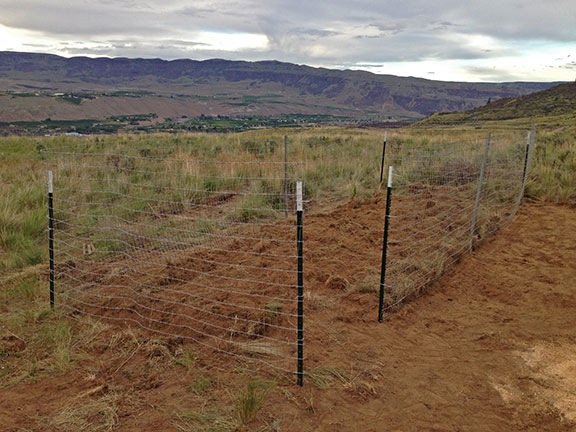
Chicken Yard
The nearly finished chicken yard.

Finishing Up. Almost.

The next day, I bought some bird netting at Coastal. Although it was supposedly 14 x 45 feet in size, the 14 foot width could not span the 9 foot width of the chicken yard. (What was that all about?) But with a little creative cutting and attaching, I was able to fit three pieces across to protect the chickens from aerial predators.

The next morning was warm and sunny with hardly any wind. I decided to try out the chickens in their new yard — I really needed to get them settled in before I went on my trip. I dragged the stock tank out of the shed and into the chicken yard. I closed the makeshift gate I’d made behind me. And then I tilted the stock tank so it was laying on its side, thus freeing the chicks.

They were not happy. And Penny, of course, went nuts. She couldn’t get into the chicken yard and she wanted a piece of those chickens. The chickens ran around and Penny ran around the yard. And that’s when the chickens started squeezing through the fence.

What followed was a comedy routine that involved me and Penny chasing 3-week old chicks. Penny was good at catching them and, for some reason, she didn’t kill them. I managed to get them all back in the stock tank. After putting food and water in there, I went back into the RV, hot, sweaty, and dusty.

The chicks would not be much bigger before I headed out on my trip. That meant that if I wanted them in the yard, I’d have to put something around the bottom edge of the fence to prevent them from squeezing through. What? I had some chicken wire, but I’d bought 4-foot width and that was overkill. It looked as if I’d have to head back to Coastal for some more chicken wire.

Reuse, Recycle

I was back out in the yard, contemplating the situation, when my eyes fell upon the 22 bales of straw I had in two piles in my yard. I’d bought the straw the previous autumn to stack around the base of the RV to winterize it. When I moved the RV out for my California trip in February, I’d stacked the straw neatly to get it out of the way.

If I laid the straw around the base of the chicken yard, right up against the fence, would that prevent the chickens from getting out? It certainly seemed as if it would.
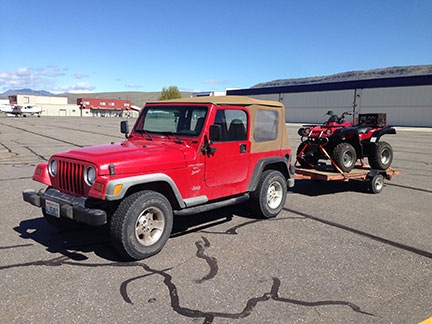
8 WD
Although I bought this little flatbed trailer — a Craig’s List deal — primarily to move my bees around in the future, its size and low bed make it perfect for moving my ATV and straw bales.

So I got to work. I’d brought my ATV home, along with the little cargo trailer I’d bought years ago for yard work up at our vacation property in northern Arizona. The cargo trailer’s tires had been replaced and it was all ready for use. But last week I’d also bought a very small flatbed trailer that was larger than the ATV’s yard trailer. With a ball on the front of my ATV for towing the helicopter, I could tow the little flatbed trailer. It would be perfect for moving all that straw.

A formerly wise man used to say that any job is easy if you have the right tools. How true. I had the straw moved and positioned in less than an hour.

I was thrilled. My solution solved more than just the chicken escape problem. It also temporarily solved the problem of what I was going to do with all that straw.

A while later, I tried again to let the chickens out into the yard. This time, they didn’t escape.
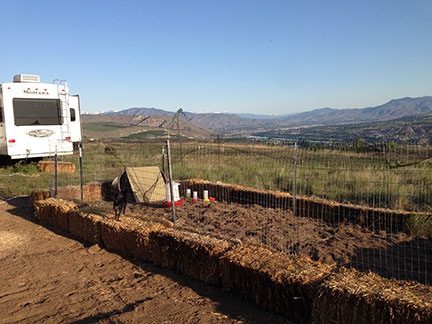
Chicken Yard
The chicken yard this morning. I haven’t done a headcount, but I’m pretty sure all eight of my little girls are in there.
Temporary Coop
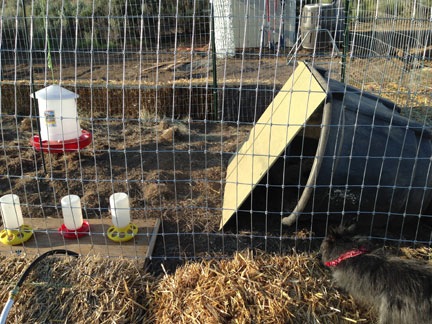
The temporary chicken coop is nothing more than a stock tank on its side with a piece of scrap plywood as a lean-to wall.

I set up an automatic waterer that I think might be a bit too big for them. Then I set up their chick feeders and waterer. I left the stock tank on its side against the side of the fence as a makeshift shelter for them; later, I leaned a piece of scrap plywood against it to enclose most of it. My list of things to do includes building a chicken coop, but I’m not sure I’ll get to that before my trip. The chicks are still small and should be okay in the stock tank, at least for a few more weeks.

The sun has just risen as I’m tying this. Seeing movement out the window, I took a closer look. The chicks are out in their little yard, scratching around in the early morning light. They’re exploring their big automatic waterer and, with luck, will soon be using their hanging feeder, too.

It looks like I’m on the road to chicken success. More later, after I’ve built their coop.

Maria’s Amazing Smoked Ribs

Easy to make, too, if you have a thermostatically controlled smoker, like a Traeger.

June 18, 2017 Note:

This post has been on this site for more than three years now and it continues to be my top post every weekend. It deserves it. The recipe, which is adapted from the Amazing Ribs website, is easy to make and use. The instructions are absolutely foolproof. In fact, I made four racks of these ribs on Friday to feed 10 dinner guests and got nothing but rave reviews.

Follow these instructions exactly as written and you won’t be disappointed. Check the comments for a link to buy powdered rosemary (which I have since done; you can get it in bulk on Amazon) and suggestions about spraying with apple juice (which I still haven’t tried).

Enjoy!

I picked up my Traeger the other day. I’d stored it in a friend’s garage while I was in California for two months on a frost contract. I wanted to bring it with me, but I couldn’t figure out how to bring it along without either making a mess inside my RV or disassembling it to fit it into the RV basement.

I was back nearly two weeks before I picked it up. I was busy. But once I had it home, I wasted no time smoking up two racks of baby back ribs. Although I took them with me to a pot luck BBQ down on the river that night, I knew attendance would be low so I gave half a rack to the guy who was doing the earth moving at my place in preparation for building to begin. He’s a nice guy and I figured he and his wife could share them for an appetizer before dinner. The next day, he thanked me, said they were great, and told me his wife wanted to know where I got the ribs.

Fred Meyer, I told him, but they could have just as easily been from Safeway or Costco. The meat isn’t what makes them amazing. It’s the preparation.

If you’re interested in buying a Traeger, you can help support this site by starting with this link.

I’ve made ribs at least twenty times on the Traeger since I bought it for my birthday last summer. I thought I’d shared the recipe here, but I couldn’t seem to find an entry for it. I figured that today was as good a time as any to get the recipe out there. As you’ll see, it’s extremely easy to make if you have a decent smoker.

There are two parts to this recipe. In the first part, you prepare the ribs by removing the membrane on the back side and rub them with a good rib rub. Do yourself a favor and make your own. There are a lot of recipes out there and any of them that includes salt and brown sugar as main ingredients will do the job nicely. A list of ingredients for my preferred recipe is below, but I can’t take credit for it. It’s from the Amazing Ribs website, which I highly recommend, and is called Meathead’s Memphis Dust. You really ought to read the recipe on that page since it has a lot of interesting details and useful tips that I won’t repeat here.

(Note: I do want to mention that this is the original version of that recipe, which Meathead no longer shares. He now thinks it’s better to keep the salt out of the rub and to salt the meat in advance. I’ve tried it his new way and frankly, I don’t like it. The meat always ends up too salty. This rub makes rib preparation error-free. Try it and see for yourself.)

The second part of the recipe is where you smoke the ribs. On a smoker. For a long time.

If you insist on boiling your ribs first, stop reading here. You’ll be wasting your time and, frankly, you’re not worthy of the results you’ll get if you follow the instructions here. Ditto if you think the best way is to roast them in an oven, slathered with barbecue sauce and covered with aluminum foil until they’re a soupy mess. (#YouKnowWhoYouAre) Get your mommy to make you one of her Campbell’s soup casserole recipes and a Cool Whip no-bake pie. You won’t appreciate the results of this recipe.

Still with me? Good! Here’s the recipe and instructions.

Rib Rub

Mix together the following ingredients in a medium bowl:

  • 3/4 cup firmly packed brown sugar. The recipe calls for dark brown sugar but because I don’t like the taste of molasses I usually have light brown sugar around and that’s what I use.
  • 3/4 cup white sugar. The recipe calls for white sugar but I usually have evaporated cane sugar and that’s what I use.
  • 1/2 cup paprika. If you make rubs often, buy the largest container of paprika you can find because you’ll go right through it.
  • 1/4 cup kosher salt. Although the recipe specifies Morton’s Kosher salt and the amazing ribs website tells you why, I think you can use any coarsely ground salt.
  • 1/4 cup garlic powder. But of course!
  • 2 tablespoons ground black pepper
  • 2 tablespoons ground ginger powder. The Amazing Ribs website warns you not to omit this ingredient. Personally, I would not omit any of these ingredients.
  • 2 tablespoons onion powder
  • 2 teaspoons rosemary powder. I was unable to find rosemary powder but I did find some sort of chopped rosemary leaves which I then tried to ground up a little bit to simulate a powder. What you want to avoid is full-sized pieces of rosemary leaves because I don’t think they’ll blend as well.

If you have any of this leftover after rubbing the ribs — and you should because it makes about 3 cups — put it in a jar with a tight lid and stow it with the rest of the spices in your pantry. It usually doesn’t last me more than a month or two before I use it all up. I really like these ribs.

Prepping the Ribs

You need to prep the ribs before you start the smoker. I don’t think it needs to be done the night before. I’ve done it as little as 30 minutes before placing them in the smoker and they always come out fine.

The kind of ribs you buy depends on your taste. I always buy either baby back or St. Louis style ribs. I used to like baby backs better, but I think St. Louis are usually meatier and juicier. They take a little longer to cook, too, so that might be a deciding factor.

  1. Remove the membrane on the back side of the ribs. This is a sort of skin that will prevent the rub from getting into the meat and possibly leave a stringy, chewy bit that really isn’t that good. The best way I’ve found to remove it is to use a butter knife to get the corner started, then grab it with a paper towel (which will give you a good grip with your fingers) and peel it off.
  2. Rinse and dry the rack of ribs.
  3. Sprinkle 1 to 3 tablespoons of rub evenly on each rack and rub it in. I use a lot because I really like it coated — almost to the point that the finished ribs are crusty. Do both sides and the ends and edges. The Amazing Ribs website recommends oiling the ribs first and then rubbing them, but I forgot the first time and they came out fine so I never do now. Why add fat, especially to the St. Louis ribs, which always seem to be fatty enough?
  4. Set the ribs aside until you’re ready to put them in the smoker. If that’s more than 20-30 minutes, put them in the fridge.

Smoking the Ribs

This is the easy part; your smoker does all the work.

  1. Follow the manufacturer’s instructions to get the smoker started and prepped. I always replace the aluminum foil from the drip pan, run the smoker up to a high temperature, and rub down the grill with a wire brush to clean it.
  2. Set the thermostat for around 225°F. You don’t want the temperature below 200°F or above 250°F.
  3. Lay the rack(s) of ribs on the grill surface, bone side down.
  4. Close the smoker cover.
  5. Go do something else. For at least 3 hours.

Amazing RibsThat’s an exaggeration. You might want to check on the grill periodically to make sure the thermostat is keeping it at the right temperature. My Traeger is a Junior and has a small hopper so I usually have to add pellets after a few hours. Don’t let it go out!
And don’t try to rush it by upping the temperature. Ribs need to cook slowly.

As the ribs cook, they’ll form what the Amazing Ribs guys call a “bark.” Yum.

The ribs are done when they pass the “bend test.” That’s when you grasp one half of the ribs with a pair of tongs and use them to lift the other end. The ribs should bend. If the bark cracks, they’re done. Yes, cooking them longer will make the meat fall off the bone, but that isn’t necessarily better. It’s just drier.

Expect 3-4 hours for baby back ribs and 5-6 hours for St. Louis ribs.

This recipe is so good that even though I overcooked the baby backs the other day, every single person who had them said they were “the best ribs” they’d ever had. Everyone. And I screwed up!

The Last Step

If you like barbecue sauce, now is the time to brush it on. Raise the temperature of the smoker or, better yet, thrown them on a direct heat grill. (Yes, it’s true: I don’t currently have a home, but I have two grills. I guess that tells you a bit about my priorities.) Cook on both sides until sizzling, but be careful not to burn them.

And you’re done.

As far as the barbecue sauce goes, you can also make your own. If I get it out of a bottle, it’s usually Jack Daniels original. Otherwise, I really like the honey barbecue sauce I blogged about the other day.

What Do You Think?

If you try these, let me know how they came out. But I warn you now: I won’t listen to any nonsense about boiling before cooking. Seriously: don’t even go there with me.

And if you don’t have a smoker but love ribs, this recipe will give you plenty of reason to go out and buy a smoker. Really.

I do so love my Traeger.

Congratulations! You’ve made it to the end of yet another lengthy blog post here on An Eclectic Mind. If you got this far, you must have gotten something out of what you read. And isn’t it nice to read Web content that isn’t full of annoying ads?

How about doing something to show your appreciation? I’d love it if you’d add a comment at the end of this post to share your feedback with me and others. But I’d really love it if you’d visit my Support page and chip in a few dollars to help cover the cost of hosting this blog and motivate me to keep writing new, interesting content. It’ll only take a moment and I really would appreciate it!


Asian Ginger Salad Dressing

A refreshing break from bottled dressings.

I realized recently that I use too many bottled salad dressings with their mystery ingredients. It was time to start making my own dressing.

Today, I felt like ginger salad dressing, so that’s what I made. Surprisingly, I had all of the ingredients in the mobile mansion’s tiny pantry.

Here’s my version of the recipe; it’s quick and easy to make and tastes great over mixed lettuce (think bagged) with grape tomatoes. It would probably be good over cabbage salads, too, or perhaps a marinade for chicken.

Ingredients:

  • 3 tablespoons honey
  • 1/4 cup warm water
  • 3 cloves minced garlic
  • 2 tablespoons grated fresh ginger root
  • 3/4 cup olive oil
  • 1/3 cup rice vinegar
  • 1/2 cup soy sauce
  • 1/8 teaspoon freshly ground pepper

Instructions:

  1. In a 1-pint jar or dressing cruet, combine the honey and warm water.
  2. Swirl stir, or shake to melt the honey and combine.
  3. Add the remaining ingredients.
  4. Shake well.
  5. Chill at least 30 minutes to cool and combine flavors.
  6. Shake well before using.

Store unused portions in refrigerator.

Honey Barbecue Sauce

Excellent on tiny meatballs, better on smoked ribs.

I’m a member — well, the vice president, actually — of the North Central Washington Beekeepers’ Association. We meet twice a month: once for a formal “business and education meeting” and once for a “bee chat” at a restaurant.

President Steve encourages members to bring honey-based snacks to the business meeting. He usually tries to assign the snack to someone and the person who is supposed to bring it usually doesn’t. So after missing two meetings due to my two-month trip to California, I decided to make up for my absence by bringing a snack. I’d whip up a batch of honey barbecue sauce and slather it over tiny meatballs. Quick and easy to make, especially since I cheated and used frozen “Swedish style” meatballs from Fred Meyer.

They were well-received at the beekeeper meeting. (Of course, someone else brought two kinds of cake and honey-sweetened tea, too!)

Here’s the ingredients and instructions for the sauce. I’ve also had it over smoked ribs and it’s delicious!

Ingredients:

  • 3/4 c. honey
  • 1/2 c. ketchup
  • 1/4 c. butter (1/2 stick)
  • 1 tbsp. vinegar
  • 2 tsp. Dijon style mustard
  • 2 tbsp. brown sugar
  • 1 tbsp. soy sauce
  • 1 clove garlic, pressed

Instructions:

  1. Combine all the ingredients in a sauce pan.
  2. Bring to a boil and simmer gently for 5 minutes.
  3. Remove from stove and cool.

Yields:

About 1-1/2 cups sauce.

Flying with a Student Pilot

Dealing with questions about the R44 Raven I vs. Raven II and weight and balance, and instruction from a non-pilot.

Note to Visitors from Helicopter Forums:

I’ve been blasted on Facebook by a number of “readers” who obviously didn’t read this entire post before sharing their inane comments on Facebook and elsewhere. If you can’t be bothered to read something, you have no right to comment about it.

And here’s a special tip for the folks who like to read between the lines and find fault in what they’ve “read”: if you read and comprehend the actual words instead of your angry and cynical interpretation, you might just learn something.

Just saying.

The other day, I flew with a client who has been taking helicopter flight lessons for about a year. We’ll call him Don. I’m not a CFI, so I can’t train him. He’s flown with at least one CFI in R22s and R44s and, more recently, with an experienced ENG pilot now flying an R44 Raven I for other work.

Observations and Instructions

Don was the first of my two passengers to arrive for the flight. He climbed into the seat beside me as I was shutting down. For the first time, he really seemed to study the R44’s simple panel. He began pointing out the differences in what he saw: no carb heat control or gauge, mixture in a different place, Hobbs meter in a different place, etc. I attempted to explain that it wasn’t just the absence of carb heat that made the R44 Raven II different. The performance charts were also different. But not having the Raven I charts handy, I couldn’t really explain.

When the second passenger arrived, Don passenger insisted on putting him in the seat behind me — despite the fact that I always put the two men on the left side of the aircraft. They each weigh in at under 200 pounds, so balance is not an issue. But Don had learned that the larger fuel tank is on the left side of the aircraft, thus making that side naturally heavier. Someone had apparently “taught” him that it was better to put a second passenger behind the pilot to better balance the aircraft. For the record, it didn’t really matter to me — I’ve flown my helicopter in all kinds of balance situations. I admit that I was amused when he tried to justify his decision on takeoff by observing that it seemed more balanced when I lifted into a hover. I honestly didn’t notice a difference.

During the flight, Don made quite a few observations about the wind and weather conditions. None of them really affected the flight, although the wind did kick up and storm clouds moved in a little later on. (I had been monitoring the weather on radar while we were on the ground and they were in meetings.) But what kind of bugged me is when Don began telling me how to land in the off-airport landing zones that I’d landed in before. He explained that that’s how he’d done it when he was with the Raven I pilot he’d been flying with recently.

While I listened to his input, I did it my way, which, in some cases, was the same as he advised. After all, I am the pilot in command and I don’t blindly follow the instruction of non-pilots.

What his nearly constant string of advice told me, however, was that he trusted the other pilot’s judgement and guidance more than mine, despite the fact that I’d been doing charter flights for his company for two years and had obviously gained the trust of his boss, who happened to be the other man on board.

I held my tongue — after all, this was a client — but I admit that it really got under my skin after a while. Not only had he overridden my usual loading setup, but he was telling me how to fly. I ended the mission hours later with a bad taste in my mouth from the experience.

Setting Him Straight

Since I had already promised to send him my R44 weight and balance spreadsheet that would clearly show him how it was next to impossible to load an R44 out of CG laterally, I figured I’d address all of his concerns with one instructional email. The following is drawn from that email with names changed, of course, to protect my clients’ privacy. I think it might be helpful for student pilots trying to understand how what they’re learning applies in the real world — and why not all pilots do things the same way.

Don,

I just wanted to follow up on our discussion regarding R44 Raven I and R44 Raven II performance, as well as weight and balance.

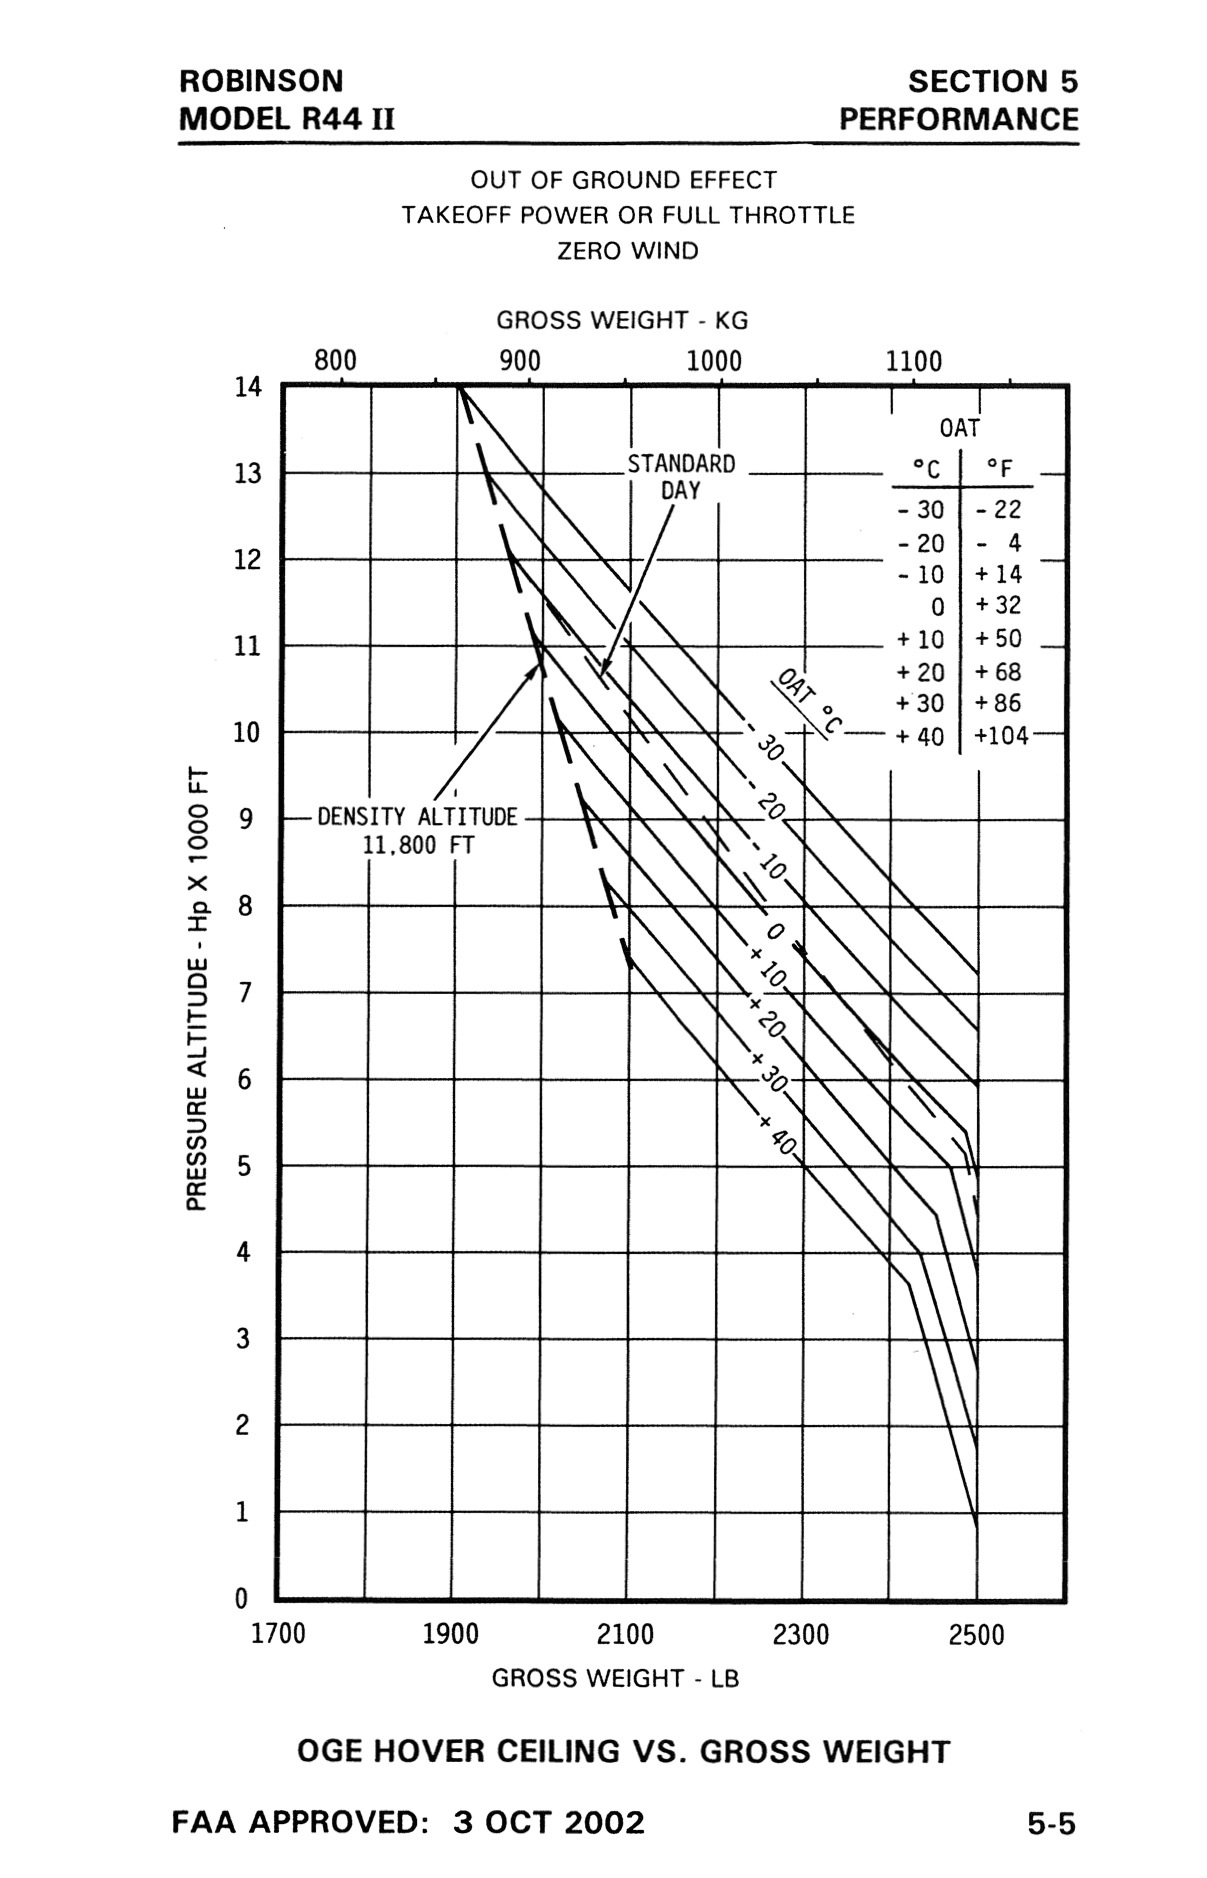
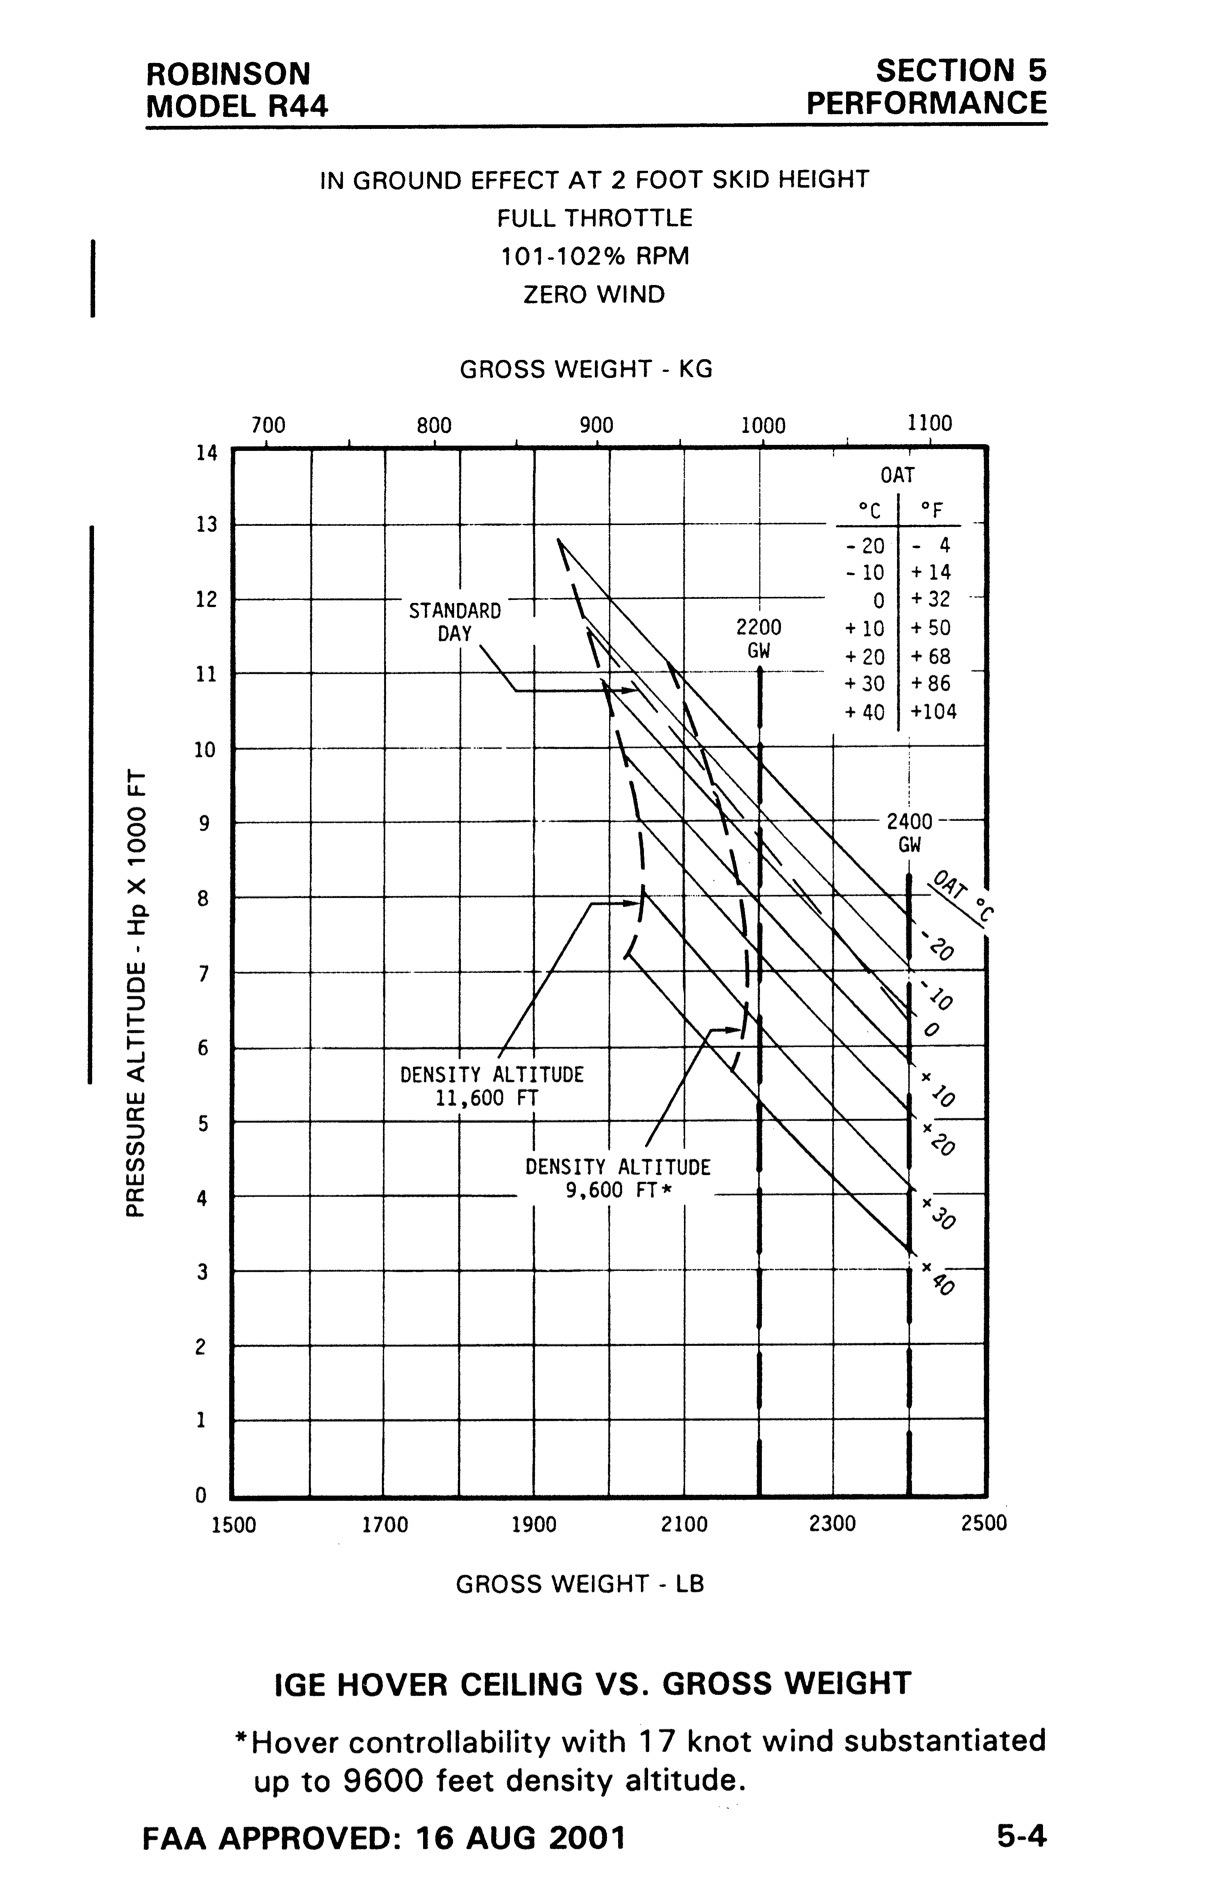
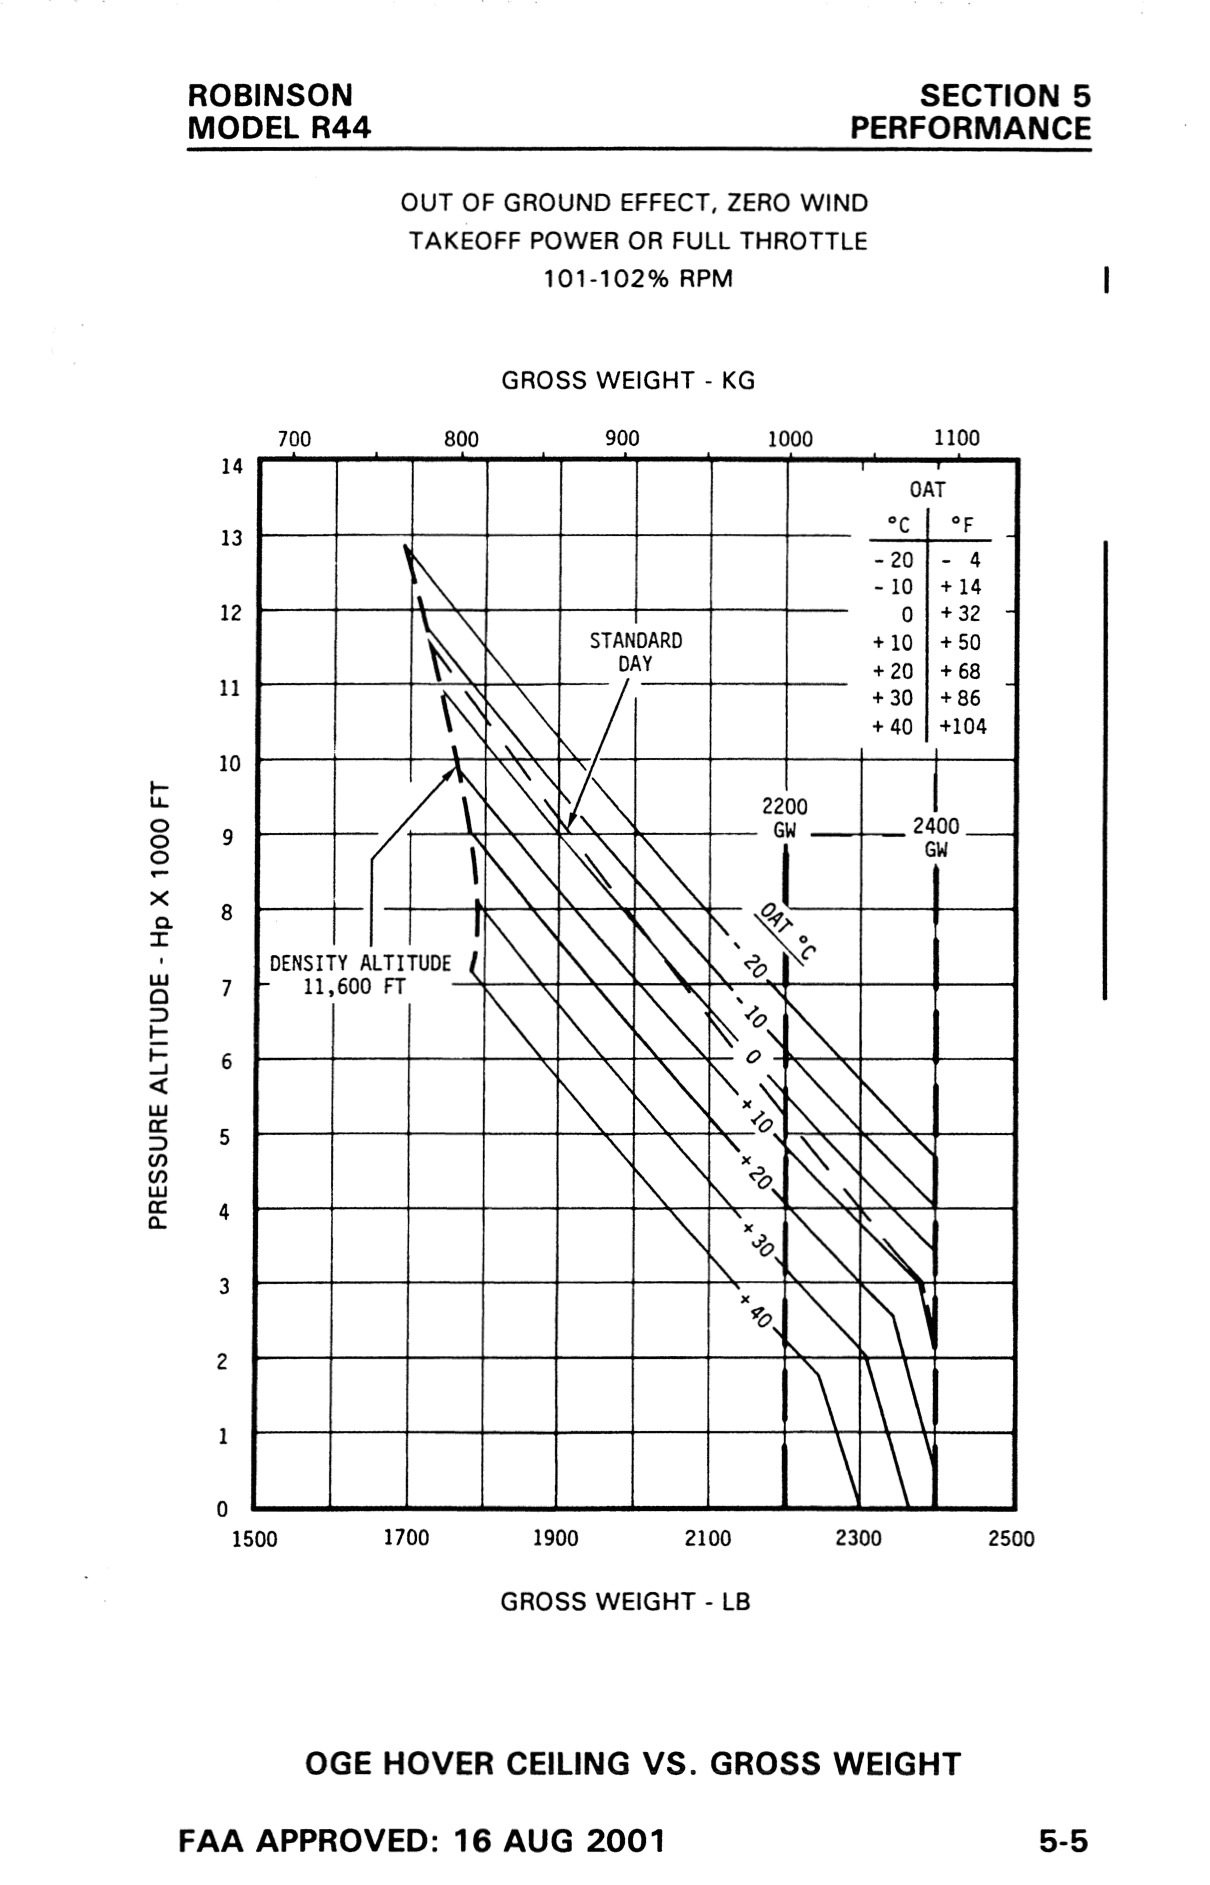
I’ve attached the performance charts for IGE and OGE hover ceiling for both models of R44 helicopter. As you can see, performance for the Raven II is far superior to that of a Raven II, especially out of ground effect. Frank Robinson designed the Raven II for better performance in high density altitudes, and that’s why I paid the extra $40K to buy one. In Arizona, I routinely operated at elevations above 5,000 feet and temperatures over 90°F. I recall one particular flight when I was able to take off from Grand Canyon Airport, elevation 6609, on a 86°F day at max gross weight. Another time, I was able to depart with 3 adults and some luggage on board — at an estimated weight of 2300 pounds — from Bryce Canyon Airport on a day when the AWOS reported density altitude over 10,000 feet. Both of those flights would have been impossible in a Raven I.

R44 I IGE Hover Chart R44 I OGE Hover
The hover ceiling charts for an R44 Raven I.

R44 II IGE Hover R44 II OGE Hover
The hover ceiling charts for an R44 Raven II.

Some of the kinds of flying I do for your company would be very difficult in a Raven I — particularly the confined space landings and departures with 2 or 3 passengers on board. As you know, a maximum performance takeoff makes a “ground run” impossible, putting the pilot on the left side of the power curve until clear of obstacles. On a day when carb ice is possible, additional power is robbed by carb heat in a Raven I. It would take a lot of pilot skill to avoid a low rotor horn (or worse) on a departure like that in a Raven I.

The Raven II also has an extra 100 pounds of payload. That’s what makes it possible for me to take you, Alex, and Walt together, since we often depart the airport at max gross weight for those flights.

So the difference between the two aircraft is considerable. While a Raven I is great for cherry drying, photo work (with one photographer on board), and other low-payload missions, I think the Raven II is more flexible and reliable for charter operations.

We also talked a little about weight and balance. I almost always put both of my passengers on the same side of the aircraft and I do so for a reason: so they both have the same view. I’ve witnessed the frustration of passengers on one side of the aircraft talking about something that they see that’s impossible for the person behind me to see. To avoid that frustration, I seat people together. This is especially helpful in hot loading situations where it’s impossible for me to keep an eye on both sides of the aircraft at once.

While it is true that the larger fuel tank is on the left side of the aircraft, making that side heavier, that additional 80 pounds of fuel weight does not make a significant difference when loading the aircraft. This can be confirmed with the W&B spreadsheet I created and use for my flights. You can play “what if” with it all day long and find that it’s extremely difficult to load an R44 out of CG laterally. I’ve attached the spreadsheet for your reference; I pre-entered the information for Wednesday’s flight with Walt sitting behind you. Putting him behind me simply shifted the weight to my side — in either case, the weight was about 1-inch off center. Now if you were both 230 pounds, things would have been different! Play with the spreadsheet and see for yourself.

Weight and Balance Example

I’m glad to see that you’re enthusiastically learning all you can about flying helicopters. It’s also great that you’ve had an opportunity to fly with so many pilots. You can learn from all of us, especially since we all have different backgrounds and experience. I hope you keep in mind the fact that I’ve put more than 1700 hours on my Raven II (and more than 1400 hours on other helicopters before it) and have a pretty good handle on how to load and operate it. I know how it will react in just about any circumstance. I hope you’ll continue to quiz me as you work toward your private pilot certificate. It’s my pleasure to help you learn!

Maria

What do you think? Did I get my point across without getting rude?

April 27, 2014 Update

Less than an hour after I sent the above email message to Don, I got an email back from him that was followed up by a phone call before I’d even read the email.

Don thanked me enthusiastically for sharing the information, including the spreadsheet. He told me that he’s flown with 6 different instructors in R22, R44 Raven I, and R44 Raven II helicopters over the past year. He’s so early into the training process that he hasn’t even practiced any autorotations yet. He confirmed from his own experience what he’s noticed about the power differences between R44 I and R44 II helicopters. He believes that working with so many instructors has been a good learning experience.

My point is, he took my message in the spirit in which it was intended: as a tool for learning. So I guess I did okay.