A Suggestion for an In-Flight GPS Data Logger

Foreflight on an iPad is all you need.

The other day, I got an email from a blog visitor who’d apparently read my 2009 post titled “My Geotagging Workflow.” This post discusses the rather convoluted process I used to add GPS coordinates to photos using a GPS data logger and some software on my Mac. (That was six years ago; I have a different process now.)

But the email I got the other day wasn’t about photography. It was about in-flight GPS logging:

Hey. I came across your post on data loggers.

What have you found in your search. I am looking for a great option as well– but something that does alt. Speed. Position. Specifically downloadable in 3D in google earth through kml. I am looking for something that we can use for training stabalized approaches. Set it up to record during flight. And then download and make points or a line that showed speed and altitude. Showing later students speed and altitude errors that they might now have noticed during actuall approaches distracted by actual flight.

Have you came across anything like this?

My answer: Yeah. Foreflight.

Foreflight is my application of choice for flight planning and navigation. I run it on an iPad Air and have it mounted securely beside the instrument panel in my helicopter. Not only has the FAA approved my mounting of this device, but it has also approved Foreflight as an electronic flight bag (EFB). Indeed, it has been added to my Part 135 OpSpecs and it is not legal for me to conduct a Part 135 flight without it onboard.

I cannot say enough positive things about Foreflight. Not only does it do everything I need it to do — and more — for the VFR flights I’m limited to, but it has a wealth of features designed for IFR flights, including the instrument approaches the reader is referring to. With the right subscription, it can even place a marker for an aircraft in flight on an instrument procedure chart. Who could ask for more?

As far as GPS data logging is concerned, Foreflight has him covered, too. You can set up Foreflight to create a track log of any flight. Once saved, you can access it on the Foreflight website, where you can view it on a map and download it in KML, GPX, and CSV formats. That’s exactly what the reader is looking for.

Example Track Log on a Map
I remember this pleasure flight. I’d gone up the Columbia and Methow to check out the fire damage and then came straight back.

Frankly, I’m surprised that this CFI hadn’t thought of Foreflight. In this day and age, I’m surprised that any professional pilot doesn’t have Foreflight or a competing product on a tablet in the cockpit. For a relatively low investment — $500 or so for the tablet (which can be used for a host of other things and will last at least 5 years) plus $75/year for Foreflight Basic, it’s a must-have tool for any professional pilot who is serious about his career.

Do you fly? Are you using Foreflight or a competitor? Either way, how about sharing some of your experiences in the comments on this post? I’m sure other pilots can learn from them.

Beef Barley Soup

Skip the mushrooms!

Freezer full of meat
Here’s what 100 pounds of beef looks like in a mid-sized upright freezer. The other meat I’ve been storing is on upper shelves. The doors are filled with plastic containers of homemade heat-and-eat meals.

Yesterday, I took delivery of 100 pounds of grass fed, locally raised beef. This “1/4 cow” came butchered, wrapped, and frozen solid. Although I already had a chest freezer I’d brought with me from my Arizona home, I bought another freezer primarily to store this meat. It just about filled the bottom two shelves.

(I should mention here that our local supermarkets often put “expiring” meat on sale for 30% to 50% off. I can’t tell you how many amazing deals I’ve gotten on normally very pricey meats just because their last date of sale is that day or the next. One day I scooped up four racks of lamb for about $7 each and a large boneless leg of lamb — which was great in a Moroccan lamb dish — for about $10. Last week, Safeway had a sale on baby back ribs that were still frozen: $2.99/pound instead of the normal $4.99. I bought four racks for smoking on my Traeger. Having a big freezer makes it possible to take advantage of these deals as they come up. And when you consider how much I’ve been using my new Instant Pot lately, I don’t expect to have any trouble keeping that freezer full of meat or homemade heat-and-eat meals.)

I had some control over what I’d get in my beef package — basically a menu where I could choose a certain number of cuts in certain categories. In addition to a bunch of steaks cut from all over the place and a lot of ground beef, I also got short ribs, roasts, a very large brisket, and stew meat.

With a winter storm coming, I figured that some comfort food was in order. So when I went down into town to run errands and pick up the beef, I stopped at the supermarket for the few ingredients I needed to make beef barley soup.

I found the recipe on MyRecipes.com. I chose it over other recipes I found online primarily because it looked so hearty in the photo and wasn’t tomato-based. Although I made the recipe pretty much as it was written, I wasn’t satisfied with the results. The reason: mushrooms. In my opinion, mushrooms ruin the flavor of this soup.

So here’s my new take on this recipe.

Ingredients:

  • 1 tablespoon olive oil. The original recipe called for cooking spray. But why not use a little olive oil instead?
  • 1 to 1-1/2 pounds stew meat, trimmed and cut into 1/2- to 1-inch pieces. You can make it with less meat, but if you have more, use it. It’ll make a heartier soup. The beef I got was amazingly lean and didn’t need a bit of trimming.
  • 3-4 large carrots, sliced. Carrots are a must-have in any meat-based soup.
  • 2-3 stalks of celery, sliced. The original recipe called for 1-1/2 cups of celery. Seriously? That’s way too much.
  • 1 large onion, chopped. The third member of the aromatic trilogy, I put onions in most soups and stews. The original recipe called for 2/3 cup, but more is better.
  • 1 large parsnip, sliced. If you can’t find parsnips, add another carrot or two.
  • 1 medium turnip, cut into 1/2-inch cubes. This will really round out the root vegetable flavor.
  • 4 cups fat-free, low-sodium beef broth. I could not find real beef broth (vs. “beef flavored” broth) in my supermarket that was both fat free and low sodium. So I bought what I found.
  • 1 bay leaf.
  • 2/3 cup uncooked pearl barley. This was the first time I’d ever bought or cooked barley, despite the fact that I really like beef barley soup. Go figure, huh?
  • 1/2 teaspoon salt. You can probably omit the salt if you don’t use low-sodium beef broth. I did, but then again, I’m trying to keep my salt intake down. Remember you can always add salt; you can’t remove it.
  • 1/2 teaspoon black pepper. Pepper is always good with beef.

Instructions:

These instructions assume you’re making this on the stovetop. I’ll update this blog post when I have pressure cooker instructions. I need to experiment.

  1. Heat oil in a heavy-bottomed pot over medium-high heat.
  2. Add beef to pot; cook 4-6 minutes or until browned, stirring frequently.
  3. Remove beef from pot with a slotted spoon and set aside.
  4. Add vegetables to pot; cook 6-8 minutes or until liquid almost evaporates.
  5. Return beef to pot with beef broth and bay leaf; bring to a simmer over medium-high heat.
  6. Cover, reduce heat, and simmer 1 1/2 hours or until beef is tender, stirring occasionally.
  7. Stir in pearl barley; cover and simmer 45 minutes or until pearl barley is tender.
  8. Stir in salt and pepper.
  9. Discard bay leaf before serving.

Keep in mind that the longer you cook the pearl barley or let it sit in the hot soup, the more liquid it will absorb. The net result could be more of a stew than a soup. If you want a soupier soup, either reduce the amount of barley or increase the amount of broth.

This yields about six-eight servings, depending on serving size. I think it would be excellent with some crusty bread on a cold winter day.

Want a printable version of this recipe? Download it as a PDF.

Construction: Some Memorabilia

It might sound goofy, but I framed the pants I wore throughout most of my construction project.

Maria the Electrician
My pants didn’t look nearly as ratty here as they ended up.

Back in January, 2015, in a blog post about wiring my home, I shared a photo of myself dressed for winter wiring work inside my future home. In the photo, I was wearing a pair of Levi’s that would become my official work pants. Over the following months, I’d slowly but surely destroy them simply by wearing them while working.

They became my work pants when I wiped spray form insulation on them. Do you know the stuff I’m talking about? It comes in a can and you spray it through a narrow straw into cracks. I was working in the autumn of 2014 with my friend Barbara, spraying foam into the cracks around my windows and the doors to my deck. I got some of the spray on my finger and wiped it on my pants. Not sure why I did that — I should have known that it would never come off. It became a crusty yellow stain on the outside of my left thigh.

The pants, which I’d gotten from my brother for Christmas in 2012, already had a patched hole in the left thigh. The hole had manifested itself early on, almost as if by design. I know it’s fashionable — or maybe it was fashionable? — to have torn jeans, but I prefer mine intact. But this hole was just the first of many in that leg. (They don’t seem to make jeans the way they used to.) I patched them with iron-on patches as quickly as they appeared, but I never seemed to keep up with them.

Jeans in May
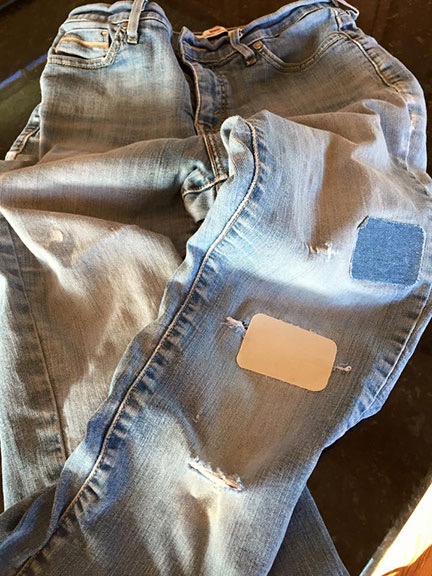
Here’s what the jeans looked like on May 7, 2015.

On May 7, I shared another photo of the jeans, this time on Facebook. My update text read:

Heavily patched and washed three times each week, I’m determined to make these designated work pants last until my home is done. I might frame them when I’m done.

I think I was kidding about the framing.

Jeans in June
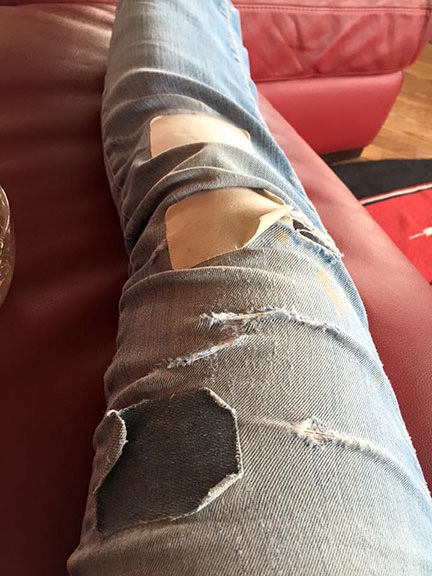
Here’s a closeup of the torn up leg on June 1, 2015.

On June 1, I shared a closeup of the torn pants leg stretched out on my red leather sofa. I couldn’t seem to prevent them from ripping. By this point, the fabric on the legs and butt was so thin that I had to be careful putting them on. I said:

It’s a good thing this project is almost done — I don’t think these pants would last through many more washings.

Somewhere along the line, I’d managed to get paint on them. That was okay. The best thing about work pants is that you don’t have to worry about getting them dirty. They become the rag you don’t have handy when you need a rag. It kind of reminds me of when I was a kid and my dad painted houses as a second job. His old police work pants became his painting pants and were soon covered with all colors of paint.

Retired Jeans
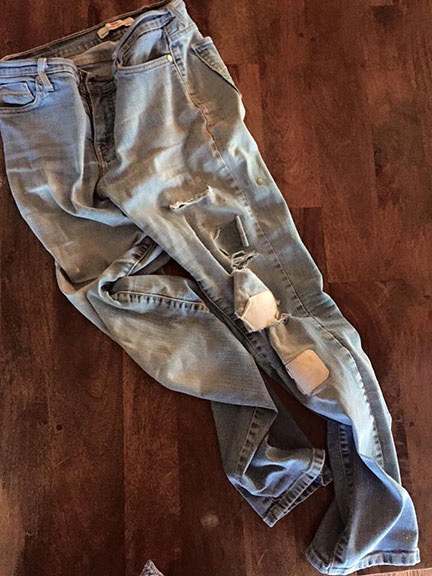
I took what I thought would be the final photo of the jeans in August 2015. You can see the original yellow insulation stain on the back side of the left leg’s outer seam.

By August 31, it was all over — even though my construction project wasn’t. (To be fair, it was mostly done and I’d gone into a slow motion completion mode fueled by procrastination, which I excel at.) I shared a photo on Facebook with the comment:

After much soul- searching, I have decided to permanently retire my work pants.

The comments came quickly.

One person (Mandy H) suggested cutting them up and sewing them together as a bag. But the fabric was so thin, I didn’t think it would last, even as a bag.

Another person (Mike B) suggested:

Frame them as a memento of your hard work to build your new home and life.

I replied that I’d thought about that but that I had enough stuff. (I actually have far more than enough stuff.)

He replied:

Nothing signifies the amount of hard work than worn out work pants.

I certainly couldn’t argue with that. The pants had seen every aspect of my construction project.

Another person (Jorja) said:

Save them…………they won’t take up much space………you worked hard……….they deserve to stay………..a while longer!

The clincher was when another friend (Shirley) added:

Yeah, I’m thinking you should frame them as part of your house building memories. :-)

I decided to look into framing them. I’d need a shadowbox frame for them, so I went to Craft Warehouse, which had done some framing for me before. The price quote I got gave me serious sticker shock: $350. Ouch!

So I went online. I wound up spending about half that for a shadowbox frame “kit” that included the completely assembled frame with glass, felt backing, and hanging hardware. The box came about two weeks later.

And sat in my garage for a few months.

Meanwhile, I’d washed the pants one final time and had folded them neatly to wait for when I had time to frame them.

Last week, I did some garage cleaning and stumbled upon the box with the frame in it. I brought it upstairs and opened it. It looked like a big project.

I put off doing it for a few days.

I needed a photo, I decided. A photo to put the pants in context. I found the photo at the top of this blog post and emailed it to the local Walgreens photo department. I ordered a 5×7 print. I picked it up the next day.

Yesterday, I got tired of seeing the frame standing in the corner of my living room. I laid it out on my big dining table, disassembled it, and stretched out the pants. I put a fold in one leg to make room for the photo. I attached the jeans to the felt board by punching holes in them and running black wire ties behind them, out of sight. I used tape behind the photo to attach it to the felt and stood back to admire my work.

It looked boring. Flat.

I thought about what I could add to liven it up. How about a piece of Pergo under that photo? After all, I’d been wearing them when I laid 1200 square feet of Pergo laminated flooring.

And wire, of course. I’d done about 95% of the wiring in my home. How many days had I spent on the floor, creating grounding wire pigtails for outlets to satisfy the electrical inspector? One of those pigtails would be nice to show.

I went down into my shop and started poking around at material scraps.

The deck. I’d laid about 600 square feet of composite decking material. Maybe a piece of that? I’d thrown most of the scraps away, but still had a piece I could cut for a cross-section.

And quarter round trim? I was still laying that around the house so there were plenty of tiny scraps around.

And some of the many different types of screws? Wall screws, wood screws, deck screws, self-tapping screws. T-25 heads, T-15 heads, Philips heads. I grabbed a few.

And a sanding wheel from my orbital sander? I’d been doing a lot of sanding lately, working on my loft rails. I had at least a dozen spent wheels in the trash.

And of course, the stub of a pencil which seldom seemed handy when I needed it. I found two small ones in a pencil jar on my workbench and grabbed one of them.

Mounted Jeans
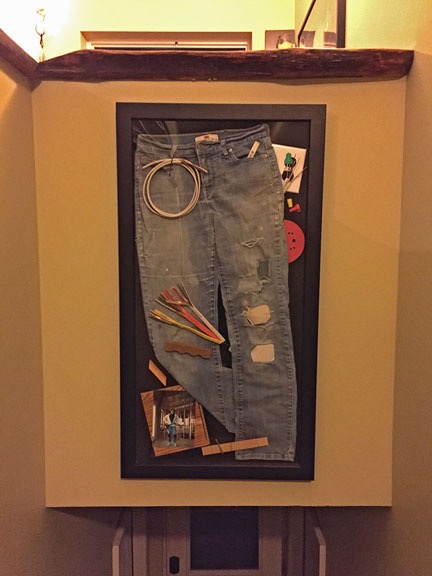
Here’s the final piece, standing against the wall before hanging.

I began laying out all these things on the black felt “canvas.” I liked the way it was looking. But how to attach them? I had a small glue gun someplace.

I lost hours looking for it and getting distracted by other things. Just when I though I’d lost it and reached for a tube of silicone sealer, I decided to look into the toolbox drawer labeled “Adhesives.” Duh. I’d put it away. I brought it upstairs and got to work.

When I was done, it looked a lot busier. But not too busy, I think.

Hung Pants
The pants, hung on my wall.

I already knew where I was going to hang it. Although my first thought was to hang them in the bedroom, on the wall I was standing in front of in the photo at the top of this blog post, I wanted to put it in a place where everyone would see them, a place where they could become a conversation piece. There was a big piece of empty wall over the stairs that was the right size and shape. I did some measuring and used the heavy-duty picture hanger that had come with the frame to hang the finished piece there.

It looked good.

I’m very glad that my friends — especially Mike, Jorja, and Shirley — talked me into keeping these jeans and making them into a piece of personal memorabilia. I put a lot of work into my home and I’m still amazed, every day, at how good it came out. These pants, framed with a few other mementos of that work, will remind me what it took to get it done.

On May 20, 2014, I began blogging about the construction of my new home in Malaga, WA. You can read all of these posts — and see the time-lapse movies that go with many them — by clicking the new home construction tag.

Once free to do what I wanted to do, the way I wanted to do it, I made it happen. I’ll remember that every time I see this piece.

Would I do it again? A few months ago, I would have said no. But now I’m starting to think that this was just practice for my next home.

A Word about Pole Building Costs

In answer to an email message.

The other day, I got the following email message from a reader:

Thank you for posting the information on your home. We are interested in doing something similar and were wondering if you had any ball park cost you could share on your project.

I’ve been blogging about the construction of my new home, which was built using post-frame (“pole building”) construction, since May 20, 2014. I’ve even created a series of daily time-lapse movies that show how the building was built.


Although each day’s time-lapse can be viewed separately on this blog, I’m pretty sure this is the only place you can find the compilation of all videos.

A lot of people have asked me why I chose this type of construction. After all, at the end of the day I’m living in a metal building. While it isn’t unattractive, it doesn’t have what most folks would consider “curb appeal.” Surely I could have made something nicer looking with normal framing construction.

Curb Appeal
As this photo hints, the reason I have such a big RV garage is because I have two big recreational vehicles to put into it. And yes, they do both fit inside.

That could be true, but I seriously doubt I could have done it on the same budget. After all, my building has a 60 x 48 footprint with a high roof peak about 30 feet up. That’s a lot of 2 x 4s. And let’s not forget the fact that the RV garage portion of the building has a 16 foot internal clearance with no central posts for support. It took some seriously engineered trusses to make that work. And how about the vaulted ceilings in the living space? Do you know how thick the five glulam beams that support the roof over that area are?

Of course, I have no answer for this person’s question. Every building is different, every builder has different pricing and materials. Before choosing a builder, I got quotes from four of them and they ranged in price from $50K to $250K. Were they all trying to sell me the same thing? I don’t think so.

My building was (obviously) custom, built to my specifications with design assistance from the builder, Western Ranch Buildings. I don’t think they’d ever done a building with such a large open space inside it (24 x 48 x 16) and I know for certain that they’d never done one with so many windows (20). I’m extremely happy with the way it turned out and have absolutely no complaints about the builder, who was completely professional, flexible, helpful, and patient with me. And this was my first (and likely only) time as a general contractor.

Of course, Western Ranch only provided the building shell. I handled everything inside either myself or by hiring subcontractors. There was additional cost for all that. So reporting what I spent on just the building shell wouldn’t offer a complete picture of my building cost. And reporting what I spent on the entire project would include all the high-end finishing touches such as the vaulted ceiling, oversized ceiling fans, custom kitchen cabinets, granite countertops, Pergo flooring, soaking tub, glass block shower stall, etc., etc.

I guess what I’m trying to say is this: The cost of any building project depends on the contractor(s), the materials, the type of construction, the size, and the features. My project is unique, so reporting its costs would be meaningless. If you’re interested in building your own pole building, come up with a plan and submit it to several builders. See what they say it’ll cost. Western Ranch was right on the money with their estimates — a reputable builder in your area should be, too.

More Facebook Creepiness

Do they have no respect at all for a person’s privacy?

About every tenth time I connect to Facebook on my desktop computer, Facebook asks me for my cell phone number. They say it’s to protect my account — and there might be something to that, for all I know — but do they think my Facebook account is so valuable to me that I’m willing to hand off my phone number to an organization that apparently sells just about any information I give it?

Today took things to a new level. I was using the Facebook app in bed. This is part of my morning routine: I wake up so early that it’s simply too early to get out of bed. So I kill some time with Facebook and Twitter on my iPad. (I recently deleted both apps from my iPhone because of this.) Two creepy things happened:

  • As I scrolled through my timeline, Facebook displayed an Amazon ad for everyday silverware that showed several plain styles. The top of the ad assured me that two of my friends liked Amazon. What was creepy was that I’d used the Amazon app on my phone the previous day while looking at silverware in Fred Meyer to determine whether the prices were reasonable. This could not be a coincidence. How did Facebook know? I thought I’d had my privacy settings buttoned down tightly enough, but apparently I didn’t.
  • As part of a chat with a friend in the Twitter app, I used the Safari browser to visit Amazon’s UK website and find a link to a weather station I own. I pasted that link into a tweet. Moments later, when I went back to the Facebook app, Facebook asked me if I wanted to share the link to the weather station — it displayed not only the full link, but the Amazon preview that went with it — on my timeline. That meant the Facebook app was reading and interpreting what I’d copied in another app.

To say I felt dirty is an understatement. Facebook is poking around in my data in places it has no right to be.

On my iPad, I cleared out all Safari cookies and data. I checked settings to make sure I hadn’t missed any sharing settings — I hadn’t. I checked the Facebook app to make sure it wasn’t authorized to talk to the Amazon app — it wasn’t. And then I went to my computer and dug into my settings in Facebook to see what I’d missed.

Ad Preferences
Facebook admits it’s going to get creepy by monitoring “actions you take on Facebook and websites and apps you use off Facebook.” WTF?

Facebook’s settings is a rathole of options, the most important of which are buried so deep that they’re nearly impossible to find. Not only that, but it seems that they periodically change how you access certain settings to make them difficult to re-find in the future.

The one thing I did find was Ad Preferences. This screen lets you add or remove items you’re interested in. The creepy part? The list already includes hundreds of preferences based on things you’ve looked at, commented, liked, or otherwise shown an interest in.

Ad Preferences
Here’s a partial list of the interests Facebook has collected based on my actions. Some of them are completely off the wall: Harley Davison? Electric guitar? Gold’s Gym? Michigan State University?

I have to individually click each item to remove it from the list. This is a long and tedious process, made even more time-consuming by the need to click See More after each dozen or so items. There were well over 700 items on my list. And clicking a tiny X that only appears when you point where it should be just removes the items from this screen — I’m sure Facebook is keeping its own private list somewhere I can’t modify it.

How can I not sound paranoid?

My Twitter/Facebook friend Pam Baker writes about Big Data. I aways thought to myself, what’s the big deal? How much info could they possibly have about me?

Now I’m beginning to get an idea.

This makes it all the more important for me to use privacy settings. Quite frankly, it’s none of Facebook’s fucking business what I like or do when I’m not using Facebook. And even then, it’s creepy that they’re keeping track of it all.

Will this be the straw that gets me off Facebook? I can only hope.