Cherry Drying: A Narrated Video

Experience the glamour of being a helicopter pilot!

Drying Cherries
The camera position offers a clear view out the windscreen, as well as the instrument panel, and my hand on the collective. It also offers partial views out the side windows.

I’ve been fiddling around with my GoPro camera setup. A few years back, I positioned a mount between the two back seats. A few weeks ago, I put my Hero 3 Black in there and played around with various video options. I was satisfied with — I can’t say I really like — the results. Other people who saw stills and videos seem to like it a lot.

I think adding audio really made it better, though. Through the use of a cable I bought online, I can get audio right from the helicopter’s intercom system. That means you can hear anyone talking in a headset as well as radio communication. I think this can be an excellent teaching tool.

Cherry Drying?

I’ve been drying cherries in Washington state since 2008. As I write this, I’m starting my ninth season.

If you have no idea what this is all about, here’s the short version: In the last few weeks before harvest, cherries are susceptible to damage when it rains. When the cherries get wet, they absorb water though the skin and they split. They can also get mold or mildew growth. It’s bad; if 50% or more of a grower’s crop is damaged, he won’t pick at all. So growers hire helicopters with pilots to stand by in the area. When it rains, they call us out to hover low over the trees. This shakes the branches, thus shaking off most of the water.

Want more info? Here’s a post I wrote about this years ago.

I gave it a try on Saturday when I dried a new (to me) cherry orchard in East Wenatchee. The resulting video was about 45 minutes long. But when I edited out the flight to the orchard and the flight home, it shortened up to 25 minutes.

So if you’d like a good, long look at what it’s like to fly a helicopter low and slow over 16 acres of cherry trees in a wire-rich environment, here’s your chance. I warn you now: it isn’t riveting stuff. In fact, it’s downright tedious. The only thing that makes it remotely sharable is the narration, where I chatter away about what I’m doing and thinking. See for yourself:

I warned you!

And yes, I should be wearing a flight suit. I promise to wear it for the rest of the season.

And while I should also be wearing my helmet, there’s a limit to how much discomfort I’m willing to endure these days while doing this work.

Easy Pizza Dough

You can make your own pizza at home.

Pizza
Homemade pizza with morel mushrooms, leeks, minced garlic, cheese, and an egg.

Last week, after a successful morel mushroom hunt, I went in search of recipes for morel mushrooms. Along the way, I found a recipe on Saveur’s website for Pizza with Ramps, Morels, and Eggs. I made the pizza on Thursday, substituting leeks and minced garlic for the ramps, which were not available locally. (Note to self: plant garlic this autumn.) It was delicious. But the thing that impressed me most was how easy it was to make that pizza dough.

A few people who saw my photo of the pizza on Facebook asked whether I’d made the crust from scratch. I did. Here’s my version of just the pizza dough recipe. I found some problems with Saveur’s recipe as published and have made changes accordingly here.

Ingredients:

  • 3/4 cup water, heated to 115°F. I heat the water in the microwave, although I suspect my tap water would come out hot enough. Use a thermometer to check it. Too cold and the yeast won’t activate. Too hot and the yeast could die.
  • 1 packet (or 2-1/4 tsps) active dry yeast. I buy yeast in a jar so I measure it out.
  • 1/2 tsp sugar. Sugar feeds the yeast. Do not omit it.
  • 1-3/4 to 2 cups flour. The recipe called for 1-3/4 cups, but I needed more to make a dough that could be handled. You’ll also need some for dusting a work surface.
  • 1/2 tsp salt.
  • Olive oil.

Instructions:

  1. In the bowl of a stand mixer fitted with a dough hook, combine water, yeast, and sugar. Let sit until foamy, approximately 10 minutes.
  2. Add 1-3/4 cup flour and salt and mix on medium speed until dough forms. Add additional flour if necessary to stiffen up the dough until it’s still very soft but workable. I added at least 2 tablespoons more.
  3. Increase speed to medium-high and knead for about 5 minutes.
  4. Use olive oil to lightly coat a clean bowl. Transfer dough to oiled bowl and turn to coat dough with oil. (The Saveur recipe skipped this step; as a result, the dough stuck to the plastic wrap. If you prefer, you can skip the oil and dust the dough with flour to prevent sticking.)
  5. Cover dough with plastic wrap and set in a warm place to rise for 30 minutes. My oven has a “Proof” function so I used it.
  6. While you’re waiting for the dough, prepare the topping(s) for your pizza.
  7. Remove the dough from the bowl and move it to a lightly floured workspace. (This is one of the reasons I love having granite countertops.)
  8. Split the dough into the number of pizzas you want. This recipe should make 2 8-inch pizzas, but there’s no reason why you can’t divide it into 3 or even 4 or leave it as one large pizza.
  9. Work each piece of dough into a flattened shape about 3/4 inches thick. While the original recipe uses the word “roll” and I used a rolling pin for the first of two pizzas, I used my hands for the second one.
  10. Place the dough on a piece of parchment paper on a flat pan.
  11. If desired, brush each pizza with olive oil. Then top with desired toppings.
  12. Bake at 450°F for 15 to 20 minutes or until golden brown.

One of my favorite pizza toppings is eggplant sautéed with garlic and olive oil and then topped with goat cheese crumbles. Morels and leeks with garlic and butter (from the Saveur recipe linked above) wasn’t bad either.

The best thing about this recipe: it’s quick. You can go from a pile of ingredients to finished pizzas in less than an hour. And it tastes good, too.

Just Say No to Traffic Patterns

Why waste time flying around the airport or hogging up the runway when you just want to get on the ground?

Note: A version of this post originally appeared in AOPA’s Hover Power blog. If you’re a helicopter pilot, you owe it to yourself to check in there regularly to read great articles written by experienced helicopter pilots.

Over the past nine or so years, I’ve done more than my fair share of long cross-country flights with newly minted commercial pilots or CFIs. In most cases, the purpose of the flight was to reposition my helicopter at a temporary base of operations 500 or more miles away and the typically 300-hour pilot on board with me was interested in building R44 time. I was on board as a passenger and got a chance to observe the things these pilots did — or didn’t do. I think the fact that I’ve never been a flight instructor gives me a unique perspective on what I observed.

One thing I’ve come to realize is that typical flight training does very little to prepare students for a commercial flying career. Instead, students are taught to perform maneuvers “by the book,” often so they can teach those maneuvers to their own students in the future. While it’s obviously important to know how to perform maneuvers properly, there are other concerns that are important to commercial pilots. In my upcoming posts for Hover Power, I’ll tackle a few of them, starting with traffic patterns.

I can tell lots of stories about new commercial pilots and CFIs entering traffic patterns to land for fuel at nontowered airports in the middle of nowhere. I can even tell you about the pilot who landed on the numbers of an empty airport’s runway, hover-taxied to the taxiway, and then hover-taxied a half mile down the taxiway to reach the midfield fuel island. They did this because that’s what they had been trained to do. That’s all they knew about landing at airports.

Our flight training teaches us a few things about airport operations, most of which are school-established routines at the handful of airports where we train. There’s a procedure for departing flight school helipads and there may be a procedure for traveling to a practice field nearby. Once there, it’s traffic patterns, over and over. Normal landing and takeoff, steep approach, maximum performance takeoff, run-on landing, quick stop, autorotation–all of these standard maneuvers are taught as part of a traffic pattern. It gets ingrained into our minds that any time we want to land at an airport, we need to enter a traffic pattern.

The reality is very different. Remember, FAR Part 91.129 (f)(2) states, “Avoid the flow of fixed-wing aircraft, if operating a helicopter.” Your flight school may have complied with this requirement by doing a modified traffic pattern at the airport, operating at a lower altitude than the typical airplane traffic pattern altitude of 1,000 feet, or landing on a taxiway rather than a runway. But despite any modifications, it’s still a traffic pattern.

But is a traffic pattern required for landing? No.

Experienced commercial pilots — and their savvier clients — know that traffic patterns waste time. And while the pilot might not be concerned about an extra few minutes to make a landing, the person paying for the flight will be. Why waste time flying around the airport before landing at it? Instead, fly directly to or near your destination and land there.

Before I go on, take a moment to consider why airplanes use traffic patterns. They enter on a 45-degree angle to the pattern to help them see other traffic already in the pattern. They then follow the same course as the other planes so there are no surprises. This is especially important at nontowered airports that don’t have controllers keeping an eye out for traffic conflicts.

But helicopters are avoiding this flow, normally by flying beneath the airplane TPA. As long as they stay away from areas where airplanes might be flying — remember, avoid the flow — they don’t need to worry much about airplane traffic. Instead, they need to look out for other helicopters and obstacles closer to the ground. If a runway crossing is required, special vigilance is needed to make sure an airplane (or helicopter) isn’t using the runway to take off or land. Obviously, communication is important, especially at a busy airport when a runway crossing is involved.

Now you might be thinking that this advice only applies to nontowered airports, where the pilot is free to do what he thinks is best for the flight. But this can also apply to towered airports.

Airport controllers who are accustomed to helicopter traffic and understand helicopter capabilities may instruct you to fly to and land at your destination on the field. You must be prepared to do this, even at an airport you’ve never been to before. That’s part of what your preflight planning is all about. Consult airport diagrams or even satellite images of the airport. Know where you’ll be flying from and where you need to park. Imagine the route to that spot. Be sure to take note of where the tower is–it’s often a great landmark for navigating while close to the ground. Never assume the controller will put you in a traffic pattern. And don’t be afraid to admit you’re unfamiliar if you didn’t do your homework or if things in real life look different from how they looked on paper or a computer screen.

What if a controller does instruct you to enter a traffic pattern and you don’t want to? As amazing as this might seem to new pilots, you can ask the controller to allow you to go direct to your airport destination.

PRC
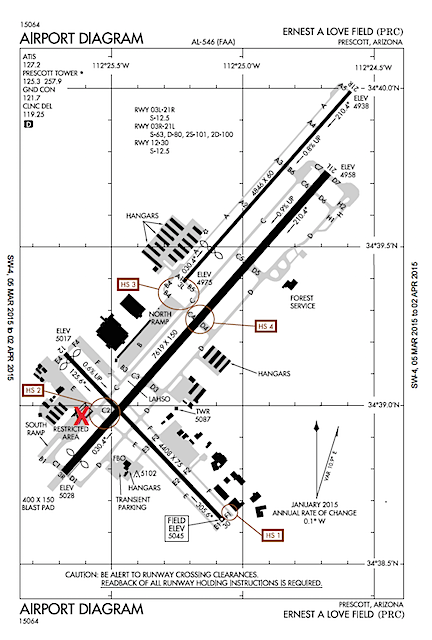
The airport diagram for Prescott. The X marks the location of the restaurant and we were coming in from the west. Runways 21L and 21R were active. The tower instructed us to fly all the way around the south end of the airport, at least three miles out, to get into a pattern for Runway 21.

I’ll never forget the flight I had one day as a passenger on my friend Jim’s Hughes 500c. Jim was a retired airline pilot who had been flying helicopters for at least 10 years. We were flying into Prescott Airport (PRC) in Arizona for lunch. When Jim called the tower, he asked for landing at the restaurant. The controller told Jim to enter a traffic pattern that would have required him to fly all the way around the airport, taking him at least 10 minutes out of his way. “Negative,” Jim barked into his microphone. “One-Two-Three-Alpha-Bravo is a helicopter. We want to land direct at the restaurant.” A new pilot at the time, I was shocked by his tone of voice. There was an uncomfortable silence and then the controller came back on and told him he could fly direct to restaurant parking.

Will the tower always grant your request? It depends on the situation. If a runway crossing is involved and the airport is busy with traffic, they might not. It might be safer or more convenient for them to keep you in a pattern with the airplanes. But it can’t hurt to ask, although I don’t think I’d be as aggressive as Jim was that day.

One of the big challenges of becoming a commercial helicopter pilot is thinking like a commercial helicopter pilot. There are things we can do that seem to conflict with what we were taught. Landing at airports without the formality of a traffic pattern is one of them.

Golden Hour at the Aerie

Two shots showcasing my home.

Even amateur photographers — or at least serious amateur photographers like me — know that the best time for landscape photography is during the so-called “Golden Hour.” This is the time of day roughly one hour after sunrise and roughly one hour before sunset when the sun’s light is soft and often golden in color. Long shadows provide depth which adds texture and highlights contours in land forms. Colors are skewed reddish, which can make everything look just better.

Construction on my home has been mostly done — I still have a few things to do inside like finishing trim and building a set of stairs to the loft — for a few months now. I got my official certificate of occupancy about two months ago. I recently did some outside work to clean up “the yard” and make it look presentable. I have ten acres but I really only maintain about an acre of it — the rest is natural vegetation: bunch grass, sagebrush, and wildflowers. It gets really green here in spring but starts to brown up by late May. This year, we’ve had just enough rainfall to really turn on the wildflowers and keep the grass green and gold. Really pretty.

Perfect for capturing some shots of my home to share with friends and family.

I got the first shot the other day. I happened to be down at my Lookout Point bench late in the afternoon when I looked back up at my home. The light was just right to illuminate the multitude of wildflowers that had grown between the bench and my building. Unfortunately, I’d left my Jeep and truck in front of their garage doors and that made the place look less than perfect. By the time I moved them and came back, the light would be gone. I decided to do it another day.

Afternoon Home
I like this shot the best, mostly because you can also see the nearly full moon in the sky above the cliffs.

That day came a few days later. I was inside, resting up from some minor surgery I’d had earlier in the day when I realized that the light was perfect. I grabbed my phone and ran down the stairs with Penny at my heels. We hurried down the path to Lookout Point and I turned around. Perfect!

I shot about 10 photos from different angles. This is the one I like the best.

I very seldom share this view of my home. The reason: it only photographs well in the afternoon in late spring, summer or early autumn. Other times, the cliffs to the south are in shadows.

This shot really shows off the beauty of the cliffs behind my home. They rise about 1,000 feet above my road and consist of basalt columns of rock laid down during Washington’s prehistoric volcanic past and carved away by ice age floods. My home sits on a shelf of tightly packed silt; the land drops away again toward the river to the north.

The vegetation up there, by the way, is ponderosa pine with the occasional aspen grove. I’ll be planting some of those on my property in the years to come. The irrigation lines to get them started are already laid.

This morning, the light and clouds were perfect again for a golden hour shot of the front of my home, which faces east. I didn’t mind the truck being parked on the concrete apron by the big RV garage door — although the truck does manage to make the 14 feet tall by 20 feet wide door look small. I grabbed my phone again and hiked up my driveway and partially up the road behind my home. I took just three shots from different angles. This was the middle one and I like it best.

Morning at Home
This shot, taken this morning, shows off the front and north side of my home, as well as the view beyond. The view, privacy, and quiet is what sold me on this building site when I first saw it back in 2012.

Every time I look at my home, I realize that none of it would have been possible if I’d stayed married to the sad sack old man who was living in a rut in Arizona. I’m sad for him — he would have really liked it here, maybe as much as I do — but I’m thrilled to have had the freedom to build the home I wanted and to live the lifestyle I’ve come to cherish.

Life is what you make it. If you want something badly enough, you need to make it happen. There’s nothing that says that more to me than my home here at the Aerie.

Two Years Ago Today

A photo reminds me of a personal milestone.

Two years ago today, on May 19, 2014, the builders broke ground on the construction of the home I’d designed for myself on 10 acres of view property in Malaga, WA. I’d bought the land the summer before, the day after my divorce decree was [finally] handed down from the judge. The building would utilize post and beam construction, commonly known as a pole building, to give me a 2,880 square foot garage/shop area and 1,200 square feet of living space with a 600 square foot deck. The goal: all my possessions under one roof with a comfortable, modern home that would showcase the amazing view.

After doing some prep work — bringing in temporary power, putting in a septic system, finalizing plans with the builder, and getting the building site prepped for construction — the four-man team that did 90% of the building construction work arrived with equipment and started digging. They dug 44 post holes that first day and had the posts set in concrete by the end of the next day.

This photo, which I stumbled upon this past weekend while digging up photos for another blog post, shows the workers digging that first hole. The auger did most of the work, but they did hit rocks that had to be removed by hand. Miraculously, this was the only hole with large rocks in it.

First Hole
X marks the spots where the holes needed to be dug. They only hit rocks on the first hole. The trusses for the RV garage roof are leaned up against the hill in this shot.

I was living onsite at the time, in my RV parked near the building site. I had a GoPro camera set up on top of it and made daily time-lapse videos of the work, which I shared on my blog starting on May 20, 2013. It was an exciting time — I was watching something I’d designed be built right before my eyes. I kept out of the way but took lots of photos. In the evening, after the crew left, I’d wander around the site and play with the equipment, sometimes using it to move dirt or easily climb to the second floor once it had been built.

Now, two years later, I’m living in that home with a Certificate of Occupancy as the County’s approval for not only my design and Western Ranch’s construction, but the hours of labor it took to turn a metal building shell into a home.

When I look at these old pictures of the place before my building existed, I find it hard to believe that I’ve come so far in such a short period of time. It’s amazing how much I can get done when there’s nothing holding me back.

This photo — and the blog posts and videos and other photos that document the work done — marks a milestone in my life, proof that I can move forward and make things happen — better than ever on my own.

It’s hard to believe that this photo was shot only two years ago.