Paying It Forward: Retro Dinette Edition

When a Craig’s List sale isn’t exactly a “sale.”

Years ago, when I lived in Arizona and was nearing the peak of my writing career, I had a lot of disposable income. Before I began dumping it into aviation and what would become my third career as a helicopter pilot, I invested that extra cash in real estate. One year, I bought a condo in town to use as a rental. The following year I got more ambitious and bought a property with a two bedroom, two bath house and a four unit apartment building on it.

The apartments, which were studios, were functional and cute. They were all furnished; the previous owner had lived in the house with her grown son and rented the apartments out to an assortment of low income folks and winter visitors. The furniture was the kind of stuff you’d find at a garage sale. In fact, that’s where most of it ended up since I wound up refurnishing every unit with southwest style lodgepole furniture made on order by a small company in Phoenix. I was trying to make the place a little more upscale, hoping to attract a different sort of tenant. (For the record, I count that as one of my failures.)

Retro Dinette
The table and chairs pose for a Craig’s List photo against my garage door. One chair was in perfect condition while the other had some upholstery issues. And yes, they are kind of ugly.

I did keep a few items, including a drop-leaf formica table and two vinyl-covered chairs. I don’t know why I kept them; maybe they reminded me of my childhood? They were certainly from that era — the 1960s or maybe even earlier — and well-made. They eventually wound up in my Wickenburg hangar where the table became a stand for my small hangar fridge and the microwave I kept on top of it. The chairs didn’t get much use.

When I moved out of my Wickenburg hangar in September 2013, the table and chairs were packed into the moving truck along with boxes of household items and other better furniture. They were unpacked into a hangar in East Wenatchee, where they sat with my other furniture until June 2014. That’s when they moved again, this time into my new home in Malaga. And it might come as no surprise that my little fridge wound up on top of the table again in my big garage.

As anyone who has been in my garage can tell you, I have a lot of stuff. Too much stuff, in fact. I’m one of those people who holds onto things if I think they might have any use at all in the future. (This also explains why I still own the Jeep Wrangler I bought new in 1999, the Honda S2000 I bought new in 2003, and the Yamaha Seca II I bought new in 1993; heck, I do use them all. It also explains why I have such a big garage.) Little by little, I’ve been selling off the stuff I no longer need/use/want. When I bought a nice rolling media cart at a school sale last year and the little fridge went on top of that, I no longer had any use at all for the table. So I listed it on Craig’s List.

I should mention that I tried to sell it last year, too. The table is probably considered an “antique” and it likely has some real value. I think I listed it for $80 last year but didn’t get a single call.

This year, I listed it for $40. It’s not as if I needed the money. It’s just that when you list something with any value for free on Craig’s List, you get all kinds of weird characters competing to claim it. I didn’t want to deal with all that.

I got a call from a girl who was interested but unable to come see it. She said she’d call back but I didn’t hear from her again.

Then I got a call from a guy in Seattle — a 3+ hour drive from here — who was very eager to come. He called at 3 PM on a Sunday and asked if he could come that night. I suspect he realized that the table had some value; maybe he even knew where he could sell it to turn a quick buck on the west side. I said, “You want to drive all the way out here for a $40 table?” He hesitated and then said, “I like retro furniture.” But I guess I’d planted a seed in his head. Was it really worth six to eight hours of a day to scoop up this bargain? What would gas cost? And what if the condition of the table wasn’t as good as he expected? He told me he’d call back. I never heard from him again.

I renewed the listing on Craig’s list. Another girl called. In all honesty, it could be the first girl. She lived in Chelan and could come Monday after work. She got out at 5 PM and would be here by 6. I didn’t tell her that it would take more than an hour to get here from Chelan.

She showed up at 6:45, still dressed for work, full of apologies. By that time, I had the garage door open for her. As we walked to where I’d stowed it in the back of the garage, a small pickup truck with a cap pulled up. She told me her parents had come in case she couldn’t get it in her car. That meant two vehicles had made the hour+ drive from Chelan. Soon we were all in the garage looking at the table.

I struggled to figure out how the supports for the drop leafs worked and finally succeeded in raising one side. It was a cool mechanism that I had completely forgotten about — the legs of the table actually slid out on a wooden track. (Seriously: they don’t make stuff like this anymore.) Her mom sat in one of the chairs. We chatted. I asked her if it was for her first apartment and she said it was.

I thought back to my first apartment. I was 20 years old and right out of college. It was a big studio with a separate kitchen in a not-too-savory part of Hempstead, NY. From my 6th floor window, I could see my old college dorm just a few miles away. I’d struggled a bit to furnish it with a combination of used and cheap new furniture, none of which I still own. I remembered the excitement of those days, of starting a new life away from home and school, of earning a living for myself. Every day was an adventure or challenge. I seldom had more than $20 in my pocket and liked to hold onto it as long as I could.

So when she handed me the $40, I told her to keep it.

She was surprised and asked if I was sure. I told her I was and that it was my housewarming gift to her. I told her that when she was ready to replace it, maybe she could sell it for $100 and put that towards the new set.

Her dad loaded the table into the truck and I carried over one of the chairs while she took the other one. They slipped it inside and closed the cap on the truck. We chatted for a while about the winery down the street and I urged them to come back there for a tasting one weekend. And then I shook her hand and wished her good luck.

Gotta pay it forward.

The funniest thing to me about the whole exchange? None of them so much as mentioned the elephant in the room: the helicopter parked in my garage.

Spring Has [Finally] Sprung at the Aerie

After a long winter and several “false springs,” spring has arrived with a vengeance.

It was a long, cold winter here in Central Washington State.

(At least that’s what they tell me. I wasn’t around. I went south and suspect I’ll be doing that most winters.)

Snow off roof
This Mavic Pro image, shot one afternoon not long after my return in March, shows the snow that slid off the roof and accumulated in front of my garage doors during the winter. There was an even bigger pile on the south side of the building, which has a bigger roof.

The cold reached deep enough into the ground to freeze the water lines running to the homes at the end of my road. The snow fell in storm after storm piling up and eventually sliding off my roof into big piles on the north and south sides of my home. And in March, which is normally when the weather starts getting good, every night temperatures dipped below freezing, stalling the wakening of the orchards. Even in April there were bouts of cold weather — as recently as last Monday, I woke to the sound of wind machines in the cherry orchard near my home.

Balsamroot at my House
Perennial balsam root, a native plant, started blooming in April and was finished by mid-May.

We had a few warm spells in April that fooled a lot of us into thinking that spring had finally arrived. The local supermarkets and big box stores opened their garden shops and began selling flowers and vegetables for planting. I planted some cold-weather plants — brussels sprouts and broccoli, for example — that survived through subsequent cold spells, as well as some herbs, such as basil, that did not.

Cherry Blossoms
Cherry blossoms on one of my two young cherry trees. I might actually get fruit this year!

I worried about the cherry trees, knowing that a serious frost could impact my clients’ orchards and, ultimately, the number of contracts I’d get for my summer work. The cherries bloomed and were sufficiently pollinated, although some clients in Quincy had early fruit drop and decided to skip a season.

Last week, spring seemed to finally take hold. After a few cold nights and chilly, rainy days, the temperature began to rise — by about 10° each day! By Sunday, it was in the 80s and I found it necessary to adjust the irrigation in my garden to provide my vegetables with enough water to grow.

Meanwhile, mother nature had watered the rest of my property. The wild grasses, sagebrush, and wildflowers took off in a wild growth spurt that I didn’t even notice until it was time to mow a path to my Lookout Point bench. The point is in the northwest edge of my property, positioned just before the land drops off into a wildlife corridor owned by the local utility company. Since most of my 10 acres is natural vegetation, I need to mow a path from my driveway to the bench to access it. I have a string mower I use for that but it needed a new axle after I ran it over with my truck. (Note to self: do not park anything in front of the truck’s garage door.) By the time I picked up the mower from the repair shop, the grass was 18 to 24 inches high in some places. I got the mower started and used it to mow my way down to the bench, mow around the bench, and mow a wider path back. I suspect I’ll have to mow it two more times before autumn.

Path to my Bench
The path I mowed down to my bench. I could not believe how tall the grass was along the way.

I began a wildflower class with the local college’s continuing education program. Every Tuesday evening we meet on a trail in the foothills to discuss, dissect, draw, and identify flowers. Most, if not all, of the same flowers grow around my home.

I’ve also started mushroom hunting, although I was apparently too early for the elevations I was hunting at. I suspect I’ll do better later this week.

My garden has taken off — and so have the weeds between the raised beds. Every morning I spend about 30 minutes pulling weeds and feeding them to my chickens.

I’ve caught two bee swarms (so far) and I’m ready to spilt the two healthiest colonies.

And this moment, as I type this, every single window in my home is wide open to let fresh air in. I haven’t heard the heat kick on in over a week and I suspect I won’t hear it again until autumn.

Spring is finally here — and not a moment too soon. Now let’s hope it sticks around for a while. I’m never in a hurry for summer.

The Last Chicken Coop

The last one I’ll build here, anyway.

I just built my third (and final) chicken coop.

The first coop was really more of a chicken lean-to. It was mostly open on one side, had two nice nests and two very rickety perches. I made it mostly out of pallets and scrap wood — and it showed.

Chicken Coop 1
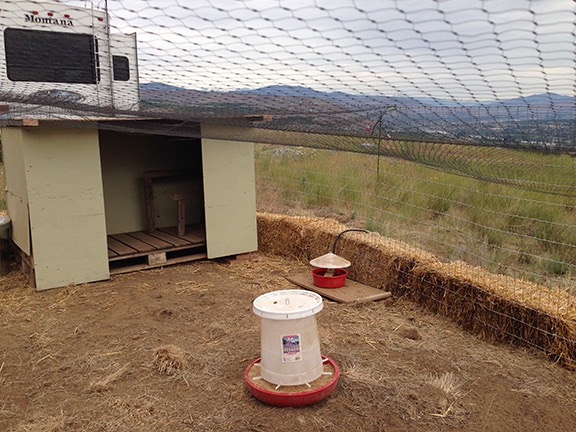
My original chicken coop and chicken yard. The coop lasted from mid 2014 through October 2015; the yard was rebuilt with better fencing early 2015. This photo was shot in early 2014, when I was still living in my “mobile mansion” fifth wheel.

The second coop was way more ambitious. Also built with pallets as its base, it was designed to match the appearance of my home with an exterior finish using the same exact metal. It had three nests under a hinged lid and three sturdier perches. It was also insulated and had a covered porch so I could keep the chicken food out of the rain. It weighed a ton, though, and I had to drag it into place with my ATV. You can learn more about this project and my other efforts in this blog post from 2015.

Coop 2
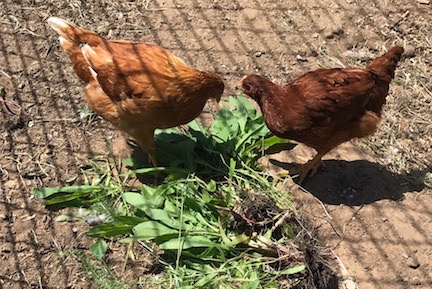
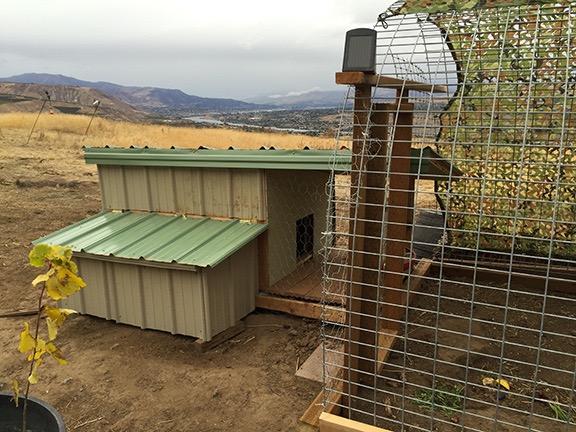
The second coop scored high on durability and insulation values, but low on practicality. I don’t think there was enough room inside for more than the 8 chickens I had at the time. This photo also shows part of my third chicken yard, a hoop affair made of 5×16 foot “hog wire” panels. I like the design and still use it.

What I wanted was a coop that was big enough to hold a lot of birds laying a lot of eggs. But I wanted one I could actually walk into, one that was easy to clean and had plenty of light and ventilation. Although I’d bought a small coop the year before, it was unsuitable for more than two or three adult birds. I wanted to raise chicks into laying hens and sell them when they started laying. To get started, I bought 18 chicks when I got home from my winter travel in March and set them up in a brooder in my garage. That gave me a time limit — I needed the new coop done before they outgrew the brooder.

I almost converted my existing shed into a coop. With a little interior modification, it would have done the job. But then I would have lost my garden storage area. And what about the controls for the irrigation? Did I really want my chickens crapping on it?

I looked into shed kits at Home Depot. They were not cheap and they were a lot of work to build. I could build a custom solution for a fraction of the price.

But no more pallets! I was going to build from scratch.

I sketched out a design. The footprint would be 4 x 8 feet. The roof would be 7 feet sloping down to 6 feet. I began disassembling the old coop. I think that was harder than assembling it. I managed to salvage the framed plywood roof and one of the trim panels. I wanted more overhang on the metal, so I scrapped what I had. I burned pretty much everything else, although I did have to throw away the Trex decking I’d used inside. (I did say it was heavy.)

I started at the bottom, building the floor on 4x4s with 2×4 studs 16 inches on center. I used a heavy OBS sheet as the base and gave it two coats of oil based porch paint.

Chicken Coop Floor
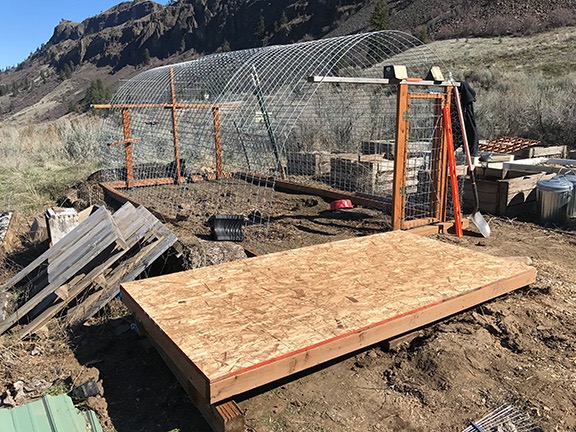
I started with a floor on 4x4s, leveled in place.

Next, I framed out the four walls. But instead of framing them on the floor, I built the frames on my concrete driveway apron. It was easier for me to work on level ground. I framed them with 2x4s 16 inches on center. Every time I finished a wall, I stood it up against a deck post. I knew that it would be impossible for me to carry the two long walls over to the coop and fasten them into place by myself, so I did as much as I could before prepping the building area with two ladders and a bunch of wood screws and my impact driver. Then I called my neighbor Elizabeth and made an appointment for her to come help me get the walls in place. I promised it would take less than an hour and it did. And not only did we get the walls in place, but we even lifted the roof into position and fastened that down.

Framed Chicken Coop
I shot this photo right after Elizabeth left. The ladders were still in place; the one on the left is an orchard ladder, which are pretty common here. The wood thing leaning against the building is the door, which I’d made while I was waiting to put the walls in place.

The coop design had a 32-inch wide door, three ventilation windows, and two chicken doors. I framed them as needed. The trick then was to cut the T1-11 wood — it’s like plywood paneling — so the openings would match up right. Measure twice, cut once. I think I must have told myself that a dozen times a day during construction. But it sunk in. I fitted the north side short wall and half the west side wall without any problems.

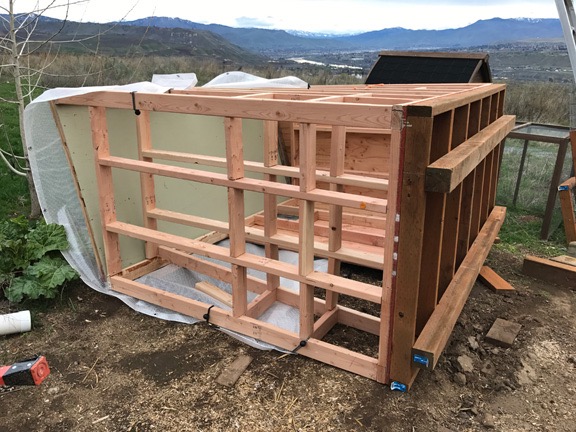
Weather came. We had an unusually rainy spring this year. I had some large tarps and fastened one over the coop’s roof and two wall panels. I hadn’t painted anything yet and I didn’t want the wood to get soaked or ruined. My camper, the Turtleback, was parked on the driveway near the coop, blocking it from view from my home. So I was very surprised to find the coop lying on its side when the weather cleared and I was ready to get back to work. Apparently, strong winds had come though and knocked it over as if it were a sail.

Coop on its side
Oops. Did I mention that it gets windy here? The tarp acted as a sail on the top-heavy coop and it went right over.

Neighbors to the rescue. I had three of them meet me the next morning to right the coop. Damage was minimal. When they left, I got right to work.

I used 1/4 inch wire that I already had between the frame and the T1-11 for the windows. Later, I’d put sliding panels to close them off. I had two doors to the outside but planned on using only one for now; the other one was for expanding the chicken yard with another hoop enclosure. (It’s important to cover the chickens here to protect them from birds of prey.)

The original designed called for nests just inside the door that were accessible through hinged panels from the outside. I decided to do away with the outside access, mostly because I figured a single T1-11 panel would add to the structural integrity of the building. And after all, the building was big enough for me to walk into.

Coop Under Construction
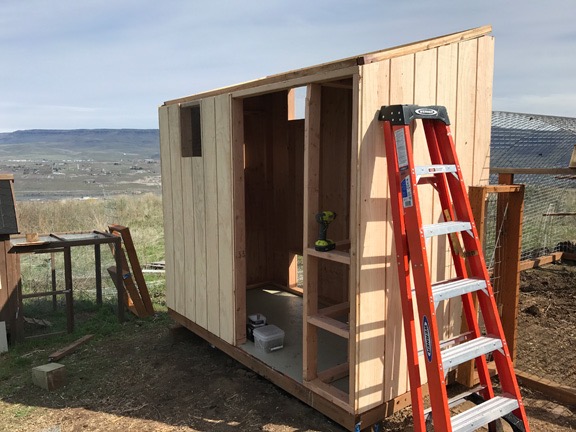
In this shot, only one wall and the door are left to install. The nests are just inside the door to the right.

Once the walls were in place and the door was hung, it was time to paint it all. I used the rest of that oil-based porch paint and even bought a second can. The paint guy had warned me that it would absorb into the wood and he wasn’t kidding. I’m going to need a second coat. But for now, the wood is sealed tough against the elements. A second coat before winter and it’ll be ready for any weather.

Painted Coop
Here’s the coop right after painting it. By this point, the chicks were living inside. I drilled a hole in the wall and ran an extension cord so I could hang their heat lamp. I blocked off the exit to the chicken yard with a framed bit of fencing I already had. The two upper windows have 1/4 inch screen that doesn’t show in the photo.

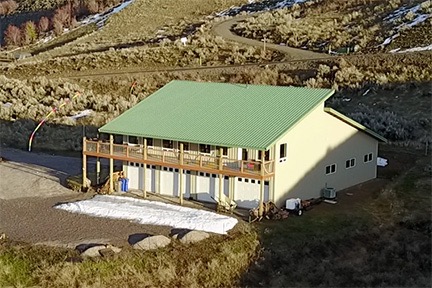
I still had to finish the roof. I wanted so badly to get metal panels that match my home — after all, the walls of the coop match the walls of my home — but Home Depot had a limited selection of colors. So I chose the dark green. I dreaded cutting the metal — it’s no picnic, believe me — but it went a lot more smoothly than I expected it to. I had insulation leftover from the old coop and I put it into place. Then I painstakingly lifted the metal panels into place and screwed them down. Not perfect by any means, but functional.

Outside Finished
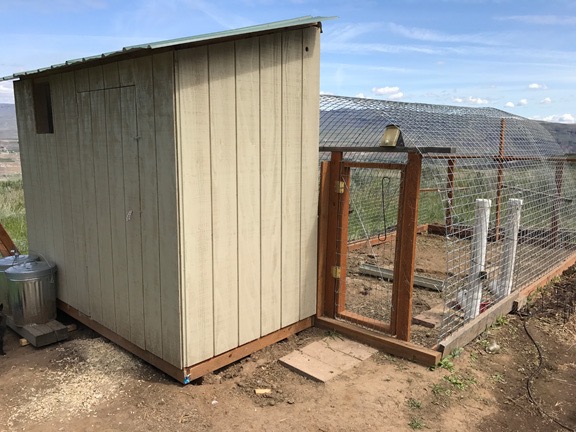
Here’s a photo of the outside of the coop and yard that I took just the other day. The door really blends in; I use a piece of rope as a “doorknob” and a hook to keep the door closed. The long white pipes are chicken feeders I made last year; they each hold about 10 pounds of chicken food.

Coop Perches
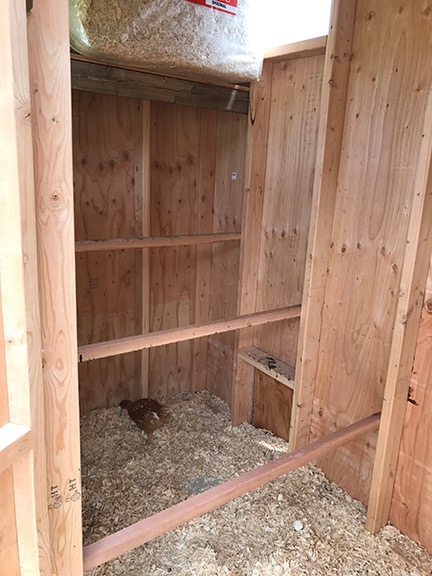
I used 2x2s with rounded edges for the perches. I also added a shelf on the north side, far above the highest perch, to store odds and ends like the pine shavings I use on the floor and in the nests.

By this time, the chickens were installed and able to come and go freely between the coop and their yard. I had put in some perches for them, but as they grew, I knew I could raise them and add more. So I did; they have a total of three perches now, each about 4 feet long. With 8 inches per bird, my 18 chickens (now 17 since one died) have plenty of space to roost. I could easily add 2-3 more if I had to since they’re spaced 16 inches apart.

Coop Nest Area
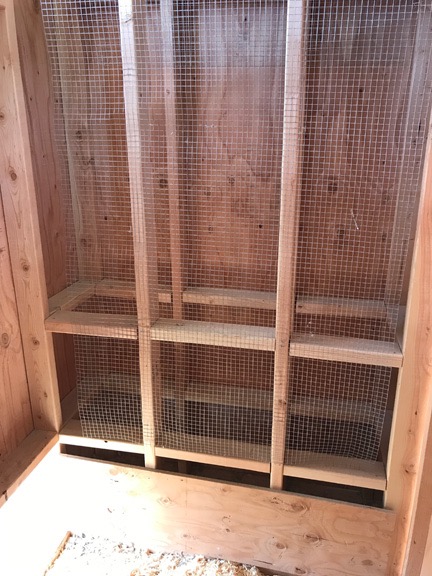
I had to block off the nest area with wood and wire mesh to keep the chickens out.

I still needed to do the nest boxes. The first thing I did was close off the nest area; the chicks were sleeping on the floor in there when they were still very young and I wanted to break them of that habit. They wouldn’t need the nests until they started laying, which probably won’t be until August.

Coop Nest and Brooding
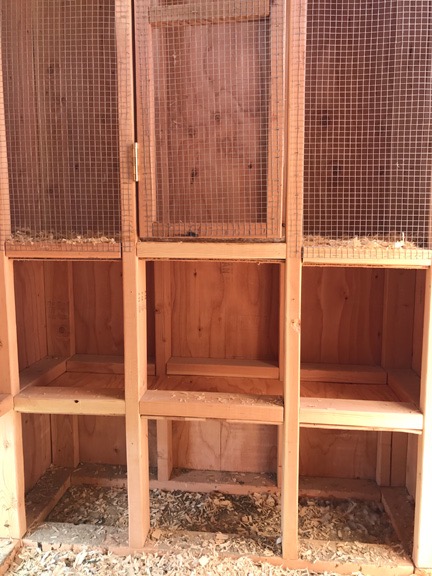
Here are the finished nests on the bottom with the bottom half of the brooding area on top.

Still, I wanted to get them done and create a brooding area above them. My design called for six nests — three on each level — so I had to build a floor for one level and then the brooding area level above it. This required me to take careful measurements of the 2×4 framing because I’d have to cut plywood around it. Then I’d have to lift it into place from below and screw it into the 2x4s I’d put in to hold them. It’s hard to describe and was hard to do, although my little jig saw did make the job easier than I expected. In the end, I had to cut each floor into two pieces to get them into the tight-fitting space.

Once that was done, I used a staple gun to securely fasten 1/4 inch screen to either side of the top brooding area. I framed a door with 2x2s and stapled more screen onto that. Then I put the door on hinges and added a hook to hold it closed. I’d be able to hang a heat lamp over the area if I needed to to keep chicks warm. I figure I can brood up to 6 chicks for up to a month in the space. Keeping them with the other chickens should allow them to get to know each other while they grow, hopefully preventing fights when they’re released into the flock.

When it was all done, I had to block off the nests again. The chickens really like snuggling up in corners when they’re indoors. I wouldn’t mind so much, but they crap where they hang out and it’s a pain in the butt to clean out the nests.

At this point, the chicken coop is mostly done. In July, I’ll pull the covers off the nests and put a fake egg — I usually use an egg-shaped rock — into one or two of the nests. With luck, they’ll get the idea and start laying in there when the time comes.

Although I’d originally wanted to add sliding panels over each of the windows, I think I’ll skip it. The ventilation is good. In the winter, I’ll fasten some heavy plastic over each window to prevent drafts. I’ll leave the door to the yard open for them.

Because this coop is not insulated — neither was the original one — I might buy a chicken coop heater for it. I already have a Thermo Cube that will turn power on when the temperature gets down to 35 and turn it off when it gets up to 45. Attaching that to the heater will run it only when needed during the winter. It’ll never get warm in there, but it’ll stay warm enough to prevent frostbite. You might think that’s nuts, but power is cheap here and from renewable energy (hydro and wind) so I have no qualms about using it to keep my chickens from freezing in the winter.

In the meantime, I’m just happy to have this project done. And even happier that I can’t find anything wrong with this design so I won’t have to build yet another one.

The T2

I take delivery of a newer, smaller truck camper.

Regular readers might remember that I spent this past winter in Arizona and California, doing my best to avoid the dark and dreary winters of north central Washington state where I normally live. I had sold my big fifth wheel camper, the Mobile Mansion late in the summer of 2016 after purchasing my first truck camper, the Turtleback. I took the Turtleback south just before Thanksgiving and spent the winter living in a friend’s guest house, camping on mostly BLM land with friends, and traveling around Washington, Oregon, Nevada, Arizona, and California.

The Turtleback was pretty deluxe. It had basically every single feature you can cram into a truck camper, including a slide to give me lots of space. It was huge for what it was and although it was comfortable, it was also heavy. I decided, on my trip south, that I’d keep an eye out for a replacement and, if I found one, I’d trade it in. I wanted something slightly smaller — certainly without the slide, which I didn’t need — and perhaps a little newer. (The Turtleback, although in near new condition, was a 2005 model.)

Finding a Replacement for the Turtleback

Floorplan
The standard 2007 Lance 950 floorpan.

I found the Turtleback’s replacement on the last day of my trip. I stopped by the Lance dealer in Yakima to see what they had among the used truck campers. They only had one — and it was one of the ones I’d seen there on my way south.

Camper Kitchen
The kitchen is compact but the sink is bigger and the propane stove includes an oven so I can bake without running a generator.

Food prep area
The “food prep” area is beside the 6 cubic foot refrigerator with separate freezer.

It was the same physical size as the Turtleback, but 400 pounds lighter, mostly because it didn’t have a slide. It had an oven and a microwave — the Turtleback had a convection microwave so I needed power to bake — and a lot more interior storage space, including cabinets over the dining area and a much larger pantry. And although the kitchen area was just as tiny as the Turtleback’s it did have a “food prep” area beside the refrigerator.

It had two 5-gallon propane tanks instead of two 7-gallon ones; that was actually good for me because the 7-gallon tanks are wicked heavy when full and tough for me to lift into place. It even had the sunroof over the sleeping area, which I’d grown to love.

T2 Overview
The view from the dining area.

The only weird thing: it had two narrow twin beds instead of a standard queen bed. The mattresses could be zipped together to make a queen bed if I wanted one. But the setup actually added more functionality — I could travel with someone I didn’t want to sleep with without turning the dining area into a bed.

Beds
It has two twin beds with a moveable night table between them. The mattresses zip together to make a queen bed if I find the perfect travel companion. Until then, I’ll likely leave them like this.

Dining Area
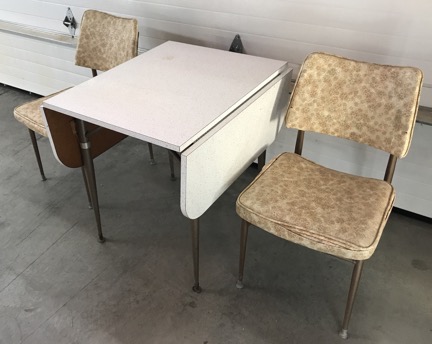
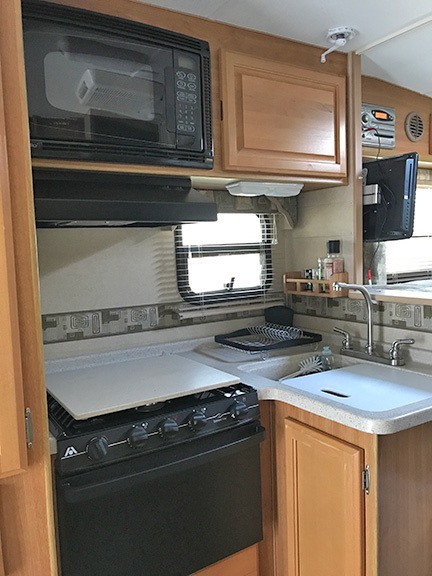
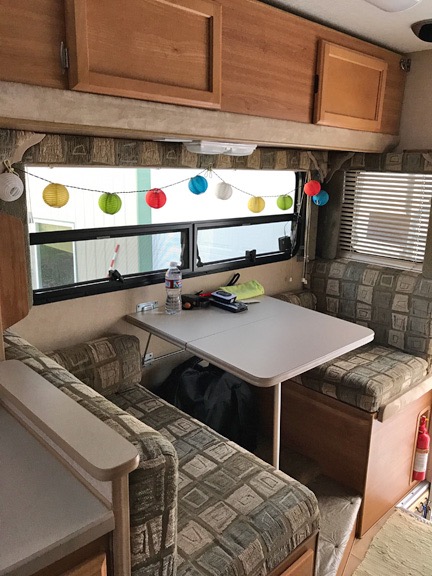
Because the dining area isn’t on a slide, there’s storage overhead. That cabinet actually folds down to be used as a bunk for kids or a huge storage shelf. (And yes, I already hung my solar Chinese lanterns.)

It didn’t have a generator or solar panel, but I have a 2KW Honda generator I bought years ago and the portable solar panel I’d bought in Quartzsite in January. And instead of a satellite dish, which was useless to me because I don’t subscribe to satellite or cable TV, it had a regular RV TV antenna.

The bathroom was about the same microscopic size. Maybe an inch bigger.

And although it was a 2007 model, it was in very good condition.

In all, it was pretty much exactly what I was looking for. Smaller, lighter, and better designed.

For some reason — probably the beds — it wasn’t selling. Since their lot was crammed with new units, they were eager to get rid of it. They offered me a deal I couldn’t refuse. The only drawback was that the trade-in deal they offered absolutely sucked. I knew I could get a lot more for the Turtleback if I sold it on my own. They kindly offered to hold it for two months with a $500 deposit. I gave them a check and went home.

Selling the Turtleback

It took a week or two to clean out the Turtleback and get it ready for sale. Since my garage was still full of boats, I parked it near my shed. I put an ad on Craig’s List. The calls started coming almost immediately. The only problem was, folks were calling from Montana, Idaho, and the Olympic Peninsula — 5 or more hours away. I honestly don’t know why they bothered if they didn’t intend to come take a look. I certainly wasn’t about to deliver.

One guy told me he’d take it sight unseen. He’d come on Monday. By Sunday, however, he’d changed his mind. His wife had talked him into looking for a pull trailer.

A few days went by I still had more than a month to sell it, but when the calls suddenly stopped coming, I started getting worried. But then another call came. I answered questions. He was definitely interested but would be coming from the west side near Seattle. A few more phone calls and he and his wife arrived.

I showed them everything. They asked lots of questions. They tried everything — including the air conditioner, which wasn’t easy to get going when the outside temperatures were around 50°F. They talked it over in private. They offered $2K less than I was asking. I told them I really needed more and countered for $1K higher. They handed me a stack of $100 bills that had already been counted. I recounted them and it was right.

A while later, they drove away with the Turtleback on the back of their pickup. They’d gotten a good deal. I’d gotten $1,000 more for the Turtleback than I needed for its replacement — and $5,000 more than the trade-in offer had been for.

Picking Up Turtleback 2

Although I still had a whole month to get the new camper, I was eager to take possession. Cherry season would start soon and I was hoping to take it on a shakedown trip before I was stuck here. (I can’t travel during cherry season because I’m on standby for work.)

I scheduled a date to pick it up and drove down to Yakima to get it. I wound up spending about three hours, mostly chatting with the two brothers that own the place while their guys put the camper on my truck, inflated the air bags on my truck’s back end to level it, and strapped it down. Then I got the unit tour, which included an overview of everything on the camper. When I voiced disappointment that the TV/DVD player was AC rather than DC, the younger brother, Mike, gave me a 375 watt inverter. (Since the TV only draws 38 watts, I’ve since replaced it with a fanless 100 watt inverter.) So yes, I can still watch movies when I’m off-the-grid.

It felt the same as the Turtleback on the way home, although the brochure says the center of gravity is three inches higher.

Of course, I needed a name for it. Since it was my second Turtleback camper, I called it Turtleback 2 or just T2.

Plans for T2

It was parked in my driveway for about a week. Some overnight guests camped out in there. It was nice to have a place to put them.

I finally put it away in the garage yesterday. I’d planned on going on a trip down to Palouse Falls, but other things popped up on my calendar and it made sense to put it away rather than leave it out in the sun.

I’ll be using it in about 10 days on a Puget Sound Mycological Society weekend-long field trip to Silver Falls. Then maybe again on Memorial Day weekend. And likely the first weekend in June for another mushroom hunting field trip before cherry season starts.

Last summer, the Turtleback was a home for three different pilots who worked for me in Quincy. Although I don’t think I’ll need it for that duty this summer, it will be available.

And there’s a slight chance I’ll get a contract job in the Yakima area in September; if I do, I’ll stay down there in the T2.

Of course, I’ll be taking it south with me again next winter. And this time, I’ll bring along my boat.

More about the Wind Machines

A few new videos.

Back in April 2015, I blogged about the wind machines commonly used for frost control in the Wenatchee Valley. Resembling tall fans, different versions of these machines can be found in agricultural areas throughout the west wherever frost — especially early spring frost — is an issue. Around here, they’re often in low areas subject to thermal inversions.

Wind Machine
The wind machines that were running this morning. That’s the Mission Ridge Ski resort in the background. Photo shot with my Mavic Pro.

The machines are fans that generate wind. The blades spin fast — faster than you might think watching the video below — to circulate the air. The fan heads rotate to constantly change the direction of the wind. The net result is that the air is circulated, bringing warm air from above down into the crops.

In the almond orchards of California, they use helicopters to do this. I think it’s because the orchards are so big that they simply can’t install and maintain as many wind machines as they need. The helicopters are likely a lot cheaper in the long run, especially when you have a few years in a row when they’re not needed. I’ve been on frost control contracts for the past five winters now and have yet to turn a rotor blade over an almond tree. (Global climate change?)

This winter was particularly long, setting the tree fruit back two to four weeks. The cherry trees are still blooming around here; last year, the cherries were already beginning to redden in the orchards closest to my home. Nighttime temperatures at my home have been in the low 40s. But in the orchards below me, pockets of colder air form. And this morning, they got cold enough to trigger the temperature-set auto start feature on the wind machines in the closest orchards.

I don’t know exactly when they started. I was up at 4:30, reading before getting out of bed, and I didn’t hear them. But by the time I made my coffee at 5 AM, I could hear them faintly through the walls and windows of my my home. I stepped out on the deck for a better look in the predawn light. The sound was louder and I could see two of the machines to the west spinning. My ears told me that one to the northeast, which I can only see from a handful of spots on my deck, was also spinning.

Here’s the zoomed in video I shot with my phone. When I shut up, you can hear the wind machines.

I did a Periscope — that’s a live Twitter video — of the wind machines. A handful of people tuned in and I answered questions as they came up. I was frustrated that I couldn’t zoom in. I signed off, used the video feature on my phone to capture a short zoomed-in clip, and posted it on Twitter. Then the sun rose and the light got good and I did another Periscope that was mostly to show off how beautiful the area was. The wind machines droned in the background of my voice as I described various things and answered questions.

I went inside, washed some pots from cheesemaking, and listened to the radio. I could hear the wind machines faintly through the walls and windows. I was sort of bummed out that I couldn’t give people a better view.

Part 107 Explained
Want to become a commercial drone pilot? Start by learning all about the FAA’s Part 107. This book will help. Buy the ebook edition on Amazon or from Apple. Or buy the paperback edition on Amazon.

And then I remembered my Mavic Pro.

It took only two or three minutes to set it up. I launched it from my deck, got the video camera going, and sent it to the wind machines, stopping before it got so close that the wind could affect it. The light was beautiful and the image the Mavic sent back to me was clear. I hovered for a while to capture a good clip and then flew around a little, just taking in the view with the camera running. I stopped the video camera, took some stills, and then flew home for some more video of my home and the area around it.

Back inside, I made a fresh cup of coffee and spent a few minutes editing the video and setting it to music. It’s unfortunate that the Mavic doesn’t capture sound, but I understand why: it would be capturing its own buzzing sound, which isn’t pleasant. So music will have to do.

A side note here: I’ve been thinking a lot lately about how much I like living here. I realized — and I think I mentioned in one of those Periscope videos — that I like it here more than anywhere else I’ve lived. I’m not sure if it’s because of the place itself or the fact that I have a home with an amazing view built to exactly meet my needs or because after a stifling relationship that went on a lot longer than it should have I finally have the freedom to do what I want to do with my life and time.

Whatever the reason, I just want to remind readers that we all have just one life and it will eventually end. Don’t waste it stuck in a rut or in a place you’re not happy.