How I do it.
I’ve been fascinated with time-lapse photography for as long as I can remember — and believe me, that’s a long time. I love the idea of compressing a series of still images into a short movie. But what I love more is the way it speeds up the process of things that happen slowly: clouds moving across the sky, shadows changing with sun angles, and things being built or moved. There are a lot of time-lapse movies on this site; click the time-lapse tag to explore them. I do want to stress that my time-lapse movies are very simple. If you want to see something amazing, look at the work of a master like Ross Ching’s Eclectic series.
I rely on certain equipment and software tools to create my time-lapse movies. Since I’ve been sharing daily time-lapse movies of the construction of my home, I thought I’d take a minute to explain how I make them.
The Camera

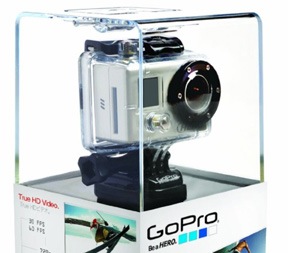
I use my old Hero HD for most time-lapse work these days.
The first thing you need to create a time-lapse movie is a camera capable of snapping an image at a regular interval. These days I use a GoPro. Although I have three of these great cameras — Hero HD, Hero 2, and Hero 3 — I tend to use the oldest (the Hero HD) for this kind of work so if it’s lost, damaged, or stolen, it’s not a huge deal.
The GoPro has an interval or time-lapse mode that I use quite often. Because the process of building my home is relatively slow, I set it to the most amount of time between images: 1 minute.
(In the past, I’ve used a Pclix intervalometer — that’s a time-lapse timer that triggers a shutter release on a camera at a preset interval — attached to an old Canon G5 digital camera. Again, the camera was old and worthless so if someone walked off with it, no big deal. Losing the intervalometer would have been worse.)

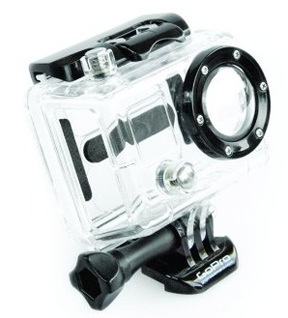
The skeleton housing gives me access to the USB port and SD card on the GoPro.
Power is an issue when you run a camera for hours on end. I use the GoPro Skeleton housing around the camera so I can run a USB cable to it. The cable then feeds into a window on my RV where it plugs into a power source. The added benefit is that I can remove the SD card without opening the housing and changing the camera angle. I use electrical tape to cover up the two sides of the housing to keep dust and rain out.
The Camera Mount
For time-lapse photography, it’s vital that the camera be held still (or moved smoothly, if you’re going for that kind of effect). That means a tripod or camera mount.

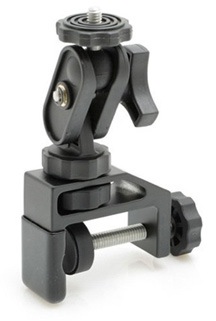
This is a must-have mount for anyone with a GoPro or lightweight digital camera.
I routinely use a Pedco UltraClamp with my GoPros. I can’t say enough things about this clamp-on camera mount. With a GoPro, all you need is a tripod mount adapter and you’re good to go.
For my construction project time-lapse movies, I clamped it onto one of my RV slide-outs, pointing at the construction site. Easy.
The Software
Okay, so the camera has been running for hours and it has collected hundreds of images. Most of my time-lapses run from 6:30 AM to 4:30 PM. That’s 10 hours with 60 shots per hour. 600 images.
The images are 2592 x1944 pixels. That’s way bigger than I need. In addition, I want a 16:9 aspect ratio, which is better suited for video projects these days. So I need to do some processing.
 The first thing I do is run the images through a program called EasyBatchPhoto. (Remember folks, I’m using a Mac.) I have the app set up to crop the image to 1920 x 1080 — that’s standard high definition. This basically crops away the edges of the image, focusing on what’s in the middle. The app also slightly sharpens the image and applies a date and time stamp watermark based on the EXIF data saved with the original file. It then saves it as a medium-high quality JPEG in a folder I specify. I do this for only the images I want to include in the movie; no reason to process them all. The rest of the images are discarded when I wipe the SD card.

EasyBatchPhoto can process huge batches of images at a time.
I should mention that you could probably do all this with another app. This happens to be the one I use. I’m sure some readers will share their solutions in the comments.
 Once I have the images in a folder, I open up QuickTime Player 7, which I’d updated to the Pro version years ago. This is an old version of QuickTime. The current version does not have the feature I need, which is the Open Image Sequence command. I use that command to get a dialog box prompting me to choose an image. I select the first image in the folder containing all of the images for the movie.

Use this dialog box to select the first image in the folder of images for the movie.

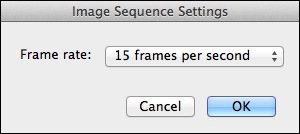
Use this dialog box to set the frame rate.
I’m then prompted to set the image sequence settings — basically the frame rate for the movie. There are a lot of options on that pop-up menu. After some experimentation, I decided on 15 frames per second for this project. That compresses 10 hours worth of images into about 40 seconds. Any faster and you miss a lot of the action. When I click OK, QuickTime makes the movie and displays it in a window. After taking a look at it, I save it to disk, usually in the same folder as the images.
Why YouTube?
I was really pissed off to discover that
Viddler, the site I used years ago to host video, has made my videos unavailable for viewing. I think it’s because they expect me to pay for hosting, which just ain’t gonna happen. This screwed up a lot of embedded video on this site. Because some of the videos are very old, I can’t find the source files so those videos are gone forever. So I’ll use YouTube on a go-forward basis for all video sharing. It’s free and very easy to access.
The last thing I do is upload the movie to YouTube. I do this with the current version of QuickTime. I just double-click the movie’s icon to open QuickTime and use the share command to share it on YouTube. QuickTime prompts me for a movie description and tags. Within minutes, it’s online and available to anyone who wants to see it.
The entire software process takes about 5-7 minutes and is mostly automated.
If you make time-lapse movies and use a different set of software tools, please do use the comments to share your process. It’s always nice to learn about new software that might make things easier or just plain better.
 There’s a new kind of typo in town.

 The first thing I do is run the images through a program called
 Once I have the images in a folder, I open up QuickTime Player 7, which I’d updated to the Pro version years ago. This is an old version of QuickTime. The current version does not have the feature I need, which is the Open Image Sequence command. I use that command to get a dialog box prompting me to choose an image. I select the first image in the folder containing all of the images for the movie.
 Chuck and me through the miracle of Skype.
 You can also go to the