Typical Late Autumn Weather Time-Lapse

Lots of fog coming and going all day long.

I knew when I woke up yesterday morning that it was going to be a foggy day. How could I tell? I looked out my window and didn’t see a single light anywhere. The fog was all around me, blocking out the thousands of lights down in Wenatchee that keep my home from getting dark at night as well as closer in lights in at my neighbors’ homes. It was pitch black dark.

But with fog and low clouds moving around, it would be a good day for a time-lapse.

The Equipment

I went down into the garage and rummaged around in a box full of old camera equipment until I found my Canon PowerShot G5. This was my first “serious” digital camera, which I bought back at the end of 2003 for aerial photography. (Back then, I had the crazy idea that my future wasband was capable of taking satisfactory photos from the helicopter to meet the needs of aerial photo clients. That turned out to be a very expensive exercise in futility.) With 5 megapixel resolution, it was a big deal — all my digital cameras up to that point had shot in 2.1 megapixels or less. I even took it with me to Supai, the Havasupai village at the bottom of the Grand Canyon, when I went on an Arizona Highways photo excursion in April 2004.

So yes, the camera is old. At least by today’s standards.

But I don’t throw anything useful away. Even when I got better digital cameras — like the Nikon D80 I bought in 2007 and the Nikon D7000 I use now — I kept the old Canon.

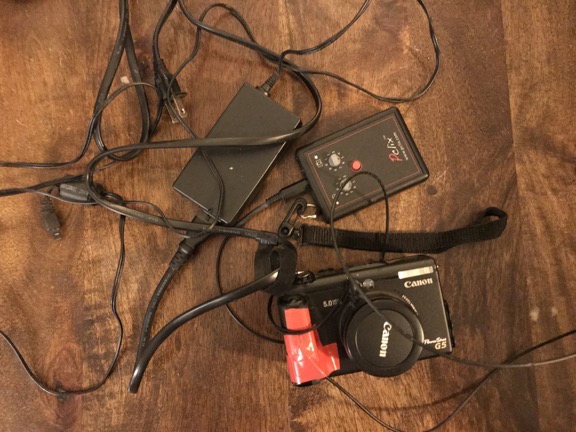
Years ago, I bought a Pclix intervalometer for it and started using it as a dedicated time-lapse camera. An intervalometer, in case you don’t know, is a device or camera feature that tells the camera to shoot an image periodically per your specifications. That and a tripod are the two things you need to make time-lapse movie images. You then use an app on your computer (or smartphone, I suppose) to compile those images into a movie.
G5 and Pclix
Shown here: my Canon G5 with optical cable taped on, Pclix intervalometer, and the power supply for the camera, which is not USB.

The Pclix I have uses an optical trigger mechanism. That means it sends a beam of light down a fiberoptic cable. The light is seen by the old Canon G5 as if I’ve pointed a remote at it and it clicks the shutter. To get this to work, I used electrical tape to attach the business end of the optical cable to the G5’s remote sensor. Of course, the camera needs to be plugged into power — its old battery won’t hold a charge and, even if it did, it wouldn’t last all day. The Pclix runs on a pair of AAA batteries and I was very surprised to see that they still had enough juice to power it. But I guess an electronic timer and tiny beam of light don’t need much power.

When I dug out all this stuff yesterday morning, I was kind of surprised to find it all. (Note to self: putting things away really is a great strategy for making them easy to find in the future.) Although I still do time-lapses once in a while, I’ve been using my GoPro, which is a lot more compact and easy to set up. But my GoPros and my Nikon D7000, which has a built-in intervalometer, are all in Arizona, waiting for me to join them. The G5 was my only option.

Setting Up

I’ve always been interested in time-lapse movies. There’s nothing quite like them to show the movement of slow-moving things. You can see the ones on this blog by checking out the time-lapse tag.

Of course, the challenge is to set up a time-lapse camera before something interesting happens. I can’t tell you how many times I’ve tried to create a time-lapse of clouds on days that clouds never made an appearance. The good thing is, the images are all digital, so if a whole day shooting results in a dull time-lapse, I can just delete it all.

Yesterday’s challenge was pointing the camera in the right direction with the right zoom magnification. (This is one of the benefits of using the G5 instead of a GoPro: optical zoom.) It was barely light out and the fog was thick when I got it all set up. I was also concerned about focus; I let the camera’s autofocus feature take care of that, but when there’s no detail to lock in on, the camera can’t focus. So I suspect there are some focus issues with individual shots.

I let it run all day from the corner of my deck, plugged into one of the outlets there, with 1 shot every 15 seconds. That’s how the Pclix was set up. I’d lost the instructions and didn’t want to mess with reprogramming it.

The Results

I checked on the camera at about 3:30 PM and discovered that its tripod had fallen over. Oops. I brought it in and saw that the last shot taken was after 2 PM, so I did get most of the day.

I brought the camera up to my loft where my office is now. It took a while to find a cable that would connect the old camera to my computer — I knew there was no chance I’d find a card reader for the Compact Flash card (which isn’t compact at all by today’s standards). I worked some magic and got the images into my computer.

Then I ran them through an app that resized them and put the time in the corner.

Then I fired up QuickTime 7 Pro — which I’ve always used for time-lapses — and created a movie with 30 frames per second. So each second of this movie is 7-1/2 minutes of the day. Here it is:

What surprises me most is just how much of the day was foggy. Keep in mind that my home sits on a shelf about 800 feet above the river. In the winter, we often get inversions that fill the valley with fog. Sometimes I’m above it, sometimes I’m in it, and sometimes I’m below it. Yesterday, I was mostly in it and above it. At one point, I looked out my office window, which faces south towards the cliffs, and it was perfectly clear. Yet at the same time, the view through the camera was nearly completely fogged in.

Of course, this has motivated me to do some more time-lapses. Maybe I’ll produce a few in Arizona when I head down there for the winter. But I think I’ll leave my clunky G5 setup home.

Creating Time-Lapse Movies

How I do it.

I’ve been fascinated with time-lapse photography for as long as I can remember — and believe me, that’s a long time. I love the idea of compressing a series of still images into a short movie. But what I love more is the way it speeds up the process of things that happen slowly: clouds moving across the sky, shadows changing with sun angles, and things being built or moved. There are a lot of time-lapse movies on this site; click the time-lapse tag to explore them. I do want to stress that my time-lapse movies are very simple. If you want to see something amazing, look at the work of a master like Ross Ching’s Eclectic series.

I rely on certain equipment and software tools to create my time-lapse movies. Since I’ve been sharing daily time-lapse movies of the construction of my home, I thought I’d take a minute to explain how I make them.

The Camera

Hero HD
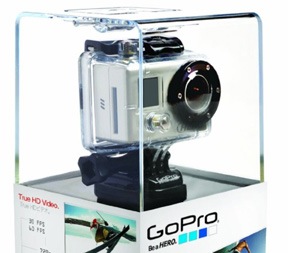
I use my old Hero HD for most time-lapse work these days.

The first thing you need to create a time-lapse movie is a camera capable of snapping an image at a regular interval. These days I use a GoPro. Although I have three of these great cameras — Hero HD, Hero 2, and Hero 3 — I tend to use the oldest (the Hero HD) for this kind of work so if it’s lost, damaged, or stolen, it’s not a huge deal.

The GoPro has an interval or time-lapse mode that I use quite often. Because the process of building my home is relatively slow, I set it to the most amount of time between images: 1 minute.

(In the past, I’ve used a Pclix intervalometer — that’s a time-lapse timer that triggers a shutter release on a camera at a preset interval — attached to an old Canon G5 digital camera. Again, the camera was old and worthless so if someone walked off with it, no big deal. Losing the intervalometer would have been worse.)

Skeleton Housing
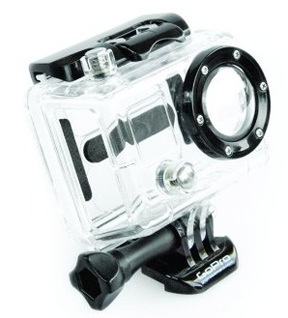
The skeleton housing gives me access to the USB port and SD card on the GoPro.

Power is an issue when you run a camera for hours on end. I use the GoPro Skeleton housing around the camera so I can run a USB cable to it. The cable then feeds into a window on my RV where it plugs into a power source. The added benefit is that I can remove the SD card without opening the housing and changing the camera angle. I use electrical tape to cover up the two sides of the housing to keep dust and rain out.

The Camera Mount

For time-lapse photography, it’s vital that the camera be held still (or moved smoothly, if you’re going for that kind of effect). That means a tripod or camera mount.

Pedco UltraClamp
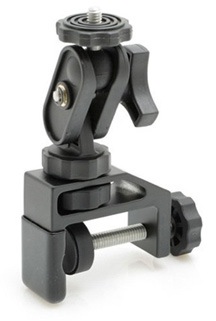
This is a must-have mount for anyone with a GoPro or lightweight digital camera.

I routinely use a Pedco UltraClamp with my GoPros. I can’t say enough things about this clamp-on camera mount. With a GoPro, all you need is a tripod mount adapter and you’re good to go.

For my construction project time-lapse movies, I clamped it onto one of my RV slide-outs, pointing at the construction site. Easy.

The Software

Okay, so the camera has been running for hours and it has collected hundreds of images. Most of my time-lapses run from 6:30 AM to 4:30 PM. That’s 10 hours with 60 shots per hour. 600 images.

The images are 2592 x1944 pixels. That’s way bigger than I need. In addition, I want a 16:9 aspect ratio, which is better suited for video projects these days. So I need to do some processing.

EasyBatchPhoto IconThe first thing I do is run the images through a program called EasyBatchPhoto. (Remember folks, I’m using a Mac.) I have the app set up to crop the image to 1920 x 1080 — that’s standard high definition. This basically crops away the edges of the image, focusing on what’s in the middle. The app also slightly sharpens the image and applies a date and time stamp watermark based on the EXIF data saved with the original file. It then saves it as a medium-high quality JPEG in a folder I specify. I do this for only the images I want to include in the movie; no reason to process them all. The rest of the images are discarded when I wipe the SD card.

EasyBatchPhoto Settings
EasyBatchPhoto can process huge batches of images at a time.

I should mention that you could probably do all this with another app. This happens to be the one I use. I’m sure some readers will share their solutions in the comments.

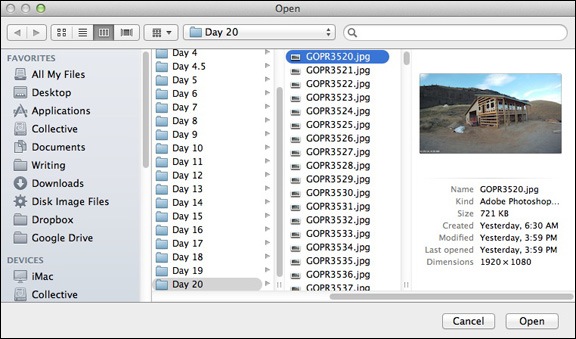
QuickTime Player 7 IconOnce I have the images in a folder, I open up QuickTime Player 7, which I’d updated to the Pro version years ago. This is an old version of QuickTime. The current version does not have the feature I need, which is the Open Image Sequence command. I use that command to get a dialog box prompting me to choose an image. I select the first image in the folder containing all of the images for the movie.

Choose the First Image
Use this dialog box to select the first image in the folder of images for the movie.

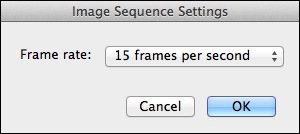
Image Sequence Settings
Use this dialog box to set the frame rate.

I’m then prompted to set the image sequence settings — basically the frame rate for the movie. There are a lot of options on that pop-up menu. After some experimentation, I decided on 15 frames per second for this project. That compresses 10 hours worth of images into about 40 seconds. Any faster and you miss a lot of the action. When I click OK, QuickTime makes the movie and displays it in a window. After taking a look at it, I save it to disk, usually in the same folder as the images.

Why YouTube?
I was really pissed off to discover that Viddler, the site I used years ago to host video, has made my videos unavailable for viewing. I think it’s because they expect me to pay for hosting, which just ain’t gonna happen. This screwed up a lot of embedded video on this site. Because some of the videos are very old, I can’t find the source files so those videos are gone forever. So I’ll use YouTube on a go-forward basis for all video sharing. It’s free and very easy to access.

The last thing I do is upload the movie to YouTube. I do this with the current version of QuickTime. I just double-click the movie’s icon to open QuickTime and use the share command to share it on YouTube. QuickTime prompts me for a movie description and tags. Within minutes, it’s online and available to anyone who wants to see it.

The entire software process takes about 5-7 minutes and is mostly automated.

If you make time-lapse movies and use a different set of software tools, please do use the comments to share your process. It’s always nice to learn about new software that might make things easier or just plain better.