Western Washington Wander 2020: A Driving Day with a Crappy Campsite

I spend much of the day on the road, driving into smoke and spending the night in a crappy place.

Friday was a driving day for me that was a lot longer than it should have been. The only highlights were lunch with friends and a long-postponed trip to Trader Joe’s. Even my campsite that night sucked.

So I’ll keep this short.

The Long Drive

I needed to be in Maple Valley at noon to meet some old friends for lunch. Normally, that would be less than an hour from where I was camped at Buck Creek Camp: Go northwest on 410 to Enumclaw and then north on 169 to Maple Valley. Easy.

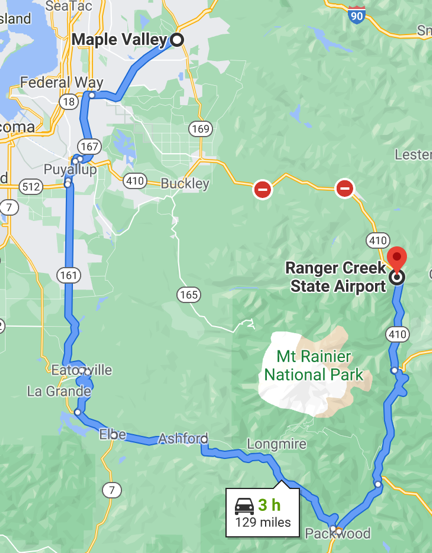
Route to Maple Valley
Not exactly the most direct route to my destination.

But a fire had route 410 closed at Greenwater and there was apparently no way to get through. So I had to go around to the south before going west, basically circumnavigating Mt. Rainier National Park. That made it a 3-hour drive.

Of course, I didn’t know that when I pulled out of my campsite at 8 AM sharp. I knew the road was closed and that I’d have to go around the long way, but I had no idea how long that long way was. I had no Internet access and couldn’t use Google Maps to calculate drive time. So I thought I’d make a leisurely drive around the park and get there with time to spare.

I realized this wasn’t the case after stopping for fuel at Packwood and using Google Maps to give me a good route with timing. That’s when I discovered, at after 9 AM — I guess I forgot to mention stopping at a bakery and going about 5 miles out of my way in search of a ranger station — that I still had a 2 hour and 16 minute drive ahead of me. If I left at that moment, I could be there by 11:52.

Holy crap.

So I drove. I took a winding road north from Packwood to the National Park Road and continued west on another road and another road through a succession of towns, each getting a little bigger and more traffic-filled than the one before it. For the first time in days, I was stopping at traffic lights and seeing red lines on Google Maps.

And that’s when I started experiencing the smoke that has blanketed the entire state. It started as a haze and got thicker and thicker until I couldn’t see far ahead. I couldn’t smell it, but by the end of the day I’d have a sore throat.

Air Quality
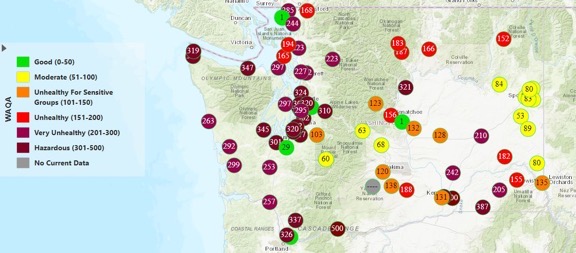
Here’s a picture of the air quality situation on Friday. It hovered around 300 where I was.

Anyway, after a miserable 2+ hours of driving, I finally arrived at my destination: a restaurant in Maple Valley, WA. I parked my rig, took my pups out for a quick pee walk, stowed them in the camper where they had access to food and water, and met my friends for lunch.

A Few Hours in Civilization

The friends I met were Don and Johnie, a couple I’ve known for at least 10 years. Don was a Robinson R44 owner and helped me find hangar space at Deer Valley Airport in Arizona for a season or two before my divorce, when I really tried to make a go of helicopter charter work down there. Don has since sold his helicopter and embraced retirement. I don’t see them often, despite the fact that their summer home is right on the other side of the mountains from me and he has a helipad in his yard. Even stranger is that, like me, they go to Arizona in the winter time and I seldom see them there, either.

It was nice to catch up with them. They’ve been mostly sheltering in place, seeing very few people. This particular restaurant was one of the few they felt comfortable eating at, although they preferred eating on the outdoor patio, which was closed that day due to the smoke. They’re heading back down to Arizona later this month and I’ll make a special effort to meet up with them when I’m in their area.

After lunch, I had Google Maps direct me to the nearest Trader Joe’s. I was in search of figs, which I buy at Trader Joe’s every autumn. They did not disappoint me; I bought three pounds. I also bought some of their olive oil sardines, sugar free chocolate bars, tamales, and the fixings I need to make my granola — mostly unsweetened coconut and flax seeds which are nearly impossible to find at a reasonable price in Wenatchee. By the time I left with my three bags full of food, there was a line to get in; I didn’t realize it, but they were limiting access to the store during the pandemic and I was lucky to be able to get right in.

One more quick stop — this time at a Lowes. I bought a pair of leather gloves and eye protection that I’d need for the blacksmithing course I was starting the next day.

The Crappy Campsite

By that time, it was after 3 PM. I needed a place to park for the night and I didn’t see any decent options between there and my morning destination in Eatonville. I took a route that kept me as close to the national forest as possible, hoping for a forest road I could slip down and park along. But no joy.

In the end, I wound up parking in a mostly empty lot in the town of Eatonville. I spoke to the guys at the used car place across the street and they assured me that the owner of the lot didn’t care who parked there and that semis parked there all the time. I did notice a police car cruising through slowly to check me out, but no one bothered me.

Bad Air in Eatonville
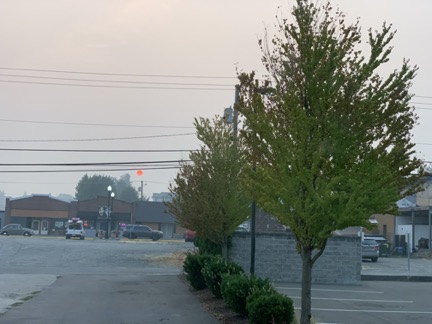
Here’s a view out my window in my Eatonville “camp.” That tiny orange dot just under the wires is the sun.

I took the girls for a walk to a nearby restaurant called Shaken, which had outdoor dining. I figured I’d get a drink and a snack. I thought the place might be nice but it turned out to be kind of redneck. They played country music and none of the servers wore their masks properly. I ordered a drink and food; the drink came quickly and was okay but the food never came. I flagged down the waitress and told her I’d take it to go. She came back a moment later to ask me what I’d ordered. They never made it; I think she forgot to put the order in. I got the check for the drink, paid it, and left. Against my better judgement, I did give her a tip. She had, after all, gotten water for my pups.

I had a terrible night’s sleep. I heard cars go by all night and it didn’t quiet down until after midnight. Some people walked by at 2:30 AM, talking loud enough to wake the girls and get them growling.

I was out of bed by 4 AM. I spent some time working on blog posts and drinking coffee. The girls woke up when it got light out and I took them for a walk. There was a coffee place across the street and I got a breakfast sandwich from them. Pre-made, microwaved. Edible but barely.

By 8 AM, I decided to move on.

The First Mushroom Hunt of Autumn 2016

Limited success and a bunch of new mushrooming resources.

Cooler weather is upon us and that means the chanterelle mushrooms are coming into season.

Last Friday morning I went out for a hike/mushroom hunt with my hiking friend, Sue. Sue knows all kinds of things about plants and animals and even rocks, so going on a hike with her is a great learning experience. And although she doesn’t eat mushrooms, her husband does and she’s always game to go hunting with me.

The Hike

We chose a trail we both like up Icicle Creek beyond Leavenworth, WA. It’s a bit of a drive — about 50 miles from my home, including more than 10 on gravel. Another mushrooming friend of mine claimed she’d found chanterelles right on the trail. I was doubtful and I think Sue was, too. So as we hiked, we took occasional forays into the forest on one side of the trail or the other, right where we thought chanterelles might grow. I did find a very nice coral-type fungus that we believe is edible; I took it with me to examine more closely later.

Then it happened: Sue found a golden chanterelle mushroom growing right alongside the trail. While she harvested it, I combed the area looking for more. She joined me. We came up empty.

I should mention here that chanterelles are pretty easy to identify. They normally have sort of misshapen caps and the gills on the underside are more like ridges or wrinkles than regular mushroom gills. They normally extend down the mushroom’s stem. You can find photos on WikiMedia. There are some “false” chanterelles and a similar looking poisonous variety called Jack O’Lantern, but it’s pretty easy to distinguish these from real chanterelles, which are prized as tasty mushrooms. If you’re interested in hunting for chanterelles, study up first and make sure you know what you’re looking for and where you might find them.

We got to a point in the trail where we were within a quarter mile of a place I’d found chanterelles the previous year and took a little detour to check it out. I walked us over to where I found them and we searched the ground. It seemed too dry. I gave up quickly and moved off to another nearby spot, but Sue stuck with it. Soon she called out “I found one!”

I hurried back. She pointed it out and I took a photo. Then we saw one nearby that was just poking out of the forest duff.

And that’s when I started seeing little mounds all over the place. Lots of young chanterelles just popping out of the ground.

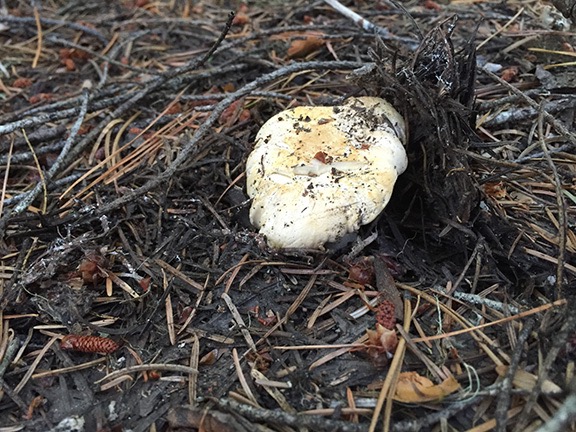
Young Chanterelle
A young chanterelle mushroom, just poking out of the ground.

I used my new pocketknife — I bought one with a bright orange handle so I wouldn’t lose it while mushroom hunting — to dig a few out and put them in my bag. They were all a yellowish white color with a relatively regular looking cap. I showed one to Sue and she confirmed that they were chanterelles.

We continued to hunt in that area before getting back on the trail. Sue found some other mushrooms in various stages of decay — russulas. None of them were worth keeping, even if they were of edible varieties.

We finished our hike and headed home, stopping in Leavenworth for lunch and to buy smoked meats (Cured), wine (Ryan Patrick), and cheese (Cheesemonger).

Uncertainty

If there’s a golden rule to hunting for edible mushrooms, it’s this: never eat a mushroom you find unless you are certain that it’s edible.

side of mushroom

top of mushroom

mushroom gills

inside mushroom
Several views of one of the mushrooms I harvested on Friday. When trying to get help with identification, it’s important to show as much detail as possible.

When I got home, I took a closer look at the five chanterelles I’d found. They were all smaller and much more “perfect” looking than any chanterelle I’d ever seen. What if Sue was wrong? What if they weren’t chanterelles and I ate them?

I combed through my mushroom books. None of the pictures matched what I had. I started to write Sue a warning email.

I posted some photos on Facebook, trying to see if any of my friends could advise me. Then I looked for and found three different mushroom identification groups on Facebook and signed up for each of them. I couldn’t post photos until I was approved for membership, though.

Then, as usual, I got sidetracked by something else and didn’t give it another thought until morning.

On Saturday morning, I was thinking about a chanterelle mushroom omelet. So I took my morning coffee to the computer and began searching the internet. I knew there was something called a false chanterelle, and I looked it up. That’s where I learned that false chanterelles have normal fin-like gills while real chanterelles have the wrinkle- or ridge-like gills. There was another chanterelle look-alike called a jack o’lantern that was definitely poisonous, but what I’d picked had very little in common with that. (Keep in mind that although I’m linking primarily to Wikipedia articles here, I consulted many sources.)

I finished the email to Sue and sent it. Then I kept researching. I wanted so badly to eat my mushrooms but I didn’t want to get sick. I’d been approved for all three mushroom identification groups on Facebook so I took and sent photos, including the ones you see here. I kept researching while I waited to hear back.

Around that time, I found a trio of photos on the Mushroom Forager website’s page about Hedgehog Mushrooms. It illustrated three similar mushrooms. The middle photo was almost identical to what I had.

Mushroom Gills
This image, which can be found at The Mushroom Forager website, helped convince me I had chanterelles.

I started cutting up my chanterelles for an omelet.

Then I checked back with Facebook. The mushroom identification group members were starting to chime in. The first few were pretty sure that it wasn’t chanterelles. I put the mushrooms away in a container in the fridge and had an omelet without mushrooms.

Throughout the day, more responses trickled in. And this is where the group dynamics really come into play. Some were sure that they weren’t chanterelles. Some were sure that they were. So I really wasn’t any better off than I’d been before consulting the groups.

Finally, late in the day, some folks who obviously knew a lot about mushrooms started responding. They identified the type of chanterelle with its genius and species: cantharellus subalbidus. While some group members argued with them, they were firm. They provided additional information about the area in which they grow: old growth forests like the one I’d been in. One even provided a link to a page that illustrated it.

I should mention here that of the three groups I joined, the Mushroom Identification Page group seemed to have the most knowledgeable participants, although none of them were free of people who offered incorrect information based on limited facts. (I really need to do a blog post about Facebook group dynamics.)

I should mention that by this time, Sue had also responded to my email. She was certain it was a cantharellus subalbidus, too. She has some resources where she looked them up. I guess she didn’t want to poison her husband!

Feasting on My Find

That evening, I sautéed some thinly sliced veal and prepared a chanterelle cream sauce for it. I had it with a side of fresh steamed green beans from my garden and glass of sauvignon blanc. Delicious.

I finished up the mushrooms the next day by cooking them into an omelet with some scallions and buckboard bacon. Very tasty.

This was my fourth mushroom hunting trip and the second for chanterelles. (I hunted twice for morels this spring.) I marked the GPS coordinates for my find and plan to return this week. Although it hasn’t rained, I’m hoping that cool, shady area of the forest is damp enough for the chanterelles to grow.

I really enjoy collecting my own food, whether it’s foraging in the forest for seasonal mushrooms, gleaning from an orchard after harvest, tending my own garden, or collecting eggs from my chickens. There’s something very special about having that kind of connection with your food.

But best of all, you can’t beat it for freshness.

Mobile Mansion for Sale

Perfect for snowbirds or a life on the road.

Back in 2010, I bought a 2010 Montana Mountaineer 5th wheel RV. I chose it after looking at well over 100 RVs of all sizes. At the time, I thought it was a “Perfect” RV.

Mountaineer 324RLQ Floor planHere’s the floor plan for my mobile mansion.

And it was. At the time, anyway. I bought an RV large enough for two people and a mid-sized dog to live comfortably for 4 to 6 months out of the year. It would need plenty of space, a comfortable dining area, a cozy queen sized bed, and a dedicated office area where I could spread out while working on books. And the kitchen would have to have enough space to prepare meals for two.

You see, the man I was married to had promised that he’d join me on the road in the summer months when he turned 55 in 2011. Buying the RV was just one of the preparations I made for him to leave the latest in a series of dead-end jobs, join me in Washington during the summer months, and chase his own dreams back in Arizona in the winter.

But although I trusted that man to keep his promises, he didn’t. Maybe he never intended to. Instead, he came up with another plan — one that didn’t include me. The divorce proceedings began in the summer of 2012.

Desk
Do you know how many books I wrote at this desk? And yes, that’s an HDTV — one of two in the RV.

In a way, it’s a good thing I bought what I came to call the “mobile mansion.” It gave me a very comfortable place to live in the months between when I left my Arizona home and when my new home in Washington was ready to be occupied.

Unfortunately, however, it’s a lot more RV than I want or need for the winter travel I’d like to make part of my rebooted life. Yes, it’s spacious and comfortable and it’s easily towed behind my 1-ton Ford diesel truck. But it’s a pain to park and it doesn’t fit into many of the tight spaces I’d like to go. It’s perfect for a snowbird — someone who wants to go south for the winter (or north for the summer) and just park in one or two places for the season. But to travel? To move every few days? Not practical.

So I want to downsize. I’d like to replace the mobile mansion with a bumper-pull trailer that’s under 20 feet in length and has no slides. Something light that I can pull with a 1/2- or 3/4-ton truck. Something that’s easy to park, even in tight spots. Something for a life on the go.

That’s why the mobile mansion is for sale. I’ve got it listed on RV Trader and on Craig’s List, as well as in a few local places. If you’ve been thinking of joining the ranks of snowbirds — or breaking free from your nine-to-five grind to start a life of adventure on the road (in comfort) — this might be the perfect solution for you.

This Can Be Yours!
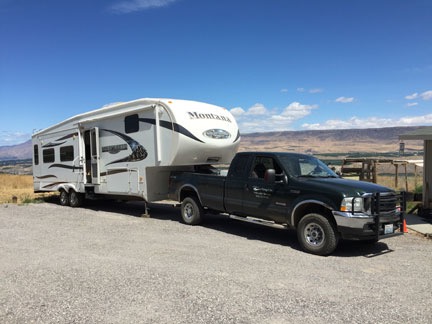
This whole rig can be yours for just $42K!

The asking price? $32,900 for the RV — pay the asking price and I’ll deliver it within 500 miles of 98828 at no extra charge. You can get a NADA Guide RV value and specifications here; just keep in mind that the value doesn’t include the solar setup.

If you want the truck with it, the price is $42,000 firm for the whole rig. You can buy them as a starter kit and hit the road before the first snow falls!

Construction: Setting Up the Power

I bring electrical power into my building.

On May 20, 2014, I began blogging about the construction of my new home in Malaga, WA. You can read all of these posts — and see the time-lapse movies that go with them — by clicking the new home construction tag.

I don’t know if it’s a state or county law, but for new construction, a home owner has two options for setting up electrical power in their home: hire a licensed electrician to do all the work or do all the work herself. Because of my tight budget constraints, I elected to do all the electrical wiring myself.

Don’t get the idea that I’ve done electrical wiring work before. I haven’t. Any time something needed to be wired, I let my wasband do it. After all, he knew how and I didn’t. It wasn’t until he was out of the picture that I did my first wiring job: replacing a thermostat in my Arizona home. That was nothing compared to what I had ahead of me to wire a 2880 square foot garage and 1152 square foot living space. And a 6×8 foot shed 80+ feet away from the power source.

My Job

Meter Requirements
The Chelan PUD provides this illustration to show requirements for the conduit connection to the meter base.

The first challenge was installing the meter base and service panel. The meter base is the component that the power company — in this case, the Chelan County PUD — attaches the electric meter to. The wires come out of the ground, through a conduit I’d have to provide into a metal box on the outside of my building. The conduit had all kinds of size and component requirements and would have to be sealed to the meter base. On the other side of the wall I’d have to install a service panel with the circuit breakers that would connect to all of my electrical circuits. I had to not only mount both devices, but connect them with extremely heavy duty wires. In addition to all that, I also needed to run a copper wire from the service panel back outside the building and connect it to 2 8-foot copper rods driven all the way into the ground at least 6 feet apart.

(These requirements weren’t exactly new to me. After all, I’d installed my temporary power pole back in September 2013. But that was already partially cobbled together when I got it and I had an advisor to help me make the connections. The only part I knew how to do well was to drive in those grounding rods.)

In addition to all this, I’d also have to have at least one circuit installed in the panel. That circuit would have to run to an outlet and light, presumably with a light switch.

My work would be inspected by a government entity called Labor and Industries, which also sold me a permit before I started work. L&I, as it’s locally called, is responsible for all wiring inside a building; the PUD is responsible for wiring outside. L&I had to approve the installation of the meter base and service panel before PUD could connect power.

The Timing Issue

Coordinating visits by the PUD and L&I workers and inspectors was crucial and tricky. I had to know when each bit of work would be done so I could request services and inspections I needed.

Once the PUD turned off power to my temporary pole so we could finish the earth work in that area, I would not have power restored until I passed L&I’s inspection. I couldn’t pass that inspection until I installed the conduit, which had to be done as part of the earth work. PUD couldn’t reconnect my power until I passed the L&I inspection. Not only did all the work need to be done timely in a certain order, but the PUD and L&I work had to be scheduled properly.

That’s how I spent Thursday while I was on vacation out at Lopez Island. I excused myself from my host, sat down with a calendar and note paper, and made a bunch of phone calls. The result:

  • Monday morning: Jeff the earth-moving guy and I would dig and install as much conduit as we could.
  • Monday afternoon or Tuesday morning: L&I would inspect the meter base and service panel. I should have enough of the conduit installed to satisfy them.
  • Tuesday morning: PUD would turn off temporary power.
  • Tuesday afternoon: Jeff and I would dig and install the remaining conduit to the transformer box.
  • Wednesday morning: PUD would connect permanent power to my building.

That was the plan, anyway.

The Meter Base and Service Panel

I bought everything I needed to mount the meter base and service panel. At least I thought I did. The funny thing about working on building projects is that no matter how many things you buy at Home Depot or Lowes, you always forget something. Or get a wrong thing. My primary destination these days is Home Depot, which is a 40-minute drive from my home. I’m there at least five times a week. (Maybe I should get a job there.)

On Sunday, my first full day home after vacation, I tried to start work. The trouble is, I couldn’t figure out how to mount the meter box on my building and I absolutely dreaded the thought of cutting a hole in the metal.

Bob Drills a Big Hole
Bob drilled a hole in my building while I looked on, cringing. Since then, I’ve drilled more than a few holes in my building.

My friend Bob came to the rescue. He came by with tools and experience and advice. While his dog Skip and my dog Penny played together in the yard, he helped me decide on a location for the boxes — height was the primary issue that needed determination — and has the dubious honor of being the first person to drill a hole in my building. Of course, we didn’t have everything we needed to finish up, so we made the trip down to Home Depot together in my Jeep, stopping for tacos at the Plaza on the way back. (Have I ever mentioned the abundance of excellent, authentic Mexican food in this area? Whodathunkit, huh?)

Meter Base Installed
Here’s the meter base right after mounting. I connected wires to the lower contacts, ran them through the hole, and connected them to contacts on the service panel on the other side of the wall.

By the time he left, the meter base was securely fastened outside the building with a “nipple” connecting it to the service panel securely fastened inside the building. I ran the three cables between the two panels and fastened them securely.

The First Circuit

Before leaving for vacation the week before, I had already wired my first circuit.

Light switch and outlet
The outlet and light switch for my first circuit.

Although I’d wanted to set up the entry hall light with a 3-way switch to make accessible from both upstairs and downstairs, Bob had convinced me to keep it simple. So I wired up a 2-gang box with an outlet and single pole switch that ran to a fixture mounted nearby. The fixture was designed for the ceiling, but I mounted it on the wall, which meant the shade wouldn’t stay on it. I hoped the bare bulb wouldn’t bother the inspector.

First Circuit
Here’s my circuit board with my first circuit installed. I’ve decided to use 20 amp circuits throughout the building except for circuits that require higher amperage.

With the service panel in place, all I had to do was run the wires from the outlet into the service panel and attach them to the neutral bar and circuit. This was remarkably simple. It was also the only time I’d be able to work on the panel without worries about electrocution since there was no power running to it at all.

The Conduit and Grounding Rods

Sweep
Here’s the 3-in conduit where it approaches my building. My job was to connect it to the meter base mounted on the wall above it.

I began running the required 3-in schedule 40 conduit the next day when we started the earth work.

Measuring and cutting the conduit to piece together required components to connect the sweep to the meter base was a bit of a challenge. My reciprocating saw made a mess of the plastic pipe when I cut it so I had to use my hacksaw. I got the measurements wrong once — fortunately, I hadn’t applied any glue yet — and had to recut a piece. But in the end, it came together well. I glued everything together, feeling relieved that the hardest part was done.

Although everyone had warned me that driving the two grounding rods into the ground would be difficult, I knew otherwise. I’d already done it once on my property — for the temporary power pole — and with a T-post driver the work had gone remarkably well. My building site is pretty much free of large rocks, as the builders discovered when they dug the holes for my building’s posts. Besides, with a 4-foot trench in the area, I only had to drive them 4 feet into the ground. As I expected, the work went quickly. I drilled a small hole through the building’s metal near the ground, ran an 8-gauge copper wire I’d bought as a remnant from Home Depot the day before from my panel to the two poles, and considered the job done.

I was now ready for inspection.

The First Inspection

The inspector showed up very late that evening. It might have been around 7 PM. He’d spent the day up in Chelan and I think the only reason he came that evening at all was because he lived nearby and had more jobs to do farther away the next day. Knocking off my inspection would leave him free to get to those other jobs first thing in the morning.

He checked the wiring of my outlet and light switch and seemed satisfied. Then he looked at the service panel. He disconnected the grounding wire, which I’d put in the wrong place. He was about to move it to the correct place when he realized it was 8-gauge wire. It was supposed to be 6-gauge.

Oops.

He said he couldn’t pass me until I replaced the grounding wire. He told me either he or another inspector would come back the next morning. I told him I’d have it taken care of.

Replacing the Grounding Wire

I absolutely dreaded the thought of driving all the way down to Home Depot that night or the next morning to buy more wire. As I was going to sleep, however, I remembered that I’d never cut the grounding wire on my temporary service pole. Instead, I’d left the extra wire coiled up beside the pole.

The next morning, I took my bolt cutters and cut the wire as close to the rod as I could. Then I went back to my building, disconnected the other wire, and ran the old wire through the hole. It was a stretch, but the wire was just long enough to go from the panel, down the wall, through the hole, and attach to the tops of both copper rods. Yes, I’d saved some money, but I’d also saved myself a trip to Home Depot.

The Second Inspection

A different inspector came to look at my work later that morning. He had a long beard like the guys in ZZ Top. He pointed out that the first outlet on a garage circuit needed to be a GFCI — a fact the previous inspector had neglected to mention. He also pointed out that I needed to clamp the conduit to the building in at least one place. But he passed me for PUD connection purposes, with the requirement that I make the two changes before final inspection.

I asked him whether I needed him to inspect the conduit that ran from the building to the shed where I planned to install power. He told me that L&I was responsible for inspecting anything on the inside of the circuit panel. Since the two circuits I planned ran from the panel back outside, he did need to inspect the conduit. Even though it wasn’t 100% complete — I still needed to bring the conduit into the building and shed on either end — he approved it. If he didn’t approve it, Jeff wouldn’t be able to bury it and that would hold up the entire project.

PUD Disconnects and then Connects

The PUD workers arrived a while later to turn off the temporary power. That enabled us to do the earth work needed to get the conduit right up to the transformer box.

From that point forward, I had no power at all. Fortunately, my RV has a solar panel on the roof that keeps its batteries — which I replaced just last year — fully charged. I could go without the microwave and coffee maker for a while. Later that day, I’d move the few items I had in the chest freezer into my RV’s freezer, which would operate on propane.

A while later that same day, a PUD engineer, who’d come primarily to consult with me about the possibility of moving the transformer, approved the conduit from the transformer to the meter base.

Jeff finished the earth work and buried the conduits, pipes, and telephone cable I’d run. (My property had a telephone line running to it and a huge roll of cable sitting beside it on the ground. Even though I don’t want a land line, the next owner might so I ran the cable in the trench. Not sure if I’ll bother to run it inside the walls, though.)

On Wednesday morning, the PUD guys came back. A crew of six ran the cable from the meter base to the transformer and installed the meter. When they were done, I had power in the building.

Success!

Working Circuit
It worked!

I was alone when I flipped the main breaker in the service panel. Then I turned on my only circuit breaker. I reached over and flicked the switch for the light. The bulb lit up.

It may seem silly, but I consider the lighting of that bulb another major breakthrough in the construction of my new home. Like the day I held the keys in my hand for the first time, it’s a milestone — something that registered inside me as a sign that I was moving forward.

But what’s more important is that having electricity inside the building meant that I could begin the task of wiring the building. That means planning and adding outlets and lights and switches throughout the garage and living space above. It’s a huge task made more difficult by having to do it alone — try running wire long distances when there’s no one to feed it while you pull. But like everything else I’ve been dealing with for the past two years and much of my adult life, it’s just another challenge.

And I’ve come to realize that I live for challenges.
The Joy of Flying with an Experienced Professional Videographer

Makes me wonder why I bother with the amateurs.

I had a great flight yesterday. A flight that should stand as a shining example of the kind of flying I love to do with the kind of professionals I like to work with. Let me tell you about it.

But first — because I can’t keep a short story short — some background.

Dealing with Amateurs

I feel the pain of professional photographers — folks who have invested thousands of dollars and years of their lives accumulating quality photography equipment, learning their craft, and practicing until they know how to make every shot count. These people are now competing with amateurs who buy DSLR cameras and call themselves “photographers.” These people use the “shotgun approach” to photography — they shoot dozens of images with the hopes that one or two of them will satisfy their client. They undercut the professionals in pricing because they simply don’t have as much invested in the business and, indeed, some might even have other jobs to support them. The professionals are losing jobs — and their livelihoods — because the amateurs are taking away their clients.

As a pilot providing aerial photography flights, I see this a lot. I get calls from photographers and videographers looking for a platform to get their aerial shots. If they don’t balk at my prices, they usually come in with a set time limit to minimize their flying costs. I can understand this — to a certain extent, anyway. Then they arrive for the shoot and immediately begin to show just how amateurish and unprofessional they are by:

  • Bringing the wrong equipment. I’m talking about consumer quality cameras and lenses, telephoto and long zoom lenses, DSLRs for video, and bulky camera bags full of equipment they will not need and likely cannot access anyway during the flight.
  • Ignoring my advice for seating. If they’re serious about getting good shots of a specific target, they should sit behind the pilot. That’s the only way the pilot can see what they see.
  • Bringing two photographers with two different missions. Usually it’s a still photographer brought along on a video flight. That simply isn’t going to be as cost effective as they think if they take my advice and put the primary photographer behind me.
  • Failing to communicate what they want or expect. I can’t fly the way they need me to if they don’t tell me what they want. They have a microphone next to their mouths. They need to use it. Without specific instructions, I can only assume that what I’m doing is what they want. They have no right to complain later if it isn’t.
  • Making unreasonable demands. I’m talking about expecting to fill all seats in the helicopter when the extra weight would seriously affect performance. (I no longer do photo/video flights with more than two passengers on board. Period.) I’m talking about expecting the pilot to fly at top speed from target to target and then stop “on a dime” if a good shot comes into view along the way. I’m talking about expecting the pilot to hover low-level, fly close to obstacles such as wires, and perform other maneuvers that simply aren’t safe.
  • Talking down to the pilot. I’ve seen this too many times. Amateurs with a bankroll have expensive equipment, no clue how to use it, and an attitude that makes me want to kick them in the teeth. They know it all — or think they do — and they feel a need to correct me every chance they get. I take guys like this just once, give them what they ask for, and never take them again. I don’t want clients like this.

I can think of at least two posts I’ve written that talk about the problems with specific amateurs: “Flying The 2010 Parker 425” and “Tips for Aerial Photographers.” You can get a better idea of the kind of crap I have to deal with by reading those.

Dealing with Professionals

But that’s not what this post is about. This post is about working with a seasoned professional who has lots of experience with aerial photography.

I started to get an idea of the level of professionalism I’d face before I even met the photographer. It was 7 AM and I needed to meet the client in Ephrata, WA at 8 AM. I was prepping the helicopter for the 20-minute flight. I wasn’t sure whether we’d have a single base of operations or if we’d be moving around. I needed to know whether I should remove doors before heading out.

The videographer, I’d been told, would be using a Tyler Minigyro. I’ve had experience with these before. They’re relatively flexible gyro-stabilized mounts that the videographer holds during flight. Because I wouldn’t be using my Moitek Mount, which needs to be installed in a specific seat, the videographer had three seats to choose from. Which door should I remove?

I called the client, coincidentally named Tyler. He was with the videographer. He asked the videographer what he thought. I heard his response through the phone: “The best seat is behind the pilot so she can see what I see.”

Rigged For Photo Flight
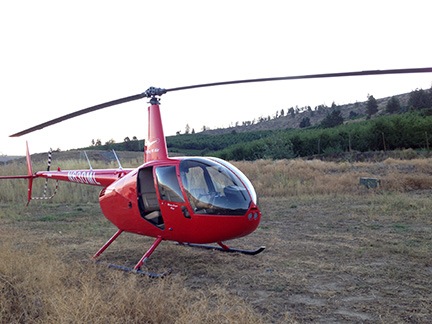
Here’s my helicopter yesterday morning, rigged for the photo flight with both back doors removed.

That was the exact right answer. “I like this guy already,” I told my client. I wound up removing both back doors in case lighting conditions made the videographer want to change seats. As it turned out, I didn’t need to do that and probably shouldn’t have — it caused additional wind to enter the aircraft during point-to-point travel. In all honesty, I probably could have left the doors on until meeting the client — and then stowed them in the client’s SUV.

Jim
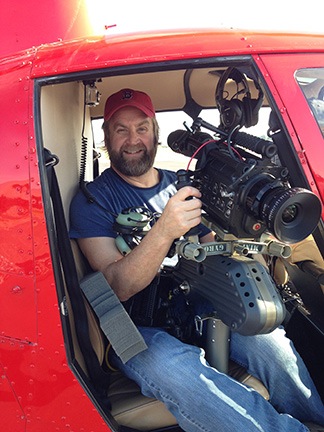
Here’s Jim, the videographer, almost ready to fly.

After picking up one client in Ephrata and flying down to Desert Aire in Mattawa, I met the other clients, including the videographer. The videographer was a burly bearded guy named Jim who was friendly and good-natured. He’d flown quite a bit with a pilot friend of mine in Idaho. He had a huge array of professional equipment, including the rented Tyler Minigyro, two enormous battery packs, an older RED camera with external hard disk, two lenses, a half dozen camera batteries, and a video monitor for the front seat observer. While this may seem like a lot of equipment, he only carried what he needed onboard; there were no extraneous camera bags and loose items.

After prepping most of the equipment, Jim told me he liked to start each shoot with a meeting to cover the expectations. Another sign of a professional. We chatted for a while about the targets we’d be shooting — mostly dams and recreational areas along the Columbia River — and the kinds of shots he was looking for. I told him what I needed from him — clear communication of what he wanted — and told him that I’d do what I could to get him in position for all of his shots. I assured him that the helicopter’s performance with just three people on board and 3/4 tanks fuel would be sufficient for most maneuvers.

We wound up taking off the front passenger door for the other client, who wanted to get some still images. (Of course.) Fortunately, for the duration of the flight I was not asked to put him into position to get his shots; he just shot what he wanted when he could get the right composition.

We lifted off and got to work around 9 AM, leaving Tyler behind to shoot on the ground. We immediately encountered some problems with the camera. First it was dropping frames and then it was locking up. Jim switched a battery in flight and we were able to get to work. His instructions to me were clear and easy to follow. I could tell that he’d flown with a lot of pilots before by the way he phrased his requests: “If you think it’s safe, can we…” It was obvious that he understood the limitations of helicopters and the potential danger of certain maneuvers. That comes from a lot of flying. (I’ve only had two other clients who clearly understood limitations: one had been a passenger in a helicopter for more hours than I’ve flown as a pilot and the other one is an airplane pilot.)

It wasn’t long before we ware working smoothly together, almost as if we’d worked together for a long time. He’d ask for maneuvers and I’d do my best to deliver them. He and the front seat passenger would ooh and aah when they saw a particularly nice shot in the viewfinder or monitor. He’d tell me when I was doing something right and when I wasn’t doing it quite the way he wanted. Communication was excellent — I don’t think I’ve ever worked with a better communicator.

The helicopter performed remarkably well, especially that morning when the temperatures were still cool. All flight sequences, including sideways “crabbing” flights at speeds up to 30 knots, were amazingly smooth. This was, in part, due to the fact that there was hardly a breath of wind. I couldn’t have asked for better flying conditions that morning, although I wish it was about 15 degrees cooler that afternoon.

We worked our way up the Columbia River, shooting the dams, boats on the river, cultural and recreational sites, bridges, cliffs, communities, and more. We refueled at Ellensburg and kept flying, always moving upriver. Time flew by. By the time we reached the Rock Island Dam just downriver from Wenatchee and Malaga, I was starting to feel fatigued and I think Jim was, too. After a quick stop at Quincy Airport to meet Tyler to swap out batteries, we got onto our last leg of the flight which took us to Euphrata and Moses Lake. We shot agricultural and industrial sites along the way.

Unseasonably Warm
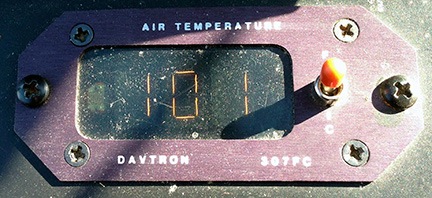
It’s been unseasonably warm this September in central Washington state.

By the time we landed at Moses Lake, I felt done — as in “stick a fork in me” done. The OAT gauge registered 101°F on the ramp. I was the only one with a door on the helicopter and was sweating up a storm by the time we touched down. Thank heaven for the folks at Million Aire; the girl who greeted us with a cart handed each of us an icy cold bottle of water that I really needed.

747
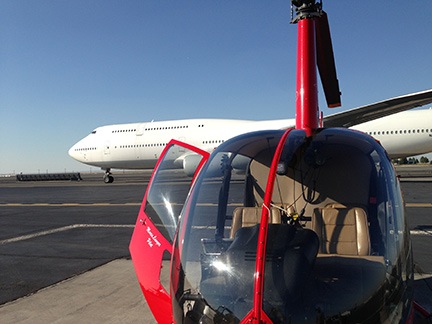
Jeez Louise! That’s a big plane!

By the time Tyler arrived and was escorted with the SUV out to the ramp, we’d unloaded most of the equipment from the helicopter. A Boeing 747 rolled in on the taxiway behind me and parked beside me; I don’t think I’ve ever been so close to a 747 on a ramp. (The damn thing is huge!) My clients stowed their equipment in the SUV and I fastened the door. I also let the FBO top off both tanks with fuel. Then my passenger and I were on our way back to Ephrata and, 15 minutes later, I was on my way home.

I got home around 4 PM. I’d spent 7.0 hours flying.

What Made this Great

I think it’s safe to say that this was one of the best aerial video gigs I’ve done in a long time. A few things made it so good:

  • The experience and professionalism of the videographer. He knew his stuff, he knew what worked, he never asked for anything I couldn’t or wouldn’t deliver. He was reasonable and extremely communicative. He was a real pleasure to work with.
  • The targets. The flight itself took us over some really nice scenery so point-to-point flying was a pleasure. The targets were interesting to see from the air and, in some cases, a bit challenging to shoot because of obstacles such as wires and cliff faces.
  • The length of the flight. It was refreshing to fly with someone who was more interested in getting the shot than minimizing flight time. More than once, we’d redo a shot just to make sure we got what the client needed. We also approached targets from a variety of angles and altitudes. This meant that we were in the air a long time. And I’ll be honest with you: I’d rather do one 7-hour video flight with no pressure to finish within a certain time than seven 1-hour video flights that must be done within an hour.

I really liked this client and hope I get more work with them in the future. And I hope they feel the same about me.

I suspect they might.