Western Washington Wander 2020: A Driving Day with a Crappy Campsite

I spend much of the day on the road, driving into smoke and spending the night in a crappy place.

Friday was a driving day for me that was a lot longer than it should have been. The only highlights were lunch with friends and a long-postponed trip to Trader Joe’s. Even my campsite that night sucked.

So I’ll keep this short.

The Long Drive

I needed to be in Maple Valley at noon to meet some old friends for lunch. Normally, that would be less than an hour from where I was camped at Buck Creek Camp: Go northwest on 410 to Enumclaw and then north on 169 to Maple Valley. Easy.
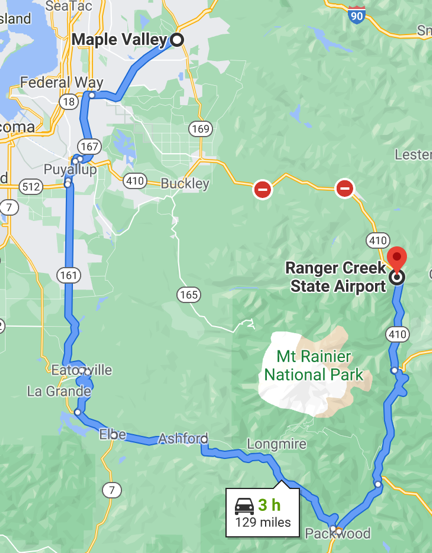
Route to Maple Valley
Not exactly the most direct route to my destination.

But a fire had route 410 closed at Greenwater and there was apparently no way to get through. So I had to go around to the south before going west, basically circumnavigating Mt. Rainier National Park. That made it a 3-hour drive.

Of course, I didn’t know that when I pulled out of my campsite at 8 AM sharp. I knew the road was closed and that I’d have to go around the long way, but I had no idea how long that long way was. I had no Internet access and couldn’t use Google Maps to calculate drive time. So I thought I’d make a leisurely drive around the park and get there with time to spare.

I realized this wasn’t the case after stopping for fuel at Packwood and using Google Maps to give me a good route with timing. That’s when I discovered, at after 9 AM — I guess I forgot to mention stopping at a bakery and going about 5 miles out of my way in search of a ranger station — that I still had a 2 hour and 16 minute drive ahead of me. If I left at that moment, I could be there by 11:52.

Holy crap.

So I drove. I took a winding road north from Packwood to the National Park Road and continued west on another road and another road through a succession of towns, each getting a little bigger and more traffic-filled than the one before it. For the first time in days, I was stopping at traffic lights and seeing red lines on Google Maps.

And that’s when I started experiencing the smoke that has blanketed the entire state. It started as a haze and got thicker and thicker until I couldn’t see far ahead. I couldn’t smell it, but by the end of the day I’d have a sore throat.
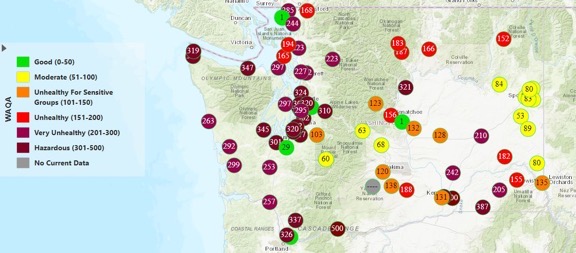
Air Quality
Here’s a picture of the air quality situation on Friday. It hovered around 300 where I was.

Anyway, after a miserable 2+ hours of driving, I finally arrived at my destination: a restaurant in Maple Valley, WA. I parked my rig, took my pups out for a quick pee walk, stowed them in the camper where they had access to food and water, and met my friends for lunch.

A Few Hours in Civilization

The friends I met were Don and Johnie, a couple I’ve known for at least 10 years. Don was a Robinson R44 owner and helped me find hangar space at Deer Valley Airport in Arizona for a season or two before my divorce, when I really tried to make a go of helicopter charter work down there. Don has since sold his helicopter and embraced retirement. I don’t see them often, despite the fact that their summer home is right on the other side of the mountains from me and he has a helipad in his yard. Even stranger is that, like me, they go to Arizona in the winter time and I seldom see them there, either.

It was nice to catch up with them. They’ve been mostly sheltering in place, seeing very few people. This particular restaurant was one of the few they felt comfortable eating at, although they preferred eating on the outdoor patio, which was closed that day due to the smoke. They’re heading back down to Arizona later this month and I’ll make a special effort to meet up with them when I’m in their area.

After lunch, I had Google Maps direct me to the nearest Trader Joe’s. I was in search of figs, which I buy at Trader Joe’s every autumn. They did not disappoint me; I bought three pounds. I also bought some of their olive oil sardines, sugar free chocolate bars, tamales, and the fixings I need to make my granola — mostly unsweetened coconut and flax seeds which are nearly impossible to find at a reasonable price in Wenatchee. By the time I left with my three bags full of food, there was a line to get in; I didn’t realize it, but they were limiting access to the store during the pandemic and I was lucky to be able to get right in.

One more quick stop — this time at a Lowes. I bought a pair of leather gloves and eye protection that I’d need for the blacksmithing course I was starting the next day.

The Crappy Campsite

By that time, it was after 3 PM. I needed a place to park for the night and I didn’t see any decent options between there and my morning destination in Eatonville. I took a route that kept me as close to the national forest as possible, hoping for a forest road I could slip down and park along. But no joy.

In the end, I wound up parking in a mostly empty lot in the town of Eatonville. I spoke to the guys at the used car place across the street and they assured me that the owner of the lot didn’t care who parked there and that semis parked there all the time. I did notice a police car cruising through slowly to check me out, but no one bothered me.
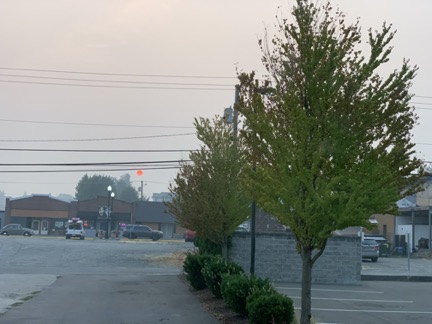
Bad Air in Eatonville
Here’s a view out my window in my Eatonville “camp.” That tiny orange dot just under the wires is the sun.

I took the girls for a walk to a nearby restaurant called Shaken, which had outdoor dining. I figured I’d get a drink and a snack. I thought the place might be nice but it turned out to be kind of redneck. They played country music and none of the servers wore their masks properly. I ordered a drink and food; the drink came quickly and was okay but the food never came. I flagged down the waitress and told her I’d take it to go. She came back a moment later to ask me what I’d ordered. They never made it; I think she forgot to put the order in. I got the check for the drink, paid it, and left. Against my better judgement, I did give her a tip. She had, after all, gotten water for my pups.

I had a terrible night’s sleep. I heard cars go by all night and it didn’t quiet down until after midnight. Some people walked by at 2:30 AM, talking loud enough to wake the girls and get them growling.

I was out of bed by 4 AM. I spent some time working on blog posts and drinking coffee. The girls woke up when it got light out and I took them for a walk. There was a coffee place across the street and I got a breakfast sandwich from them. Pre-made, microwaved. Edible but barely.

By 8 AM, I decided to move on.

The Video Editing Audio Workaround

The hoops I have to jump through to get the cockpit audio right on my YouTube videos.

I’m in the process of switching from ScreenFlow to Filmora Pro as my primary video editing software. I needed an editor that could edit 360° videos to add title screens, callouts, and additional audio. To my knowledge, ScreenFlow could not do this. That didn’t surprise me since ScreenFlow was designed primarily as a video screen capture and editing tool and the only reason I was using it was because it was cheap and it supported picture in picture.

I should mention here that in the past, I’ve used iMovie (limited) and Final Cut Pro (the old version was great; the X version is not). I knew that Adobe Premiere would do what I needed it to do, but I was not at all interested in paying Adobe a monthly fee to be able to access the files I created with its software. I believe software should be bought — not rented.

Filmora has a bunch of really good tutorials on YouTube and it was pretty easy to learn — not that I know everything about it yet. And the “lifetime” price did away with the nonsense of software rentals, letting me buy the software just once and get free upgrades and free customer support forever (however long that is). It was $180 after tax, which fit my budget.

But…

It wasn’t until I’d begun using Filmora Pro that I realized that it lacked a feature I really needed: the ability to turn stereo sound into mono sound.

Let me explain.

My videos usually have two sources of sound, each for a different type of sound:

  • One GoPro Hero7 Black records ambient sound — normally, that’s the sound of the engine and rotors as I start up, fly, and shut down. In the beginning, I left this sound out, but a lot of my fans claimed they liked it. So I made sure I had one camera running to capture that, even if I didn’t use the video that went with it.
  • Another GoPro Hero7 Black records the sound in my intercom system — normally that’s the sound of me talking to the camera or on the radio or phone. (When I’m on the phone, you can only hear my half of the conversation.) That’s captured through a connection between the camera and my intercom system via an NFlightCam Audio Cable. Channel fans apparently really love my narrations — who knew? — and the sound of radio chatter, so this is an important component of my video setup.

The problem is, the intercom audio is recorded on just one stereo channel: the left. (This is a shortcoming of the cable which, according to the folks at NFlightCam, is a problem with the one part of the cable they buy from GoPro for their products. In other words, according to NFlightCam, it’s GoPro’s fault.) If I use this audio in my videos as is and someone listens through stereo speakers or headphones, they notice that the voice is coming from just one side. And they complain.

When I used ScreenFlow, it had the ability to turn stereo channels into mono. That combined the left (with sound) and right (with no sound) into one channel that sounds like it’s coming from somewhere in the middle. That got the complaints to stop — when I remembered to take the extra conversion step.

But Filmora Pro doesn’t support the combining of two stereo channels into one mono channel. So there’s no solution in this software.

Of course, there’s a workaround — export the audio only, convert it stereo to mono, and import it back into Filmora Pro. Here’s how I do that with the software I already have:

  1. QuickTime Pro Registration
    I save old software and I’m very glad I saved this application. My iMac is running MacOS High Sierra; I don’t think this will run under Catalina on my laptop.

    Open the video clip with the single channel stereo sound in QuickTime Player Pro 7. (Note that I didn’t say QuickTime Player, which is the current version of the software. No, I’m using the version from 2009: QuickTime Player 7.6.6, which requires a registration code. This was the good version of QuickTime, which allows editing and screen recording and includes all kinds of other neat features. I recovered and saved this version when it was overwritten by the limited feature version that came after it.)

  2. Convert to Mono
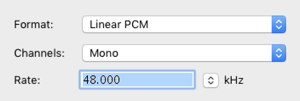
    Why can’t Filmora Pro have a Channels pop-up menu like this one?

    Use the Export command under the File menu to save the Audio Only as Sound to AIFF. Before exporting, click the Options button and be sure that Mono is selected from the Channels pop-up menu. This is how I convert stereo to mono, but the resulting file is not compatible with Filmora Pro.

  3. Double-click the resulting Audio file in iTunes to import and open it.
  4. Use the Convert command under the File menu to Create an AAC Version.
  5. Drag that version out of iTunes and into a Finder window to export it. I now have a version compatible with Filmora Pro.
  6. Drag the audio file into Filmora Pro’s media window.
  7. Drag the original video file into the Filmora Pro timeline.
  8. Unlink the video file’s original audio track from the video track.
  9. Delete the unlinked audio track from the timeline.
  10. Drag the mono audio file into the Filmora Pro Timeline and line it up exactly with the video track that remains. That will synchronize the two tracks.
  11. Link the two tracks together so they cannot be edited out of sync.
  12. Repeat the above steps for every video clip with a cockpit audio track.

And then…

From that point, all I have to do is add the second audio/video track — assuming I want the ambient sound audio track to play behind the cockpit audio — synchronize it with the cockpit audio/video so the sounds are right, unlink the audio/video from in that second track, get rid of (or adjust the size of) the second video clip, and add subsequent clips, doing the same for each, for the length of the video. I also need to be sure there’s 20 seconds with nothing much going on at the end so I can add end cards. Then I add the title screen with “theme music” and animation and any annotation text, including a reminder that the video description has lots of information that might answer viewer questions.

In all, I think the video editing process takes about 10-20x the amount of time in the video clip. So, for example, a 10-minute video would take about 100-200 minutes to edit.

Rendering varies depending on the length of the video, but at least it doesn’t require any additional effort on my part. Uploading to YouTube also takes a while, but only a few minutes of actual work as I fill in the form with the video information.

So yes, it’s involved.

A lot of folks think flying a helicopter is hard. I think it’s a lot easier than editing a quality video.

Helicopter Flight Up the Yakima River

A scenic flight video from the FlyingMAir YouTube channel.

Hop into the cockpit with me for a scenic flight up the Yakima River Canyon between Yakima and Ellensburg, WA!

This is the first half of my May 23 flight from Yakima to my summer base of operations in Malaga. I start at the ground at Yakima Airport, get clearance from the tower controller to depart, and take off, with a glimpse of Mt. Adams and Mt. Rainier in the distance. I fly over Yakima, through the gap in the hills there, and then to the mouth of the Yakima River Canyon. I follow the canyon’s twists and turns, chatting along the way, until I emerge in the Kittitas Valley southeast of Ellensburg.

I’ll release the other half of this flight sometime this summer.

A quick note here: if you noticed that the opening credit have a new look, it’s because I created this video with new video editing software: Filmora Pro. I needed software that could edit 360° videos and Filmora can. I’ll be switching to it as my primary video editing package over the next few months. It takes time to learn these things, so I’ll be fine-tuning along the way.

How YouTube Ad Revenue Works for Monetized Channels

A behind-the scenes look at how YouTube creators can make money on advertising.

A while back, I blogged about an unexpected windfall from my YouTube videos and how that had motivated me to create new content and keep my channel growing as a real source of income. Since then, I’ve learned a few things.

The most important thing I learned was how YouTube advertising revenue works, and I thought I’d share it with the folks who think that they can become rich quick as YouTube content creators. As you’ll see, it isn’t that easy.

Yes, once your channel is monetized — a step that requires the channel to have at least 10,000 subscribers, which is a challenge in itself — you can get a small part of the revenue that YouTube collects on the ads that appear before, on, after, and sometimes during your video.

As a creator, you get some control over what kind of ads appear and when they appear. You can do this on a video-by-video basis or set default options that apply to all new videos you publish. Here’s what the Video Monetization screen looks like for one of my longer videos:

Video Monetization Options
Here’s the Video Monetization settings for one of my upcoming videos.

Of course, all this is moot for a video if you turn monetization off. That doesn’t turn ads off — it just turns off your ability to collect ad revenue on the video. Why would you do that? Well, perhaps the video has a paid promotion in it; if so, YouTube requires you to turn off monetization. Failure to do so is a violation of the terms of service which is a serious no-no in YouTubeland.

If Monetization is turned on, you can select what kind of ads you’ll allow on the video and when they will appear. YouTube recommends that you turn all of them on and it’s pretty obvious that a lot of creators do. But because I hate seeing ads in the middle of a video, I keep the During Video option (at the bottom) turned off. (I wish everyone did.) Other than that, I keep them set as you see here, with most turned on. Skippable ads run for about 5 seconds before you can click to skip them and I think that’s a small price to pay for free content. (To my knowledge, skipping an ad does not reduce my revenue.) Non-skippable ads are a little more frustrating but they’re always short. Overlay ads and sponsored cards both appear over content and I have one turned on and the other turned off; I think my logic was that one is more obtrusive than the other.

Now you might think that turning these on results in ads appearing on every single view. That’s simply not the case. Surely you’ve seen YouTube videos without ads?

There’s actually a sitewide estimate of how often ads appear on YouTube content: 40% of the time. So if one of my videos is viewed 10,000 times, only 4,000 of those views were likely to include ads. This becomes an important number, as we’ll see in a moment.

I should mention here that you can actually calculate your current ad percentage manually by consulting two different analytics screens. The Channel Analytics Overview screen tells you the number of views for a specific period — 28 days by default. The Channel Analytics Revenue screen tells you the number of monetized playbacks. Divide monetized playbacks by total views to get the percentage:

For example, as of today, for the past 28 days my numbers are as follows:
Monetized Playbacks: 62.7 ÷ Total Views: 124.3K = Percent of Videos Monetized: 50.4%

So right now I’m having a higher percentage of monetized playbacks than average. That could be because one of my recent videos has become very popular and may be more attractive for advertisers so I’m getting more ad buys.

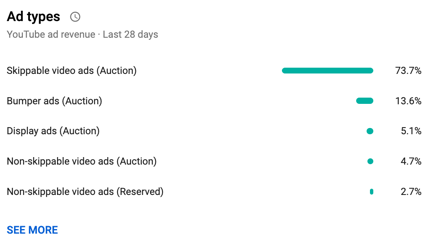
Ad Types
Here are the kinds of ads sold on my channel in the past 28 days.

Of course, I don’t see all the details of every single ad sale. All I see is a breakdown of the kinds of ads sold for videos on my channel and the all-important CPM. The breakdown is on the Channel Analytics Revenue screen and clicking a SEE MORE link brings up a full screen of detail.

The CPM, which also appears on that Revenue screen, is an average of what I’ll be paid per 1,000 monetized views. This number changes regularly — it’s $6.79 this morning, but was down to $4+ the other day. (Again, I suspect a popular video has made space on my channel more valuable.) I’ve seen it as high as $11+. I would not be surprised if I checked in this evening and it was different. (In a way, it’s kind of like a stock market per share valuation for my channel or a specific video. It rises and falls depending on the market for ads on my channel or specific video.) They say that $4 is an average CPM for YouTube creators, so I’ll stick to that for illustrative purposes.

But no, this doesn’t mean you get $4 per view or even $4 per monetized view. It means you get $4 per 1,000 monetized views.

So going back to my previous example, if a video got 10,000 views and 40% of them were monetized and you were getting $4 per monetized view, that’s

10,000 x 40% /1000 X 4 = $16.00

My channel is doing pretty well this month, mostly because of my 737 MAX video‘s popularity. I published it 8 days ago and it has almost 50,000 views as I type this. I can get analytics for just this video and the numbers are very nice: almost 50% monetized playbacks and an $8.38 CPM. That video has earned me $104.54 in ad revenue in just 8 days. Sounds great, right?

Well, let’s look at the video that came out right before it, the Autumn Cockpit POV flight. Although it has a higher percentage of monetized playbacks, it’s only been viewed 2,800 times in two weeks. Its CPM is just $5.91. In two weeks, it’s earned me a whopping $11.99. (That’s not per day, by the way. It’s for the entire two weeks. That’s less than $1 per day.)

And please do remember that a video will not earn the same amount per day/week/month/etc. throughout its whole life. Sometimes they start like duds and pick up steam, like the 737 MAX video — it wasn’t doing well at all for the first two days. And then sometimes they’re going like gangbusters and interest suddenly disappears. You never know what to expect and can only hope for a pleasant surprise.

Views
Here are the view analytics for my most popular video ever. It had hardly any views for the first year it was published and then took off like a rocket, with periodic surges. The current live analytic for the past 48 hours shows 4,466 views — three years after it was released! This is a YouTube content creator’s dream; I wish I had a dozen like this.

When I started writing this, I didn’t mean to get into the complex details of revenue calculations for specific videos. I just wanted to explain how ad revenue works for monetized channels on YouTube. To take some of the mystery out of it.

The takeaway on all this is that in order to make YouTube a full-time business — as some creators have — you need a strategy that combines ad revenue from wildly popular videos and other sources. This is why so many content creators on YouTube also sell merchandise and offer memberships or Patreon patron benefits.

I’ll be frank here: creating content for my YouTube channel is crazy expensive. Not only do I have to fly an aircraft that costs hundreds of dollars an hour to fly, but I have to have the cameras, camera mounts, and video editing equipment to record and edit the resulting footage. And the time I spend doing all this is time I’m not spending doing something that could earn money elsewhere so there’s a definite value to my time. I could easily drop $300 to $600 to make a video that will never earn more than what it cost to make.

I’m not complaining here — I’m just telling it like it is. I love flying and having an excuse to fly. I enjoy making the videos. I like most of the very positive feedback I get. But a girl has to make a living so I hope folks don’t mind me pushing Flying M Air hats and T-shirts or asking for Patreon patrons. If my video creation efforts wind up costing me more than I take in over the long term, I simply won’t be able to continue making them.

And every once in a while, I publish one that actually makes the ad revenue work for me. My Home to Airport by Helicopter video, which has over 9.5 million views, is one of them.

Now if only I could come up with about a dozen more like that.

Behind the Scenes: Cockpit Cam Instrument View Setup

A video from the FlyingMAir YouTube Channel.

COME BEHIND THE SCENES at Flying M Air while I show you my new “cockpit cam instrument view” setup. This is the same setup first used in the Helicopter POV Flight: Autumn at Mission Ridge & Wenatchee video (https://youtu.be/4aktQnGbC68), although the audio connection failed me that day.

IMPORTANT NOTE: In this video, I mentioned the GoPro Tripod mount. That is not necessary. The MyPilotPro Helicopter mount comes with a GoPro-compatible mount.

Also note that the camera setup I have here is customized to raise the camera above the bar by an extra 6-8 inches. That’s so that the camera clears the shoulders of the two front seat occupants and looks down at the instrument panel (instead of through the top of the cyclic). If you do not need the camera raised, you don’t need to bother with the extra RAM Mount equipment; the MyPilotPro helicopter mount includes everything you need to mount a GoPro to a bar.

Here are some links where you can find components mentioned in this video:

MyPilotPro: https://mypilotpro.com/shop/?wpam_id=13
Helicopter Mount: https://mypilotpro.com/product/helicopter-gopro-mount/?wpam_id=13
Other airplane and helicopter mounts are available. Check their site to see what products might work best for you.

RAM Mounts: http://www.rammounts.com/
PVC Pipe Products: https://www.rammount.com/shop-all/pvc-pipes

GoPro Hero 7 Black: https://amzn.to/2Lxyzwl

Nflightcam Aviation Audio + Power Cable for GoPro Hero: https://amzn.to/31syLTm

About Me and the Helicopter

  • I have been flying since 1998. My nearly 4,000 hours of flight time (as of 2019) is in Robinson R44, Robinson R22, and Bell 206L (Long Ranger) helicopters.
  • My helicopter is a 2005 Robinson R44 Raven II — the same one that appears in the photo at the beginning of the video. You can learn more about them here: https://robinsonheli.com/r44-specifications/ I own this helicopter. It is the third helicopter I’ve owned since 2000.
  • My helicopter has ADS-B Out and is picked up by radar facilities. You can see my track for recent flights on Flightradar24: https://www.flightradar24.com/data/aircraft/n7534D This is a great site for tracking any almost any flight, including the airlines.

About this Video

I try to drop cockpit POV videos every Sunday morning and “extras” with more info about owning and operating a helicopter midweek. (Some channel members get early access to some of these videos.) I also host occasional livestreams with Q&A chats. Subscribe so you don’t miss anything new! And tell your friends. The more subscribers I have, the more motivated I am to keep producing videos.

Some links on my channel are affiliate links, including all links to Amazon (https://amzn.to/32PLHTD) and MyPilotPro (https://mypilotpro.com/shop/?wpam_id=13). If you click one of them and buy something, I get a small referral reward. It doesn’t cost you anything so I hope you’ll shop with one of those links. Thanks.

Want to support the FlyingMAir channel? Here are four suggestions: