The Sun Shades

A solution to a “problem” I’d hoped I wouldn’t have.

On May 20, 2014, I began blogging about the construction of my new home in Malaga, WA. You can read all of these posts — and see the time-lapse movies that go with many them — by clicking the new home construction tag.

Earlier in June, I finally broke down and ordered sun shades for my home.

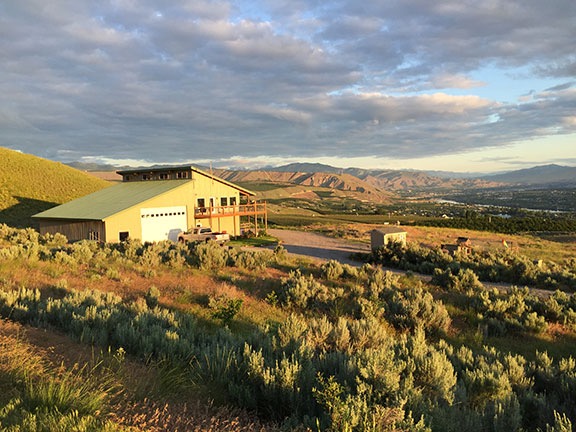
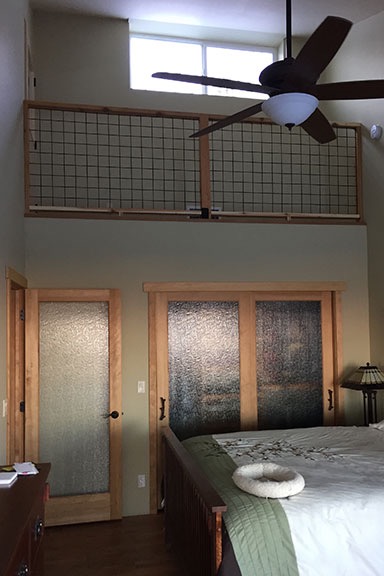
My living space has 15 windows, 11 of which are 4 feet wide by 5 feet tall and, as positioned, offer a nearly unobstructed view of what’s outside. (The others 4 are 6 feet wide and 3 feet tall up near the ceiling facing south.) Because I have no close neighbors and no worries about people looking in, I don’t have any curtains or shades. The result: my home is very bright with natural light during daylight hours.

Great Room at First Light
My great room, looking west northwest, shot from my desk at first light. The number and placement of windows offers an almost unobstructed view of what’s outside beyond my deck.

This isn’t perfect, however. (What is?) While the 7 north-facing windows are shaded by the roof over my deck on that side, the 3 east-facing and 1 west-facing windows are not. This time of year, I get a lot of direct sun into the east windows in the morning and into the west window in the afternoon. Although this tends to raise the temperature in my living room (morning) and bedroom (afternoon), that’s not really a problem — my air conditioning and ceiling fans can handle that. What is a problem is that I can’t work comfortably at my desk in the morning with the sun shining in my face. I’m also slightly concerned about the affect of direct sun on my living room’s red leather sofa and bedroom’s brown leather sofa and the various antique and heirloom items I own.

Solution: sun shades: shades that offer some filtering of the sun without completely blocking out the view. These are extremely popular in Arizona, where the sun can be brutally strong, especially in the summertime. I had a set at my home there for afternoon relief on the west-facing downstairs patio. Those were off-the-shelf roll-up shades from Home Depot that were admittedly cheap and ill-fitting but did the job. I’d want something a lot nicer for my new home.

In the past, I’ve ordered blinds from Select Blinds, a great source of blinds, shades, and other window treatments. This is where I ordered faux wood blinds for the little windows in my Howard Mesa cabin in Arizona and cloth vertical blinds for the sliding glass doors on the Phoenix condo. These folks do great work at a good price. There’s always a sale or special deal.

This time around, I ordered inside mount sun shades that filtered out only 14% of sunlight, thus letting a lot of light through. I’d be able to see through them, even when they’re down. I figured I’d put them on the 3 east and 1 west windows and use them in the summer. If they were easy to remove from the mounting hardware, I’ll likely remove them for the rest of the year. I don’t want anything blocking my view.

What I liked a lot about the blinds I chose is that they didn’t have to be wound up or down with a cord. They were spring-loaded, just like the blinds my parents had in our house for privacy back in the 1960s. You could pull them down in any position and with a tug, let them retract back up. No cord to worry about getting sucked into my Roomba or tangled into the power cord for my router or TV.

As usual, there was a special deal. (Deals aren’t really “special” if they’re always available, but I’m not complaining.) This time it was 35% off plus an additional 10%, 15%, or 20% off depending on the order total. My order of four custom-sized blinds — each window opening is a little different, thanks to the slap dash nature of the window framing — qualified for the extra 15% off, bringing the order total to just $370, including shipping. I sincerely doubt I could have gotten a better deal locally

Weeks went by. I was out working in my garden when the FedEx Ground truck came and dropped off a long box. My blinds.

I got to work the next day. The first chore was to finish the seal between the window and drywall. Although the drywall guys had done a great job hanging a lot of drywall in my home and fitting it around windows to create the box-like effect I have, they did a crappy job of finishing. I had to buy paintable caulk, run beads in the joints, and smooth it with a neat little caulking tool I have just for that purpose. A bit of paint once the caulk had dried finished the job.

Bad Finish Better Finish
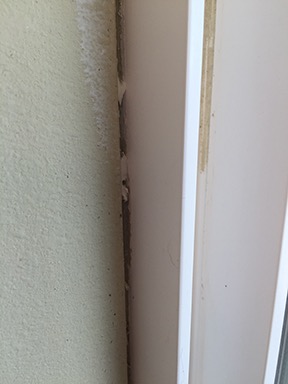
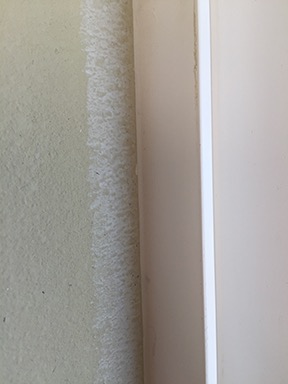
Left: typical bad joint between drywall and window frame. Most of my windows were like this. (Apparently, the general contractor (me), was supposed to hire a finish guy. Who knew? I guess I’m that guy.) Right: joint between window and frame after applying and smoothing caulk. A bit of paint made it perfect.

Drywall Anchor and Screw
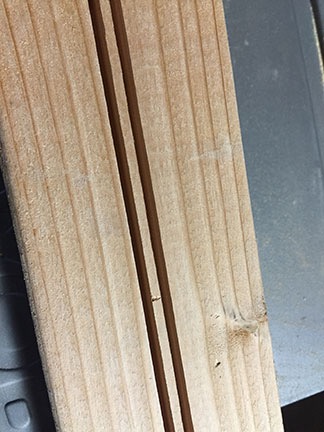
An example of a drywall anchor and screw.

Installation of the blinds was easy. Although I used the mounting brackets they came with, I could not use the screws. I needed drywall anchors, since the screw positioning did not connect with any of the studs. No problem — I had suitable drywall anchors with corresponding screws leftover from another project that didn’t need the anchors. I measured and marked, drilled holes, tapped in anchors, positioned brackets, and screwed in fasteners. (Any job is easy when you’ve got the right tools.) Using the tags in each blind bag, I matched the blinds to the windows. There was a bit of a challenge getting the middle east blind in — they were all a tight fit — but some creative use of a hammer resolved the problem.

Blinds Down
With the blinds down, plenty of light comes through and I can still see what’s outside. Although the blinds are long enough to go down to the windowsill, I typically only lower them to the part that opens so air flow is not restricted.

Blinds Open
When the blinds are open, the roller at the top of the window frame is nearly invisible, so I don’t have to look at them at all.

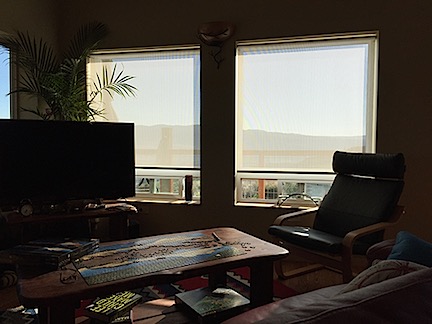
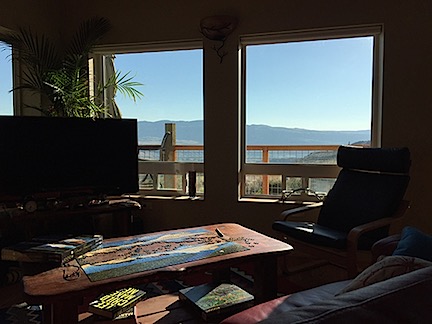
The result was perfect — exactly what I wanted. Actually, even a little better, as these two photos of two east side windows illustrate.

When the blinds are down, the light is filtered just enough. I can sit at my desk and work comfortably to get things done, but there’s still plenty of that morning light to illuminate the room. And I can see right through the shades for a sort of gauzy view of what lies beyond.

When the blinds are up, they roll tightly to the top of the window. Because I chose a neutral color — a sort of linen white — they are nearly invisible. No need to remove them in the winter months — which is good because the hardware would be very noticeable without them. This is a total win-win for me because I really don’t want to see any window coverings on any of my windows unless they are in use. I don’t believe in “dressing” a window when the real beauty is outside.

Of course, I only need the blinds down on the east side in the early morning — say before 10 AM — starting about a month before the summer solstice and ending about a month afterwards. The same goes for the one west side window in my bedroom for the afternoon — say after 4 PM — although I tend to keep that one down all day long because I’m not usually in that room during the day.

In all, I think I found the perfect solution to a “problem” I was hoping I wouldn’t have. The sun shades do the job, look great, and weren’t outrageously expensive.

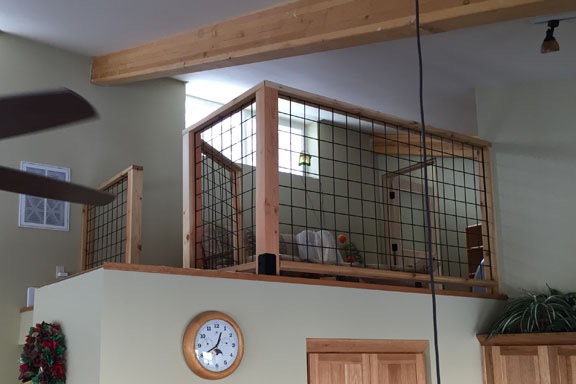
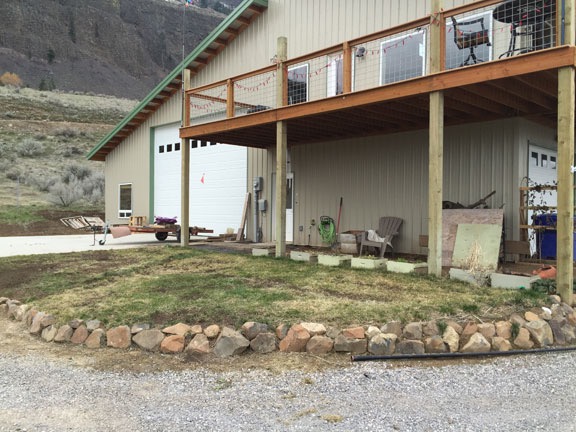
This is only one of the challenges I’m facing and working through as I put the finishing touches on my home. The loft rails, which I finished this past winter, was another. Coming up is a big one: the stairs to the loft. Now that I have all the materials I need to start working on them, I hope to be blogging about that soon.

Golden Hour at the Aerie

Two shots showcasing my home.

Even amateur photographers — or at least serious amateur photographers like me — know that the best time for landscape photography is during the so-called “Golden Hour.” This is the time of day roughly one hour after sunrise and roughly one hour before sunset when the sun’s light is soft and often golden in color. Long shadows provide depth which adds texture and highlights contours in land forms. Colors are skewed reddish, which can make everything look just better.

Construction on my home has been mostly done — I still have a few things to do inside like finishing trim and building a set of stairs to the loft — for a few months now. I got my official certificate of occupancy about two months ago. I recently did some outside work to clean up “the yard” and make it look presentable. I have ten acres but I really only maintain about an acre of it — the rest is natural vegetation: bunch grass, sagebrush, and wildflowers. It gets really green here in spring but starts to brown up by late May. This year, we’ve had just enough rainfall to really turn on the wildflowers and keep the grass green and gold. Really pretty.

Perfect for capturing some shots of my home to share with friends and family.

I got the first shot the other day. I happened to be down at my Lookout Point bench late in the afternoon when I looked back up at my home. The light was just right to illuminate the multitude of wildflowers that had grown between the bench and my building. Unfortunately, I’d left my Jeep and truck in front of their garage doors and that made the place look less than perfect. By the time I moved them and came back, the light would be gone. I decided to do it another day.

Afternoon Home
I like this shot the best, mostly because you can also see the nearly full moon in the sky above the cliffs.

That day came a few days later. I was inside, resting up from some minor surgery I’d had earlier in the day when I realized that the light was perfect. I grabbed my phone and ran down the stairs with Penny at my heels. We hurried down the path to Lookout Point and I turned around. Perfect!

I shot about 10 photos from different angles. This is the one I like the best.

I very seldom share this view of my home. The reason: it only photographs well in the afternoon in late spring, summer or early autumn. Other times, the cliffs to the south are in shadows.

This shot really shows off the beauty of the cliffs behind my home. They rise about 1,000 feet above my road and consist of basalt columns of rock laid down during Washington’s prehistoric volcanic past and carved away by ice age floods. My home sits on a shelf of tightly packed silt; the land drops away again toward the river to the north.

The vegetation up there, by the way, is ponderosa pine with the occasional aspen grove. I’ll be planting some of those on my property in the years to come. The irrigation lines to get them started are already laid.

This morning, the light and clouds were perfect again for a golden hour shot of the front of my home, which faces east. I didn’t mind the truck being parked on the concrete apron by the big RV garage door — although the truck does manage to make the 14 feet tall by 20 feet wide door look small. I grabbed my phone again and hiked up my driveway and partially up the road behind my home. I took just three shots from different angles. This was the middle one and I like it best.

Morning at Home
This shot, taken this morning, shows off the front and north side of my home, as well as the view beyond. The view, privacy, and quiet is what sold me on this building site when I first saw it back in 2012.

Every time I look at my home, I realize that none of it would have been possible if I’d stayed married to the sad sack old man who was living in a rut in Arizona. I’m sad for him — he would have really liked it here, maybe as much as I do — but I’m thrilled to have had the freedom to build the home I wanted and to live the lifestyle I’ve come to cherish.

Life is what you make it. If you want something badly enough, you need to make it happen. There’s nothing that says that more to me than my home here at the Aerie.

Two Years Ago Today

A photo reminds me of a personal milestone.

Two years ago today, on May 19, 2014, the builders broke ground on the construction of the home I’d designed for myself on 10 acres of view property in Malaga, WA. I’d bought the land the summer before, the day after my divorce decree was [finally] handed down from the judge. The building would utilize post and beam construction, commonly known as a pole building, to give me a 2,880 square foot garage/shop area and 1,200 square feet of living space with a 600 square foot deck. The goal: all my possessions under one roof with a comfortable, modern home that would showcase the amazing view.

After doing some prep work — bringing in temporary power, putting in a septic system, finalizing plans with the builder, and getting the building site prepped for construction — the four-man team that did 90% of the building construction work arrived with equipment and started digging. They dug 44 post holes that first day and had the posts set in concrete by the end of the next day.

This photo, which I stumbled upon this past weekend while digging up photos for another blog post, shows the workers digging that first hole. The auger did most of the work, but they did hit rocks that had to be removed by hand. Miraculously, this was the only hole with large rocks in it.

First Hole
X marks the spots where the holes needed to be dug. They only hit rocks on the first hole. The trusses for the RV garage roof are leaned up against the hill in this shot.

I was living onsite at the time, in my RV parked near the building site. I had a GoPro camera set up on top of it and made daily time-lapse videos of the work, which I shared on my blog starting on May 20, 2013. It was an exciting time — I was watching something I’d designed be built right before my eyes. I kept out of the way but took lots of photos. In the evening, after the crew left, I’d wander around the site and play with the equipment, sometimes using it to move dirt or easily climb to the second floor once it had been built.

Now, two years later, I’m living in that home with a Certificate of Occupancy as the County’s approval for not only my design and Western Ranch’s construction, but the hours of labor it took to turn a metal building shell into a home.

When I look at these old pictures of the place before my building existed, I find it hard to believe that I’ve come so far in such a short period of time. It’s amazing how much I can get done when there’s nothing holding me back.

This photo — and the blog posts and videos and other photos that document the work done — marks a milestone in my life, proof that I can move forward and make things happen — better than ever on my own.

It’s hard to believe that this photo was shot only two years ago.

Construction: The Loft Rails

One of the last big projects to finish prior to final inspection.

On May 20, 2014, I began blogging about the construction of my new home in Malaga, WA. You can read all of these posts — and see the time-lapse movies that go with many them — by clicking the new home construction tag.

The living space in my home is small — less than 1200 square feet. I designed it to have a vaulted ceiling which climbs from about 10 feet on the north side to 18-20 feet on the south side. (One of these days, I’ll measure it.) My floor plan is simple, with a large great room on the east side and the bedroom, bathroom, and laundry room on the west side. A hallway on the south side connects these two spaces.

Floor Plan
Here’s one of my working floor plans with some measurements. North is down in this image.

Because it made absolutely no sense to have 20-foot ceilings in the hallway and the bedroom closet and because I needed some way to access at least two of the four clear story windows at the top of the south wall (so I could open and close them for ventilation), I added a “storage loft” to the design. You can see it as the gray space in the above floor plan. While I was doing the design work, I envisioned this as a sort of shelf where I could store things that I didn’t want in the garage. But when the framing and drywall work was done, I wound up with a nice-sized room that I figured I’d use for my library — I have a lot of books, including 85 that I wrote — with a futon I had brought from Arizona that could be used for guests. Although the ceiling on the north side of the loft was only about 5-1/2 feet, there was plenty of headspace at the rest of the loft.

That put the loft into a sort of limbo area as far as the county’s building inspectors were concerned. It was clearly not a shelf, but it also was not a room. This was good and bad for me. Good, because I didn’t have to worry about putting in stairs, which I had not designed space for and bad because I still had to surround the entire loft with a guardrail that met county code specifications for height (at least 32″), openings (no larger than 4″), and durability (able to support the weight of a 250 pound person leaning against it. I basically had to build a rail like the one I’d put around my deck outside.

I was not looking forward to this job and, like most jobs I don’t want to do, I put it off. I put it off for a long time. Part of me was trying to figure out how to do it so it would be aesthetically pleasing — I didn’t want anything ugly in my home. The other part of me was just too damn tired of building. I’d already done a bunch of huge projects: I’d wired my shed, my shop, and my living space; I did 95% of the electrical finish work; I’d tiled the bathroom floor; I’d laid 1,200 square feet of Pergo flooring; I’d laid the composite decking and built rails for my 600 square foot deck; I’d set up shelves in various closets and rooms throughout my home; and I’d gotten about 75% finished with baseboard and door trim — a project that’s still in progress. I was worn out.

But putting a job off doesn’t make it go away. This was a job I needed to get done if I wanted a certificate of occupancy for my home — which I did. So by autumn 2015, I was trying to move it to the front burner of my life.

The Hard Part: Design

The hard part about the job was coming up with a solution that would not only be aesthetically pleasing but also allow airflow — some of my HVAC ductwork is up on the loft — be affordable, and be relatively easy to construct. Making that difficult was the fact that the larger of the two spaces was not rectangular, as shown in the above floor plan. I needed to make some adjustments during the framing stage to accommodate a ships ladder to access the loft. For various reasons, that required a sort of cut out. That meant that if I wanted to enclose the entire space, I’d have to have a rail that followed that cutout, with a gate at the top of the ladder.

I have to say that I wasted a lot of time thinking about that. And making measurements. And stressing over how I was going to adequately support each vertical post I needed when I didn’t really have anything to fasten it to. In the end, I decided to just run the rail straight across the top of the ladder, cutting off some of the loft’s floor space to form shelves. Since most of that space was in the low ceilinged area anyway, it wasn’t a big deal.

Railing
The railing system I originally bought. Ick.

As for how I’d build it, I started by looking at the easiest solution: a packaged railing system. Home Depot had one and I actually ordered enough to do the easier of the two rails: the one over the shelf in the bedroom. This was clearly a “shelf” — it was only 4 feet wide, over my closet and the linen closet — but because it was accessible from the larger part of the loft, it also had to be safeguarded with a rail. I bought a white metal railing kit on a special order from Home Depot and even managed to bring it all up to the part of the loft where it would be installed.

It sat there for at least four months. I just couldn’t bring myself to start installing it.

Why? It was ugly. It was designed for outdoors and it was white metal. Everything inside my building was mellow earth tones and wood. Why the hell would I put an ugly white metal railing inside my home?

Wire Railing
Another, more attractive but also more costly option for the railing.

I went to Marson and Marson, the folks who had sold me my doors and had also provided much of the building materials — trusses, lumber, posts, etc. — that the builders had used to build the shell of my home. Rita, the special order lady, priced up another solution: horizontal wire railings. The wire could be combined with hemlock — the same wood I’d chosen for my doors and door trim — for vertical supports and top rails to give me the look I wanted. But by the time she priced up the wire, the special hardware and tools needed to secure it, I was looking at thousands of dollars and a ton of work.

When I balked, Rita suggested another possibility to work with the wood: powder coated “hog panels” from a company called Wild Hog Railing. This would give me essentially the same look I had on my deck outside, but the powder-coated metal would be a bit more polished looking than galvanized wire. I ordered up some panels with black powder coating and then started to think about holding them all together.

The wood was easy. My doors were hemlock and I’d been trimming them with hemlock trim pieces I bought at Home Depot and cut to size. I’d finished the doors and the trim around them with Danish oil (at Rita’s suggestion) and I really liked the way they looked. On a trip to Home Depot, I realized that they sold hemlock lumber — 2x4s, 4x4s, etc. I’d use 2x4s for the top rail, bottom rail, and side rails affixed to the walls. I’d use 4x4s to create support posts on either side of the gate, in the main loft corner, and at the center of the bedroom loft.

Fixing the vertical supports to the walls wasn’t a big deal — I’d find studs or use anchors. But the four 4×4 posts were a problem. I needed a way to fix them to the floor. I’d been looking for appropriate hardware for months and had been coming up empty. But the folks at Marson came to the rescue. They suggested a pair of brackets for each post that could be attached with lag screws to the 4×4 and through the Pergo floor to the underlying wood floor. I bought eight of the brackets and a box of lag bolts.

Trouble was, the hardware was metal colored. The wire for the railings would be black. When I pointed this out to the guy at Marson who was helping me, he suggested getting them powder coated. So on my way home, I dropped them off at Cascade Powder Coating. They had a bit of a backlog, but thought they could have them done within two weeks. That worked fine for me, since I didn’t have the wire panels yet anyway. The total cost to powder coat the brackets and lag bolts: $70.

Putting It All Together

Once I’d assembled the panels, hardware, and lumber, it was just a matter of doing a lot of measuring, cutting, and assembling.

I figured that I’d fit the panels into a grove I’d cut on the inside of the supports. So I went out and bought a dado saw blade set. For my table saw. If you’re not familiar with dado saws, they basically make it possible to cut a groove of just about any width into a piece of wood. But on assembling my new dado blades to give me the right width, I realized that the plate covering the blades didn’t have enough of a gap for the blades. Some research made it clear why: my table saw could not be used with dado blades. This is one of the drawbacks of buying low-end, home improvement grade tools.

Grooves in Wood
I had the guide set so that I could run the wood through once in each direction to create two grooves like this.

I realized that I could simulate a dado set by running each piece of wood through the table saw’s regular blade two or three times, shifted a tiny bit over for each pass. So that’s what I did. It wasn’t difficult, but it certainly wasn’t fun. And, when I had to do the 11-foot long 2×4 length for my bedroom loft’s top rail, I had to wait until I had company who wasn’t afraid of table saws. (There was no way I could get that long piece through by myself.) My electrician friend Tom and one of his buddies, who’d come by to help me with an outlet for my new freezer, helped guide that long piece through the saw three times.

Grooved Wood
I then adjusted the guide and ran the wood through a third time to cut away the piece between the two grooves.

Here’s the process I followed to prepare each part of the wood frame:

  1. Measure the space to be fitted. Then measure again. Do something else and then come back and measure one more time.
  2. Cut a length of wood to size.
  3. Run the wood through the saw blade 3 times to cut the groove. I got really good at setting the guide bar on my saw.
  4. Sand the length of wood with 80 grit and 160 grit sandpaper using an orbital sander. I have a belt sander but don’t like to use it.
  5. Wipe all the sawdust off the wood with a damp cloth and allow to dry.
  6. Coat the exposed sides of the wood with 2-3 coats of Danish oil. Allow to dry between each coat.

Prepping the metal was more straightforward: all I had to do was cut it. Fortunately, I had a 36″ bolt cutter I’d used to cut the fencing for my chicken yard. Still, it was hard work to cut it accurately. And if I screwed up, I’d be looking at buying another $50 panel. So I was very careful.

Gate
The gate was my proof of concept. I think it came out pretty good.

I assembled all the panels with screws, with two in each corner. I drilled pilot holes in every single one. The gate was the first panel I finished, since it did not have to be affixed to the wall or floor. In a way, it was a proof of concept. I was pleased with the way it turned out.

The rest of the rail had to be installed in place. That meant doing a lot of measuring on the loft, cutting and finishing in my ground-floor shop, and then carrying pieces up the stairs and the ladder I’d put in place for temporary access. By this time, it was mid-December and cold downstairs. It was hard to stay motivated. For some reason, I got it in my head that I wanted final inspection done before year-end, so that drove me and I got a lot done very quickly.

I worked through the main loft in just a few days. I had it down to a science. For each section, I followed these steps:

  1. Install the vertical posts against the walls. I used 2x4s and ran the screws through the groove so they’d be invisible in the finished product.
  2. Posts
    Here’s the post at the top of the ladder. And yes, I screwed right through the Pergo. I know you’re not supposed to do that, but at that point, I really didn’t care.

    Install the freestanding posts. I used 4x4s and bolted each one in using two brackets and 8 lag bolts.

  3. Install the bottom rail. I used a pair of blocks cut from 2x4s to prop up the bottom rails while I screwed them into place.
  4. Measure, measure, measure, and cut the wire panels.
  5. Slide the cut panel into place.
  6. Set the top rail over the posts and wire panels and screw it into place.

Panel
Here’s the first panel installed.

I drilled pilot holes for every single screw I put in. I was not interested in splitting wood or stripping screws. I wanted it done right the first time. I had my drill set up with two drill bits I could quickly swap out and my impact driver set up with a screw driver bit and a socket that could be easily switched out. (Someone I knew once used to say that any job is easy if you have the right tools. It’s one of the few things he said that are worth remembering.) Because these tools are cordless, I didn’t have to deal with wires up there. But I did do a lot of crawling around on the floor.

I finished the main loft area just before I went away for Christmas. I go cross-country skiing up the Methow for Christmas. It’s become a bit of a tradition for me — this was my third Christmas away. Just me and Penny, winging it.

Loft Rails
Here’s what the main loft’s rails looked like before I went away for Christmas. The gate is installed and ajar. As you can see, I still have a bit of trim to do up there in the shelf area.

When I got back, I still had the bedroom loft rail to do. All I had installed was the side and central vertical posts. The wood was grooved and cut, but hadn’t been sanded or oiled. But by this point, I’d run out of steam and was thinking only about my upcoming snowbirding trip. It was unlikely any inspector would come during the week between Christmas and New Year. So any thoughts I had about having the project finished by the end of the year were gone. I figured that if it waited this long, it could wait a little longer.

So I left everything just as it was and went on my trip.

Bedroom Loft Rail
The finished loft rail in my bedroom. The top rail is one continuous piece 130 inches long. It’s the one I needed help getting through the saw three times.

My trip included a week home, mostly to relieve my house-sitter so she could go on a trip and to check on things. But while I was home that last week in January, I figured I may as well finish up the rail. It only took about 6 hours split over two days. And then I was done.

It’s a funny thing about the jobs I’ve done at my home. Before I even start, I spend a lot of time thinking about them, planning them out to minimize the chances of doing them wrong and then having to redo them. Then I eventually get to work and, in many cases, work on them for days or weeks or even longer. And then one day, I’m just done. It feels weird to be done because I’ve been so consumed with the project, thinking about it and working on it for so long that there’s suddenly a hole in my life when I don’t have it to work on anymore.

But then I get on to the next project and it’s all forgotten.

De-Winterizing the Lawn

The remnants of winter have been raked away.

I have a very small front lawn. The only reason I have a lawn at all is because my dog likes grass. She likes to roll in the grass and drag her belly across the grass and yes, even poop in the grass.

I created my front lawn in the late summer of 2014, when my building was done but my living space was barely started. I bought some sod on Craig’s List for $20. It turned out to be enough to do half the lawn. I seeded the rest. It grew and, before long, the lawn looked like one nice patch of grass.

I bought a push mower. You know — the kind you push and the wheels spin some blades. It’s a small lawn. I don’t need more. It takes about 15 minutes to do if I do it often enough. I’m thinking of buying an electric mower, but I like the exercise the push mower gives me.

In the spring of 2015, I set up a sprinkler system. In the hottest part of summer, it waters the lawn twice a day for about 10 minutes. The grass grows quickly. At the peak of the season, I have to mow twice a week. Otherwise, the grass gets too long and it’s a real bitch to mow.

Last season, I turned off the sprinklers in the fall and waited for the lawn to go into winter mode. It took a long time, I mowed it once in a while and then, when the first frost came, I put the mower away.

It snowed in November. And it snowed some more in December. A lot more. I went away and while I was gone, it snowed even more. The front lawn was covered with snow throughout December and January. It took its time melting in February. I watched while I was away, looking at it through one of my security cameras. Even when the snow was mostly gone, there were still patches on the lawn.

Frost Burn
My neighbor called this frost burn. I just call it ugly. It happens when a lot of snow sits on the grass for a long time, crushing and killing it. At the top of the photo, you can see where I’d already raked and added soil.

When I got home in mid February, I discovered that they weren’t patches of snow. They were patches of dead, flattened grass. Frost burn, is what my neighbor called it.

I went to California, hoping the grass would somehow miraculously recover while I was gone. But it didn’t. It looked the same when I got back in early March.

Of course, it isn’t as if it was warm here. It’s true that the land around where I live is “greening up,” for spring, but it’s still in the 30s at night. While the grass is just waking up from its winter slumber, I wasn’t convinced that it would shake off this layer of dead grass on its own. So I began raking it.

It was a tough job, especially when the grass was still wet. I was raking up clumps of it. For a while, it looked as if I were raking more than I was leaving behind.

Still, I kept at it, doing a little bit every day. It was a real upper body workout. I had two different rakes I used: my old RV rake (recently used to roast marshmallows while camping) to really dig down deep and a wide plastic leave rake to gather up all that dead grass. I worked on it, off and on, for a week. I just finished it earlier this afternoon.

While I was doing all this, I also removed my half-hearted front walk, which I’d created when I put in the lawn using some very ugly rectangular concrete pavers. I never liked the way it looked and it was a pain to mow over. No one used it except me. Everyone else walked up the paved driveway.

I also finished the “retaining wall” separating the grass from the gravel driveway. I’d started the wall when I put in the lawn, wanting to avoid sloping the grass right down to the driveway. I used local stone — there’s no shortage of it in the talus slopes of basalt rock that sometimes cross the road. I’d go out on my ATV with the trailer attached and load up the biggest pieces I could find, bring them home, and stack them carefully. I’m actually pretty good at it — but that might be because of my Italian blood. (Italians are excellent stoneworkers.) I’d stopped the wall at the walkway, but when the walkway was removed, I figured it was time to finish the wall. So I did.

Turf Builder Grass Seed
I’ve had a lot of good luck with this grass seed.

I then spread about 8 cubic feet of lawn topping on the lawn, concentrating on the low spots that needed to be built up. I bet I could use another 8 cubic feet — but I’ll save that for next year.

I finished up with some Scott Turf Builder Sun/Shade grass seed. I used about half of a seven-pound bag, spreading it with a hand spreader I have. It was important for me to get it done today; there’s rain in the forecast for the next few days and I wanted to let mother nature do the watering, at least for now.

At this point, my lawn is done until it starts growing. I fully expect it to be lush and green in about a month.

Raked Lawn
Here’s a shot from the paved driveway. Yes, I know it looks like crap here — I bet it looks great in a month. You can see where most of the soil went.


I do have a few more things to do:

  • Fine tune and test the sprinkler system I installed last summer. I’d actually like to replace the two impact sprinkler heads with the kind of head that drops down into the ground when it’s not working. That’ll make mowing a lot easier. I figure I have about a month to do that.
  • Finish up the space under the deck. This is a huge project that consists of:
    • Removing the beehive planters. It seemed like a good idea at the time, but now I think it looks trashy.
    • Leveling the ground under the deck. Although it’s mostly level, there are some bumps that need to go away. I’ll be using a shovel, a rake, and a piece of wood for scraping to get that done.
    • Laying weed preventer cloth on the entire surface. I’m tired of grass growing where I don’t want it.
    • Setting border stones between the lawn and the space under the deck. I want a definite divider between the two areas.
    • Laying down pavers. I chose ones that look like a mosaic of stone. I figure I’ll need about 60 of them to get the job done.
    • Planting shrubs between the walkway and border stones. Not sure yet what I’ll plant. Hoping to buy something native that makes berries.
    • Surrounding shrubs with mulch or bark. I want the weed preventer cloth completely covered.
    • Filling in the area between the walk and building with river rocks. There’s too much shade under the deck against the building to plant anything there.
  • Dress the driveway edge with additional gravel. I’ll be getting a truckload of gravel delivered, possibly as soon as next week. I want half spread on my driveway to fill in some low spots and the rest dumped where I can use it as needed.

Retaining Wall
This angle shows the retaining wall I built to avoid the lawn sloping down into the driveway. It also gives you a good idea of where the additional gravel needs to go.

Owning a home is a lot of work. But it’s worth every minute when the jobs are done and you get to admire the results of your labor. And its nice to know that in this case, a little exercise also saved a bunch of money that I could have spent hiring landscapers to do this for me.

But the biggest challenge is not the work — it’s dreaming up ideas to make the space more attractive and usable. Two years ago, as I got ready for the construction of my home, I knew I’d have to put in a lawn somewhere. Later that year, when the building was in place, I had the earth work done to prep for where the lawn would go. I then added the grass and the retaining wall. While the path I added turned out to be a bad idea, it wasn’t so difficult to remove. Since then, I’ve been building on what I have, making the ideas I’ve come up with become reality — which is basically what my entire home project has been all about.

Yes, it’s a lot of work. But I’m loving every minute of it.

Now where’s that bottle of ibuprofen?