Construction: Setting Up the Power

I bring electrical power into my building.

On May 20, 2014, I began blogging about the construction of my new home in Malaga, WA. You can read all of these posts — and see the time-lapse movies that go with them — by clicking the new home construction tag.

I don’t know if it’s a state or county law, but for new construction, a home owner has two options for setting up electrical power in their home: hire a licensed electrician to do all the work or do all the work herself. Because of my tight budget constraints, I elected to do all the electrical wiring myself.

Don’t get the idea that I’ve done electrical wiring work before. I haven’t. Any time something needed to be wired, I let my wasband do it. After all, he knew how and I didn’t. It wasn’t until he was out of the picture that I did my first wiring job: replacing a thermostat in my Arizona home. That was nothing compared to what I had ahead of me to wire a 2880 square foot garage and 1152 square foot living space. And a 6×8 foot shed 80+ feet away from the power source.

My Job

Meter Requirements
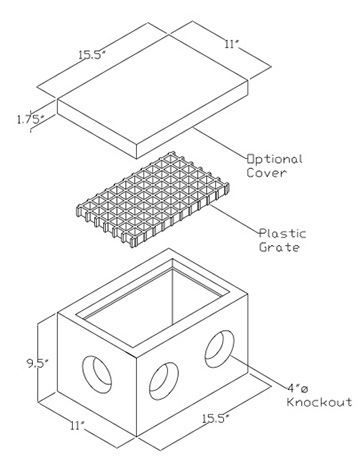
The Chelan PUD provides this illustration to show requirements for the conduit connection to the meter base.

The first challenge was installing the meter base and service panel. The meter base is the component that the power company — in this case, the Chelan County PUD — attaches the electric meter to. The wires come out of the ground, through a conduit I’d have to provide into a metal box on the outside of my building. The conduit had all kinds of size and component requirements and would have to be sealed to the meter base. On the other side of the wall I’d have to install a service panel with the circuit breakers that would connect to all of my electrical circuits. I had to not only mount both devices, but connect them with extremely heavy duty wires. In addition to all that, I also needed to run a copper wire from the service panel back outside the building and connect it to 2 8-foot copper rods driven all the way into the ground at least 6 feet apart.

(These requirements weren’t exactly new to me. After all, I’d installed my temporary power pole back in September 2013. But that was already partially cobbled together when I got it and I had an advisor to help me make the connections. The only part I knew how to do well was to drive in those grounding rods.)

In addition to all this, I’d also have to have at least one circuit installed in the panel. That circuit would have to run to an outlet and light, presumably with a light switch.

My work would be inspected by a government entity called Labor and Industries, which also sold me a permit before I started work. L&I, as it’s locally called, is responsible for all wiring inside a building; the PUD is responsible for wiring outside. L&I had to approve the installation of the meter base and service panel before PUD could connect power.

The Timing Issue

Coordinating visits by the PUD and L&I workers and inspectors was crucial and tricky. I had to know when each bit of work would be done so I could request services and inspections I needed.

Once the PUD turned off power to my temporary pole so we could finish the earth work in that area, I would not have power restored until I passed L&I’s inspection. I couldn’t pass that inspection until I installed the conduit, which had to be done as part of the earth work. PUD couldn’t reconnect my power until I passed the L&I inspection. Not only did all the work need to be done timely in a certain order, but the PUD and L&I work had to be scheduled properly.

That’s how I spent Thursday while I was on vacation out at Lopez Island. I excused myself from my host, sat down with a calendar and note paper, and made a bunch of phone calls. The result:

  • Monday morning: Jeff the earth-moving guy and I would dig and install as much conduit as we could.
  • Monday afternoon or Tuesday morning: L&I would inspect the meter base and service panel. I should have enough of the conduit installed to satisfy them.
  • Tuesday morning: PUD would turn off temporary power.
  • Tuesday afternoon: Jeff and I would dig and install the remaining conduit to the transformer box.
  • Wednesday morning: PUD would connect permanent power to my building.

That was the plan, anyway.

The Meter Base and Service Panel

I bought everything I needed to mount the meter base and service panel. At least I thought I did. The funny thing about working on building projects is that no matter how many things you buy at Home Depot or Lowes, you always forget something. Or get a wrong thing. My primary destination these days is Home Depot, which is a 40-minute drive from my home. I’m there at least five times a week. (Maybe I should get a job there.)

On Sunday, my first full day home after vacation, I tried to start work. The trouble is, I couldn’t figure out how to mount the meter box on my building and I absolutely dreaded the thought of cutting a hole in the metal.

Bob Drills a Big Hole
Bob drilled a hole in my building while I looked on, cringing. Since then, I’ve drilled more than a few holes in my building.

My friend Bob came to the rescue. He came by with tools and experience and advice. While his dog Skip and my dog Penny played together in the yard, he helped me decide on a location for the boxes — height was the primary issue that needed determination — and has the dubious honor of being the first person to drill a hole in my building. Of course, we didn’t have everything we needed to finish up, so we made the trip down to Home Depot together in my Jeep, stopping for tacos at the Plaza on the way back. (Have I ever mentioned the abundance of excellent, authentic Mexican food in this area? Whodathunkit, huh?)

Meter Base Installed
Here’s the meter base right after mounting. I connected wires to the lower contacts, ran them through the hole, and connected them to contacts on the service panel on the other side of the wall.

By the time he left, the meter base was securely fastened outside the building with a “nipple” connecting it to the service panel securely fastened inside the building. I ran the three cables between the two panels and fastened them securely.

The First Circuit

Before leaving for vacation the week before, I had already wired my first circuit.

Light switch and outlet
The outlet and light switch for my first circuit.

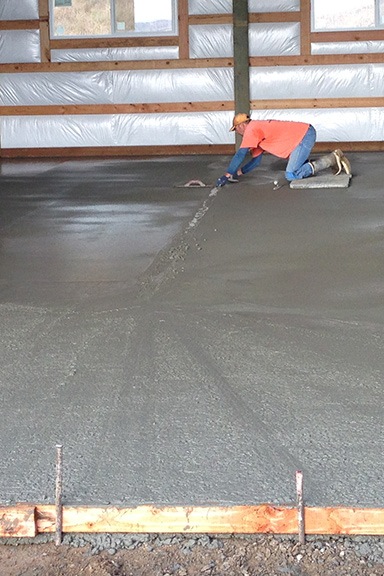
Although I’d wanted to set up the entry hall light with a 3-way switch to make accessible from both upstairs and downstairs, Bob had convinced me to keep it simple. So I wired up a 2-gang box with an outlet and single pole switch that ran to a fixture mounted nearby. The fixture was designed for the ceiling, but I mounted it on the wall, which meant the shade wouldn’t stay on it. I hoped the bare bulb wouldn’t bother the inspector.

First Circuit
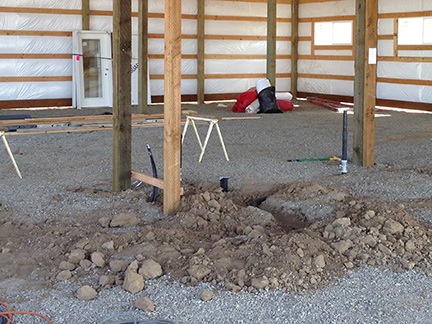
Here’s my circuit board with my first circuit installed. I’ve decided to use 20 amp circuits throughout the building except for circuits that require higher amperage.

With the service panel in place, all I had to do was run the wires from the outlet into the service panel and attach them to the neutral bar and circuit. This was remarkably simple. It was also the only time I’d be able to work on the panel without worries about electrocution since there was no power running to it at all.

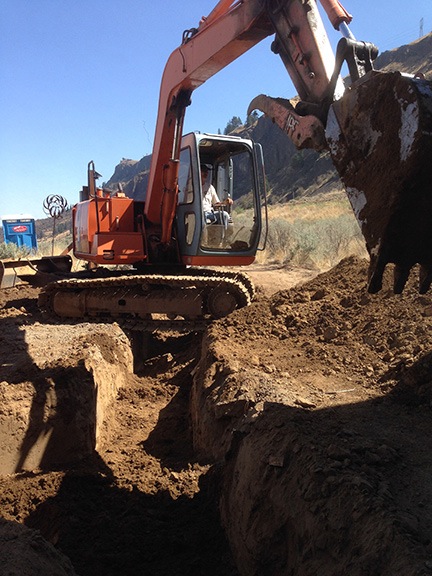
The Conduit and Grounding Rods

Sweep
Here’s the 3-in conduit where it approaches my building. My job was to connect it to the meter base mounted on the wall above it.

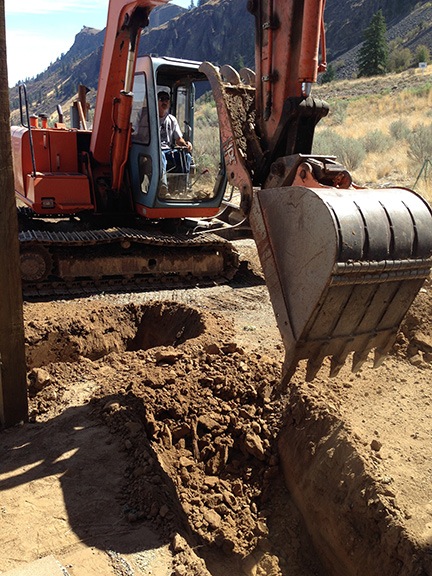
I began running the required 3-in schedule 40 conduit the next day when we started the earth work.

Measuring and cutting the conduit to piece together required components to connect the sweep to the meter base was a bit of a challenge. My reciprocating saw made a mess of the plastic pipe when I cut it so I had to use my hacksaw. I got the measurements wrong once — fortunately, I hadn’t applied any glue yet — and had to recut a piece. But in the end, it came together well. I glued everything together, feeling relieved that the hardest part was done.

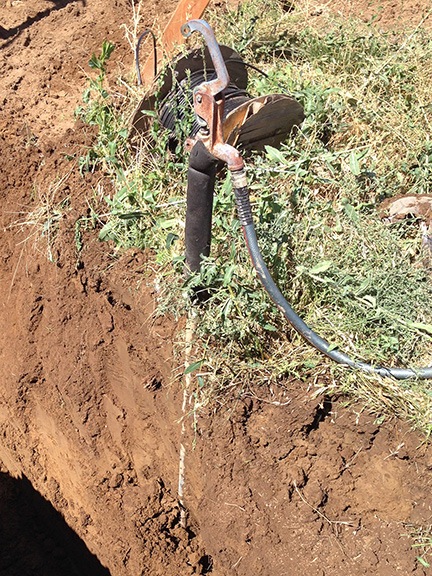
Although everyone had warned me that driving the two grounding rods into the ground would be difficult, I knew otherwise. I’d already done it once on my property — for the temporary power pole — and with a T-post driver the work had gone remarkably well. My building site is pretty much free of large rocks, as the builders discovered when they dug the holes for my building’s posts. Besides, with a 4-foot trench in the area, I only had to drive them 4 feet into the ground. As I expected, the work went quickly. I drilled a small hole through the building’s metal near the ground, ran an 8-gauge copper wire I’d bought as a remnant from Home Depot the day before from my panel to the two poles, and considered the job done.

I was now ready for inspection.

The First Inspection

The inspector showed up very late that evening. It might have been around 7 PM. He’d spent the day up in Chelan and I think the only reason he came that evening at all was because he lived nearby and had more jobs to do farther away the next day. Knocking off my inspection would leave him free to get to those other jobs first thing in the morning.

He checked the wiring of my outlet and light switch and seemed satisfied. Then he looked at the service panel. He disconnected the grounding wire, which I’d put in the wrong place. He was about to move it to the correct place when he realized it was 8-gauge wire. It was supposed to be 6-gauge.

Oops.

He said he couldn’t pass me until I replaced the grounding wire. He told me either he or another inspector would come back the next morning. I told him I’d have it taken care of.

Replacing the Grounding Wire

I absolutely dreaded the thought of driving all the way down to Home Depot that night or the next morning to buy more wire. As I was going to sleep, however, I remembered that I’d never cut the grounding wire on my temporary service pole. Instead, I’d left the extra wire coiled up beside the pole.

The next morning, I took my bolt cutters and cut the wire as close to the rod as I could. Then I went back to my building, disconnected the other wire, and ran the old wire through the hole. It was a stretch, but the wire was just long enough to go from the panel, down the wall, through the hole, and attach to the tops of both copper rods. Yes, I’d saved some money, but I’d also saved myself a trip to Home Depot.

The Second Inspection

A different inspector came to look at my work later that morning. He had a long beard like the guys in ZZ Top. He pointed out that the first outlet on a garage circuit needed to be a GFCI — a fact the previous inspector had neglected to mention. He also pointed out that I needed to clamp the conduit to the building in at least one place. But he passed me for PUD connection purposes, with the requirement that I make the two changes before final inspection.

I asked him whether I needed him to inspect the conduit that ran from the building to the shed where I planned to install power. He told me that L&I was responsible for inspecting anything on the inside of the circuit panel. Since the two circuits I planned ran from the panel back outside, he did need to inspect the conduit. Even though it wasn’t 100% complete — I still needed to bring the conduit into the building and shed on either end — he approved it. If he didn’t approve it, Jeff wouldn’t be able to bury it and that would hold up the entire project.

PUD Disconnects and then Connects

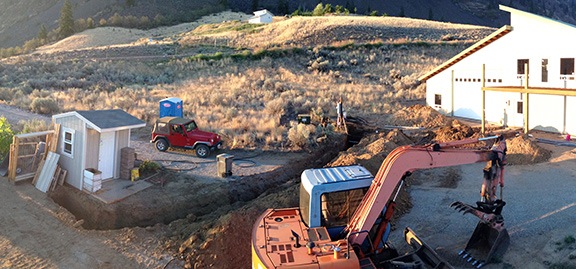
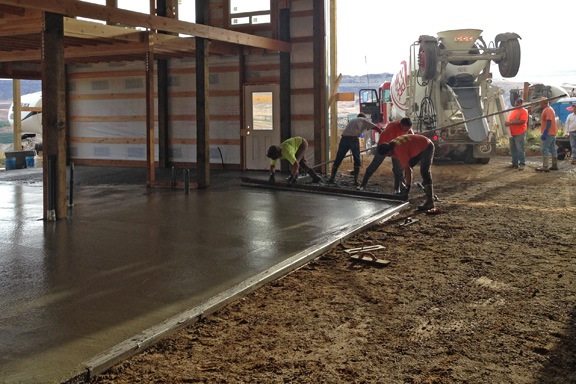
The PUD workers arrived a while later to turn off the temporary power. That enabled us to do the earth work needed to get the conduit right up to the transformer box.

From that point forward, I had no power at all. Fortunately, my RV has a solar panel on the roof that keeps its batteries — which I replaced just last year — fully charged. I could go without the microwave and coffee maker for a while. Later that day, I’d move the few items I had in the chest freezer into my RV’s freezer, which would operate on propane.

A while later that same day, a PUD engineer, who’d come primarily to consult with me about the possibility of moving the transformer, approved the conduit from the transformer to the meter base.

Jeff finished the earth work and buried the conduits, pipes, and telephone cable I’d run. (My property had a telephone line running to it and a huge roll of cable sitting beside it on the ground. Even though I don’t want a land line, the next owner might so I ran the cable in the trench. Not sure if I’ll bother to run it inside the walls, though.)

On Wednesday morning, the PUD guys came back. A crew of six ran the cable from the meter base to the transformer and installed the meter. When they were done, I had power in the building.

Success!

Working Circuit
It worked!

I was alone when I flipped the main breaker in the service panel. Then I turned on my only circuit breaker. I reached over and flicked the switch for the light. The bulb lit up.

It may seem silly, but I consider the lighting of that bulb another major breakthrough in the construction of my new home. Like the day I held the keys in my hand for the first time, it’s a milestone — something that registered inside me as a sign that I was moving forward.

But what’s more important is that having electricity inside the building meant that I could begin the task of wiring the building. That means planning and adding outlets and lights and switches throughout the garage and living space above. It’s a huge task made more difficult by having to do it alone — try running wire long distances when there’s no one to feed it while you pull. But like everything else I’ve been dealing with for the past two years and much of my adult life, it’s just another challenge.

And I’ve come to realize that I live for challenges.

Construction: The Final Ground Work

The excavator guy comes in one more time.

Interior Plumbing Trenches
The plumbers hand-dug the trenches inside for the plumbing lines.

My building has a concrete slab. The cost of construction included plumbing “stub outs” — that means a plumber came and laid in pipe for my water and sewer lines before the slab was poured. Inside the building, I have a bunch of pipes sticking out of the ground under the stairs. In front of the building, I had the other end of those pipes, all ready to be connected to city water and my septic system.

Inside Stubouts
Here’s what the interior stub outs looked like right after the concrete was poured. This space, which is now under the stairs, will eventually house a small bathroom with shop sink.

All of my utilities were already on the property and not far from the building site. The septic system line, which had been installed the previous summer, came within 10 feet of the front of the building. The water line, which had been installed by the original property owner came within 50 feet of the front of the building. The electric transformer, also installed by the original property owner, came within 60 feet of the building. A telephone line and fiber optic cable came out of the ground between the water and electric lines.

The Work

On May 20, 2014, I began blogging about the construction of my new home in Malaga, WA. You can read all of these posts — and see the time-lapse movies that go with them — by clicking the new home construction tag.

My task was to connect the utilities to the building. For that, I needed my earth-moving contractor, Jeff of Parkway Excavating, to come back and dig some trenches. I then had to lay conduit in the trenches — 3-in. schedule 40 for electric service and 1-in. schedule 40 for fiber optic lines — while Jeff laid 1-in. pipe for my water supply and sewer pipe for my septic system. At the same time, I wanted to run power, water, and the sewer line out to my shed, which was 80 feet from the building, so I could have a full RV hookup for future guests. That meant running 2-in. schedule 40 conduit, 1-1/2 in. water pipe, and more sewer line.

Conduit Requirements
The Chelan County PUD very kindly provides this diagram to show the requirements for laying all kinds of conduit for underground utilities.

Although Jeff was allowed to do all the plumbing and sewer line connections, I had to lay all the electric and fiber conduit. This was required by local building codes: either the owner hires a licensed electrician do do all the electrical work or the owner does all the work herself. Because of my limited budget, I elected to do it all myself. That meant everything, including the laying of conduit.

There was also an element related to timing for the electricity connection. But I’ll cover that in a separate post.

Digging the Trenches

Jeff in his Backhoe
Jeff got right to work. In this shot, he’s begun the trench for the electric service.

I got back from my vacation on Saturday and did as much prep work as I could on Sunday. Although I expected Jeff bright and early on Monday morning, he was delayed. There had been heavy rain over the weekend and his equipment was partially buried in mud. He didn’t roll down the street with his backhoe until 11 AM. He got right to work.

Jeff had to dig three trenches. The first, for the electric, fiber, and telephone service, ran from the space between my front door and the RV garage door to as close to the electric transformer as he could get. The second, for the water and sewer lines, ran from the space to the right of my front door away from the building and then connected to the first trench. The third ran from a place near the transformer across my driveway to my shed. He dug this third trench last, after both he and I had moved our vehicles away from the building so we could still drive away.

Frost-Free valve
A frost-free value goes deep into the ground, far below the frost line. When it’s turned off, it drains the water in the pipe out so it doesn’t freeze. Rather than buy a new one for the shed, we moved the old one.

The plumbers had left enough 1-in. pipe from the building stub out to reach the main water line, which was 1-1/2 in. pipe. Whoever installed that pipe had left a bunch of it behind — enough to reach my shed. That would save some money; I wouldn’t have to buy any water pipe. Jeff dug around the frost-free valve and eventually turned off the water so he could pull the valve out. From that point on, I had no water.

(If I’d planned better, I would have topped off the water tank in the RV. But I didn’t. I had only 1/3 tank of water left. Since I didn’t know how long I’d be disconnected from the water supply, I showered that night at my neighbor’s house. Thank you Michelle and Aaron!)

Laying the Pipe and Conduit

Jeff was all business. (It’s such a pleasure working with someone who has done the job so many times before.) He stayed focused and worked quickly, laying the pipe and making the connections.

Sweep
Here’s the 3-in conduit where it approaches my building. The copper wire is for grounding; unfortunately, it needed to be redone because it was 8 gauge wire and I was supposed to have 6 gauge. (Fortunately, I was able to salvage the correct wire from my temporary power pole the next day.)

Meanwhile, I laid conduit. It’s really not difficult to do. Each length has a wide end called a bell that fits over the narrow end of the piece it’s connected to. You brush some special glue inside the bell and outside the other end and slip them together. The glue sets in less than a minute. The only challenges were the bends, called sweeps, which had to be within certain specifications. For example, for the 3-in. conduit, the 90° sweeps needed to be 36 inches. Tight bends simply wouldn’t work for pulling heavy wire.

Jeff called it quits for the day around six. I was hot, tired, and covered with dirt. After a hot shower at my neighbor’s house, I just about passed out. I slept amazingly well.

The Dig
I shot this panoramic image from the top of my RV on Tuesday morning. What a mess!

Final Conduit and Plumbing Work

On Tuesday morning, Jeff was back to work. The Chelan County PUD guys showed up around 8:30. to turn off the power. This was necessary because I had to remove the temporary power pole I’d installed the previous year. The pole was in the way of the ground prep work Jeff needed to do for my concrete driveway apron; I needed the concrete to get as close to the transformer as possible. The PUD guys opened the transformer and disconnected the cables. I was now without water and power.

With the power to the pole turned off, Jeff wasted no time digging it out. With a weird sense of dread, I cut the fiber optic cables, thus disconnecting my Internet service. I helped Jeff attach a chain to the pole and he used his backhoe to pull it out of the ground and lay it on the ground out of the way. (Later, I’d salvage my 30 amp circuit breaker, RV outlet, and Internet connection components from the pole for reuse and put the remaining components on Craig’s List.) This made it possible for me to run the remaining 3-in. and 1-in. conduit for the power and fiber-optic cable.

Meanwhile, Jeff installed the frost-free valve at my shed — after I filled the hole with three loads of rock leftover from my septic system the year before — and finished the water line connections. He wanted to pressurize the system to make sure there were no leaks. So he went up to the road and turned the water on. I immediately heard water running and yelled up for him to shut it off. Turns out, neither of us had capped the open water line inside the building. Turning the water on had sent up a geyser of water under the stairs. (No harm done — the water hit the bottom of the stairs and came right back down; it dried quickly in this desert environment. Bonus: I got to test the slope of the concrete in my garage — it did indeed drain out the doors.) Jeff put together a makeshift plug and turned the water on again. The only leak was at the plug, which I’d have to replace as part of my plumbing work. He covered up the water and sewer pipes.

(Later, I’d connect the RV supply hose to the valve at the shed to restore my water supply. The first thing I did was drain the water from my tanks and fill it with fresh water.)

Sewer T
Here’s how Jeff connected my new RV spot sewer port to my existing septic system.

Around this time, Jeff also laid in the sewer lines that would connect a new sewer port to my septic system. He did this by digging a trench from the port behind my RV to a spot we’d agreed upon near the shed and putting a T in the line. Once I ran power to the shed and set up a 115v and 30 amp plugs, I’d have a very nice RV parking spot for visitors. (I’d likely be the first to use it when I returned in the spring.)

At midday, an engineer from the PUD came by as requested to talk to me about moving my transformer. I really wanted it about 10 feet either closer to the road or further from my building. Either was possible at what was actually an affordable amount — if I had Jeff do all the ground work. But Jeff’s time with me was limited and I really couldn’t wait for him to come back. Besides, I don’t think he was too keen on using his equipment around live wires. (Can you blame him?) So we decided not to make the move.

Covering the Trenches
Jeff covered the trenches about 24 hours after he dug them.

While she was there, however, she also inspected the trench and conduit and passed it. That gave Jeff the green light to cover the trenches up. I laid the red warning tape the PUD supplied as he dumped dirt onto it. (Of course, that meant I was covered with dirt again — fortunately, I could take a shower at home that night.)

Power Restored, Prepping the RV Garage Apron

With the trenches covered, Jeff got right to work on prepping the area for my RV garage apron. This meant digging and moving earth to create a gradual slope from the building down to my driveway. He took the extra dirt and moved it in front of my garage, smoothing down the fill so I could better access the last garage bay, which is where I expect to park my truck. (My dining table is currently set up in there for the occasional dinner party.) Along the way, he created an area in front of my front deck that would be perfect for a lawn with a rock border.

View from Above
Here’s what my building site looked like on Wednesday morning. The bobcat is parked on what will someday be a small lawn for Penny. (She loves grass.)

Jeff finished up on Wednesday morning with the delivery of two loads of gravel that he spread on the garage apron area and my driveway.

He was out getting the second load when the PUD guys returned. There were six of them in three trucks. They backed one of the trucks up to the meter base I’d installed on Sunday (more on that in another post) and pushed the heavy cable from a spool through the conduit. They connected the cables to the transformer. They installed the meter. They tested some things on the panel inside. And then they left. It took less than 15 minutes. I now had power running to my building.

Before they left, however, I chatted with them about my upcoming project — to pull six wires through the 2-in. conduit I’d laid to the shed. One of them asked what I was going to use to pull the wire. When I told him I’d buy some nylon rope, he gave me a 200-foot length of the fiber strapping they use to pull wires. Apparently, they have so much of this stuff they usually just throw it away.

Jeff returned with the second load of gravel and spread it out. He was done by 11 AM. He left with his dump truck and backhoe on a trailer behind it. Later, I’d meet him at another job site and bring him back to my place to fetch his truck, smaller trailer, and bobcat.

Although the place was still a bit of a mess after all that work, it was definitely shaping up. I was now ready to start wiring my shed and building and install the plumbing. But more important than that, I was ready to get the concrete laid so I could finally get my helicopter inside.

Construction: Interior Framing

My living space begins to take shape.

On May 20, 2014, I began blogging about the construction of my new home in Malaga, WA. You can read all of these posts — and see the time-lapse movies that go with them — by clicking the new home construction tag.

Although I plan to do a lot of the interior work on my living space myself, there are a few things I simply can’t do. Framing is one of them.

Framing — in case you’re not familiar with the term — refers to dividing a space into rooms with the use of lumber. It’s basically the skeleton of the home. Framing must be done before insulation, electrical wiring, plumbing, and HVAC systems can be installed.

Because I built a pole building and not a regular frame construction home, the framer had to frame the entire inside of my designated living space area. In effect, he had to build my home within that space.

Upstairs before Walls
Here’s the upstairs right after the stairs were put in. The subfloor isn’t even finished yet in this July 7 shot.

My living space is only 1200 square feet. In that space, I needed walls to split it into a bedroom, closets, bathroom, laundry room, pantry, and great room (with kitchen).

I got three bids. Although I wanted very much to go with a framer who came highly recommended by my next door neighbor, I found his partner’s attitude condescending and simply didn’t want to deal with her. So I went with another framer that a friend of mine had used for his home in Wenatchee Heights, a guy named Mark.

The Broken Planter

Things got off to a bad start.

Rock Garden
Yes, I know it’s just a crappy little rock garden, but it had been there for months, unscathed by other truck drivers.

Mark keeps all of his supplies in a trailer — the kind that’s pulled by a semi truck. When he pulled in with the trailer, he ran over the corner of the little rock garden I’d built for my house number sign. It wouldn’t have been so bad if he’d admitted that he’d done it and apologized, but his assistant played it all down, assuring me that they’d “fixed” it. It wasn’t fixed. It looked like crap.

I didn’t let it go. I voiced my concern about carelessness — literally dozens of truckloads of materials had been delivered down the same driveway past the little rock garden by large trucks over the previous three months and he was the first to hit it. I wanted him to understand that I was paying attention and that I wasn’t interested in letting little things go. Yes, I might be a woman acting as a general contractor on a construction job, but I wasn’t the kind of woman who could be pushed around.

It took me an hour to fix the planter and replace the crushed plant.

Floor Plans

The next little problem reared its ugly head soon afterward. I’d come up with a simple design for a floor plan that took into consideration window placement and approximate room size. I handed this off to Mark. Although I was prepared to work with him to lay out the chalk marks for the rooms, he told me he’d do it with his assistant and I could review them that evening when they were gone. Assuming that he’d use my floor plan as a guideline, I let him get to work.

Floor Plan
The version of the floor plan that I gave Mark was a lot like this. The posts in this drawing are round.

I don’t remember why I came up to check on the progress a while later, but I’m very glad I did. He was using my floor plan as a blueprint for the walls. Unfortunately, my floor plan did not include exact measurements and did not take into consideration the thickness of walls: 5-1/2 inches. So when they marked the wall between the bedroom and bathroom, it extended past the post I’d used in my design to divide the rooms. When I came up to take a look, he was measuring the wall between the bathroom and kitchen, placing it right in the middle of the kitchen window.

When I pointed this out, his response was, “Well, they shouldn’t have put the window there.”

I told them to put the window there,” I said firmly. “This is my design.”

It wasn’t worth explaining the concept of symmetry to him. I thought he’d understand — I thought someone who built homes for a living would understand something about design aesthetics. Fortunately, I didn’t have to. My anger over the entrance planter incident was probably still fresh in his mind. And, like me, I’m sure he often recites the mantra, “The client is always right.”

Whatever.

I did explain that the measurements were rough estimates and that they didn’t take into consideration wall thicknesses. I explained that the walls needed to be set in relation to the windows. And then I spent the rest of the morning with him while he laid down the chalk marks. We had some difficulties with the pantry, which had crept into the living room — too many walls! — but we fixed that by making a much smaller pantry.

The Work Begins

They got to work the next day. Mark had a ton of experience and things went quickly. His assistant, however, seemed to need a lot of guidance and that was slowing things down. The speed of their work didn’t bother me — I was paying by the job, not by the hour — but I think it frustrated Mark.

Framing in Progress
Framing in progress.

To save the $500 cleanup fee, I’d elected to do job site cleanup myself. (Frankly, I think it was dumb of him to put cleanup as a separate line item. If they’d just clean up as they went along, there wouldn’t be much to do. If the amount had been included in the cost of the framing, I would have paid it.) Each day, I’d go upstairs, sweep, collect nails and small scraps of wood, and throw away Gatorade and water bottles. That made me the daily inspector of their work, too.

One thing he did that wasn’t in my plans was to relocate my bedroom door. I’d wanted it a bit farther down the hall, closer to the bathroom door. He’d put it right next to the closet wall. I thought about making him change it, but then realized that his design would probably make it a lot easier to move furniture into the room. I left it as is.

George on Scafford
This terrible picture of George at work shows how fearless he is — he’s standing on a scaffold above my open stairway, at least 20 feet off the ground.

After a few days, the young assistant stopped coming and George, his more experienced assistant, showed up. I like George. He’s got a really upbeat personality and a good sense of humor. A real pleasure to deal with. And unlike Mark or his younger assistant, George didn’t seem afraid to climb the scaffolding to get to the high areas — at its highest point, my ceiling is 18 feet off the ground — even over the open stairwell.

Finishing Up

Mark had a deadline, which was determined by another job he needed to start right after mine. In the end, I think that’s what got them to finish up within two weeks.

Finished Framing
Here’s how the framing looks today with the area (mostly) cleaned up. This shot was taken from the northeast corner of the living space, in what will be the great room, looking toward the kitchen.

I think the job was a lot more work than Mark had expected. It certainly looked like it should cost more than what he’d bid. But when he gave me the final bill, it wasn’t any more than he’d told me it would be. I thanked him and wrote him a check.

Later, I went upstairs and measured everything. I updated my floor plan drawing to reflect actual measurements and then even began drawing in furniture to scale to make sure it’ll fit. (Admittedly, the bedroom will be tight with my king-size bed, two night tables, two dressers, and sofa. The sofa may wind up in the consignment shop in town.) Eventually, I’ll get around to drawing in the rest of the furniture. There doesn’t seem to be much of a rush — there’s still so much to do. In the meantime, this drawing is useful for estimating building materials and planning my kitchen cabinet layouts.

Final Floor Plan
Here’s the final floor plan with wall widths taken into consideration. The gray shaded area is a loft 8 feet off the floor over the hallway and utility areas.

I will admit that I wasn’t sorry to see that ugly trailer pull out of my driveway.

Still Alive and Kicking!

Very, very busy!

Just a quick note to let regular readers know that I’m still among the living.

I’ve been incredibly busy since that last post with a trip to AZ for more divorce bullshit, a week-long vacation in the San Juan Islands with a friend, some earth work at my building site, and a lot of electrical and plumbing work in my building and shed. I hope to blog about a bunch of this stuff very soon.

Until then, stay tuned. And remember, you can always use the form in the sidebar to subscribe to new posts as they are published so you don’t miss a thing.

Construction: The Oil/Water Separator

Another do-it-yourself project for my home.

On May 20, 2014, I began blogging about the construction of my new home in Malaga, WA. You can read all of these posts — and see the time-lapse movies that go with them — by clicking the new home construction tag.

I had a lot of time to design my new home. A lot of time. And not only did I have time to think about the building and how I would use it, but I also thought a lot about the land.

The Plan — or at least the relevant part of it

I decided that I’d try to plant a small vineyard. The rolling hills on the east end of my property are well-suited for wine grapes and, after all, there is a winery less than a half mile down the road. If I did everything right and could produce some good grapes, I could sell them for supplemental income. I don’t expect to get rich and I certainly don’t want to become a winemaker, but it would be a nice way to join the agricultural community beyond my short season cherry drying work. Of course, all this is a bit in the future — 2 to 3 years, I think — but it got me thinking about features I could incorporate into my building to make it more attractive for someone who might want to buy a vineyard and start making wine.

And that’s what got me thinking about the floor drain. If there’s one thing you need when you’re making wine, it’s a place to rack the wine. Wine racking involves pumping wine out of the barrels where they’re aging, cleaning the lees (dregs) out of the barrels, sterilizing the barrels, and pumping the wine back in. The process is time consuming and labor intensive and since you’re dumping the lees and rinsing the barrels, the runoff has to go somewhere. Being able to do this indoors, in the shade, in a possibly temperature-controlled space would be a big plus for a future winemaker, making my property a bit more attractive than it otherwise might be.

As if the view and the privacy and the giant garage and the wrap-around deck weren’t enough.

Besides, I reasoned, I’d like a drain in the floor, too. It would make it possible for me to wash a car or my RV indoors or simply hose off the floor.

The Drain

I talked to the builder and we decided on a 24-foot long drain with a grate on top and pipe leading the water out the back of the building. I already had a drainage channel dug back there to take rainwater off the roof away from the building. We’d tap into that.

I went to Home Depot and bought the parts: 2 10-foot lengths and 1 4-foot length of drain channel, 12 2-foot lengths of snap-in grating, 2 10-foot lengths of plastic pipe, 3 drain channel fittings, and 1 drain channel end cap. I spent just over $500.

When the workers prepped the floor for the concrete pour at June month-end, they installed the channel and the cap. It sat above the gravel grade; the concrete would be poured around it. They covered the grate with duct tape to prevent concrete from getting in. And then they poured.

Pouring Concrete around the Drain
In this shot, the drain channel divides the poured concrete from the unpoured gravel floor. The concrete is basically as thick as the drain channel is high.

Finishing around the Drain
You can barely see the drain in this shot; they used silver duct tape that really blends in with the concrete color.

Finishing took effort. The drain runs down the center of a 24 x 48 foot space. The front, back, and sides needed to slope down gently to the drain so if water got into that space, it would eventually end up in the drain. I was told that the slope would not be steep and that was fine with me. I didn’t expect to use it very often anyway.

The Drain in my Floor
Here’s the drain looks like today, although it’s actually longer than what you see here. The white “stain” is from me hosing off my tile saw; some of the water came back into the building and went where it’s supposed to go: into the drain. That’ll wash away the next time I use the hose.

Later, when the concrete was dry, I peeled off the duct tape. I even took out a hose and hosed down the floor to watch the water flow into the drain. I walked around the back of the building and watched the water move away. Cool.

The Oil/Water Separator

There was a bit more to the drain than just the drain itself. Because the drain was in the floor of a garage space, it needed an oil/water separator. That’s a contraption (for lack of a better word) that prevents oil that might wash away from vehicles from getting into the ground. Instead, it’s trapped and, when enough has accumulated, can be cleaned out.

Before buying the drain parts, I did some research. I found a very simple oil/water separator that I thought I could make myself. It was basically a container with a water inlet from the drain and outlet to the drainage ditch. Inside the container were two baffles or dividers. One was short but went to the bottom of the container; sludge would gather between the inlet and that first baffle. The other was short but went nearly to the top of the container with space beneath it. The water would move through there but the oil, which floats, would stay at the top. The water would then go through the discharge outlet, clean.

Oil/Water Separator
Here’s the design I found on the Web.

Box Diagram
Here’s a diagram of the box. I didn’t buy the grate, mostly because I wanted it completely covered; I don’t want to be fishing dead rodents out of oily sludge.

I sent this image to the plans inspector to see what he thought. He agreed that it would do the job. I suggested making it out of a heavy-duty plastic toolbox. He said that wasn’t heavy-duty enough.

It took a while to figure out what I could use as the container. It was Tanya who suggested that I go to H2 Pre-Cast near Wenatchee Airport. I sat down with the sales guy and showed him my drawing. He showed me concrete boxes on his computer screen. I spent $70 for a small one with a concrete lid.

The Concrete Box
They used a forklift to load the box onto my truck for a reason — it’s very heavy.

When I realized I how heavy it was, I rushed home to get there before the crew working on my building went home for the day. I let them use their forklift to get it off my truck. They stowed it in the building. Later, when they’d gone for the day, I used the forklift to move it to the back of the building so it would be out of the way.

When the concrete was poured, the box was waiting for the rest of the installation: digging a hole for the box, moving it in, and putting in the baffles. That was my job — and I had no idea how I was going to do it.

The Concrete Solution

I thought about how I would do this for almost a month. I talked to friends. My friend Bob suggested using the concrete pavers I already had to build the dividers. He had a masonry saw he thought could do the job. Because the interior of the box was smaller on the bottom than the top, if we cut the pavers just the right size they should slip into place. We could then use a cement paste to sort of “glue” them in.

It sounded good to me.

In the meantime, I had to get the box into the ground. That meant digging a hole in compacted earth. Fortunately the earth there has very few rocks and I have a very heavy digging stick. I made short work of the job one morning before it got hot and the spot was still in the shade.

Of course, I still needed to get the box in the hole. And I couldn’t budge the box.

The solution came on a motorcycle: my friend Mike. Looking for an early morning destination with his dirt bike, he showed up at 6 AM on Tuesday. After giving him hot coffee and a bacon and egg breakfast, I led him around to the back of the building to the little moving problem I’d discussed with him on the phone. Together, we knocked out the holes on either side of the box — guess who I was thinking of as I banged away with a heavy hammer on one of the punch outs? — and lowered it into the hole. Then we connected a cut length of pipe to the pipe coming out of the building to make the inlet and used the rest of the pipe as an outlet.

Now I was ready for Bob and his masonry saw.

But it was Tuesday and Bob works 10-hour days during the week. The soonest he’d be able to come would be Friday — if he didn’t have something else on his plate for his only weekday off. And I’d been thinking about other solutions.

Like concrete.

I figured I could make 2 concrete forms for the inside of the box, mix up some concrete — I already had portland cement and sand — and pour the concrete into the forms.

And that’s exactly what I did on Wednesday. I cut some 1-1/2 inch foam insulation sheets I had lying around into 4 dividers. I positioned the dividers for the pour, being sure to place more foam under the dividers on the outlet side to leave a space under the baffle. I used scrap lumber to hold everything in place. It looked extremely makeshift.

Dividers
Foam dividers are held in place by pieces of scrap lumber.

Then I mixed up some concrete in a big paint bucket. I tried 4 parts portland cement + 4 parts sand + 4 parts water but the mixture — once I got it mixed up enough — seemed too thin. So I added 2 more parts of cement. The resulting blend looked like it might be thick enough to stay within the forms.

So I poured it.

Concrete immediately began leaking from the first form. But only for a moment; it seemed to sort of clot itself, like blood on a wound. So I kept pouring. I poured both forms, stopping the inset side form about 2/3 of the way up and bringing the outlet side form (with the foam beneath it) within a few inches of the top of the box. Then I got down on my hands and knees, scooped up the leaked concrete and slapped it against the walls where the pipes came in and out. I did the best I could to use all the concrete in the baffle forms and around the pipes. It looked awful when I was done. So did my hands.

After the Pour
Here’s the big picture after the pour. You can see the box lid standing up against the side of the building as well as one of the pavers Bob wanted to cut for baffles.

I cleaned up and resisted the temptation, for the rest of the day, to pull off the forms. Instead, I used a level and a shovel to make sure the outlet pipe sloped down. I put the paver on top of it and closed up its mouth with some hardware cloth to keep the rodents out. (Around here, you don’t wonder if the mice will get in. You assume they will and take preventative measures to keep them out.) Then I buried both pipes and brought the dirt around the outside of the box.

On Thursday, I could resist no longer. In all honesty, I didn’t think it would work. I couldn’t imagine why freshly poured concrete would adhere to the concrete walls of the box. But it did. As I pulled the forms out, cracking and cutting them as I worked, I revealed the smooth walls of my new concrete baffles. With a little cleaning up, it would be all ready for inspection.

Finished Separator
Here’s my finished oil/water separator after cleaning it up a bit. The inlet from the drain in the building is on the right; the outlet is n the left. Although you can’t see it, there’s space beneath the left side baffle.

Inspection and Test

I was hoping I’d be around when the inspector stopped by so we could test it together, but I was on a charter flight at an orchard near Othello. He called me to get access to the building, which is secured by a keyless lock. He asked me to remind him what he was supposed to inspect.

“The oil/water separator and the framing,” I told him. “If you want to run the hose over to the drain in the building to test the oil/water separator, you can. Just don’t add oil unless you have to.”

“Oh, I already looked at that,” he told me. “It’s fine.”

And that’s that.

Of course, I wanted to test it. I wanted to make sure the water drained out properly.

Besides, who doesn’t like playing with flowing water?

So I ran a hose into my RV garage and laid it down by the drain. Then I turned on the water and ran around to the back of the building. I’d just managed to turn on my phone’s video camera when the water arrived.


Here’s the test. The water was only turned on partway — I have excellent water pressure. But the outlet drain kept up with the inflow of water and none of the water went over the top of the outlet side baffle.

Success!

What I like best about my solution for the oil/water separator is that other than the concrete box, I already had everything I needed to get the job done: foam for forms, scrap wood for supports, cement, sand, hardware cloth. So rather than spend over $1,000 for one of the many of the pre-made solutions out there, I got the job done for about $70. You gotta like that.

One More Thing

Of course, not everything could go perfectly smoothly.

Wrong Lid
Duh-oh! These two pieces were sitting around here for two months and I never noticed I had the wrong size lid.

When I was cleaning up the area after the test, I put the lid on the box. That’s when I discovered that I had the wrong size lid.

Well, at least I can lift it to return it for the right one.