Why I Can’t Just Enjoy My New 13″ MacBook Pro

It really is a business expense.

13Last week, I finally broke down and ordered a new MacBook Pro. I’d been wanting a computer like the 13″ MacBook for a while, but what I really wanted was a Mac netbook. When Apple unveiled the 13″ MacBook Pro at the Apple Worldwide Developer’s Conference earlier this month, I finally stopped denying the truth: that there would be no Mac netbook in my immediate future. Instead, I saw the new 13″ MacBook Pro as a reward for my patience. Not only did it have more features than the MacBook I’d been looking at, but it would cost less money.

Apple also announced some new features in Snow Leopard. While I’m not prepared (because of NDA stuff) to write publicly about Snow Leopard, I am in the middle of a revision to my Mac OS Visual QuickStart Guide for Mac OS X 10.6 Snow Leopard. One of the hurdles I was facing was not being able to show and discuss features of Mac OS X that work on the new MacBooks. About two years ago, I bought a 15-inch MacBook Pro to use as my “test mule” for writing about Leopard. That computer simply doesn’t have the bells and whistles of the newer models I need to write about.

It looked as if I’d have to buy a new MacBook Pro so I could write about it for my book.

This is both good and bad:

  • Good because having to buy a new computer for work means I can deduct the cost of it from my taxes. (I use my computers for all of my various business endeavors — I don’t play games on my computers. If I’m not working, I’m out having fun somewhere or sleeping.) And let’s face it: it’s always nice to have a computer with the latest technology.
  • Bad because having to buy a new computer means having to come up with the money to pay for it. Just because I can deduct it as a business expense doesn’t mean it’s free. (So many people don’t understand this simple fact: you still have to pay for business expenses; it’s just like being able to buy them at a discount equal to your tax bracket percentage.) In this case, the final price tag came to just under $2K. Ouch.

It’s also bad because I never seem able to buy a new computer and just enjoy it like a normal person.

Believe it or not, this is my first “unboxing” video. Let’s just say it doesn’t completely suck. The weird noises you hear in the background are coming from Alex the Bird.

Most folks buy a computer, open the box, fire it up, and start exploring. I, on the other hand, buy a computer, open the box, fire it up, erase the hard disk, and install beta operating system software on it. I then get to spend several weeks exploring the minutiae of the operating system’s elements, including every single window and dialog that might appear to the average user. I take screen shots of everything I see and write about it in an unbelievable level of detail.

So right now, as I type this, I’m waiting for the Developer Preview of Snow Leopard to install on my brand new, just-out-of-the-box 13″ MacBook Pro’s freshly erased hard disk. I’ll put some sample files on it, set it down on my workspace table beside my 24-inch iMac, get them talking to each other via AirPort network, and start exploring the current topic I’m writing about, which is the Dashboard and Widgets. I’ll put my old 15-inch MacBook Pro away in its case and set it atop the Dell laptop I’ve also brought along with me this summer to revise another book for another publisher.

When I get back to Arizona, if I’m not too busy doing other things, I’ll use the discs that came with the 13″ MacBook Pro to restore it to its factory hard drive configuration. Then maybe — just maybe — I’ll put it back in the box and have a reopening, trying my best to pretend it’s brand new again.

Why I Don’t Have an iPhone

Another answer to a frequently asked question.

Twentieth Anniversary MacintoshI’m a devoted Mac user and have been since I got my first Mac back in 1989. I’ve written dozens of books and hundreds of articles about Mac OS and applications that run on Macintosh computers. I currently own six Macs, including two Mac laptops, a 24″ iMac, and a Twentieth Anniversary Macintosh. I have four iPods. I even own Apple stock.

But I don’t have an iPhone.

People ask me why I don’t have an iPhone. The answer is very simple: AT&T.

I won’t switch to AT&T. I’ve used them in the past and their service frankly sucks. I don’t like talking to India when I have a billing or technical support problem. I don’t like the fact that if they screw up your bill, you can’t get it fixed and they put a black mark on your credit report. For as little as $26 they claim you owe them.

ATT Coverage

AT&T’s Voice/Text Coverage


Verizon Coverage

Verizon Voice/Text Coverage

And if personal opinions regarding AT&T’s service aren’t enough, then let’s look at its service area. It simply doesn’t cover the areas I need coverage in. Like at my house — AT&T’s coverage is spotty. Or at our place on Howard Mesa — AT&T won’t work there at all. And other places I’ve been to.

Don’t believe me? Look at these two coverage maps, keeping in mind that I live in a small town on the edge of nowhere in Arizona. AT&T’s service in my town is through a “partner” — it doesn’t even have regular service here.

I need a cell phone that works everywhere I go. I go a lot of places in the west and I go a lot of places where there simply aren’t any cities. AT&T is a city cell phone provider.

Apple partnered with AT&T for the iPhone. While I believe this was a mistake, AT&T probably doesn’t think so. Right after the iPhone’s introduction, many users dropped their carriers (no pun intended) to switch to AT&T so they could buy iPhones. If Apple had gone with Verizon, it probably would have killed AT&T’s mobile business. It seems to me that the iPhone is the only reason someone might want to use AT&T.

I invested in a Palm Treo 700p with Verizon a month before the iPhone came out. I knew it was going to AT&T and I knew I couldn’t have one. So I invested in the Palm with a 2-year plan, just so I wouldn’t be tempted to do something stupid. I didn’t regret it at all. Although my Treo didn’t look slick, like an iPhone, it did things that an iPhone couldn’t do — like act as a Bluetooth modem to get my laptops on the Internet when I’m hanging around an off-the-grid cabin on top of an Arizona mesa. Or on a cruise ship off the coast of Alaska. Sure, an iPhone can connect to a WiFi network, but what if no network is available? Can it get a laptop on the ‘Net? My Treo could.

Blackberry StormLast month, I stepped up to a Blackberry Storm. The darn thing sure looks a lot like an iPhone. It even works a lot like an iPhone. Yes, I know there aren’t as many apps, but do I really need all that crap on my phone?

And guess what? Even though they told me it wouldn’t work, I can still use the phone’s Bluetooth connection to get my laptops on the ‘Net when there’s no WiFi network around. I can still sync flawlessly with my Mac’s Address Book, iCal Calendar, and other data applications. I have voice dialing, better Bluetooth support, MP3 player capabilities, a built-in GPS that works with the mapping application, and more features than I know what to do with.

So while I admit that I did look longingly at iPhones when I was a Treo user, I no longer feel as if I’m missing out. I have what I need in a cell phone — including the most important thing: coverage — and more to explore in a slick, user-friendly package.

Choosing a cell phone should be a logical decision; not an emotional one. Logic told me to stick with Verizon and choose the Treo and then the Storm.

Please don’t think I’m knocking the iPhone. I’m not. I’m just saying that it isn’t the only solution for an Apple user. Some things are more important than having a cool-looking, popular phone. Service and features are right at the top of my list. AT&T and the iPhone simply won’t deliver the service and features I need.

Visual QuickStart Motor Skills

It’s all coming back to me.

It’s no secret that Apple will soon — well, hopefully sometime in 2009, anyway — release an update to Mac OS X. It should be numbered 10.6 and it’s definitely called Snow Leopard. But that’s all I can say about it. I’m under nondisclosure and I take this stuff very seriously.

I’m working on a revision to my Mac OS X Visual QuickStart Guide. I just rather belatedly realized that this is the first VQS I’ve worked on in over a year and a half. The last was Leopard (10.5), which was released the same day Leopard hit the Apple stores. I think it was late October 2007. I clearly remember working on it while I traveled. I even blogged about it here, here, here, and here.

I don’t just write VQSes. I also do layout. I write and lay out in InDesign. This year, it’s a real breeze. Not only do I have all the real estate on my 24″ iMac monitor, but I also have another 24″ of real estate on the Samsung sitting next to it.

As I work, I find myself repeating the same keystrokes and mouse drags I performed all those months ago. The shortcuts and techniques have all come back to me — my hands fly over the keyboard and mouse without consulting my brain — and miraculously, they get it right. I even reprogrammed Photoshop actions using the same keystrokes I used for the last VQS project.

Is it any wonder I can completely revise typical page, with new screenshots and added page references, in less than 30 minutes?

The page reference addition is something I’m pretty excited about. Because InDesign has always lacked a good cross-referencing feature, I had to manually reference everything. As a result, I kept it simple and stuck to chapter references. For example, “I tell you more about disks and volumes in Chapter 6.” But when InDesign CS4 was released, it had one feature that made it worth the upgrade for me: cross-referencing. I think that by referencing exact pages in the book, rather than making vague references to chapter numbers, I’m making the book far more valuable as a reference tool than ever before.

At this point, two chapters are done. I’ve got 24 more to go. I’m sure you’ll read more about my progress here.

You’ll have to wait until Snow Leopard hits the shelves to read more about it.

My Geotagging Workflow

How I add GPS coordinates to my photos.

A while back, I decided I wanted to include the GPS coordinates in the EXIF data for my photos. Because my cameras (a Nikon D80 and a Nikon CoolPix something-or-other) don’t have built-in GPS features or communicate via bluetooth (or any other method) with a GPS, I have to manually attach the GPS coordinates to the photos.

I say manually, but I do this with software that automates the process. (I’m not a complete idiot.) Still, there’s a slightly convoluted workflow to get this all together. I thought I’d outline it here for two reasons:

  • Some blog readers might be genuinely interested. I’m not the only photo-snapping geek around.
  • By documenting this, I can look back, years from now, and see yet another example of how technology changes to make things easier and how I solved a “problem.”

So here’s the workflow rundown. I skipped the nitty gritty details to keep it short. (I read somewhere that people don’t like to read long blog posts.)

Step 1: Acquire the Photos

GlobalSat BT-335Bluetooth GPS w/ ChargersWhen I go out to do photography, I take minimal equipment. I don’t like to carry a bunch of stuff. But one of the things I do take with me (other than my camera) is a GPS data logger. I bought a GlobalSat BT-335 Bluetooth GPS Data Logger. I made my choice after lots of research, including this excellent review on bioneural.net. Three things sold me:

  • Price. It’s $69.95 on Amazon.com.
  • Size. It’s small and lightweight.
  • Connectivity. It’s Bluetooth, so I don’t have to deal with cables. (I hate cables.)

As an added bonus, when paired with my MacBook Pro, it puts live GPS data on my computer. Which is kind of cool, even though I currently have no use for this capability.

I’m not saying you should go out and buy this. I’m just saying that I did and I’m very satisfied. And while I certainly welcome comments that suggest other models, my choice has been made, so please don’t try to sell me on your solution.

A GPS data logger like the BT-335 does one thing, and it does it well. It keeps track of where you’ve been by recording GPS coordinates and corresponding times. It stores all this data inside itself with virtually no user interface. I attach it with a wrist strap I bought at a camera store to my camera’s shoulder strap. Before I start shooting photos, I turn it on and it does its thing. I basically forget all about it.

So when I go out to do photography, I turn on my GPS data logger and use my camera to take pictures. Pretty simply stuff, no?

It’s important to note here that the time on my camera must be right — at least within 10-20 seconds (if I’m on the move) or 1 to 2 minutes (if I’m moving more slowly). I check it against my computer’s clock (which is set by atomic clock) and adjust it a few times a year. The GPS data logger gets its date/time information from the GPS satellites.

Step 2: Get the Data and Photos on the Computer

The next step is to get all of the GPS data and the photos onto my computer.

LoadMyTracks
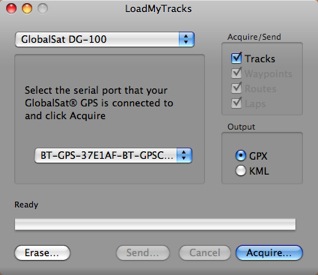
Although GlobalSat has a perfectly fine utility for getting the data off its unit and onto a Mac, I use the freeware application, Load My Tracks. I tell it I’m using a GlobalSat DG-100 and because the unit is paired to my computer, it finds it. I can then download tracks into either GPX (which I need) or KML format. I download both — heck, why not? — into the folder where I’ll soon be downloading the photos. I then erase the data logger so I don’t have extra track points in it the next time I use it.

Next, I use a card reader with Image Capture, which comes with Mac OS X, to download all photos from my camera into the folder where I saved the track logs. They don’t have to be in the same folder, but I like it that way. Nice and neat. And it makes it easy to back up the logs with the photos.

Now I’ve got the GPS data and photos on my computer.

Step 3: Match GPS Coordinates to Photos

Next, I launch GPSPhotoLinker, another freeware application. I use the Load Tracks button to load up the GPX data file for the photo shoot. Then I use the Load Photos button to load all the photos I took during the shoot. I go into batch mode, which has my settings saved from the last session, and click Batch Save to Photos.

GPSPhotoLinker uses my settings and the data to write the GPS coordinates, including altitude, to each photo. It displays a progress bar as it works. When it’s done, the Latitude and Longitude for each photo appears in the appropriate columns in the list of photos. Here’s what it looks like while it’s working. (Yes, I took pictures of very big, red rocks.)

GPSPhotoLinker In Action

As for the big, red rocks, you can find them here. (But it seems to be off by a 10-20 feet; maybe it’s time to adjust the camera time again.)

Step 4: Backup

After losing a hard disk for the third time two years ago, I have become fanatical about backing up my data. After importing photos and linking the GPS data to them, I burn them onto a CD or DVD (depending on the capacity needed). When the burn is done, I check the CD or DVD to make sure it functions properly. Then I apply a label with the date and some descriptive information and file the CD or DVD in a box with a bunch of others.

I format the memory card for my camera in my camera to clear it out completely.

I then feel good about deleting photos off my hard disk, adding them to iPhoto, or modifying them in Photoshop or some other image editing too.

Sounds Like a Lot of Work?

It really isn’t a lot of work. It’s a whole workflow thing. Do it enough times and you can do it quickly. Steps 2 through 4 take about 15 minutes from start to finish.

That’s my flow for geotagging. What’s yours? Got a camera with a GPS or GPS connectivity built in? Please do brag about it by adding a comment here. I’d love to learn more.

Giving My iMac a Fresh Start

Why I’m reformatting my iMac’s hard disk.

iMacAs I type this, I’ve set the wheels in motion for my iMac’s internal hard disk to be reformatted and a fresh installation to be installed on its clean surface. This is a “clean install,” in the real sense of the phrase, and I expect it to take most of the Christmas holidays to get things back up and running in a way that I can be productive again.

This may seem drastic, but drastic times call for drastic solutions. My computer has been plagued with problems for the past two months — since my return from points north after this summer’s galavanting — and I simply cannot tolerate it anymore. I not only get kernel panics several times a week, but I also get what I call “blue screen restarts” (screen turns blue and computer restarts itself for no apparent reason), frozen mouse pointers, and unresponsive applications. I’m losing unsaved work — although less than you’d think because I’ve actually come to expect problems and save often.

I’ve run every diagnostic tool I have on the hard disk, booting from the CD/DVD drive whenever possible. Disk Utility says the hard disk is fine, but it finds all kinds of problems with permissions, which it just can’t fix. Drive Genius won’t even check the permissions, but it finds an error with my preferences file and gives up scanning. Permissions are definitely screwed up because my document permissions include permissions for (unknown).

Did I mention that it’s just over a year old now?

I know the cure for the problem — reformat and reinstall. So that’s what I’m doing.

Oddly enough, I used to do this regularly back in the old days, before the operating system got so darn complex and my hard disk filled up with music and video files. Each time a new version of Mac OS came out, I’d install it by reformatting my hard disk and putting the software on a clean disk. Then I’d reinstall all my applications and copy back the documents I needed on my hard disk. It took about a half a day to get the job done and the computer worked flawlessly afterwards.

But nowadays, things aren’t that simple. Reformatting a hard disk and reinstalling everything from scratch is a real pain in the ass. Before I could even think of doing it, I started by making three backup copies of what was important on the disk: the Time Machine backup I always have, a disk image of my entire hard disk, and a copy of my home folder. All this had to wait until I got an external hard disk large and fast enough to make the extra two backups. I bought it yesterday: a 1TB Western Digital FireWire/USB drive.

Never in my wildest dreams did I think I’d own a 1 TB hard disk. The amazing thing: it only cost $200. So storage is no longer an issue here.

At least not for the next few months.

Right now, my iMac is still verifying the installation DVD. I can still change my mind. But the thought of dealing with daily blue screen is too frustrating for words. So I’ll do the drastic thing and fix my problem.

And next week, I’ll pump my iMac up to 4 GB of RAM. If that doesn’t make it happy, nothing will.

Related Articles: