The Best Camera…

… might really be the one you have with you.

I have been doing photography, mostly as a “serious amateur,” since my college days. I took a photography class in college, where I learned to develop film, make contact strips, and print negatives into 8 x 10 enlargements. For a while, I had a darkroom in my home. I went from SLRs to DSLRs, with a string of point-and-shoot digital cameras in between. I embraced digital photography — not for what I could do with Photoshop, but for the instant gratification it provided.

But let’s face it: DSLRs with their interchangeable lenses are big and bulky. As the cameras in my iPhones got better and better, I found myself reaching for my Nikon less and less. Yes, I still dragged it around with me when I traveled south for the winter in my camper and it’s even with me on my boat. But I’m just not happy with the pictures it produces.

No, it’s not a top-of-the line full-sensor Nikon. And it’s not anywhere near new at this point. But yes, I do have the quality glass (not plastic) lenses, some of which were quite costly to obtain. And it seems to me that if you have quality equipment, it shouldn’t matter how old it is. It should continue to take good pictures.

But lately, every time I’ve reached for the Nikon and twisted on its 85-300mm lens to shoot photos of mostly birds in the near distance, the images have come out like crap. Yet nearly every photo I take with my iPhone 13 Pro — yes, a 2 1/2 year old phone! — looks pretty amazing.

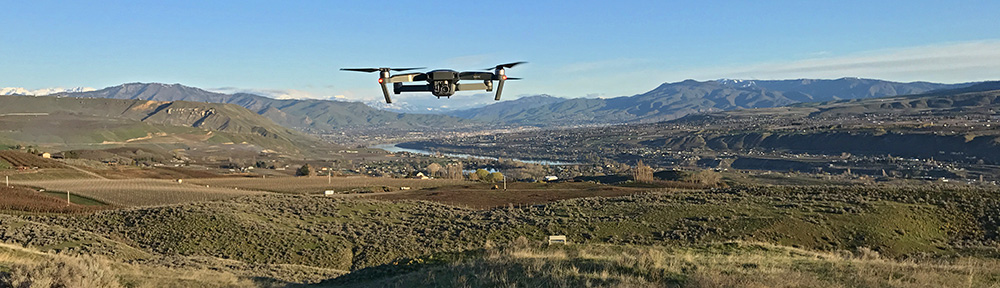
Hell, even my drone takes better photos.

I started to think that it might be the age of the camera. But I wasn’t the least bit interested in spending thousands of dollars on a newer Nikon DSLR or “mirrorless” — which seems to be the big trend — camera.

I thought that if I got a newer point-and-shoot, it might be better. So earlier this month I invested in a Canon Powershot SX740HS. It wasn’t cheap — it cost more than $500. For a point-and-shoot. (I could trade in my current iPhone and get a brand new one with its latest generation camera for about the same amount of money.)

I got the camera while I was at a state park in North Carolina and went on a hike. I took photos of moss on trees and flowers and birds off in the distance. It had a 40x optical zoom lens! Just what I needed to shoot images of the osprey nesting on channel markers along the ICW.

But every photo looked like crap. It wouldn’t focus right. The exposures were bad. There was no clarity in the details. Images were washed out.

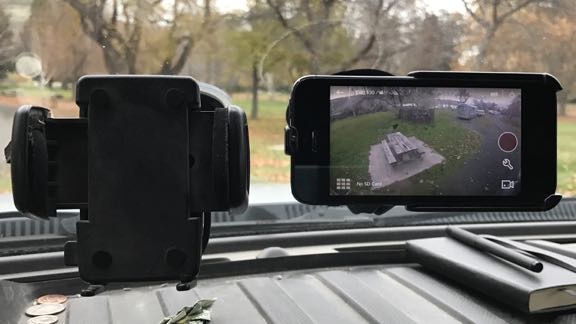
I took photos of a handful of subjects with both the new camera and my iPhone to compare them side by side. Guess which one took better photos?

iPhone Photo Powershot Photo
Side by side photos of the same subject only minutes apart. The iPhone photo is on the left.

Example 2Example 2
I took the camera to the beach. Which photo do you think my iPhone took? Well, which one looks better?

I was upset and kind of angry. Why was my phone taking better photos than a camera?

I put the question to my friends on Mastodon. A few of them pointed out that Apple iPhones do a lot of image processing inside the phone. After all, the phone is a computer, isn’t it? It automatically does HDR and makes all kinds of adjustments.

I could do that too, someone pointed out. Just bring the photo into Lightroom or Photoshop.

But I don’t want to do that. I just want to capture what I’m seeing so I can remember it later or share it with others. I’m not a “serious” photographer anymore. I’m a point-and-shoot photographer. I can handle the composition; I know how to find good light. I just want the camera to record what I see. I don’t want to spend hours processing photographs. It would take all the fun and spontaneity out of it for me. It would leave me wondering, when I was done, exactly what I’d originally seen.

I returned the camera.

I’ll get the Nikon serviced and checked over for problems. They’ll clean it and return it to me. I’ll try again. But I know I won’t be happy. I know that in the future I’ll continue to use the best camera I have — the one that’s always with me and can send the pictures I take to anyone in the world, instantly.

About the BOGO iPhone 8+

How I got conned into getting a second phone and why I don’t mind.

Back in September, when I was on vacation in Washington, DC, I upgraded my old iPhone 7 to an iPhone Xs. It was just under 2 years since my last upgrade, but the iPhone 7 had a tiny scratch on the camera lens. I was facing either $80 to repair a two-year-old phone or $1000+ to buy a new phone with a much better camera. I went with the upgrade.

While I was there at the Verizon store in Union Station, the salesperson excitedly told me that because I was 55 or older, I qualified for a buy one get one free offer on a second phone. “I don’t need a second phone,” I told her. “I’m one person.”

“But it’s free,” she said.

“What kind of phone?” I asked, figuring I could get it and sell it on Craig’s List. “An old flip phone?”

“Any phone we sell that lists for under $1,000,” was the surprising answer.

“And what about using it?” I asked. “Do I have to pay more every month to have it?”

“No, she told me. “Your monthly service cost will be the same. You just have to keep it for two years.”

Red iPhone 8+
It’s pretty and I am partial to red.

This sounded too good to be true, even though I couldn’t sell it right away. The way I saw it, it would be an insurance policy; if I broke my other phone, I could use this one. I was hooked. I picked out a red iPhone 8+, which is known for having a good camera. That’s the big screen iPhone. Too big for everyday use, in my opinion, but what the hell. It was free.

Except it wasn’t. I had to pay sales tax on it. That was nearly $80.

She activated my iPhone Xs and I tossed the boxes for both phones in a shopping bag. I finished my vacation 2 weeks later, packed them in my luggage, and brought them home. I put the boxes on a shelf in my office, never even bothering to take out the red phone.

Fast forward to the other day. After getting a phone call while I was recording a video, I decided it might be nice to use a different camera for all these YouTube videos I’ve been making. I thought immediately of the red phone still in its box. The big screen would make it easier for my 55+ eyes to see what I was shooting. I retrieved it, plugged it in to charge its dead battery, and called Verizon to make sure I could activate it and use it without paying additional fees.

I was on the phone for over an hour with the customer service person. Turns out that the Union Station salesperson wasn’t exactly truthful. Although my bill was about what I expected every month — higher than the old bill but just enough to cover the cost of the $1200 iPhone Xs I was paying off over 2 years — I was paying extra for that new phone. I didn’t know it because I never bothered looking at my bill. Service was $40 each per phone and I’d been paying $40/month since September for a phone in a box just draining its battery.

Imagine how pissed off I was. Maybe you can’t. I can get pretty pissed off. I could feel my blood pressure rise.

She did more research and we discovered that my old plan had been $85/month for my one phone. That included unlimited talk, text, and data. The new plan with the BOGO phone was $60/month for one phone or $40/month per phone for more than one phone. So, in reality, I was paying slightly less for my plan every month with two phones than I had been paying for one phone.

But I would be paying $20/month less if I had just one phone. Still, $20/month wasn’t going to break me. Hell, I hadn’t even noticed the difference.

I thought about the situation I’d found myself in. In my mind, I was basically getting two phones for the price of one. At the end of my two year period, I could sell both phones and come out fine. (I keep my phones in pristine condition with cases and screen covers.) In the meantime, I could use this new phone for video stuff; it had exactly the same plan as the one I was using every day.

To sweeten the deal, the Verizon customer service rep put a $100 credit on my account, basically covering 5 months of what I’d paid ($80/month paid – $60/month what I would have paid with one phone = $20/month).

Of course, I wound up keeping the phone. It was a hell of a lot easier than fighting with Verizon about taking it back. And I really do like the phone for the video work I’m doing. The big screen rocks and the camera quality is better than I need.

But I did learn a valuable lesson: The next time I upgrade my phone, I’m taking my bill along with me and will compare the current bill with the new bill. I’m not going to pay for equipment I’m not using again.

Breathing New Life into Old Hardware

If it still works, why not use it?

Since moving into my home, I’ve been looking for a speaker solution that would allow me to play music or podcasts throughout my home and garage. I did all the wiring for my home, but I (sadly) did not think of wiring it for audio. Repeated Googling and Amazon shopping did not give me the kind of system I wanted: a wifi-based speaker setup that would work with my phone. All I could find was Bluetooth solutions, which were a real pain in the ass — every time I moved out of range, the sound would cut out, sometimes requiring a manual reconnect.

I was on Apple’s website this morning looking for a Homekit-compatible light switch. That’s a whole other story and I’ll try to tell it briefly: I have high ceilings in my living space and my heating ducts are pretty high on the wall. Two of them are actually up on my loft. Heat rises so, in the winter, it gets pretty warm up on the loft (and high up in the living room and bedroom). I have a temperature sensor in the loft that works with a smart plug to turn on a fan there when the loft temperature exceeds 74°F and shut off the fan when it drops back down below 71°F. (It also stays off at night since it isn’t exactly quiet and I don’t want to listen to it when I’m trying to sleep.) The fan pushes the air out into the living room where two standard ceiling fans push the warm air down into the room. It works great and keeps the furnace from running all day long, but I have to manually turn on those two ceiling fans. I want smart switches that’ll use the temperature sensor in the loft to turn them on and off automatically. So that’s why I was at Apple’s website: to see what smart switches they offered.

While I was there, I reacquainted myself with Airplay, which I actually blogged about way back in 2005 when it was called AirTunes. Back in those days, I was writing books about using Mac OS and had to buy all kinds of hardware to write about it. I’d bought an AirPort Express base station and later bought another one. I think I used them for music or printers or both. I don’t remember. It was a long time ago.

Well, I still have both of those old AirPort Express base stations. For a while, I was using one of them for remote printing from my color laser printer, which I kept in my loft. My office is up there now and the printer is directly connected to my iMac so I don’t need the AirPort Express. I started wondering whether I could still use it for speakers.

The short answer: Yes.

Of course, it wasn’t easy to set up. Even though my desktop Mac is now about 6 years old and is running an old version of Mac OS — 10.10.5 Yosemite — the version of the AirPort Utility I needed to configure a 12-year-old AirPort Express would not run on my computer. I even fired up my old MacBook Pro, which is running Mac OS 10.9, and it wouldn’t run on that, either. I knew I’d configured it just a few years ago for the printer and had to do some Googling to remember how I’d done it. That’s when I found the ZCS AirPort Utility Launcher. This free utility fools AirPort Utility v5.6.1 into thinking it’s getting launched on an old version of Mac OS. That gets it running so it can configure the old base station.

An Old Version of AirPort Utility
Here’s AirPort Utility 5.6.1 running on a Mac with the Yosemite OS installed. Both of my old AirPort Express base stations are configured for speaker duty.

Even then I had trouble getting it to see the base station. I had to use an Ethernet cable to connect the damn thing directly to my ACUS router. And reset the base station by pressing in the tiny button with a pen point.

But once the software could see the base station, it configured it without any problems. I had it connect to my 2.4 G network. Then I hooked up a pair of cheap powered speakers that I used to use with my Mac, and got it playing music from my iMac and, later, from my iPhone. Success!

I went down into the garage and tracked down the other AirPort Express. I set it up the same way. I hooked that up to a stereo clock radio in the bedroom that I rarely use. I might even put it by the bed.

I still have an old Time Capsule somewhere; if I can find it, I’ll set it up for the living room and move the Express down into the garage. I’ve got an old boom box down there with great speakers; it should work fine with AirPlay.

Of course, the next hurdle to jump was being able to play music on multiple AirPlay speakers at the same time. After all, I wanted my music all over the house and garage when I was playing it. My phone could only stream to one device at a time.

More Googling. This time, I learned about an Apple iOS app called Remote. I could install it on my iPhone, pair the phone to my computer’s copy of iTunes, and be able to access my computer’s music from my phone. It works. And it sounds pretty damn good coming from speakers all over the house.

I know this blog post makes me sound super geeky. Deep down inside, I am. I especially love taking old computer hardware that most people would have thrown away by now and use it for a new purpose. Sure — I could go out and buy new AirPort Express base stations at a cost of $99 each. But why should I when the old ones I have still work?

My Poor Man’s Backup Camera

If a poor man happens to own a wifi-capable GoPro and spare smart phone.

One of the things I really like about my 2012 Ford pickup is its backup camera. Incorporated into the tailgate, it automatically shows an image on the rear view mirror every time I shift into Reverse. It helps me see what’s behind me in tight spaces or parking lots and, when used in conjunction with the obstacle warning system, makes it impossible for me to hit anything while coming as close as possible to it.

Trouble is, when the truck’s tailgate is off — as it is when I’m traveling with my truck camper (the Turtleback) — I don’t have a backup camera anymore. And when the Turtleback is on board, I can’t see out the back at all.

Clearly I needed a backup camera that would work with the Turtleback.

Commercially Available Solutions

There are some options I could buy to give me the setup I want.

The first is the Lance backup camera, which installs over the back door. The Turtleback was already wired for it, although the camera wasn’t installed. I had to buy the camera and then buy the cable that would connect the camera to my truck or some sort of monitor in the truck. I was spared the ordeal (and cost) of putting this system together by the simple fact that Lance no longer sells the camera. At least that’s what I was told and it works for me.

I could also buy a Ford backup camera just like the one in my tailgate. After spending $800 for that, I’d have to figure out how to mount it on the Turtleback and run the wires to the truck’s existing plug. That would be great because it would work just like my tailgate camera. But $800. And how the hell would I mount something that was designed to fit into a truck tailgate?

There were various wired and wireless options I could buy from various online sources. Prices ranged from $50 to close to $1,000. All of them had one thing in common: they would likely be a bitch to install, the biggest problem being getting power to the camera. This, however, would be the avenue I’d travel if I couldn’t come up with a better idea.

The DIY GoPro/Smart Phone Solution

Camera Mount
The window over the Turtleback’s sink with the GoPro mounted and plugged in. I can close the blinds without disturbing the camera. In this photo, the Turtleback is parked in my friend’s backyard in Arizona.

Reading about all these wireless cameras and receivers reminded me that I already had a wireless camera: my GoPro 3. It also had a suction cup mount that made it possible to mount on the inside of the Turtleback’s back window (so I didn’t have to worry about it falling off or getting stolen when parked). And because I’d had a USB power center installed in the cabinet over the sink (where the stereo is), I could run a power cord to the GoPro to keep it powered all the time, thus enabling me to keep the WiFi feature turned on and ready all the time. That gave me the camera component without spending a dime.

But I still needed a monitor.

Sure, I could use my iPhone and just run the GoPro Capture app every time I wanted to look behind me. But did I really want to deal with pushing buttons every time I shifted into Reverse or just wanted to see what was back there? Not really.

And that’s when I remembered my iPhone 5. I’d sold it to Amazon when I bought my iPhone 6 two years ago. They’d rejected it. There was nothing wrong with it. In fact, it was in remarkably good condition since I’d had a skin on it the entire time I owned it. I tried again. They rejected it again, on different grounds. I called up and complained. They looked at my Amazon purchase history. They saw the thousands of dollars I spend on Amazon every year. And they gave me a credit for the value of the phone. When I offered to send it to them, they told me to keep it.

And it had been sitting in a box inside another box in my garage ever since.

By some miracle, I found it. I charged it back up. And then I set it up to work with the GoPro. Sure enough, the rear view picture was almost exactly what I needed. Certainly close enough.

I poked around in my box of RAM mount parts. I found a suction cup mount and an iPhone 5 cradle and all the other parts I needed to mount the old iPhone over the truck’s dashboard beside the mount I already had for my iPhone 7. Then, because I knew the now 6-year-old iPhone 5 wouldn’t hold a charge as well as a new one, I attached a power cable to it.

The result: a dedicated monitor showing a live image of whatever’s behind the Turtleback.

Backup Camera Monitor
Here’s an example image from my backup camera “monitor.” In this example, I was parked at a campground in Washington. The empty phone cradle to the left of the monitor is the one where my iPhone 7 lives in transit; I was using my phone to take this picture.

All without spending a dime on any equipment I didn’t already have.

Best of all, when the Turtleback is removed from my truck while traveling, I can set up that camera in the truck’s back window to give me some of the same benefits as the backup camera in the tailgate I left home.

Keep in mind that although I’m unlikely to use that old iPhone for anything else, I can grab the GoPro and use it while I’m on my trip any time I don’t need it back there. In fact, I brought an assortment of GoPro mounts and SD cards, as well as my GoPro 3+, to use on my trip.

A Word about Having “Too Much Stuff”

My friends constantly rib me about having too much stuff. After all, they’ve seen my garage and the seemingly countless labeled bins and still unpacked (but labeled) boxes of things I’ve collected throughout my 50+ years of life.

But there’s a lot to be said about having all this stuff and this blog post offers a perfect example. Because I kept that old iPhone, I had an easy monitor for my camera solution. And because I had later model GoPros with wireless built in, I had an easy camera setup. And because I had that old RAM mount stuff, I was able to put together a solid and reliable mount for my monitor.

In other words, this solution cost me nothing because I already had all the components I needed. And I had those components because I don’t throw much of anything out if there’s any possibility I might be able to use it in the future.

So yes, I have a bunch of labeled bins with old electronic equipment in it. So what?

It’s what made my poor man’s backup camera possible.

An(other) Apple Maps Fail

This example was so outrageous, I had to share it.

I spent last weekend in California with friends. (Blog post to come, eventually.) On Friday, they needed to take care of business in the Folsom area. We decided to have lunch while we were out.

My friends are not smartphone people, although one of them does have an iPod Touch that she uses with various apps on WiFi. In an effort to show how useful a smartphone could be, I used Apple Maps and my preferred navigation app, MapQuest, to navigate to their primary destination. It worked like a charm.

Google AppAfterwards, I used the Google Search app to perform a voice search (on my iPhone 4; no Siri) for “restaurants serving breakfast in Folsom California.” The app understood me perfectly and displayed a list of results. We decided on the Sutter Street Grill. The entry for the restaurant included its address as a link, as you can see in the screenshot. I tapped the link to view the location in Apple Maps.

Apple Maps ExampleAnd that’s where things got weird. It showed me the location on the map, but no matter how far I zoomed out, I could not see the dot representing our current location. And then I realized that the body of water on the map was a lot bigger than the lake we’d driven by.

Apple Maps ExampleI tapped the arrow beside the location on the map. And that’s when I discovered that the map was showing us a location in New Zealand.

Here’s where I see a problem. I’m in California. The phone knows I’m in California. Yet when I tapped the address, it displayed a location on the other side of the planet.

And no, the location wasn’t incorrect in the link — although the street name does not include the word “historic.” For some reason that I can’t understand, Apple Maps decided to display 811 Sutter Street in Canterbury Seaview, New Zealand, 7,111 miles away, instead of the 811 Sutter Street that was less than 5 miles away.

Come on, Apple. Firing people isn’t going to fix the problem. Let’s get down to business and make this app work right.

By the way…the restaurant was great!