Again, but this time with video.
The initial call about the January photo gig at Lake Powell came in December through one of my Russian connections. Apparently, two Russian businessmen who were attending the Consumer Electronics Show (CES) in Las Vegas wanted to photograph the Lake Powell area from the air. They were willing to pay me to fly up to Lake Powell from Phoenix and make at least two flights totaling 3 to 5 hours.
Trips like this are extremely costly — after all, the client has to pay for 4 hours of flight time just to get me up there and back — and I honestly didn’t expect it to happen. But a week before the chosen dates — January 12-13 — I got the green light and the all-important credit card number I needed to get paid for that 4 hour repositioning flight plus a standard overnight fee to cover my expenses and compensate me for my time away from home.
The Gig
 I admit I wasn’t looking forward to the gig. The two photographers claimed to weigh 242 pounds (converted from kilos) and I knew they likely weighed more fully dressed and carrying camera equipment. I calculated the weight and balance as soon as I had this information and discovered that I’d have to strip all non-essential equipment out of the helicopter to lighten it up so we could take enough fuel for 2 hour flight segments (plus FAA-required reserves). Anything that was left on board would have to be shifted from under my seat to under the seat behind me, just to shift weight backwards. Having two fatties — yes, including me — up front would make us front-heavy. Having two fatties on the left side would make us heavy on that side. But even after adding 15 pounds of weight for each of them, I confirmed that’d be in balance with 2/3 fuel or less on board.
The other thing that bothered me was weather. Page, AZ was having unseasonably cold weather with daytime highs barely getting above freezing. Flying a helicopter with two doors off guarantees plenty of outside air inside the cabin and no amount of heat is going to win against 30°F outside air. So not only did I have a bit of a challenge ahead of me with a listing (but still within acceptable CG) aircraft to fly, I’d likely be freezing my ass off.
As far as the helicopter goes, I wasn’t worried about the cold weather affecting operations. My R44 Raven II is fuel injected, so carburetor ice is not an issue. I’d flown it in cold weather before and it was always peppy — once I got it started. In fact, that was my only real concern: Lake Powell photographers usually want to get off the ground at dawn for morning flights and with overnight temperatures under 20°F, I worried a bit about getting the helicopter started for its morning flight.
But the gig did have one big thing going for it: at least 4 hours of revenue time. And if there’s one thing I’m interested in, it’s getting paid to fly.
The Flight Up
Lake Powell is about 200 nautical miles north of the Phoenix area. Since my clients were paying for a 2-hour flight, my goal was to make it there in two hours. That meant flying as close to a straight line as I could.
 Using Sky Vector, I plotted a course from Phoenix Deer Valley Airport (KDVT) to Page Municipal Airport (KPGA) with only one waypoint in between: the Little Colorado River Gorge (LCRG) on the east side of Grand Canyon’s Special Use Airspace. I wrote down the coordinates for the LCRG to punch them into my GPS — a recent GPS battery change had wiped my user waypoint list clean. The flight path would take me north along the east side of I-17, crossing it just before it dips down to Camp Verde. I’d cut across the Verde Valley between Sedona and Cottonwood, then climb the Mogollon Rim west of Sedona, pass east of the restricted area for the Navajo Army Depot, west of Flagstaff, and west of the San Francisco Peaks, the tallest mountain in Arizona. From there, I’d drop back down into the Navajo Reservation, flying over its western edge, hop the Echo Cliffs, and drop back down to Page, AZ.
And that’s mostly how it all came off.
I departed Deer Valley at about 8:45 AM under partly cloudy skies with little or no wind. It was a cool morning, with temperatures just climbing through the 50s. I crossed Deer Valley’s runways at 2000 feet MSL as required by the Tower there and got right on course, aiming for the LCRG waypoint I’d added to my GPS.
It was interesting and different to fly a straight line route through an area I knew so well. After all, I’ve been flying from the Phoenix area to Sedona, the Grand Canyon, Flagstaff, and Lake Powell for years, so it’s not as if the area I’d be flying over was new to me. But I usually fly with passengers on board and, to make the flight more interesting, I fly over or past various points of interest, such as towns, highways, mine sites, and canyons. On this flight, speed was the goal — I wasn’t interested in scenery. But I got scenery anyway — how can you fly a helicopter through Arizona without seeing something spectacular every mile?
As I flew, my GoPro Hero camera recorded a 720p widescreen video of the flight. Mounted up front, it offered an unobstructed view of everything ahead of me. The wide angle lens brought in details of what was close while pushing back distant points. Later that night, I’d watch much of the 2 hours of video and remember the various points of the flight.
 What fascinated me was the way the light changed throughout the flight. At first, it was partly cloudy. Then the sun slipped behind the clouds and it was cloudy. Then the sun began to break through, speckling the mountainsides with light. This still image, captured from the video, gives you an idea of what I mean. The light changed numerous times over the two-hour period of the flight — at one point, clouding over completely only 1,000 feet above me — giving the illusion that the flight was conducted over multiple days.
It wasn’t just the light that changed, of course. It was also the terrain. Flat desert in the Phoenix area, soft mountains studded with saguaro cacti as I headed north, flat mesas with steep basalt sides, deeply carved canyons, wide valleys, red rock cliffs and hoodoos, alpine forests blanketed with snow, tall mountains, ancient cinder cones, flat “painted” desert, deep gorges, buttes, uplifted cliff faces, slot canyons. I saw it all over the course of my two hour flight — all without trying to see it. My nearly straight line course simply put me over the top of all these things. I sat comfortable and warm in my seat, admiring the view as I glided over it.
Glided is definitely a good word. There was hardly a breath of wind during the entire flight so it was amazingly smooth. A pilot’s dream. And although outside temperatures dipped as low as -5°C, I was cosy and warm with the heat up only about halfway.
 One of the highlights of the flight was crossing the red rock cliffs west of Sedona and climbing up over the Mogollon Rim. The light was absolutely perfect, breaking through light scattered clouds to illuminate the rocks with a soft golden light. Absolutely breathtaking and the GoPro camera captured the whole thing.
Beyond that was a surprising amount of snow and a light overcast layer that shrouded the top of the San Francisco Peaks. The temperature there was around 0°C, but the Flagstaff ATIS reported -5°C — a real thermal inversion only 10 miles east. The low cloud layer and dimly lighted snowfields made me feel claustrophobic. Ahead of me, it looked as if some precipitation could be falling from the clouds. That got me a bit worried about icing, but I continued on. By the time I got to the point I thought I’d seen rain or snow falling, it had stopped — and so did my worries.
The only surprise on my flight was upon reaching the GPS coordinates for the LCRG. Simply said: it wasn’t there. It was about 10 miles northwest of where I’d plotted it to be. I can only assume that I’d punched in a wrong digit when I entered the waypoint into my helicopter’s GPS. So rather than fly over its most dramatic point, I crossed a bit to the east and kept going. I deleted that waypoint so I wouldn’t depend on it again. Oddly if I’d made a serious mistake in the entry, I would have noticed it a lot sooner. But because it was only off by a little bit, it wasn’t until I passed the waypoint that I realized the error. I’ll definitely be more careful in the future.
 When I got to the empty expanse of the Navajo Reservation, I dropped down and flew low over the ground. There were few homes in the hundreds of square miles and only a handful showed signs of life. In the video, my helicopter’s shadow is clearly visible: small when I’m flying higher and larger when I’m flying lower. The video makes it seem as if I’m going much faster during this portion of the flight, but I’m not. I managed to keep a steady 100-110 ground speed for most of the flight. It’s just an illusion: the closer the camera is to the ground, the faster I seem to be flying.
I crossed over the Echo Cliffs at Cedar Ridge — at least I think that’s where I was — and sped across more of the Navajo Reservation north. In all, I think about 45 minutes of the flight was spent over the Rez. It’s an amazing land of stark beauty, sprinkled with traditional homesteads, more modern yet simple homes, and, on its far western reaches, the ruins of abandoned homesites clearly visible as rock rings and corrals. The traditional Navajo home is a round or octagonal building called a hogan and they are clearly visible from the air. Also visible on most days are livestock such as cattle and sheep and wild horses.
I descended down toward the lake, flying at a low enough level that I didn’t actually see its clear blue water until I was about 15 miles out. Of course, I could see other landmarks — notably the bulk of Navajo Mountain about 50 miles to the east of Page and the Navajo Power Plant, with tall stacks belching ugly smoke into the air just outside of town. The radio frequency was silent as I descended toward the airport. I lined up with the taxiway and set down on one of the helipads.
The Video
Later, after doing 3.4 hours of photo flying around the lake and points east, I watched the video shot by my GoPro Hero. It was probably some of the best footage I’d ever captured with the camera. My only regret was that I hadn’t shot in in 1080p.
Over the course of two days, I assembled a movie from seven-second clips shot during that two hour flight. Last night I added titles and music. I exported it for my iPad and uploaded it to YouTube. Here it is. Enjoy.
 Here’s proof. I was distracted by a tweet that took me to Amazon.com and was further distracted by a “Lightning Deal” offer for the Garmin nüvi 500 GPS. Here’s the deal as it appeared on Amazon.
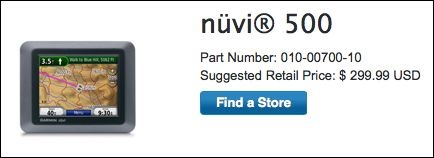 What did I discover on
  And the deal isn’t so sweet when you look at Amazon’s regular (not “Lightning”) price: $232.38. Now you’re saving only $67 or 22% off retail price, despite the fact that Amazon claims you’re saving $267 or 54%.
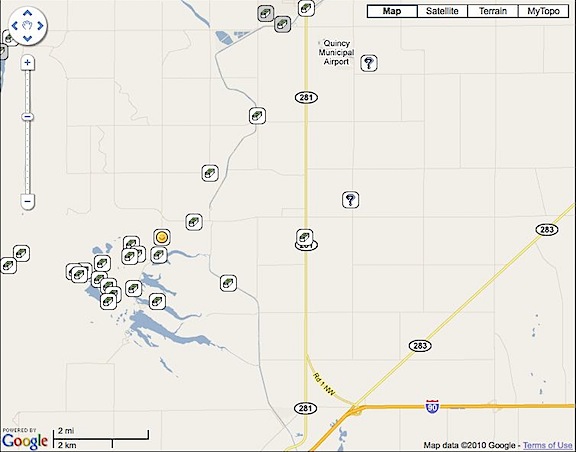
 Hold down the Control key and click right on the spot you want the coordinates for. A menu pops up. (You may be able to simply right click, but I’ve had limited success with that on my Mac using Firefox; Control-click always works.)
 Above the map area, in the blue bar, click the Link button. A window appears with two text boxes in it. The contents of the top text box, which are selected, includes a link to the map that you might paste into an e-mail message. It also includes the GPS coordinates, which I’ve indicated with a red box around them. Sometimes the GPS coordinates are not so obvious and you’ll need to scroll through the contents of the box to find them.
 I had a