Making Greek Yogurt

It’s easy and it just makes sense.

I eat a lot of yogurt. I like yogurt for breakfast — especially with granola — and yogurt for snacks. I eat salad dressing with yogurt in it, enjoy frozen yogurt, and sometimes even eat flavored yogurt for dessert.

I buy plain, non-fat, Greek yogurt. Greek yogurt is basically the same as regular yogurt but with a lot of the excess whey removed. You know what whey is if you’ve bought yogurt or cottage cheese or ricotta in a large container and used only some of it: it’s the liquid that accumulates at the top after you’ve scooped some out.

Greek yogurt is more properly known as strained yogurt and is also called yogurt cheese or labneh. You can read more about it on Wikipedia.

Not All Greek Yogurt is Created Equally

Creamy, delicious Greek yogurt has become wildly popular. Unfortunately, that’s causing a serious environmental problem: an overabundance of whey, the by-product that must be discarded. As this excellent article about the problem in Salon mentions, there’s 2-3 ounces of whey for every ounce of Greek yogurt produced. This video explains the problem and potential solutions:


A quick video explains the problems with mass-produced Greek yogurt and some possible solutions.

The article also suggests that you can help the environment by making your own Greek yogurt (instead of buying it) and using the whey that’s produced in your own kitchen and garden.

What some Greek yogurt makers are doing to circumvent the problem is “faking” Greek yogurt by adding artificial thickeners. The article, “Greek Yogurt: What’s Real & What’s Not,” lists the actual ingredients of many popular plain Greek yogurts. You might be surprised to learn that your favorite creamy yogurt is made that way by the addition of thickeners like corn starch and gelatin. This is covered in articles like “Greek Yogurt Wars: The High-Tech Shortcuts vs. The Purists” on The Kitchn and “High-Tech Shortcut To Greek Yogurt Leaves Purists Fuming” on NPR’s The Salt.

Real yogurt should have just two ingredients: milk and active yogurt cultures such as S. Thermophilus, L. Bulgaricus, L. Acidophilus, Bifidus and L. Casei.

I don’t know about you, but when I buy yogurt, I’m not interested in buying corn starch and gelatin. Take-away lesson: Read the ingredients list and make sure you’re paying for what you really want.

Or make your own.

The Recipe

My wasband wasn’t a big yogurt eater, but he told me, time and time again (as we often do in long-term relationships) that his Armenian grandfather used to make his own yogurt. I was kind of impressed, mostly because I thought it was difficult to do. That’s until I stumbled onto a recipe posted by my friend Tammy on her blog. I tried it and had immediate success. Since then, I make about half the yogurt I eat.

Tammy’s recipe can be found here. It’s got lots of photos with the step-by-step instructions. I find myself searching for the recipe time and time again; for some reason I can’t remember the important temperatures. So I’ve decided to put the short version here, mostly for my own reference. I recommend you stop by Tammy’s site and read it there before you try it. And then leave her a comment telling her about your results. I think she’d like that. (Most bloggers do like comments.)

Tools:

I don’t usually include a Tools section in my recipes, but there are four that you must have (beyond what you might expect in a recipe):

  • Thermometer. I use an instant read meat thermometer. It needs to go up to at least 200°F. Temperature is extremely important in this recipe, so don’t try it if you can’t take an accurate temperature reading.
  • Whisk. I have a plastic whisk, but that’s because I use non-stick cookware. A regular metal wire whisk should be fine.
  • 2 1-quart mason jars with tight-fitting lids. Even if you don’t can your own foods, you really should have a few of these around your kitchen.
  • A small cooler taller than the jars. Make sure it has a tight-fitting lid.

Ingredients:

  • 1/2 gallon non-fat milk. I used to make this by the quart, but when I started “Greeking” it (see below), the yield was lower so I started making 2 quarts at a time.
  • 1/4 cup real plain yogurt with active yogurt cultures. Did you know that not all yogurt is just yogurt? I discuss that above, in case you skipped it to get to the recipe. I recommend the following Greek yogurts: Chobani, Dannon Oikos, Trader Joe’s, Athenos, and Stonyfield. If not using Greek yogurt as a starter, check the ingredients list to make sure the only ingredients are milk and yogurt cultures. This quantity, by the way, is more than Tammy uses. Let it get to room temperature.

Instructions:

  1. Heat the milk to 190°F, stirring occasionally. I do this in a microwave. I have a huge glass measuring cup that holds 1/2 gallon. I put it in the microwave and heat it on high. In my current microwave, it takes 20 minutes to get to 190°F. I know this by repeated temperature readings as I heated it. (My old microwave in Arizona had a temperature probe, which was probably its best feature — and definitely the reason I packed it when I moved. I’d put the probe in the milk, tell the microwave I wanted the milk at 190°F, and it would simply stop zapping when the temperature reached 190°. I’m looking forward to installing it in my new kitchen — despite the fact that it’ll be nearly 30 years old by then.) Of course, you can always do this in a pot on the stove.
  2. Remove the milk from the heat source and allow to cool to about 120°F. I do this by letting it just sit on the stovetop.
  3. In a small bowl, mix about 1/4 cup milk with the 1/4 cup yogurt. This smooths out any lumps and makes it easier to blend with the rest of the milk in the next step.
  4. Whisk in yogurt/milk mixture in to the rest of the milk. Mike sure it’s blended well, but try to minimize bubbles.
  5. Pour the milk mixture into the mason jars. Fill them to the very top. Then close them up tight.
  6. Place the mason jars into the cooler and fill the cooler with the hottest tap water you can get out of your sink. My water heater delivers 130°F water in my kitchen, which is just a tiny bit too hot for my hands — but otherwise perfect, in my opinion. Fill to the very top of the jars, almost so they’re floating in it.
  7. Cover the cooler tightly and set aside for 6-8 hours. When I made this in Arizona in the spring and autumn, I used to set it outside on the patio in the shade. In the winter, it stayed inside. The idea is for the water (and milk) to cool slowly.
  8. Remove the jars from the cooler and discard the water.

At this point, the jars should contain yogurt. You can pop them in the fridge to enjoy at your leisure or “Greek” it.

“Greeking” the Yogurt

My only gripe with Tammy’s recipe — or at least the way it usually came out for me — was that the yogurt tended to be very runny. I don’t like runny yogurt.

I started making yogurt right around the time I discovered Greek yogurt. I actually stopped making yogurt because I preferred Greek yogurt and didn’t know how it was made.

Then I did some research and discovered that all I needed was one more step: strain out the extra whey.

Greek Yogurt Maker
You can get this nice Greek yogurt maker for about $22 on Amazon.com.

While you could do this with cheesecloth in a strainer and make a big mess on your countertop or in your fridge, I went online to Amazon.com and bought a gadget: a Euro Cuisine Greek Yogurt Maker.

To “Greek” your homemade yogurt, add these steps to the recipe above.

  1. Refrigerate the yogurt. I suggest overnight to really chill it down and give it as much substance as it can get on its own. Just put the jars in the fridge.
  2. Empty the yogurt into a strainer lined with cheesecloth or a nifty Greek yogurt maker like the one I bought. If using a strainer, you’ll want a bowl beneath it to catch the whey.
  3. Straining Yogurt
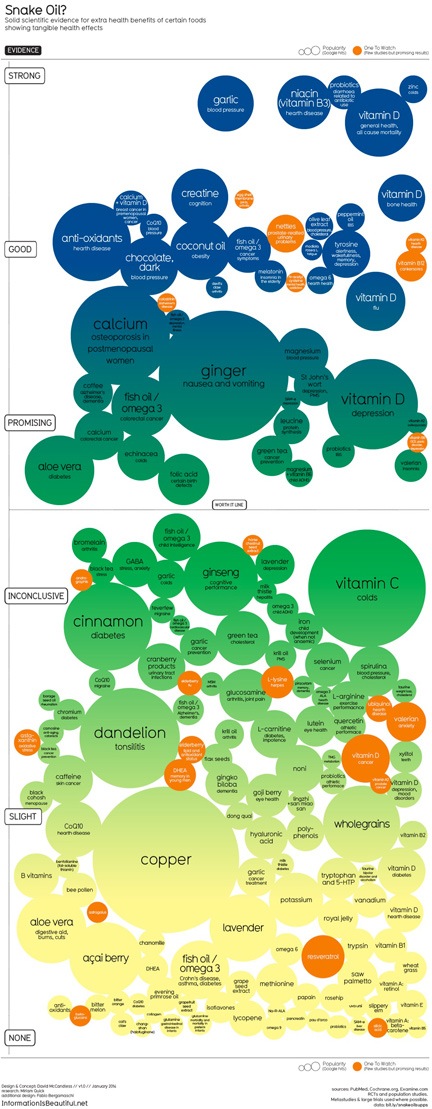
    This yogurt has been straining in my refrigerator for about 90 minutes. The yellow liquid is whey.

    Let strain for 2-4 hours, preferably in the refrigerator. The amount of time you allow it to strain will determine how thick the yogurt is. I have, in the past, forgotten about it and let it go overnight. The resulting yogurt was too thick, almost like cheese.

  4. Remove the yogurt from the strainer and place it into a container you can seal. I use (ironically) old yogurt containers.
  5. Give the yogurt a good stirring. This will smooth out any lumps and make it creamier.
  6. Store in the refrigerator. Obviously.

The removal of the whey should cut the total quantity of yogurt in half.

If you’re wondering what to do with the whey, this page has some excellent suggestions. I give it to my chickens and blend it with water for my tomato plants. I also, on occasion, make it into ricotta. As you might imagine, its very high in calcium but supposedly tastes very bad on its own. I’ve been too cowardly to try it.

Cost Considerations

One of the most mind-blowing things about making my own Greek yogurt is the cost savings. Yesterday, I spent $1.69 on half a gallon of skim milk. I already had yogurt for the starter and can use the yogurt I made for the next starter, so there’s no additional cost. This half gallon of milk will yield about a quart of Greek yogurt.

The last time I bought Greek yogurt, it cost $5.89 for a quart. So I’m saving more than $4 every time I make it instead of buy it. With two quarts a week — my average consumption — that’s $416/year saved.

And you know what Ben Franklin said about saving pennies…

Flavoring Yogurt

I have two things to add here.

First, a while back when I posted on Facebook about making yogurt and included a photo, one of my friends commented to ask, “When do you add the flavor?” Well, there’s no reason to add flavor because yogurt already has flavor. It’s yogurt flavor.

However, if you like to add flavor, you can always mix in some honey or a spoonful of your favorite jam or preserve. I like apricot, which I keep around mostly for a condiment on grilled pork.

And that brings up my second point, also from Facebook. A friend posted an image of a bowl of yogurt with fresh strawberries on top of it. Her caption: “This is how you flavor yogurt.”

Yes, fresh fruit is the best way to do it. Don’t add sugar; add more natural ingredients. It’s more healthy for you and it really is quite tasty.

What do you think?

Do you make your own yogurt? Do you think it’s worth the time?

Share your tips, thoughts, and recipes (or links to recipes) in the comments for this post.

View to a [Chicken] Kill

Not quite as gross as I expected it to be.

One of the things about living in farm country is that there are a lot of farmers around. I’m not just talking about the folks who grow corn or soybeans or even the cherry trees that originally brought me here in 2008. I’m also talking about people who raise cows and chickens for milk and eggs and meat.

I ran into an acquaintance at the local Coastal Farm and Ranch store about a month ago. I was looking for a chicken fencing; he was buying a ton of feed for meat chickens. We chatted about our chickens, ending up with an offer to buy some freshly slaughtered birds the next time they killed. I ran into him and his spouse again a week later and placed my order for two birds — which is about all I can fit in my RV’s tiny freezer. I asked if I could come watch them slaughter the chickens and was told I could. I wasn’t sure how I felt about it, but I suspected it would be, at the least, very interesting to see.

I was invited to their next slaughter, but had to turn down the invitation because of a scheduling conflict. (I spent that day in Woodinville, wine tasting with a hard cider maker friend. I really need to blog about that excellent day.) But they slaughtered again on Saturday morning and I made it my business to attend.

First came a tour of the facilities. The birds live in a relatively spacious pen beneath a deck. All my non-farming friends talk about “free range” — this is about as free as these birds want to be. They basically do four things: eat, poop, sit, and sleep. They are not interested at all in wandering around, pecking at the ground and doing bird things.

This could be because of selected breeding. Meat chickens are bred to grow quickly. The birds in the pen were 6 to 8 weeks old and ready to slaughter. They were huge — far bigger than my 7 week old laying chickens — and downright lazy. They just sat around in the shade and seemed perfectly happy about it. Melanie, who’d invited me that day, said that if they don’t slaughter them now, they’d likely die of heart attacks within the next few days. She’d already lost two of them that week. These chickens are not bred for longevity.

We talked about “free range” and she confirmed what someone else had told me: if given access to a large open area, these chickens would do the same thing they were doing right then: nothing. It would be a waste of space. They’d tried it and had seen for themselves.

I can actually confirm a bit of this. My 7 laying chickens have a 9 x 25 enclosure and they spend most of their time either in their coop or in the shade of some straw bales stacked up outside their yard.

Melanie gave me a quick rundown of the process. Rather than just narrate, why not look at the photos I took and read the captions?

Carrying the Chickens  Carrying the Chickens
Al was in charge of fetching the chickens from the pen. He took one or two at a time. He said he talked softly to them as he caught and carried them, telling him that he was sorry but that they were going to taste good. And before anyone freaks out about him carrying them by their feet, that’s actually how it’s supposed to be done to calm them down.

Chicken in Cone Chicken in Cone
Al placed each chicken head down in what’s commonly known as a killing cone suspended over a large basin of water. After a few minutes, the chicken relaxes enough to let its head through the bottom of the cone.

Slit throat
Next, Dennis stepped up with a very sharp knift, grabbed the chicken’s head, and slit its throat.

Draining Blood
The blood drained from the chickens into the bins of water. Although the chickens died very quickly — this is supposedly the most humane way to do this — they often had muscle spasms that made them jerk around inside the cones. That was probably the worst part of this whole thing — seeing those dead chickens move as the blood drained from them.

Dipping Chickens  Dipping Chickens
When the chickens stopped moving and the blood had sufficiently drained, Al took them, one at a time, to a vat of very hot water to loosen the bird’s feathers. The water had to be an exact temperature: too hot and the skin would split when the feathers were plucked; too cool and the feathers wouldn’t come off. He dunked each bird 3 times, swirling it around in the water before taking it back outside.

Off with their heads!
Back at the butchering table, Dennis used his sharp knife to cut off the chicken’s head.

Into the plucker  Plucking Chickens
Then Dennis dropped the bird into the chicken plucker and turned it on. This machine has a bunch of rubber-covered fingers that pull the feathers off the bird as it bounces around inside. The process takes less than 10 seconds and splashes quite a bit, so I couldn’t get a decent photo of it.

Ready to Butcher
The chickens emerge with only a few feathers left, all ready to be butchered.

Ready to be butchered
Jill and her husband did the butchering, using sharp knifes and cutting boards on a stainless steel restaurant sink. The feet are cut off first.

Getting out the Guts
Next, they open up the chicken’s bottom end, reach inside, and scoop out the innards. (This part is pretty gross.)

Chicken Guts
They saved the hearts and gizzards — for the dogs, I think — but threw away the rest of the guts, including some really excellent livers that my mother-in-law would have killed for. (People outside of the NYC area don’t seem interested in chicken livers.)

Washing Chickens
There was lots of washing with fresh, cold water. Afterwards, the chicken was put into a large plastic container filled with ice water. It stayed there for about 15 minutes before being transferred to another plastic bin of ice water.

Packaging
Melanie’s job was to pull off any remaining feathers and exterior fat, pat the chickens dry, and then vacuum seal it. From there, it went right into a freezer.

We started work at about 9:30 AM and, when I left at about noon, 25 birds had been slaughtered. Melanie was almost done packaging them. It was a lot of work.

I got to take home one fresh bird and one frozen one from the last slaughter. I cooked up the fresh one on my Traeger grill and it was good — although I have to admit that it wasn’t quite as good as I expected.

Grilled Chicken
Looks yummy, no?

It tasted like chicken.

Would I do this again? I can’t see any reason to. And although I might buy chickens from Melanie and company in the future — mostly to support local farmers — I don’t think I’d stop buying store-bought chickens.

California Strawberries

Sweet, with bittersweet memories.

Strawberries
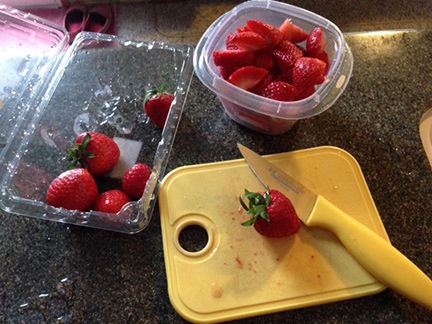
This morning, as I cut up some fresh, ripe California strawberries for breakfast, I found myself thinking back to April days in the late 1980s.

Back then, I worked as an Internal Auditor for ADP. Each spring, in April, they’d send a team of us — usually 3 or 4 auditors — out to their La Palma, CA location. In those days, I lived in New Jersey with the man I’d later marry and a three-week trip to California at the tail end of winter was like a gift from heaven.

They put us up in the Embassy Suites (now a Radisson Suites) up the road from Knotts Berry Farm, each in our own suite. (Back in those days, a “suite” was really two rooms.) Great breakfast every day, happy hour every evening. We really got to know the staff and used to party with them once in a while. There was one rental car for each pair of us, so ground transportation was not a problem. 9 to 5 at the office a few miles away, then on our own with expense accounts for R&R in the evenings.

There was a set of high tension power lines running alongside the hotel’s property. And there, under the power lines, they farmed strawberries.

That’s not the only place, of course, Fresh local strawberries were all over southern California in April. Strawberry shortcake in every restaurant. I especially remember a place near Disneyland in Anaheim. My brain keeps telling me it was called Carroll’s, but I can’t find it in Google. We joked that it was Paul Bunyan‘s restaurant — the portions were enormous. Even the flatware was huge — a soup spoon could not fit in my mouth. The strawberry shortcake there could feed a whole table of people.

On weekends, we had the option of sticking around or using our hotel allowance to pay for lodging elsewhere. One year, I met up with fellow auditors working in the San Francisco area for a trip to Lake Tahoe where they skied and I sipped spiked hot cocoa. Another year, we went to La Jolla and stayed in a hotel on the coast with a trip into Tijuana.

The trips to California were three weeks long and we were given a choice: fly home one of the two weekends or have someone from home fly out to California. Each year, my future wasband would fly out on the second weekend. (That was back in the days when he preferred to spend his vacation time with me rather than with his mother.) We’d do something fun together over the weekend and then he’d spend the week goofing off while we worked, taking the rental car to explore the area. He saw the Spruce Goose and Queen Mary, drove up the coast, and did all kinds of things during his free vacation. At 5 PM, he’d be back in the parking lot with the rental car to pick us up.

When the job was over, I’d take my vacation, tacking a week on to the end of the trip. One year, we drove out to Death Valley and Las Vegas. Another year, we explored Kings Canyon, Sequoia, and Yosemite National Parks. We’d car camp — he’d bring our camping gear with him in a big duffle bag — and explore. They were some of the best vacations I had, visiting beautiful places with the man I loved, back when he seemed more interested in the beauty of the world around us and having fun than buying expensive cars and other assets he didn’t need and couldn’t afford. Best of all, the trips were remarkably affordable with the airfare for both of us covered by my employer.

When I moved out of my Wickenburg home last year, I left behind the photos I took on those trips. They’re in photo albums of prints painstakingly laid out afterwards to share with family and friends. I wanted to forget that part of my life and the man, now dead, who I shared it with. But too many memories survive, even without the photos.

And they can be triggered by something as simple as the look, smell, and taste of fresh, ripe strawberries from California.

Crock-Pot Beef Soup

Easy recipe for a winter day.

I love Crock-Pot® — or, more generically, slow-cooker — cooking. There’s nothing like throwing a bunch of ingredients in an appliance, covering it, turning it on, and coming back 6 to 10 hours later for a delicious meal. Best of all, the aroma of that slow-cooked meal permeates your home, greeting you quite pleasantly when you get back from a long day at work or play.

True story: a few weeks ago, I had to make a trip down to Goldendale for some business. it’s a 3-1/2 hour drive — each way. I set up a slow-cooker before I left at 7 AM and completely forgot about it. On my way home that afternoon, I thought about what I could cook for dinner without having to stop at the supermarket. When I turned the key in the door and pushed it open, I smelled the lovely aroma of the chicken soup that had been cooking all day and actually thought to myself, “What did I make yesterday that smells so good today?” I was actually stepping into the house when I remembered the slow cooker-meal waiting for me. What a reward at the end of a very long day!

Anyway, I was in the supermarket Sunday and found some very meaty “soup bones” in the meat department. Remembering the excellent beef soup I’d made last winter in Arizona from similar “soup bones” in my chest freezer from a half cow we’d bought the previous year, I decided to whip up a batch here. But rather than put it on the stove, I pulled out the slow-cooker. Here’s the recipe I used.

Ingredients

  • 3-4 pounds of very meaty beef soup bones
  • 3 carrots, cut into 2-3 inch lengths
  • 2 stalks celery, cut into 2-3 inch lengths
  • 1 medium onion, sliced
  • 4 cloves garlic, peeled and halved
  • 1 teaspoon salt. You might want to put more; I’m trying to limit my salt intake. Remember; you can always add it later.
  • 1 teaspoon fresh ground pepper. Is there any other kind?
  • 1 tablespoon Herbs from Provence. The prepared blend I used includes chervil, basil, rosemary, tarragon, garlic, lavender, marjoram, savory, thyme, and parsley.
  • 3-4 cups water

Root vegetables also work well in this recipe, although I never use potatoes because I’m trying to avoid starches.

Instructions

  1. Place beef bones at the bottom of a slow-cooker.
  2. Spread vegetables on top of beef.
  3. Sprinkle salt, pepper, and herbs on vegetables.
  4. Beef Soup
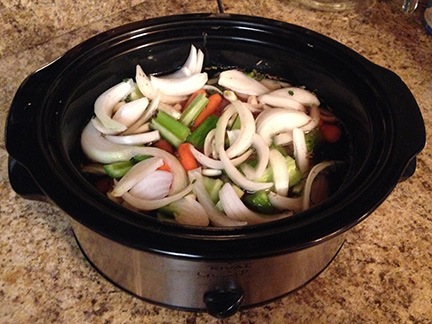
Pour enough water over slow-cooker contents to barely cover them. In the slow-cooker I’m using, that was just over 3 cups.
  5. Cover the cooker and set to high.
  6. When the cooker contents start to boil or simmer, set to low. If it never starts to boil, that’s okay. It really depends on the slow-cooker. If you need to go out for the day, just set it to low before you leave.
  7. Cook all day. I’m thinking at least 6 hours to tenderize the beef and bring out the flavors of the meat and vegetables.
  8. Remove the beef bones from the soup and allow to cool enough to remove meat pieces from them.
  9. Cut the meat as necessary and return it to the soup.

Serve piping hot with crusty bread.

Again, I’m watching my carb intake so I’ll be skipping the bread. I’m also avoiding pasta. But noodles or orzo would be really good in this recipe. Cook it separately and add right before serving.

This should make enough soup for at least 4 people. I use plastic containers to freeze leftover soup in single-serving portions. I can then pull out a container and heat up a nice hearty meal any time.

One more note: If you expect to be pressed for time on the morning of the day that you’ll be making this, you can put all ingredients except the water into the slow-cooker insert the night before and store it, covered, in the fridge. Then put the insert into the slow-cooker first thing in the morning, add warm or hot water, and turn it on high. Be sure to set it down to low before you leave for the day.

Snake Oil Supplements?

An amazing infographic about the tangible benefits of popular supplements based on scientific evidence.

Snake Oil Supplements?
This is a greatly reduced version of the static image dated January 2014. Don’t strain your eyes to study this — go here to see the full sized image.

Fellow author Tom Negrino shared a version of this infographic on Facebook the other day and I’ve found myself going back to it over and over to study the data it presents.

The presentation of the data is pretty straightforward. In each bubble is the name of a supplement and the condition the bubble represents. (If both aren’t listed in the static graphic, try the interactive version; point to a bubble to expand it.) The size of the bubble indicates the popularity (based on Google hits) for the supplement/condition combination. The location of the bubble determines the amount of scientific evidence to support the supplement’s effectiveness for the paired condition — the higher up in the image, the more evidence exists.

So, for example, fish oil/omega 3 appears several times on the chart. in the “Good” area, it’s paired with cancer symptoms, meaning that there is good evidence that it is effective against cancer symptoms. Near the “None” area, it’s paired with Crohn’s disease, asthma, and diabetes, meaning that there is no good evidence that it is effective against these conditions. You’ll find this particular supplement in other areas of the chart, too — I’ll let you explore those for yourself.

Why This Matters

Too many people are relying on supplements to help them with real health problems. They read something online or get advice from their “alternative medicine practitioner” with recommendations and they spend lots of money on pills and powders and liquids at health food stores, hoping to avoid real doctors and real medicine. They think they’re saving money and keeping “big pharma” from getting even bigger. But if they’re using supplements for conditions at the bottom of this infographic, they’re basically throwing their money away.

And that bothers me.

It’s nice to see the research presented in such a user friendly way. Best of all, as the main page for the latest version of this graphic says:

This visualisation generates itself from this Google Doc. So when new research comes out, we can quickly update the data and regenerate the image. (How cool is that??)

So we can expect to see this image modified as time goes on. In fact, you can see previous versions of it on the site if you poke around enough. (Tom, in fact, originally posted an older version that was embedded on another Website.)

Why You Should Care

Now I know some readers are going to push back against this data, possibly with anecdotes about how copper or acai berry or slippery elm helped you or your friend or your sister-in-law’s cousin overcome some ailment. You’re also going to say something like, “It can’t hurt to try, can it?”

You’re wasting your time with such an argument here. I don’t put supplements in my body for a specific problem without scientific evidence that it might actually work. I don’t throw away money on unproven remedies when proven remedies are available.

You probably shouldn’t either.

As for whether it can or can’t hurt to try, it certain can hurt. First, it can hurt your finances by causing you to waste money on something that probably won’t help you. Second, if you rely on ineffective remedies instead of getting real medical care and proven effective remedies, you run the risk of extending or complicating the condition. The What’s the Harm? website summarizes all kind of harm that came to people who relied on “alternative medicine” and supplements. (Alternative medicine is not medicine; if it was proven effective, it would be medicine. Think of aspirin.)

And if you want to explore a similar graphic about “superfoods,” be sure to check out this image.

And now pardon me while I add garlic to my shopping list…