Helicopters 101: Hover Charts

What the hover charts mean, how to read them, and which one to use.

Articles in the Helicopters 101 series:
Flight Planning
CG
Weight
Hover Charts
Ground School

The “Performance” section of a helicopter’s Pilot Operating Handbook (POH) includes two charts related to hover power: IGE Hover Ceiling vs. Gross Weight and OGE Hover Ceiling vs. Gross Weight. (The exact names of these charts may differ by helicopter manual; these are the names in the Robinson R44 Raven II manual I have handy.) These are perhaps the most important charts in the book — they help you understand the amount of power a helicopter will have under specific operating conditions.

What the Charts Mean

The hover charts enable you to plot your operating conditions to see whether performance is possible. The operating conditions include altitude, gross weight, and temperature — all of which you should be familiar with prior to flight time. You should consult the charts before every flight using the information that applies for that flight.

There are two charts and they work much the same way, although they do provide different data:

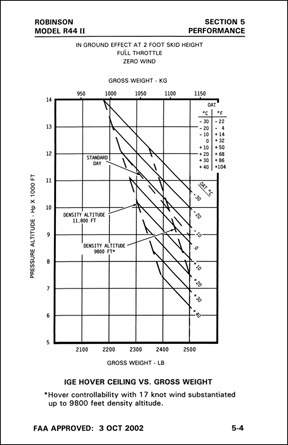
  • The IGE Hover Chart (below, left) indicates expected performance in a ground effect hover. A note near the chart should get more specific than that. In the example here, the chart is for a 2 foot skid height with full throttle and zero wind.
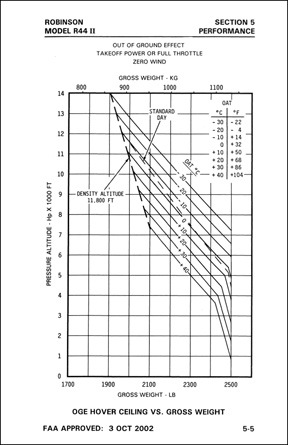
  • The OGE Hover Chart (below, right) indicates expected performance in an out of ground effect hover. Again, a note gets more specific. In this example, the chart is for takeoff power or full throttle with zero wind.

Generally speaking, the IGE chart is for hover operations very close to the ground while the OGE chart is for all other hover operations.

I’ve provided these two charts side by side here, but you can zoom into either one in separate browser window or tab by clicking it.

IGE Hover, R44 II OGE Hover, R44 II

If you fly a different helicopter, you might want to pull out the charts for it and consult them while reading this. No sense in learning about my helicopter if your helicopter’s charts are handy.

How to Use the Charts

In order to use the charts, you need three pieces of information:

  • Altitude of where you’ll be operating. This should be the pressure altitude, but in most instances the elevation above sea level will be close enough.
  • Aircraft weight. This is the weight of the aircraft at the time of the operation.
  • Temperature. This builds density altitude into the chart so you don’t have to calculate it.

The best way to explain how to read the charts is to provide a few examples.

IGE Hover Chart

Suppose your local airport is at 2500 feet MSL. It’s a pretty warm day and forecast for flight time is 35°C. You’ve done your weight and balance and you know that with you (the pilot), fuel, two passengers, and some added equipment, your weight at takeoff will be 2300 pounds. You want to make sure you have enough performance to do a regular takeoff from a hover, so you consult the IGE Hover Chart. The first thing you notice is that the chart starts at 5,000 feet. Since your airport is below that level, you’re done; the chart only addresses higher elevations so you’re good to go.

IGE Landing Example 1
Plotting the altitude and the weight in this example keeps you below and to the left of the temperature line, so you’re okay in these conditions.

Now suppose you’re flying to Flagstaff, AZ, which sits at 7014 feet MSL. It’ll take you an hour to get there and the forecasted temperature there is 30°C for your arrival time. You want to make sure you have enough performance to do a regular landing to a hover and then to the ground, so you consult the IGE Hover Chart. If you burn 16 gallons per hour and each gallon weighs 6 pounds, you’re now nearly 100 pounds lighter or 2200 pounds. You plot the point where the altitude meets the weight. Because you’re still below and to the left of the 30°C temperature line (highlighted in yellow here), you have enough performance. If you follow the 7000 foot line to the 30°C line, you can see that you’d even have enough performance at that temperature and altitude if you were just about max gross weight (2500 pounds).

IGE Takeoff Example 2
In this example you have a problem: the plotted point falls above the temperature line. This means you might not have enough performance to hover in ground effect under these conditions.

Now let’s say that when you get to Flagstaff, you’re picking up another passenger and he’s a big guy. You also have to put on some fuel — enough for you to be at max gross weight for takeoff. In addition, takeoff will be at 3 PM when the forecasted temperature is 35°C. Plotting that indicates a problem — the plotted intersection of altitude and weight is above where the 35°C line would be (as estimated in yellow in this example between 30°C and 40°C). This means that under these conditions, the helicopter may not have the performance you need in a ground effect hover.

What could you do about this? A few things:

  • Lighten up the aircraft. Take on less fuel (if possible) or leave behind a person or some equipment (good luck with that).
  • Wait until the temperature drops. The temperature will likely drop again later in the day. Wait until it drops below 30°C.
  • Perform a running takeoff. But is that possible? Because you need less power to fly at speeds in excess of ETL than to hover, it could be. The only way to know for sure is to try. (A serious question here, though: do you really want to take off if you know you don’t have enough performance to even hover in ground effect? Think long and hard about that before doing it.)

OGE Hover Chart

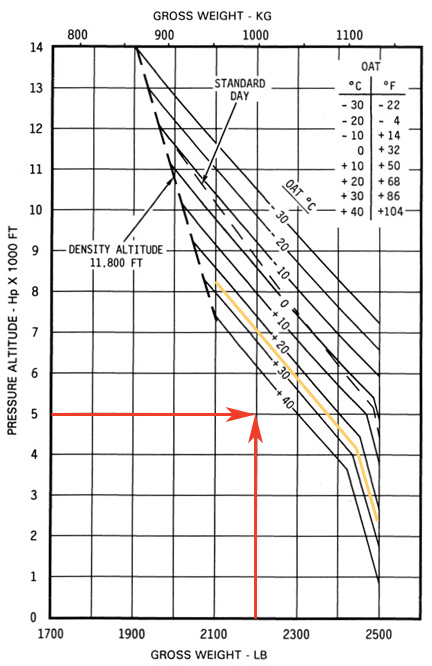
It’s the next day. A photographer wants you to take him and his client around a marina at the lake so he can get video footage of the new dock and some boat races that will be going on. The lake is near Prescott; it sits at 4900 feet and is surrounded by desert mountains. The forecasted temperature in Prescott for the early morning flight is 25°C. You get the passenger and equipment weights and calculate your fuel load for the flight. The total aircraft weight at the time you’ll be on point to start the shoot will be 2200 pounds.

You’ve worked with this videographer before. He likes you to fly very low and slow — usually less than ETL, sometimes only 100 feet off the ground. (You’ve already warned him of the potential danger of this, being sure not to refer to the height velocity diagram as the “deadman’s curve.” But you’re willing to take the risk and he likes flying with you because you’re the only area pilot who will.)
OGE Hover Example 1
In this example, you’d have enough performance to hover out of ground effect in the plotted conditions.

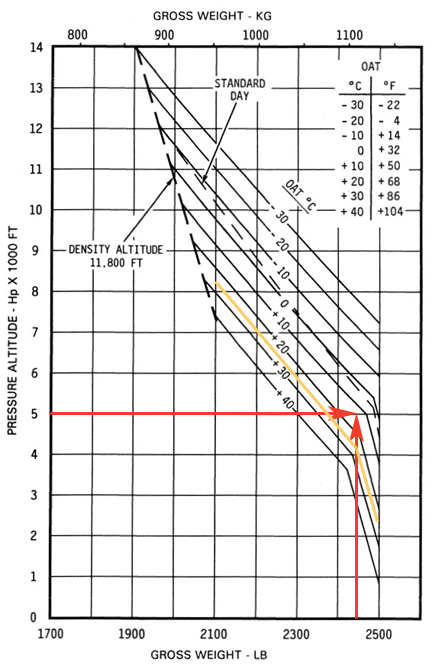
You pull out the POH and turn to the OGE Hover Chart. Why that chart? Well, you know that you’ll be flying at speeds less than ETL. That’ll likely take at least as much power as hovering out of ground effect. You plot the altitude and weight, as shown here. The resulting point is below and to the left of the temperature line (sketched in yellow). You should be good to go.
OGE Hover Example 1
With the fatty client on board, you simply wouldn’t have enough power to hover out of ground effect.

Now let’s say that the photographer calls an hour before the flight. His client wants to come along, supposedly to provide instructions. You ask how much he weighs and the photographer tells you 240 pounds. A big guy. You recalculate the aircraft weight at the time of the flight adding 250 pounds for the client because you know everyone lies about their weight. Now you’re at 2450 pounds, which is pretty darn close to max gross weight. You plot the points and what do you find? With the client on board, you’d be too heavy to hover out of ground effect.

What can you do? A few things:

  • Lighten up the aircraft. Assuming you can’t leave the client behind, you might be able to operate with less fuel on board.
  • Wait until the temperature drops. Of course, the photographer picked that flight time for a reason and probably won’t take a time change.
  • Don’t drop below ETL when out of ground effect during the flight. If you keep your speed above ETL, you should have plenty of power to fly. But will the photographer accept that?

IGE vs. OGE

In these examples, I used both charts. You might be wondering why I used the OGE chart for a flight that didn’t necessarily require hovering. After all, you reason, if you don’t have to hover, you don’t need a hover chart, right?

Wrong.

As I mentioned earlier, operating at speeds less than ETL — which is about 25 knots in an R44 — requires about as much power as hovering. That’s why you need to consult a hover chart. And since you’ll be 100 feet up or higher, you’re not in ground effect so you need the OGE hover chart.

Let’s look at what could happen in the photography example if you conducted the flight when the OGE hover chart told you hovering wasn’t going to be possible.

You get into position for the photographer to start videoing the new dock. You’re about 100 feet off the lake surface, doing 40 knots. “Slower,” the photographer urges. You drop speed little by little. Finally, you’re at about 15 knots. The helicopter starts to settle. You pull up the collective and either you get a low RPM rotor horn (in a piston helicopter like the R44) or you over-torque or over-temp the engine (in a turbine helicopter). Either way, the settling doesn’t stop. You push the cyclic forward, trying to fly out of the vortex ring state you’ve put yourself into, but you’re now less than 100 feet off the lake. Are you wearing floatation devices? I hope so. You might be going swimming.

Think this doesn’t happen? It does. It even killed people in this accident and this accident — both of which were for aerial photography missions. (And yes, the pilot in the second accident was also impaired.)

Throughout this blog I refer over and over to the OGE hover chart. This is why. It gives you worst case scenario performance for your operating conditions. If the OGE hover chart says you can operate, you can operate at any speed. Indeed, if you consult the OGE hover chart first and it says you’re good to go, you don’t even need to consult the IGE hover chart.

Conclusion

My advice: consult the OGE hover chart before every flight. It gives you a good feeling for the kind of power you’ll have available throughout various phases of a flight, even if airspeed drops below ETL.

This can become vitally important, especially if you’re doing an off-airport takeoff or landing in rough terrain. Think about it. Suppose you’re sitting on the ground near that marina in the last example, with the fatty client on board. Maybe that’s where you picked him up. You pick the helicopter up into a hover; it’s possible but perhaps you need nearly full allowable power to do it. You push the cyclic forward only two or three feet off the ground. What happens as you begin to go through ETL? The helicopter’s nose might dip. If you’re close to the ground, you could hook a skid. Add rising terrain and/or a tailwind and you might find yourself in serious trouble. That’s what happened to a pilot in Easton, WA in 2007 and it killed her and her three passengers.

If the OGE hover chart says you don’t have the performance you’ll need for an OGE hover at your expected flight conditions, at the very least you should consult the IGE hover chart to make sure you can hover in ground effect for takeoff and landing. If you don’t have the performance for that, consider what you can do to increase performance before taking off, even if a run-on takeoff is possible and you’re certain you’ll be able to hover when it’s time to land.

These charts are your true performance guides. Operating when they say you can’t is just plain stupid.

Inappropriate Solo Training Landing Zone?

How about preventing accidents by making conditions easier for new pilots?

I stumbled across this brief preliminary accident report in the NTSB database today. Here it is in its entirety:

The pilot who held a commercial pilot certificate with single-engine land airplane ratings was receiving training to obtain a helicopter rating. The pilot had 31 hours of helicopter flight time and the accident occurred on his second solo flight. The pilot reported he was attempting to takeoff from a wet grass area when the accident occurred. He stated that when he increased the collective to lift off, the helicopter began to roll to the right with the right skid still on the ground. He moved the cyclic to the left and the helicopter responded by rolling to the left with the left skid contacting the ground. The pilot then applied right cyclic and the helicopter again rolled to the right. The right skid contacted the ground and the helicopter rolled over onto it’s right side. As a result of the accident, the main rotor blades and the helicopter fuselage were substantially damaged. The pilot reported that there were no preimpact mechanical failures/malfunctions that would have precluded normal operation.

The accident aircraft was a 2003 Robinson R44 Raven II.

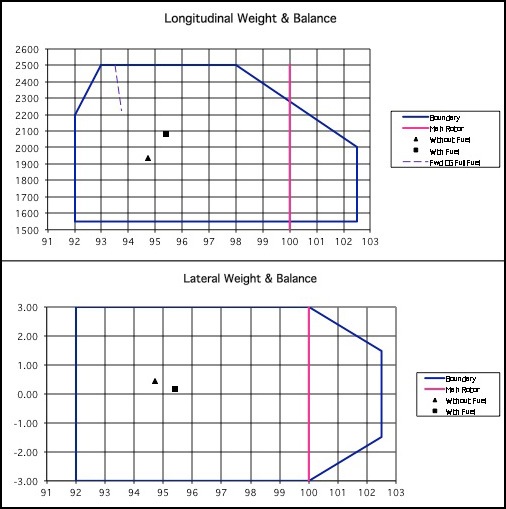
Those of us who have soloed in Robinson (or other small) helicopters know that balance varies greatly depending on how many people are on board. We learn to fly helicopters with two people on board: student pilot and instructor. The helicopter is usually quite balanced with two people on board. I don’t have the exact numbers for this particular flight, but using my R44 as a guide and assuming the pilot and instructor were each 200 pounds with 1/2 tanks of fuel, the weight and balance envelopes should look something like this:

W&B with 2 On Board

If you’ve never seen one of these, let me explain. The longitudinal weight and balance chart shows where the weight is distributed front to back. The pink line represents the main rotor mast. With two 200-pound people on board in the front seat, the center of gravity is forward of the mast. This is pretty normal for an R44. The lateral weight and balance chart, which is what we’re more concerned with in this analysis, shows how the weight is distributed side to side. The 0.00 mark is dead center and, as you can see, the with/without fuel points are very close to the center. In other words, it’s laterally quite balanced.

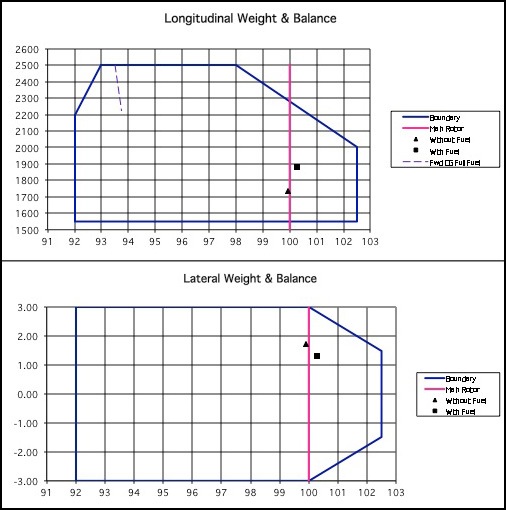
Now take the instructor out of the left seat. With everything else remaining equal, here’s what the weight and balance envelopes look like:

W&B with 1 on board

First of all, the center of gravity shifts aft. That makes a lot of sense. After all, there’s 200 pounds less weight up front. When I fly, this is extremely noticeable, especially at my new, slimmer weight. The helicopter actually lands on the rear of its skids first; on pick up, the front of the skids come off the ground first.

Laterally, there’s also a big change — and again, that’s what we need to focus on here. Without that 200 pounds of weight on the left side of the aircraft, the center of gravity shifts quite a bit to the right. The heavier the pilot is, the more to the right the weight shifts. So although I used 200 pounds in my example, if the pilot was 250 pounds — which is still legal in an R44 — the weight would shift even further to the right (and slightly forward). When the pilot attempted to lift off, the left skid would rise first.

Again, I don’t have the exact numbers. You can play with this using any reasonable numbers you want. It won’t change the conclusion here.

Now read the description of the accident events and put yourself into the pilot’s seat. He’s taking off so he’s lifting the collective slowly, getting the helicopter light on its skids. The left skid comes off the ground first because that side of the aircraft is lighter. This feels to the pilot as if the helicopter is rolling to the right while the right skid is still on the ground.

Stop right there. This is where the terrain comes into the picture.

The pilot is on wet grass. The accident report didn’t say mud so we won’t assume a sticky surface. But it certainly isn’t smooth. We don’t know how long the grass is or whether it’s uniform or has clumps of thick weeds. The question we should be asking is this: was the right skid “stuck” and creating a pivot point? The answer to that question determines the appropriate action:

  • If the right skid is indeed “stuck” and creating a pivot point, the correct action to avoid dynamic rollover would be to lower the collective. In other words, abort the pick up.
  • If the right skid was not “stuck” or creating a pivot point, the correct action would be to adjust the cyclic to assure there was no lateral movement (as you’d normally do in a pick up) and continue raising the collective.

An experienced pilot would know this. An experienced pilot would have done dozens or hundreds or thousands of solo pickups. He’d have a feel for the aircraft or, at least an idea of what to expect and what to do.

But this wasn’t an experienced pilot. It was a student pilot with only 31 hours of flight time — almost all of which was with a flight instructor beside him — on his second solo flight. So he used the cyclic to stop what he perceived as a roll. He may have been more aggressive than he needed to be, thus causing the helicopter to come down on the left skid. Then another adjustment to the right. The right skid hits that grassy surface and the helicopter rolls. Game over.

So my question is: What the hell was he doing taking off and landing on wet grass?

Flight instructors can reduce the chances of accidents like this by setting up their student pilot solo flights with easy flight conditions. That includes smooth surfaces for takeoff and landing. If this had happened on a nicely paved airport ramp or helipad that was free of surface obstructions like cracks or tie-downs, this accident may not have happened at all. There would be no question about a pivot point because none could exist.

You might also question whether the flight instructor properly taught the concept of dynamic rollover and what to do if it’s suspected on takeoff — lower the collective. And whether the flight instructor made it clear that there should be no lateral movement on pick up or set down. Yes, I know that’s hard for a new pilot to do — especially with only 31 hours — but it’s vitally important, especially on surfaces that could snag a skid.

Which brings me back to my original point: why was he taking off from wet grass?

Fortunately, the pilot was not injured, although the helicopter was substantially damaged. I think this accident makes a good example for teaching about dynamic rollover. With luck, instructors and students will learn from the mistakes here and avoid them in their own training experiences.

Of course, another possibility is the the student pilot simply was not ready to solo.

Three Tips for Becoming a Better, Safer Pilot

My take on some advice offered by the FAASTeam.

The Deer Valley Pilot’s Association (DVPA) held its annual membership drive at Deer Valley Airport (DVT) in Phoenix yesterday. I’d joined the group earlier this month, when I discovered that membership entitled me to a $1.10/gallon discount on 100LL fuel at my preferred FBO there, Atlantic Aviation. One top-off was enough savings to pay the cost of a year’s membership.

DVPA EventI was so appreciative that when I heard about the event and the fact that a few aircraft would be on static display, I offered to put my helicopter on display. So yesterday morning, at 8:15 AM, I parked on the ramp in front of the terminal building to give attendees just one more aircraft to look at. I even hung out for a while and let kids climb into my seat.

FAA LogoThere were other organizations on hand, with tables set up under a big shade. The FAA’s Safety Team, which sponsors the WINGS pilot proficiency program, was one of them. They had a table full of informational flyers. Because of my general interest in helicopter accidents — which, by the way, I’m starting to think isn’t exactly healthy — I picked up a flyer titled “Helicopter Training Accidents.” Later, back home, I gave it a quick read.

The pamphlet focused on two areas of training accidents: autorotation and dynamic rollover. It provided a lot of bullet points under headings like “Autorotation — Common Errors” and “Dynamic Rollover Precautions.” It was pretty basic stuff, but good to read just to refresh my memory. I wish I could link to it here for reference, but I simply can’t find it online. I’ve scanned it; you can download it here. And believe me, there’s lots of online reference material available at their Web site.

But the most useful content — especially for new pilots or pilots falling into the complacency trap that can catch you at any experience level — were the bullet points under “Cockpit Resource Management and Personal Readiness.” Three of these points jumped out at me as great topics for discussion in a blog post. Here they are.

Oh, and although I’m a helicopter pilot and use helicopter examples here, most of this applies to airplanes, too.

Know your limits and observe them.

I think that this is one of the biggest causes of accidents — although I’d expand it to read “Know your limits and the limits of your aircraft and observe them.” Many of the accidents I’ve discussed in this blog can be categorized as what I call ‘stupid pilot tricks.” In so many cases, pilots overestimate their own skills or the capabilities of their aircraft either in general or under conditions they’re not accustomed to.

So how do you discover what your limits are? The best way is by experience. If you’ve successfully performed a maneuver consistently over time, that maneuver is probably within your limits — in the conditions in which you’re have successfully performed it. But whenever conditions differ, you need to proceed carefully to test your limits. For example, perhaps you’ve landed quite a few times off-airport on dirt and gravel in light wind conditions. But now you need to land on terrain littered with big rocks. Don’t assume that it’s just as easy as any other off-airport landing. Consider the risks and proceed carefully. Leave yourself an out. Don’t commit to setting down unless you know you can do it safely and then take off again later. The same goes for making an off-airport landing in a strong crosswind or tailwind situation. Or in dusty or snowy conditions. Have you done it successfully before? Multiple times? Consistently? Then it’s probably within your limits. But if the situation is brand new to you, you can’t possibly know for sure whether it’s within your limitations. Proceed with caution!

Advanced training can also help. If you find yourself with a need to perform maneuvers that you’re not sure about, find an experienced CFI and go flying with him. Let him train you, let him give you the additional support you might need to practice it safely. Isn’t it worth a few hundred dollars to get the experience you need to safely expand your personal limits?

As for the limits of your aircraft, that’s pretty easy. Open the Pilot Operating Handbook and look them up. If you fly the same kind of aircraft often, you should have most of the limitations memorized, including a rough estimate of out of ground effect hover capabilities at various weights and density altitudes. And if you find yourself in a situation where you’re not sure if an operation is even possible for your aircraft, reach for that book and look it up to make sure. It’s required to be on the aircraft, so there’s no excuse not to consult it. I’m not ashamed to admit that I’ve done this several times. I even keep a copy of the book in my office to make sure I can handle unusual client requests before booking a flight.

Develop and use good habits (e.g., checklists).

The FAA loves checklists and I’ve been told by a few pilots that they won’t let you pass a check ride unless you use available check lists during the flight. While I agree that checklists are extremely helpful — I actually created my own for preflight, startup, and shutdown when I flew LongRangers at the Grand Canyon back in 2004 — I also feel that if you perform the same series of tasks in the same order without distraction more than 50 or 100 times, a checklist becomes a bit redundant. So if you’re expecting me to wax-poetic about checklists, I’m sorry to disappoint you.

What I will expound on, however, is the idea of developing good habits for all phases of flight. Here are a few examples from my own flying:

  • Always perform a preflight inspection in the same order.
  • When adding oil during preflight, always leave the cowl door open until the oil cap/dipstick is replaced. Do not close that cowl door unless the cap/dipstick is confirmed present and tight.
  • Just before stepping into the aircraft, always do a complete walk-around starting and ending at the pilot door. Use that walk-around to check for open cowling doors and fuel cap tightness one more time.
  • Always perform all parts of the startup procedure, from sitting in the pilot’s seat and fastening my seatbelt to loosening frictions just before bringing RPM to 100%, in the same order.
  • Always check to make sure all doors are secured before lifting up. (I can reach all doors from my seat and all their windows have fingerprints where I push on them before each flight.)
  • Always do a visual scan of the area before lifting up and then again before departing the area.

These things, when done regularly, become routine. I actually feel as if something is wrong if I neglect to perform one of these tasks. I have even gone so far to climb back out of the aircraft before starting up to check fuel caps if I can’t recall doing so.

What’s a bad habit? How about storing papers, pens, or other items in the area beneath the collective? While some aircraft have ample storage space there, many do not. Don’t place anything there that could prevent you from getting the collective down in a hurry if you need to. How about leaving dual controls in when non-rated passengers are on board? Do you really want to worry about some idiot pushing the cyclic, resting his feet on the pedals, or having his fat butt blocking the collective when you’re trying to pull pitch? Pull those controls out if you don’t want the person beside you able to mess with them. Or how about glazing over or skipping your passenger preflight briefing? Do you know how you’d feel if your passenger were trapped in the aircraft after a mishap because you neglect to tell him how to open the door?

Think about the things you do when you fly. What good (or bad) habits have you developed? Get rid of the bad ones — they’re not going to help you become a better or safer pilot. Instead, think about the things you need to do or be aware of when you fly and incorporate them into your workflow or cockpit management.

Be constructively critical of each flight.

This is my favorite of the tips, the one that made me think this was a topic to blog about.

The trouble is, too many pilots are head cases who think they can do no wrong. No matter how well or poorly they fly or complete a mission, they’re too full of themselves and confident in their own capabilities to review what they’ve done and think of how it could have gone better.

The Pick Up/Set Down Challenge

I must have written about this elsewhere, but I can’t find it so here it is.

When I flew at the Grand Canyon in 2004, I averaged 10-14 flights a day. The flying itself was rather tedious, with only two extremely well-defined routes and no room for deviation. There wasn’t any opportunity to make it more interesting — other than the challenges Mother Nature threw in our way — so I decided to focus on the part of the flight where there’s always room for improvement: those 10-14 pickups and set downs.

From nearly day 1, I concentrated on that part of the flight, working hard to make every single pick up or set down as smooth as I could make it. Then, right after each one, I’d give it a score from 1 to 10, with 10 being the kind of pick up or set down where you didn’t even feel the aircraft make or lose contact with the ground. I didn’t have many 10s — I’m a tough scorer — but after a few weeks and months, I didn’t have many below 6 either.

To this day, I do the same thing with pick ups and set downs. The result: I’m pretty sure that few fellow pilots would find much fault in most of my pick ups or set downs. The passengers think they’re great no matter how low I’d score them — but what do passengers know?

Have you ever considered doing something like this for your flying? Challenging yourself for no other reason than to improve yours own skills? If not, why not?

The reality is that anyone can improve at least one aspect of any flight or mission. Just think about everything you did and focus on what wasn’t perfect. Then think about what you could have done to make it perfect — or at least closer to perfect.

Here are some examples:

  • During preflight, did you miss any inspections you should have done because you were distracted? If so, how could you prevent future distractions? (A friend of mine will restart a preflight inspection from the beginning if anyone interrupts him while he’s doing it.)
  • Did startup go smoothly? If not, what could you have done to make it better next time? (I’ve gotten to the point where I usually know how long to prime the engine before starting based on the ambient temperature.)
  • Was your departure smooth and within height-velocity diagram recommendations (if possible)? If not, what could have improved it?
  • Were your radio calls well-timed, concise, and correct? Is there anything you could have done to make them better?
  • Did you choose the best route to your destination? If not, what route might have been better and why?
  • Was your approach to landing suitable? If too steep/shallow, fast/slow, or with a tailwind, what could you have done to make it better or safer?

I can go on and on with examples, but you get the idea. Review each flight or mission and make mental notes about how it could have been better. Then, the next time you fly, act on those mental notes as appropriate. Not only will this make you a better, safer pilot, but it could help you develop some of those good habits I discussed earlier.

The point is, no matter how much experience you have and how great a pilot you think you are, you are not perfect and no flight is perfect. There’s always room for improvement. It takes a good pilot who is genuinely interested in becoming a better pilot to recognize this and work hard to get better. And better. And better.

Only You Can Make Yourself a Better, Safer Pilot

Not only is it within your control and capabilities to make yourself a better and safer pilot, but it’s your responsibility to do so. These three tips are a good place to get started.

What do you think?

Going Back to My Flying Roots: Stick Time in an R22

Was it really that bad?

Last week, I wrote a blog post in my series about becoming a helicopter pilot. In it, I make an often-repeated statement:

They say that if you can fly an R22, you can fly any helicopter.

I’d heard the same thing said recently in the Rotorspace helicopter site I haunt regularly. And I agree with it. But it also got me thinking…was flying an R22 more difficult than flying the R44 I’ve been flying since January 2005?

So I decided to find out. I’d planned a trip to Seattle for this week anyway. I used the opportunity to book an hour or two of flight time with a CFI named Matt at Helicopters Northwest at Boeing Field.

Matt and the R22

Matt and the R22 we flew together.

Matt is a great guy. With 800 hours of flight time under his belt — including a few good, long cross-country flights — he has a good, positive attitude and likes to teach. He’s the kind of flight instructor the industry really needs: friendly, level-headed, sincerely interested in teaching and learning, not in any hurry to build his first 1,000 hours and move on. He showed amazing patience with me. Oddly enough, when I came out to the helicopter and sat inside it, I actually had some fear.

But I’m getting ahead of myself.

N7139L

My old R22, parked out in the desert. I loved that little ship, but now I don’t remember why.

We went out to the helicopter and I was immediately reminded of how tiny R22s are. I owned one — N7139L — from October 2000 to October 2004 and built my first 1,000 hours on it (or R22s very much like it). I remember now how huge the R44 seemed to me when I first started flying it. But now, the R22 is just tiny.

We did a preflight, splitting the chore. I looked under the hood and checked the tail rotor and warning lights. He climbed up (one step!) and checked the rotor hub. Then we rolled the helicopter out from parking to the flight line on its tiny ground handling wheels. (To be fair, I use oversize wheels on my R44, making the stock R22 wheels seem even smaller than they really were.)

We climbed on board and buckled up. My hips are definitely wider than they were when I was 20 pounds lighter in my R22 days and I almost had trouble getting my hand between the seats to the collective. Sheesh. I used the checklist to start up and was so surprised at how quickly it started that I forgot to engage the clutch. That’s when I started wondering if I was making a mistake.

The helicopter’s cyclic friction did not work. I had to hold the stick as we warmed up.

They were doing taxiway construction about 100 feet from the flight line. Trucks and men were moving around. I started getting worried about picking up the helicopter. About what might happen if I screwed up. I realized — and this is hard to admit — that I was afraid to try.

So when the time came, I let Matt make the radio call, pick up, and take off. I felt like a first time student. It was a humbling experience.

But I took the controls as we climbed out, heading south toward Auburn. I immediately felt the stick push hard to the right. I remembered the trim knob and pulled it. That helped a little. But I knew my shoulder would be aching by the end of the flight. No hydraulics. I would be fighting the stick pressure the whole time.

When I released the collective, the manifold pressure immediately dropped from 20 inches to 15. Auto-land mode, one of the other instructors joked later.

Had my R22 been this much of a chore to fly? I don’t remember, but I don’t think so.

We came in for a landing on the taxiway at Auburn airport. I made a nice landing and set down. And a nice pickup. I was working hard to do it, though.

We did a few maneuvers. Standard takeoff, standard landing, steep approach, a few autos, two quick stops.

The autos weren’t anything like I remembered them and, after thinking about it for a while, I know why. When I learned back in the late 1990s, we’d start an autorotation by cutting the throttle first. We then had about 2 seconds to dump the collective. You could feel the drop in your gut. Nowadays, they start an autorotation by lowering the collective first and then rolling off the throttle. It’s a non-event — and not very realistic. I did the first one okay but set up for the second one badly and let airspeed drop too low for success. Got a low rotor horn on the power recovery. No big deal, but not very good, either. Sure wouldn’t pass a check ride.

The first quick stop sucked, but the second one was okay.

We climbed out and headed to my friend Don’s house. He lives on the outskirts of Auburn and has a helipad at his house. He’d suggested that morning, half joking, that we should try landing there. I knew we could land, but wasn’t convinced that we could take off. The place is surrounded by tall trees — a true confined space. I showed it to Matt. He was game to give it a try.

I’d landed there several times in my R44, so I knew the preferred approach. There was just about no wind. I came in low over the trees — even Matt didn’t see the LZ until I was ready to start my final descent. I lowered us into the area and hovered there for a moment. It hadn’t been difficult at all. But the real trick was to get out. I made a 180° pedal turn and pulled pitch, easing the cyclic forward to gain airspeed. (I hope I didn’t scare Matt with my soft chant: “Airspeed, airspeed, airspeed.”) We slipped through ETL when we were about 50-75 feet up, level with the tops of the trees quickly approaching. Then we were up and out.

I told Matt that I’d tell Don we’d managed it with full tanks of fuel. (A lie, of course; I really don’t think that would be possible.)

We headed back to Boeing field. I’d had enough. My shoulder was aching and I was tired of supporting the collective. I landed at the flight line. After shutting down and rolling the helicopter back to parking, I took a moment to whine a little to the owner/mechanic about the collective droop, cyclic friction, cyclic trim, and intercom static.

I really think my old R22 was in much better shape.

So yes, I can still fly an R22. But now I realize that I really don’t want to.

So You Want to Be a Helicopter Pilot, Part 7: Stay Slim

Fatties need not apply.

As strange as it might seem, one of the biggest barriers to building a career as a helicopter pilot is size — pilot size. Simply put, if you’re a heavyweight, you’re going to have a heck of a time learning to fly and getting your first job.

How Big is Big?

What do I mean by “heavyweight”? Well:

  • N7139LHow much do you think you can squeeze into one of these?

    If you weigh more than 250 pounds, you may as well forget about learning to fly helicopters for a flying career. Most training helicopters simply can’t accommodate a big guy (or gal) plus a flight instructor. Even if you did learn how to fly, no one will hire you as a flight instructor.

  • If you weigh between 200 and 250 pounds, you might find a flight school that can accommodate you for training, but it’s highly unlikely that you’ll find one willing to hire you as a flight instructor. After all, the more the CFI weighs, the less capacity there is for the student pilot. A big CFI could only train small student pilots; flight schools simply don’t want to deal with this limitation.
  • If you weigh between 180 and 200 pounds, you’ll likely find a flight school that can accommodate you for training and might consider hiring you as a flight instructor. But you’d have to be really good with no serious competition to get that job.
  • If you weigh less than 180 pounds, not only will you have no trouble finding a flight school, but if you prove your worth throughout training, you probably won’t have much trouble getting a job as a flight instructor either.
  • If you weigh less than 150 pounds — listen up, ladies! — and you’re a good pilot with the right attitude, you will be sought after as a pilot.

Remember, the less the pilot weighs, the more other stuff — passengers, cargo, etc. — can be loaded on board.

Real-Life Examples

Don’t believe me? I can back this up with a two real-life stories.

One guy who flew with me on my annual journey from Arizona to Washington state needed to build R44 time to qualify as an R44 CFI. He was a tall guy — probably at least 6 ft 2 in — and weighed 220 pounds. This was not a fat 220 pounds; he was tall, thin, and fit. He’d been told flatly by the school he hoped to get a job with that he weighed too much to be a CFI in R22s. He figured he’d go after a job as a CFI for R44s. What he didn’t realize is that flight schools don’t want CFIs limited to training in just one aircraft model. They could easily prep a 180-pound R22 CFI to train in an R44 — in fact, they could use that possibility as motivation (think carrot) for their R22 CFIs. I don’t know if this guy ever got a CFI job, but I tend to doubt it.

A very tiny female pilot who has been flying helicopters for years at the Grand Canyon weighs in at only 115 pounds. While it’s true that she’s too small to fly solo without ballast in the EC130 she flies at work, her employer loves her, referring to her as their “secret weapon.” Indeed, I saw her value one spring day when I dropped off two passengers for a flight over the Grand Canyon. The aircraft originally had only four passengers who would fly with one of the other pilots. When two more passengers showed up for the same flight, they pulled the other pilot — a man who probably weighed in between 180 and 200 pounds — and put her on board instead. They’d gained at least 65 pounds of capacity by simply swapping pilots, making a flight that may have been over gross weight now under gross weight. What company wouldn’t see the value of that?

And if these two examples aren’t enough for you, take a look at helicopter pilot job listings. You’ll see that a surprising number include maximum pilot weight as part of the requirements — or ask you to include your weight with your resume. In other words, fatties need not apply.

Don’t Disregard this Advice!

This is not advice that should be disregarded. This is vitally important for career pilots.

If you’re a 220+ pounder and a flight school trying to sign you up tells you not to worry about it, they are lying to you to get your business — as they may have done to the 220 pounder who flew with me. Sure, they may be able to squeeze you and a tiny CFI on board an R22 for flight training. Or maybe they’ll convince you that you’ll be better off training in an R44, which costs about twice as much per hour to fly. But you’ll still find it impossible (or nearly so) to get a job as a CFI when your ratings are in hand. And unless you plan to pay to build your first 1,000 hours, you’ll need that CFI job to move forward in your career.

It should go without saying that even if you start on the slim side, it’s important to stay that way — at least until you’ve reached a point in your career where your personal body weight doesn’t matter as much.

For example, I have two not-so-slim friends who are well along in their pilot careers. Both are utility pilots; one flies medium twins like Hueys and Bell 212s and the other flies Sky Cranes. Both of these guys are between 200 and 240 pounds. But they (obviously) weren’t always that big. Pounds are often added with years.

Yet another friend of mine was a medevac pilot who allowed his weight to creep up over time. When his company started closing bases, he was one of the first pilots to go. Coincidence? I don’t think so. At the time, he probably weighed about 250.

What You Can Do

If your current weight is above 200 pounds and you know some of it is body fat, it’s time to go on a diet. Do your best to get your weight down to what I consider the magic number for helicopter pilots: 180. If you can keep your weight at or below 180 pounds, weight will not be a barrier to your career.

Keeping slim and trim will help you throughout your life. Not only will it make it easier for you to get work as a pilot, but it will keep you healthier. Obesity-related illnesses such as high blood pressure, heart problems, and diabetes can end your career. If this isn’t motivation to take care of yourself, nothing is.

Next up, I’ll talk about what I consider the best part of being a helicopter pilot — but what others hate: travel.