I remember what online community is all about.
I got my start in the online world back in 1984, when I bought my first computer. It was an Apple //c and I quickly began visiting bulletin board systems (BBSes) using my 300 baud modem. You could get away with 300 bps in those days — there were no graphics, no big downloads, no Flash or PDF or QuickTime files.
Back in those days I visited BBSes to participate in online discussions on what were called message boards: the precursor to today’s forums and blog comment features. Later, in 1989, when I bought my first Mac, I was quick to start my own BBS, The Electronic Pen. I kept it up and running for years, until the Web made BBSes archaic. Then I hopped on board Web 1.0 with a Web site — back in 1995 or so? — and have been a Web publisher ever since.
It Was about Meeting People
In exchanging comments and ideas on BBSes, I met a lot of people:
- There was Tim, who ran a BBS out of the same office where he sold tombstones. (Really!) Tim was my age and a Mac user and he’s part of what made me so enthusiastic about Macs. He introduced me to Mark, a legally blind albino guy who worked as a graphic designer. (Really!) Mark couldn’t drive, so we’d take him out to dinner once in a while. He had all this high-tech computer equipment that he’d show off to us: things like CD-ROM writers, 20″ monitors, and high-end graphic software. (Remember, this was in the early 90s.) Although I lost touch with Mark, I still exchange e-mail with Tim, who married his high school sweetheart, fathered three boys, and got a job as an IT guy for some medical information company.
- There was May, who ran a BBS for writers. She wanted to become a writer, but she couldn’t seem to get her foot in the door with any publisher. She even quit her day job to devote all her energy to writing. She wound up broke and depressed. She went back to work. Years later, she finally got some stories published. I don’t know what she’s doing now. She once called me an “overachiever,” which is something I’ll never forget. It made me feel as if I should be ashamed of my success.
- There was Art, a computer programmer who knew everything — or thought he did. At thirty-something, he still lived at home with his parents. When I met him in person, I was very surprised to see that he was only about 4’10” tall. He bitched a lot about his employer and I wasn’t too surprised when he got canned. When he got 18 months pay in his severance package, I encouraged him to travel around a bit before getting back to work. He visited his brother in Seattle. “There’s snow on the Rockies,” he told me after his trip. “Art,” I replied, “there’s always snow on the Rockies.” Some people really need to get out more. We lost touch just a few years ago.
- There was Bill, a copywriter. Here was a middle-aged man who wrote for a living. And he made a good living. He offered me advice (when I asked for it) and was amazed when I told him that I thought something I’d written “sounded good.” “That’s the point,” he said, obviously excited that I’d made the comment. “Good writing should sound good when it’s read out loud.” I learned a lot from him, but ironically, we lost touch soon after my first book was published.
- There was Martin, a computer geek like me, but with an arty streak. He did design work and computer training for a local computer store. If my memory serves me right, he helped me get my foot in the door there and I worked for them for some time. I went to his wedding and, when I moved out to Arizona, he, his wife, and their new baby spent a day with us. When he set up his own consulting firm, he sent me a full complement of his high-class giveaways. I still use the logo-embroidered throw blanket when I sit on the sofa to watch television some evenings. I haven’t seen him in years, but he’s one of my LinkedIn contacts.
These are just some of the people who entered my world through the world of online communication. (And no, these aren’t their real names.) They were friends, despite our mutual shortcomings, and we socialized both online and off. In fact, I was better friends with these people than my college classmates.
What Changed
Somewhere along the line, things changed. I think it had something to do with switching from the two-way communication of BBSes to the one-sided Web sites of Web 1.0. Although I remained friends with this handful of people for some time, I didn’t meet anyone new.
And I didn’t miss meeting people.
After all, I was busy with work — writing books and articles, teaching computer courses for two different companies, writing course material. And then we moved to Arizona and I was busy with my new home, learning to fly, and exploring my surroundings. As my old BBS friendships faded away, new ones didn’t replace them. But I didn’t even notice the gap in my life.
Social Networking
Until yesterday, I never realized the value of social networking sites like LinkedIn, MyBlogLog, and Twitter. You see, I wasn’t in the market for new friends. I didn’t need any. I have friends around here, I have friends elsewhere.
The trouble is, our friends around here are either 20 to 30 years older than we are (remember, Wickenburg is a retirement community) or, if they’re younger, they’re transient, passing through Wickenburg on their way to someplace where they’re not always the youngest person in a restaurant or supermarket. (Okay, so that’s an exaggeration. There are usually a few people younger than me in the supermarket, and some of them are even customers.) We lost two friends our age just last month when he got a better job in Michigan and they just packed up and left. Other friends have been bailing out regularly: one couple to Colorado, one to San Diego, one to New Mexico.
Mike and I aren’t movers. We like to stay in one place a good, long time. But with the way things in Wickenburg are going, I’m ready to bail out. We’ve been here 10 years — that’s longer than most of our friends (in any age group).
So I’m starting to think about new friends who live someplace other than Wickenburg.
Yesterday, I read “How to Use MyBlogLog to Succesfully Build Massive Blog or Website Traffic.” I’d signed up for MyBlogLog back in January, but never did anything with my membership. I had some time, so I went through the instructions in the article. And I started finding blogs for people who write about the same kinds of things I write about. People with similar thoughts and ideas and concerns. And I began to realize that I could make friends online again. Perhaps even good friends.
Now if you’re reading this and actively participate in social networking sites, you’re probably thinking that I must be some kind of moron. Of course that’s what social networking sites are for.
 Well, have you ever seen a hoof pick? There’s a picture of one right here. You use it to scrape horse poop and mud and rocks from the bottom of a horse’s foot. It’s standard equipment for everyone who rides a horse — a responsible rider wouldn’t even consider getting into the saddle unless the horse’s feet had been checked and scraped. But if I didn’t tell you this and you’d never needed one and someone handed one to you, would you know what it was for?
That was me with social networking Web sites. I couldn’t understand the purpose.
Now I do.
(Duh.)
Build Community Through Participation
Yesterday, I also realized that what’s holding back my blog from reaching the next level (whatever that is) is the sporadic participation of visitors.
Sometimes I’ll write a post, hundreds of people will read it, and a bunch of people will post comments with other viewpoints about what I’ve said. This adds substance to the blog and makes it more valuable not only to visitors, but to me. I learn by starting a conversation and reading what others add to it. (I love to learn.)
Most times, however, I’ll write a post and even though many people will read it, no one will post comments to it. Which makes me wonder whether I “got it right” or if anyone cared about what I said. Are these posts a waste of time? Are they useless bandwidth suckers? Why did Post A get a lot of response while Post B, with a similar topic, generate “dead air”?
I may never know.
But the one thing I do know is that I want more participation here. And since I want it here, I’m sure other bloggers want it on their sites. So I’m actively trying to add something to a comment string — sometimes even starting a comment string — when I have something to add. Even if what I have to say is just a quick note to thank the blogger or give him/her my support on that issue. (Whatever that’s worth.)
Twitter Really Is More than Just a Waste of Time
Yesterday was also the day that I realized that Twitter is a lot more interesting if you’re monitoring the tweets of people you know and/or care about. I realized this as I started adding “friends” to my Twitter account — the same people whose blogs I was beginning to monitor. When you follow the tweets of a select group of people, you learn more about them and the things they do. Like me, some of these people publish tweets about the major work-related things they do throughout the day. Or about ideas that have just gone through their heads. Or about life’s frustrations.
And I think that Twitter can be a great way to help decide whether I want to take another step toward a real friendship with someone. A person’s tweets reveal not only what he/she is doing or thinking, but his/her personality. I could never pursue a friendship with someone who composed tweets like AOL chat room IMs. Or a person who took him/herself too seriously. Or someone who used Twitter solely to market a product or service.
So I’m going to be more active in the blogging world, both in my blog and on other people’s it will be interesting to see what new friends I can make.
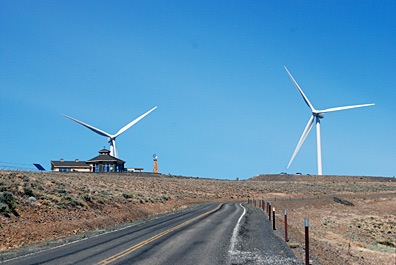
 Follow the entrance road about three miles as it winds up a hill. You’ll pass a bunch of windmills along the way — the road actually passes quite close to a few of them. Eventually, you’ll see the Visitor Center at the top of the site. Behind it are a few windmills that, when seen with the building in front, look absolutely enormous.
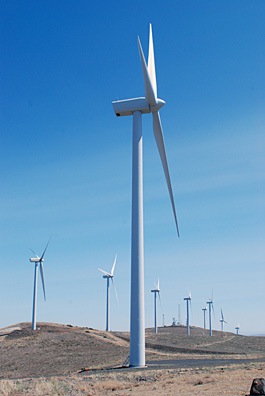
 Want some stats? The facility is on a 9,000 acre site overlooking the Columbia River Basin. It was started up in December 2006 with 127 wind turbines. Each turbine is capable of producing up to 1.8 megawatts of power in 31 mph winds, for a total of 229 megawatts. The turbines start generating power at 9 mph of wind and are programmed to feather their blades and basically shut down when winds exceed 56 mph to avoid damage. Since the site is usually pretty windy, the facility does a pretty good job generating power.
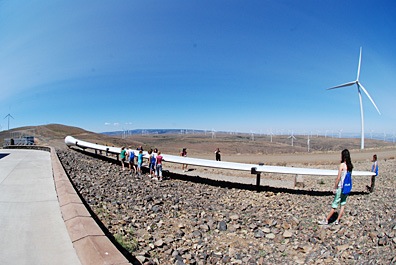
 The blades are also huge. There was one on display outside the visitor center and I snapped a photo with my fisheye lens (which explains the distortion) of the girls gathered around it. Each of a windmill’s three blades is 129 feet long, 11.6 wide near the hub, and 1.6 feed wide at the tip. They’re made of composite materials, are hollow, and weigh 7 tons each. When you figure the length of the rotor blade into the total maximum height of the windmill, you get 351 feet.
 Well, have you ever seen a hoof pick? There’s a picture of one right here. You use it to scrape horse poop and mud and rocks from the bottom of a horse’s foot. It’s standard equipment for everyone who rides a horse — a responsible rider wouldn’t even consider getting into the saddle unless the horse’s feet had been checked and scraped. But if I didn’t tell you this and you’d never needed one and someone handed one to you, would you know what it was for?