Please Don’t Expect Me to Teach You for Free

Why do strangers expect me to share my time and knowledge with them for free?

I’ve been making jewelry for a bunch of years now and have expanded my skillset from the wire-framed cabochon pendants I began with to all kinds of silversmithing work. Along the way, I developed my skills by watching videos, attending hands-on classes, and practicing what I’ve learned. I’ve also invested literally thousands of dollars in equipment and materials.

This is not a “side gig,” as someone once suggested. It’s a real business with income and expenses. I was on track to be profitable (after all that training and equipment) in 2020 — until COVID hit. I’ll likely turn a profit this year.

Understand that I am self employed with several sources of income. Jewelry making is one of them. Making YouTube videos is another. Flying helicopters during the summer months is yet another. So when someone expects me to share my hard-earned skills with them without compensation, I bristle.

Getting My Skills

My jewelry making skillset began through watching a few videos about wire-wrapping stones. In hindsight, I realize that those videos did more harm than good. One of them actually recommended using hardware store pliers, which have ridges for gripping that seriously scratch metal. The finished pieces I created looked just as amateurish as the pieces in the videos. I fooled myself into being satisfied with them.
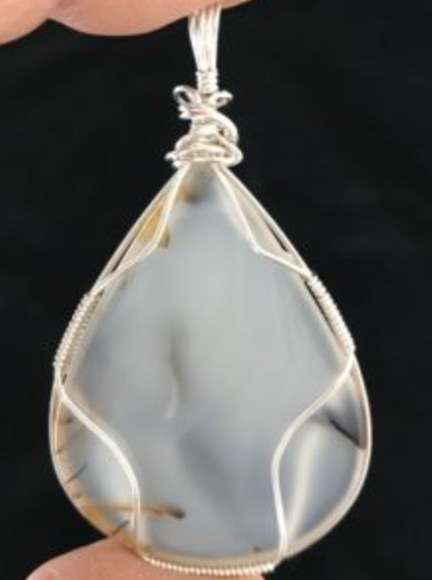
Montana Agate first Piece
The first true wire-framed pendant I made in sterling silver. Many thanks to Dorothy for sharing her knowledge with me.

But I was lucky in that I had a friend who did much nicer work and volunteered to teach me. We sat down together and I made my first piece in real silver using her technique. I remember that day as if it were yesterday. We were in Quartzsite and she was renting a far-less-than-perfect single-wide mobile home in a trailer park while working for a lapidary who was set up at Desert Gardens. We did it at the kitchen table one evening with a lamp brought over to provide the light we needed. She was very patient. That first pendant took two hours to make.
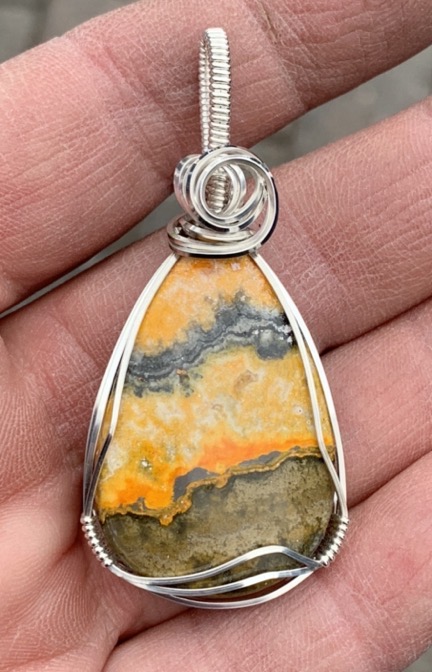
Bumble Bee Jasper
I made this Bumble Bee Jasper pendant this past weekend while sitting in my booth at the art show; it sold the same day. I can now make a pendant like this in about 30 minutes if I’m not interrupted.

I was happy with my first effort, but looking at it now reminds me of how far I’ve come. My style has changed significantly over the years. I now wrap all of my bails for a cleaner (in my opinion) look and work hard to cover the stone as little as possible. I’ve made (and sold) hundreds of these pendants over the past three and a half years and I’ve since moved on to other things.

I should make something very clear here. I never asked Dorothy to teach me how to make pendants. She offered to do it. She wouldn’t take my money, either — even though she’d provided the sterling silver for that first pendant. But I wasn’t satisfied to let it rest. I called up Rio Grande, the jewelry supply company she introduced me to, and asked them to put $50 on her account for her to use the next time she bought something. A sort of gift certificate. Months later, she found that credit and thanked me for it. But the way I see it, I still owe her.

The trouble with wire work is that it’s seen as an inferior form of jewelry making. I’m not sure why. While some wire work — like what I’d started doing on my own — can be pretty crappy, there’s other work that is far more polished and professional. Still, when you apply for a juried art show and the only thing you’ve got to show is wire work, prejudices keep you out, no matter how polished it looks. I needed to take my jewelry making to the next step.

That said, I signed up for a 3-day intensive metalworking class at the Tacoma Metal Arts Center. This was not a cheap undertaking. The class itself cost $375 and I had to get myself over to Tacoma, which is about a 4-hour drive. I also had to get lodging for myself; I lucked out there because they let me park my truck camper in their back parking area every night. I’ve since taken two other classes through TMAC, including a blacksmithing class in Eatonville.
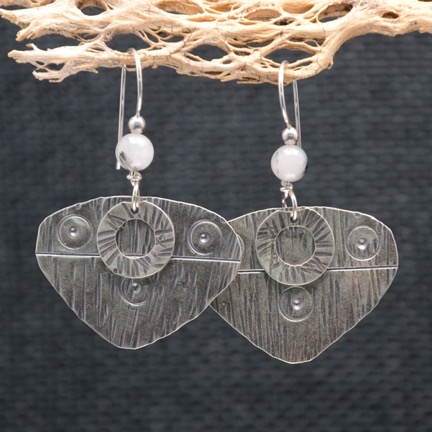
Hammered Earrings
These silver earrings are entirely handmade, right up to the ear wire. (Only the beads are purchased.) I started with silver sheet metal and cut the earring and “washer” shapes. Next came hammering and stamping the texture. Then I applied a patina and used various tools to rub it off the high points. Finally, I created the ear wire with the quartz and silver beads.

I learned a ton there although few of the skills were polished enough to use right afterwards. I had to practice. I started producing different styles of earrings, using the metal forming skills I learned. Soldering, at first, was a stumbling block, but I (mostly) got past it. I began making tab-mounted, then prong mounted, and finally bezel set cabochon pendants.

I also decided to take the deep dive into jewelry making by investing in equipment. A flex shaft. A rolling mill. A table-top metal shear. Hammers and dapping sets. Mandrels. A vice. A grinder. Bench blocks. Finishing tools. Soldering station equipment. The list — and the related costs — go on and on. But if there’s one smart thing my wasband ever said (again and again), it’s “Every job is easy when you have the right tools.” I invested in the tools I needed to explore my design ideas and get the job done.

And I took more classes. In January/February 2020, before COVID hit hard, I signed up for 5 Vivi Magoo classes at the Tucson Gem and Mineral Show. That meant an investment in close to $2,000 on just skills. And $250 for a site in a campground nearby — rather than the $250/night cost of a room at the hotel where the classes were being held. I learned more advanced techniques by actually doing them. The skills I brought home enabled me to come up with new designs and take my work to the next level. I was able to get into most of the juried art shows I applied to — the ones in Palm Springs remain elusive — and to sell my work at shows and in galleries.

Still, I continue to this day to take classes — I just signed up for one in Tucson this coming February — and to hone my skills with new designs.

Sharing My Knowledge

About two years ago, before COVID hit, I did some one-on-one and classroom training. In most cases, it was project based: I’d teach people how to make something I made, including wire-framed pendants, chain bracelets and necklaces, and a variety of metal formed earrings.

Understand that I’ve always been paid to share my knowledge with others. Whether I did one-on-one training at Pybus Market when I sold pendants there or taught small groups at a booth in Quartzsite, AZ in the winter or did classroom training at Gallery One in Ellensburg, I was compensated for my time and the materials I provided to class attendees.

The only exception is when one of my neighbors wanted a copper cuff bracelet like the ones I make out of copper pipe. I invited her over to my shop and the two of us hammered out a pair of bracelets. She is my friend and she takes care of my cats and chickens when I travel. It was a pleasure to be able to teach her how to make her own bracelet and I think she values it more than if I just gave her one. There’s something special about having a hand in making something you wear.

A Stranger Emails

In an effort to generate some off-season revenue before I head south for the winter — as I normally do — I placed a few Craig’s List ads offering my services as a jewelry maker to teach people how to make some of the things I make and sell. The ads go under the heading of “Learn to Make these Earrings!” etc. They basically show a photo or two of the project item and skills they’ll learn while making it. There’s a cost with a discount if more than one person attends. I’d link to them, but chances are they will have expired by the time most people read this. Here’s a screen shot of the start of one:
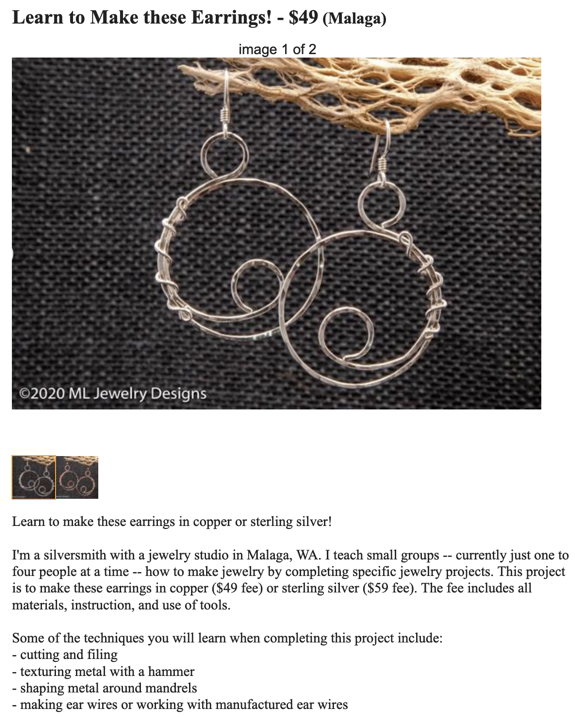
Learn to Make Earrings
This is the first pair of earrings I designed and made; ironically, they remain one of my most popular styles.

I also have an ad for general jewelry making where I offer to teach anything I know using any of my equipment for $50/hour/person with a 2-hour minimum. This is for someone who has an idea of what they want to learn but doesn’t necessarily want to do one of my projects.

On Thursday, I got an email forwarded by Craigs List, referring to one of my project-based ads:

Hi:

Saw your post on CL, and I watched your YT video, nice shop.

I am semi-retired and live in [redacted] and process roughs from a local source. I would like to learn how to make jewelry, and I also interested in perhaps contracting with you for some consulting.

In my garage/shop, I have a commercial grade vibratory tumbler, and 3 large rotary tumblers, a 6-inch Hi-Tech saw, and flat lap, a Gryphon router, and the necessary tools, and most of the supplies for making jewelry. Oh yeah, and about 400 lbs of roughs, and about 200 lbs of finished stones (I’ve been tumbling since 2016).

I also had a professional website built in January of 2021 but I have not really given it the focus it needs, in part because I want to add jewelry to the product line.
[redacted]

While I am a life-long (closet) artist, my devotion has been to pencil & paper, otherwise I was a [redacted] in [redacted] for [redacted].

I want help organizing my shop, so that I can make jewelry here in [redacted]. I have also been toying with the idea of hiring a part-time employee to make jewelry from my processed stones, and would enjoy a second opinion.

Best regards,

[redacted name and phone number]

(By the way, here’s the shop video he’s referring to. It gives you some idea of my investment in equipment.)

I have redacted some identifying information because it’s not my purpose to identify and/or shame this person. It doesn’t really matter who it is, does it? I’ll just point out here that, like me, his primary career was not in any way related to art or jewelry making. This is something pretty new for him.

I looked at his website. It was very pretty. It had a lot of pictures of tumbled stones and a lot of the usual nonsense about spirituality and vibrations and the meanings of rocks. It did not seem to actually sell anything.

I re-read his message. He is basically a rock tumbler — he polishes rough stones by putting them in a barrel with different grits and letting the barrel run for weeks on end. Anyone can tumble rocks — hell, Amazon sells a kit that’ll get a 10-year-old kid started in no time for just $59. The only thing that impressed me about his equipment was that he was set up to tumble a lot of rocks.

(Maybe I should mention here that you can buy tumbled rocks by the handful or little bagful from a lot of gift shops out west for $5. Here’s 2 pounds of the stuff with a book about rocks for $20.)

I don’t use tumbled rocks in my work. The only stones I use are cabochons, which require different equipment and a lot more time and effort to make. Cabochons have flat backs and domed fronts. They’re often in regular shapes, like ovals and teardrops, but can be more randomly shaped, depending on the skills and artistic ideas of the lapidary who makes them.

I thought for a while about how I would answer this guy’s message. I even toyed with the idea of hooking him up with someone who did the kind of wire wrap work I started with. But in the end I decided to give him what he seemed to be asking for: advice.

I’m sorry it took me so long to respond. I was busy this weekend selling my work at Art in the Park in Leavenworth.

I don’t think I can help you. I don’t use tumbled stones in my work at all. I use cabochons, which are best for the kind of stone setting I do.

As for an opinion: if you hired someone to make jewelry for you, the money you pay that person would have to be added to the cost of the jewelry, along with the materials used to make the jewelry.

You have to consider how much you could sell the jewelry for. Have you visited shops selling the kind of jewelry you want to make? Have you seen the prices on that jewelry? Can you discern whether it’s actually selling at those prices?

As you may have already surmised, having a “professional website” does not mean you’ll be able to sell a lot of product. Everyone has a website these days. You’d do better attending art or craft shows or setting up wholesale or consignment accounts. All that costs money, too. And, after spending a total of 30 hours in Leavenworth this weekend, with six hours of commuting and the cost of the booth fee, my tent, and display equipment to factor in, I can assure you that shows take a lot of time, energy, and money to sell at. Wholesale accounts expect to pay 50% of retail; consignment these days wants 35% to 40% of the selling price. Selling costs are real and need to be figured into any calculation.

Is the selling price minus cost of sales and cost of creation worthwhile for you?

These are the things you need to think objectively about. I hope this has been helpful to you.

Apparently, I misunderstood what he wanted. He didn’t want “a second opinion,” which I read as advice. He replied within 24 hours:

Thank you for your response. The business part I understand, the mechanics of jewelry making is my present interest.

Like yourself, I also do shows. I’ll be at the [redacted] Farmers Market this [redacted]. I do it because it’s a great chance to interact with the community, and I am test-marketing new products, some of which I purchase from Amazon, and resell.

I do have a rock saw, a sander and dop station, and can make cabochons myself.

However to speed things up, I’m in the process of determining whether I want a Cab King or a 6-inch Covington combo unit. I realize the lead times on these are significant but I am not deterred.

So, with that said, would consider teaching me how to make jewelry?

Regards,

[redacted]

Whoa. There was a lot to unpack there.

I bristled big time when I read, “like yourself, I do shows.” (And it wasn’t the grammar that got me.) He has no fucking idea what “doing shows” is all about if he’s limited to a 4-hour local farmer’s market. Has he carted a tent, leg weights, tables, table coverings, displays, etc. all over the southwest, spending hours to set up and tear down booths at venues in three (so far) different states? Has he dealt with trying to sell inside a tent in the cold or heat or rain? Having to go to the bathroom when there’s no one around to watch your merchandise while you wait in line at a port-a-potty? Has he even dealt with the jurying process, paying a fee just to see if his work is good enough to get into a show?

Okay, fine. But then there’s the farmers’ market itself. I’d been talking to a customer about that particular farmers’ market over the weekend. The customer suggested it to me. I tried to kindly explain why I wasn’t interested, focusing on the fact that setting up my booth for a 4-hour event was just not practical. The real reason was the fact that most farmers’ markets are not juried — that means there’s no assurance that I’d be showing my work with other people selling real art. You might think that’s a good thing, but when you’re trying to sell silver and gemstone pendants for $59 each and sterling silver earrings for $39 a pair, it really isn’t good to be among people selling junk jewelry for a lot less money.

And then there was his admission that he buys stuff on Amazon and sells it at the farmers’ market. Holy shit. That is a mortal sin in the world of art shows. I guess it’s okay if you just want to turn a few bucks, but if you want to be and represent yourself as an artist? My opinion of him dropped a few levels when I read that.

And I became very glad I didn’t waste my time at that farmers’ market.

As for buying a Cab King (which I own) or Covington Combo Unit and thinking you can make great cabochons cost effectively right out of the gate, I can tell you from experience that it just isn’t going to happen. When I make my own cabochons — which I occasionally do — I spend roughly an hour or more of time on every single one of them. I have come to realize that my time is worth a lot more than I could get for it by making cabochons, so I’ve decided to simply buy most of the cabochons I use. My collection is quite extensive at this point, with over 800 stones from all over the world, and I have no trouble selling them for considerably more than their cost on the rare instances when someone wants to buy one. My art is in the jewelry I make — not the raw materials I make it with.

Anyway, I was able to answer his request with a much shorter email. After all, it seemed that he wanted me to teach him how to make jewelry. Sure, I could do that:

Yes, I have a Craig’s List ad that offers that service.
https://wenatchee.craigslist.org/art/d/malaga-learn-to-make-fine-jewelry/7383971485.html

I can basically teach how to make almost anything that I make.

Maria

The link would take him to my ad about teaching jewelry making for $50/hour with a 2-hour minimum. If he wanted me to teach him how to make jewelry, he, like almost everyone else I’d taught over the past few years, would have to open his wallet and pay me for my time, knowledge, and equipment.

That was three days ago. I’m still waiting for his response.

Isn’t It Worth Something?

This is the same crap I’ve been dealing with for years in all of my freelance work: writing books and articles, flying helicopters, editing video, making jewelry. I have skills and equipment — sometimes very costly equipment — do you know what costs to buy and maintain a helicopter? — and someone expects me to share these things for free.

These are the tools I use to make a living. Any job I do requires my skills and equipment and the most valuable thing I have to offer: my time. Why the hell should I be expected to give this stuff away? To a stranger, no less?

In hindsight, I’m sorry I spent so much time answering his original email message. I gave him information based on my experience and I used my time to share it with him. What the hell is wrong with me? Why didn’t I realize from the get-go that he was just another person trying to squeeze something of value out of me, likely for free?

Anyway, I don’t expect to hear from him again, unless he’s going to try to trade me training time for some of his rocks.

I bet you can guess how that suggestion would go with me.

Great Loop 2021: The Log Books

I create a custom log book to track my time on the water.

One of my goals as I head into my “golden years” is to get charter boat captain certification. The endorsement I’m interested in is commonly known as a “six pack,” meaning that I can take up to six passengers for hire on a boat. While I don’t expect to make charter boating my fourth (or fifth?) career, I’d like the ability to be able to cover my boating costs by occasionally taking paying passengers on day or overnight trips.

(And yes, I know I don’t have an appropriate boat yet. I’m working on that, too.)

About the Six Pack

The official name for the captain’s certification I’m looking for is National Operator of Uninspected Passenger Vessel (OUPV) of Less Than 100 GRT. The common abbreviation is OUPV 6-pack. According to the US Coast Guard, which oversees these certifications:

This officer endorsement is most appropriate for uninspected passenger vessels which by law are limited to six or less passengers for hire. These are usually smaller vessels and normally engage in charter fishing, whale watching, SCUBA diving, and tour cruises.

OUPV Near Coastal endorsements may be limited to 100 miles offshore, Inland or Great Lakes in accordance with 46 CFR 11.467 and the service provided. No OUPV endorsement is valid for International voyages.

There are a number of requirements to get this certification. Here’s a simplified list; you can download a more detailed list here:

  • U.S. Citizienship
  • 18 Years or age or older
  • Medical certificate
  • Drug testing compliance
  • Mariner fees paid
  • Sea service accumulated – 360 days
  • Sea service recency – 90 days in past 3 years
  • First aid course
  • CPR course
  • Exam or course completion certificate

Sea Service

The sea service requirement will be the toughest to meet and since it must be documented on the application, I’m motivated to keep track of it.

I’ve spoken to numerous people who have told me a variety of things about what constitutes “sea service.” One person I spoke to said that because he’d grown up boating with his family, all of those day trips could be logged as sea service. He said that even though he didn’t have a record of all of those days, he could make a reasonable estimate.

I’m in the same boat — no pun intended. My family had a boat that we’d often take on day trips on the Hudson River near New York City. In fact, a common outing would be a ride around Manhattan Island or down to the Statue of Liberty or up as far north as West Point. Later, when my family moved to Long Island, my family boated out in Long Island Sound. I have no idea how many outings we did as I was growing up, but I don’t think that 50 is an unreasonable estimate.

I also have boating experience as an adult on a variety of inland bodies of water including Lake George, Lake Powell, Lake Mead, Lake Pleasant, the Colorado River, the Columbia River, Lake Chelan, and Lake Roosevelt (in WA). Some of these trips involved overnight stays on the boat. Added up, I’m sure that would account for another 50 days.

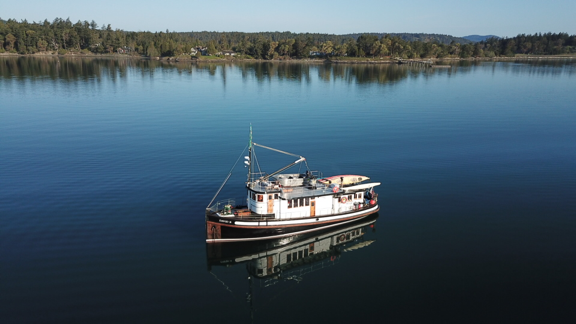
And then there’s the Learn to Navigate the Inside Passage cruise that I went on back in 2019. This was the real deal: I was one of four people on a 65-foot, 90-year-old wooden boat that cruised at the breakneck speed of 6 knots up the Inside Passage between Bellingham, WA and Ketchikan, AK. For 12 days, I was a “crew member” while we learned about navigation and piloting from Captains Jeffrey and Christine. The following year, I joined them again for another 4 days on the water in the San Juan Islands. According to Captain Jeffrey, all this time could be logged.

David B at Garrison Bay
The David B at anchor in Garrison Bay.

It’s that time that was most valuable given that of the 360 days I needed on the water, 90 days of service had to be on Ocean, Near Coastal, or Great Lakes waters, depending on the kind of charter services I wanted to offer. Because I wanted to offer Near Coastal charter services in the San Juan Islands and possibly on portions of the Great Loop, I needed that Near Coastal time.

And my upcoming trip would be a huge addition to my sea service time. After all, I expected to be on the boat for about two months. That’s a lot of days of near coastal and Great Lakes time.

Finding a Book to Log Time

Of course, the best way to keep track of the time I could include in my sea service submission to the Coast Guard was to log it — much like I already log the time I fly to maintain a record of currency for my pilot certificate. With that in mind, I started looking for a “captain’s log” or “crew log” book.

And I found a lot of books that I just couldn’t see working for me.

The trouble is, most books were designed for either commercial boat captains or pleasure boaters:

  • The commercial captains’ logs had lots of form fields for entering daily boat and engine check information, weather, departure, destination, and miscellaneous paperwork information. This is the information you’d expect to be part of a legal record of every single day or trip on a commercial vessel. I simply didn’t need all of those form fields.
  • The pleasure boaters captains’ logs had less detailed forms but not much space for including a narrative of the trip. They didn’t seem concerned with logging time as much as logging where the boat went and who was on board.

I wanted something that combined features from both flavors of books, something where I could log each day of the journey and take notes for blog posts or other written accounts. And rather than enter detailed vessel information on each page — after all, I expected to be on the same handful of boats as I built my time — I wanted vessel details listed separately. I also wanted pages that summarized the days logged by month and by vessel.

So I designed my own book.

My Captain/Crew Log Book

Creating my own book pages wasn’t a big deal once I knew what I wanted on each page. After all, from about 1995 to 2012, I did layout of about half the books I wrote using a variety (over the years) of desktop publishing software: QuarkExpress, PageMaker, FrameMaker, and InDesign.

I’ve had a love/hate relationship with desktop publishing software for a while now. In my later days of writing books, I used Adobe InDesign to do page layout and then to generate PDFs and ebook format files for publishing. But when InDesign went from a pay once software package to a subscription software package, I simply stopped using it. I couldn’t see paying monthly for a software package that I only used a few times a year.

Just before I began tackling this design project, however, I got my hands on Affinity Publisher, a desktop publishing package that was inexpensive and didn’t require a subscription to use. I decided to try my hand at using it while doing this project.

It went remarkably well. Affinity Publisher was similar enough to InDesign that the learning curve was relatively easy for me. When I got stumped, I used its online help feature to figure out how to do what I needed to do. Little by little, I built up the master page styles that would make up my book. Then it was just a matter of adding pages.

Some of the design choices I made include:

  • 8.5 x 5.5 page size. This is half a standard “letter size” sheet of paper. It makes the book relatively small.
  • Spiral binding. This makes it easy to lay the book open and, if necessary, to remove pages.
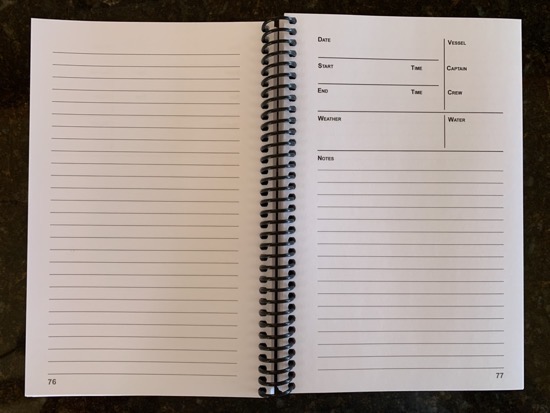
  • Double sided log pages. The recto (right side) page has the form to detail the entry and it’s followed by half a page of lines for notes. The back of each page has more room for notes. Again, I wanted to be able to include a lot of notes for each logged day. I chose this format instead of spreads — where the start of each entry would be on the verso (left) side and the rest on the recto side — because I wanted to be able to remove pages if necessary. I’m still not 100% sure about this decision; I think it would work either way.

    Log Book Pages
    A log page spread. The entry starts on the recto page and ends on the following verso page.

  • Simple summaries at the beginning of the book. I could add entries here as time went on.
  • Vessel Info
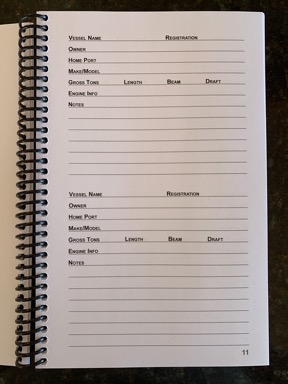
    There are three double-sided Vessel Info pages that I can use to enter details about up to 12 boats.

    Vessel details at the beginning of the book. Each vessel could be listed on a half-page form at the beginning of the book. This keeps those details off the log pages. I write the vessel name in the log page and then can cross reference it to details in the vessel list.

Log Book Cover
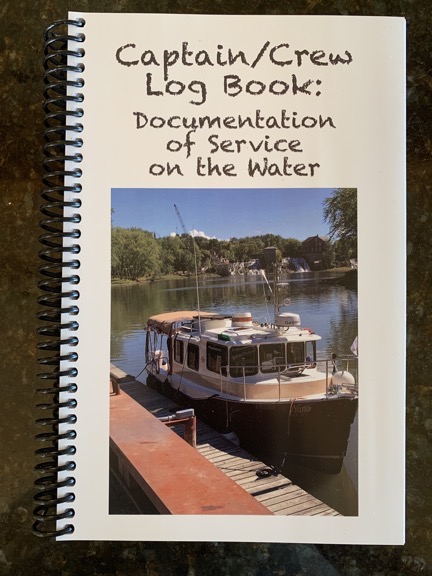
Here’s the book’s cover, with a nice photo of Nano on it.

I got a high-res photo of the boat I’ll be on this summer, Nano, to put on the cover.

I used a service called Printivity to print my books. I submitted a properly prepared PDF, made my payment, and waited. At my request, a representative got back to me to answer some questions and, with the information she provided, I fine-tuned some options.

Although the books were affordable to print, shipping was costly. To get the most bang for my buck, I ordered four copies. I figured I’d give the extras away to my fellow crew members, if they’re interested.

The books arrived two weeks after I submitted the PDF and paid for them. They looked pretty darn good for a first effort. I’m looking forward to making entries in mine during the trip.

Handmade Items: It’s NOT Just Materials Cost

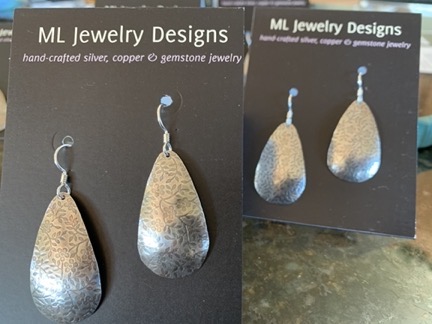
I explain why I charge $39 for a pair of earrings with less than $10 worth of materials.

Yesterday, I went down into my jewelry shop and made 6 pairs of earrings out of roughly $55 worth of sterling silver sheet metal and pre-made ear wires. I’ll sell each pair for $39. Sounds like a great deal for me, right? Well, if you read on, you’ll learn more about the actual cost of these earrings.

I tweeted my progress while creating these earrings, using a Twitter thread with photos. I skipped tweeting the first step, which was getting the pattern onto the silver — I don’t buy sheet silver with a pattern already on it (although I do sell it that way) — but got most of the other steps. They make up good documentation for this blog post’s purpose, which is to talk about what actually goes into making something from scratch: materials, tools, skills, and time.

Materials

The materials for this project were pretty basic:

  • 26 gauge sterling silver sheet. I buy the metal I plan to apply a pattern to in 6″ x 2.5″ pieces because that’s the size of most of my texture plates. I learned (the hard way) that you can ruin a texture plate by using it to texture a smaller piece of metal than the plate. Because of a 75% or so increase in the price of silver last year, this small piece of metal cost just over $42.
  • Sterling silver ear wires. I buy these in bulk, but they still cost nearly $1 each. I can save money by making them myself out of 20 gauge half-hard sterling silver wire, but I like the look of the ones I buy and they’re less likely to bend out of shape than the ones I make. I’ve even had one of the galleries I provide inventory to tell me that they prefer manufactured ear wires for the very same reason.
  • Rubber ear nuts. These are tiny pieces of rubber that go onto the end of the ear wire, making them less likely to fall out of your ear (or off the jewerly display card I use when selling). I buy them by the gross and they cost a fraction of a cent each. (I don’t understand why all jewelry makers don’t include them with ear wire earrings. Such a tiny, inexpensive little thing can prevent the loss of earrings.)

In addition to these materials. I also have the printed cards I use to display and sell the earrings. These cost just pennies apiece and are part of my marketing/selling expenses, but they shouldn’t be overlooked. Ditto for the specially sized, clear plastic zipper bags I put the earrings and cards into when I sell.

Tools and Equipment

It’s the tools and equipment that really add to the cost of the jewelry I make. As an accountant might tell you, these are fixed costs that need to be considered as part of anything you make with them. The more you use a tool or piece of equipment, the less the per-piece cost of that equipment is. An analogy from my day job as a pilot would be something like insurance: if it costs you $15K/year and you fly 100 hours a year, that’s $150/hour; but if you fly only 10 hours, that’s $1500/hour. Ouch.

Going through the steps to create these earrings, I used the following tools and equipment:

  • Rolling mill. This is the device I used to impress the pattern onto the silver. Rolling mills vary in cost. I have a Durston, which is made in the U.K. and isn’t cheap. But mine is small, so it wasn’t too costly. I think I paid around $750 for it.
  • Texture plate. This is a piece of brass with a texture on it. The brass is harder than the silver so when the two pieces of metal are run through the rolling mill together, the texture from the brass is imprinted onto the silver. The texture plates range in price from about $5 for a single-use paper version up to $100 or more for steel versions. My brass plate cost about $10 and will give me about 50 impressions before it’s too flat to make more impressions.
  • Metal shear. Although I didn’t really need it for this project, I used my metal shear to cut off a 1/4″ by 2 1/2″ piece of the textured metal to use as a ring blank. You see, when the metal goes through the rolling mill, it stretches. So even though I cut 1/4″ off one end, I still had 6″ x 2 1/2″ of textured metal to work with. My metal shear, which I use a lot, cost about $250.
  • Shape template. I use shape templates to create earrings and other items in consistent sizes and shapes. The template I used for this project has about 30 shapes/sizes on it and cost $8. It’s made of heavy duty plastic so it’ll last a long time.
  • Fine point Sharpie pen. That’s a tool, too. I used it to trace the shapes onto the metal as close as I could without overlapping. What do they cost? About $3 each?
  • IMG 0028
    Here’s the cutting job in progress.

    Joyce Chen kitchen shears. I have a variety of ways to cut metal sheet — my jeweler’s saw, a pair of French shears — but I used these shears for this project. They’ll cut through any reasonably thin soft metal — and 26 gauge silver is pretty thin and relatively soft. The cost? $21.

  • Flex shaft. After cutting out all those pieces, I needed to smooth their edges. Being the machine person I am, I used my flex shaft, which is basically a Dremel-style tool with the motor at the end of a long shaft and a foot pedal to control the speed. Mine is a EuroTool and cost about $120. But don’t forget to add the motor hangar for it, which cost another $32.
  • Mounted sandpaper cartridge roll. I used a sandpaper roll to do the actual sanding. They cost about $1 each.
  • IMG 0032
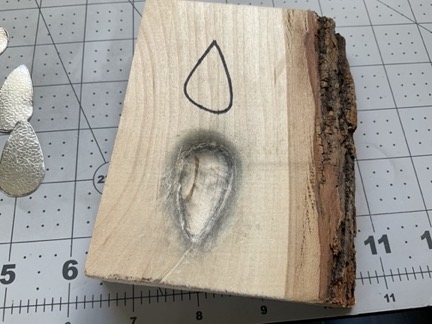
    Here’s my custom dapping block. The other drawn-on shape is for one I no longer use and never actually carved into the wood.

    Custom dapping block. A dapping block makes it possible to put a dome into pieces of metal. But because these earrings aren’t round, they needed a custom dapping block. I made mine from a piece of bass wood that only cost about $2, but I used a variety of Dremel bits to carve it out and I fine-tune it every time I use it. Still, we’ll say $2 for this homemade tool.

  • Nylon hammer. Although my photos on Twitter show me using a dapping punch with the block to put a dome on the metal, I actually used a domed nylon hammer that has always worked a little better for me. Cost: $14.
  • Hole punch. While I could have drilled holes for the ear wires into each piece before doming it using a center punch, flex shaft, and drill bit, I took the easy way with a 1.25mm metal hole punch. Cost: $14.
  • Scrap wire. I used a piece of thin copper wire to attach the earring pieces together for oxidizing them. The cost of this scrap is pennies and not even worth adding into the equation.
  • Using Liver of Sulfur
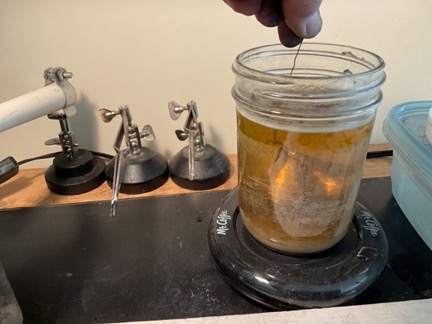
    In this shot, I’m dipping all 12 pieces of the earrings, on a copper wire, into the liver of sulfur. You can see the jar and mug warmer, as well as the side of the container next to it that I use for the baking soda rinse.

    Liver of Sulfur. Liver of sulfur is a chemical that, when dissolved in warm water, can darken copper or silver (but not gold). It’s widely used by jewelers who want an oxidized look on textured metal. The stuff I use costs $18/jar and that’ll last about a year.

  • Mason jar. I use a 1-pint wide mouth mason jar to mix, heat, and store the liver of sulfur. Because I do canning, I always have a bunch of spare jars — although once I use them for chemicals, I can’t wash and reuse them for food. Figure about $2 for this jar with the plastic lid.
  • Cup warmer. I use a coffee mug warmer to keep the liver of sulfur warm while working. The one I use costs $11, but you can sometimes find them cheaper in thift shops.
  • Baking soda. I mix baking soda and water in a glass bowl and use that to neutralize the chemical reaction of the liver of sulfur so the metal stops darkening. It’s the stuff you buy in the supermarket. How much? I don’t know. $3 for a box that’ll last a very long time?
  • Container. Of course, I need a container to put that baking soda and water solution in. I use reusable disposable plastic containers with lids. When I’m done, I cover it up so it doesn’t evaporate. Figure $2 for a container with a lid.
  • Tumbler. There are all kinds of tumblers you can use for jewelry, but I use a basic Lortone 3A 3-lb capacity rock tumbler. I paid about $110.
  • Ceramic tumbling media. This is my secret sauce and I’m not very motivated to provide details, mostly because it saves me a ton of work and provides consistent results every time I use it — which is vital when you need to make multiples that are the same. Let’s just say that it’s ceramic tumbling media that rubs the darkening off the raised part of the pattern. The stuff I use costs $45/bag and that bag will last at least a year. If you want to try it, find one that works for you. (Good luck.)
  • Dawn detergent. I add a drop or two of Dawn to the tumbler with the ceramic media and water. I always use dawn because everyone recommends Dawn. I buy small bottles that last a long time. What does that cost? Let’s say $2.
  • Extra tumbler barrel. Because it’s best to keep stainless steel shot separate from any other tumbling media, I had to buy an extra barrel. Add $36.
  • Stainless steel shot. Steel shot burnishes the finished jewelry. Don’t buy the cheap stuff; it’ll rust. I buy it by the pound for $26; because it doesn’t rust, it should last forever.
  • Burnishing compound. A few drops of burnishing compound in the tumbler with water and the steel shot helps achieve a nice polish. It’s $10 for an 8 oz. bottle that lasts at least a year.
  • Earrings
    I finished the earrings in my home at my breakfast bar while waiting for dinner to cook.

    Chain nose pliers. I use pliers to open the ear wire loops and close them once the earring piece is attached. My preferred brand: Wubbers. They’re not cheap but they’re heavy duty. $26.

  • Paper hole punch. I use a small punch to put holes in the cards that I mount earrings on. Figure about $9.

That’s everything I used directly during the course of this project. It doesn’t include rags or paper towels or the wipes I use to keep my workspace clean after sanding. It doesn’t include any of the furniture in my shop — my homemade jeweler’s bench, the tables where I keep my rolling mill and soldering station (where the liver of sulfur lives), or my adjustable height stool. It doesn’t include lighting and utilities for my shop space. Heck, it doesn’t even include the cost of constructing my shop space, which is an entire 12 x 24 foot room in my garage.

Let’s add these costs up:

ItemAcquisition Cost
Rolling Mill$750
Texture Plate$10
Shape Template$8
Fine Point Sharpie$3
Joyce Chen Shears$21
Flex Shaft$120
Flex Shaft Motor Hangar$32
Sandpaper Roll$1
Dapping Block$2
Nylon Hammer$14
Hole Punch$14
Liver of Sulfur$18
Mason Jar$2
Cup Warmer$11
Baking Soda$3
Container$2
Tumbler$110
Ceramic Media$45
Dawn Detergent$2
Extra Tumbler Barrel$36
Stainless Steel Shot$26
Burnishing Compound$10
Chain Nose Pliers$26
Paper Hole Punch$9
Total$1,275

Add that to the $55 in materials and you come up with $1,330. So if the only thing I ever made was those six pairs of earrings, their cost would be $222/pair.

Yes, that’s absurd. Of course I make more than six pairs of earrings with all this stuff. But how many pairs of earrings do I need to make and sell at $39/pair to cover my investment in tools and equipment?

Think about it.

Skills

And then there are skills, which come with training and experience.

I am not exaggerating when I say that I’ve spent thousands of dollars on jewelry making courses — in-person and online — as well as books and magazines. YouTube videos can only take you so far — what works best is one-on-one time with someone who has actually been doing this for a while.

And practice. How many times did I screw up a piece of metal in my rolling mill? Or cutting it apart? Or oxidizing it? (I’m still smarting from a bad oxidation job on 3 pairs of Keum-boo earrings where I used a new (to me) solution and darkened the gold as well as the silver. Ouch.) Or any of the other steps that went into this project? Practice really does make perfect — or as close to it as a person can get. Practice takes time and burns through materials and supplies. It’s no coincidence that we practice with copper instead of silver or — heaven forbid — gold.

Time

Time is easily quantified for this job since I know when I started and when I finished: 3 hours. That comes out to 30 minutes per pair of earrings. This is why I made stuff like this in batches; it’s a much more efficient use of time.

But how long did it take last time when I didn’t necessarily have everything as well organized? And how long will it take next time, when practice makes me a bit faster?

And shouldn’t I be compensated for my time? Clearly, I wasn’t compensated directly for the time I spent in training or reading up on new techniques or ruining materials because of inexperience or dumb errors. I should, at least, be compensated for the time I spent actually creating salable pieces of jewelry, no?

The Bottom Line

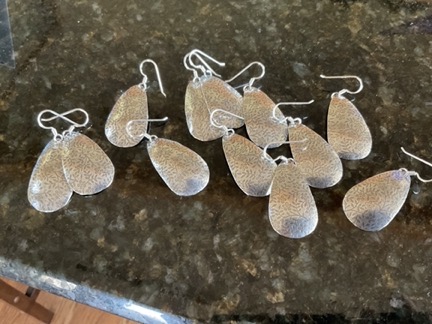
Finished Earrings
Some of the finished products.

Here’s the bottom line: I took 3 hours of my time and used thousands of dollars worth of training, hundreds of hours worth of practice time, and $1,330 worth of materials, tools, and equipment to make 6 pairs of earrings that I’ll sell for $39/pair.

I think buyers are getting quite a deal, don’t you?

B&S Gauge Thicknesses, Saw Blades, and Drill Bits

Another handy chart for jewelry makers.

The other day, I published a chart of Minimum Metal Gauges for making jewelry. I’d made the chart for my own use, based on information I got from the Rio Grande website.

But what I’ve really wanted for a long while was a single chart that listed B&S gauge sizes, the corresponding measurements in millimeters and inches, and the correct jeweler’s saw blade and drill bit sizes for each gauge. For some reason, I could not find all of this information on one chart anywhere.

So I made one by combining information from the Contenti and Livingston Jewelers websites. Here’s the result:

Thicknesses, blades, and bits
This is the chart I’ve been looking for! In the end, I had to make it myself from multiple sources of information.

You can download this chart as a PDF from my public Dropbox folder.

Keep in mind that although I do have a set of jeweler’s drill bits, I don’t use them. Instead, I have a set of bits in various fractional mm sizes — I pick the drill bit I need from that set because I can get a much closer drill bit size for my needs.

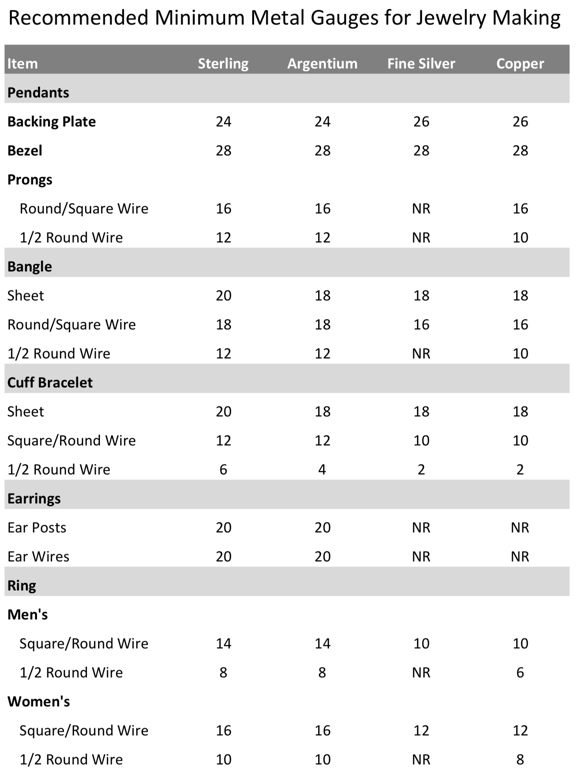
Minimum Metal Gauges

A handy chart for choosing metals for jewelry making.

My “day job” may be flying helicopters, but I moonlight as a jewelry artist. I’m constantly looking for reference materials to help me choose the right tools and materials for making jewelry. I find charts extremely handy since I can print them out and attach them to a wall beside my jewelry making bench in my shop. No need to rely on my memory since the chart is right there.

I stumbled upon one on the Rio Grande website recently. It was almost what I needed. I modified it to add information I needed and remove metals I don’t work with. (I only work with sterling, Argentium, and Fine silver and copper.) Here’s the result:

Recommended Metal Gauges
Table of metal gauges. “NR” means not recommended.

You can download a copy in PDF format from my public Dropbox.

If you find posts about jewelry making interesting, please take a moment to leave a comment and let me know. Thanks!