Finally finished after too much procrastination!
One thing I wanted on this home was a deck — a place to spend time outdoors any time of year to take in the view, entertain friends, and just kick back and relax in a comfortable place. In my opinion a home in a beautiful place needs an outdoor living space.
The Plan
My original plans called for just a long, narrow, covered deck on the north side of the building, over the garage doors. But I realized that I’d need room for a table and chairs so I added a wider, uncovered deck on the east side of the building. The total nearly 600 square feet was split almost evenly between the 6 x 48 foot covered deck on the north and 10 x 30 uncovered deck on the east.
The builders prepared for the north deck from the start, planting the posts at the same time they planted posts for the rest of the building. This made it easy to make the deck roof part of the living space’s roof. Later, just before pouring concrete for the building’s floor, they placed the deck posts for the east deck. And finally, near the very end of the project, they spent two days framing the deck.
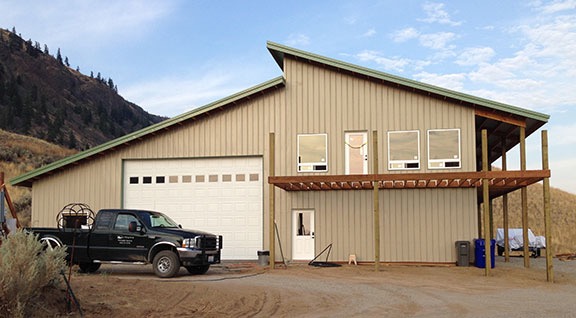
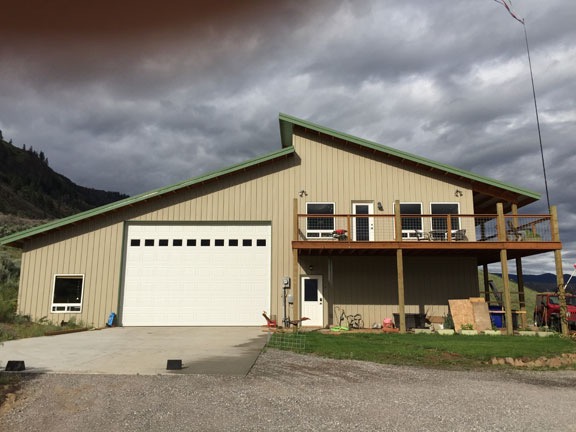
Here’s what the front of my home looked like on August 1, 2014.
And that was all they did. There was no deck floor, no deck rails. That would be up to me.
Off to a Slow Start
Although the deck’s completion, with rails, was required for final inspection, it was very low on my priority list. If you click the new home construction tag and page back through the blog posts that appear, you’ll get a better idea of what I considered more important. Almost everything. And that was especially the case as summer turned to autumn and then winter.
When spring rolled around, I was ready to start thinking about the deck. I already knew that I wanted composite decking — I have absolutely no desire to paint or stain or waterproof wood.
I struggled for a while trying to figure out what brand and color I wanted. I shied away from Trex — the popular brand name — because their new decking planks are wrapped with color and have a different color core. That means if the deck is gouged, the interior color would show through. Choice Deck, which is the brand I went with, was the same color throughout. And although I could get a gray color that Lowe’s had in stock for about 20% less, I went with the reddish tan color I preferred. After all, I have to live with it — may as well get something I really like.
I did the math and ordered 100 12-foot planks. The guy at Lowe’s got me a contractor’s discount. I paid for delivery and waited.
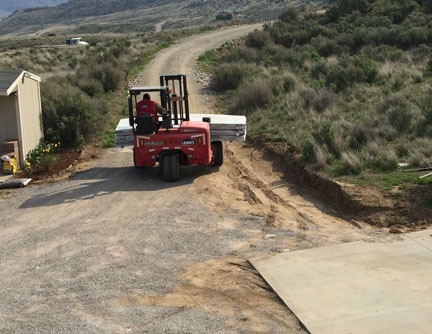
100 pieces of Choice Decking being delivered.
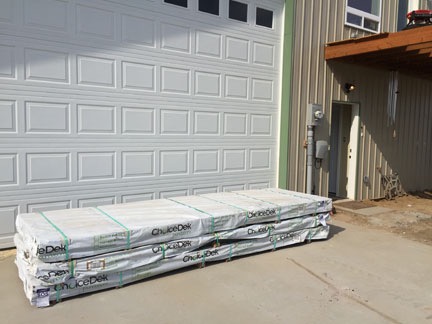
The stack of decking effectively blocked the garage.
The deck arrived on April 3 on a semi flatbed truck. It came palletized in three bundles. The driver left the truck on the road and drove the pallets in, stacked, on a three-wheeled forklift. He backed it down my driveway, which I thought was weird, but it worked. I had him leave it in front of my big garage door. At the time, my RV was in there but my helicopter was still in California on a frost contract.
Traveling for the frost contract and doing other things around my home kept me too busy to start on the deck. At least that’s what I like to tell people. In reality, I was probably procrastinating. The problem was, I didn’t know how I’d get the decking materials up to the deck and didn’t know how to install it. And then there was the height problem — my deck is 10 feet off the ground and the only way I could walk on it was on 2 x 8 sheets of plywood I’d put down. I’d tried (and failed) to hook up my deck light fixtures because I’ve kinda sorta got a fear of heights.
It was only after watching a video on the Lowe’s website and realizing that it wasn’t going to get done by itself that I was ready to move forward.
I realized that I could stand up a piece of decking against the framing and then pull it up from on top. That solved the how to move it problem. I’d stand up a handful of boards, then climb the stairs, go out onto a piece of plywood, and pull the boards up, one at a time. What a workout! I pulled up about a half dozen pieces to get started.
My friend Rich volunteered to help and I’ll never say no to volunteer helpers. He came by on his day off and we started laying the first few pieces closest to the door of the front (east) deck. It took some trial and error, but by the time we took a break a while later, we had the first five or six pieces laid.
Later that day, I was called to California on my frost contract and was gone for two full days. I’m not sure why I was so surprised that the deck hadn’t laid itself while I was gone.
More procrastinating. I am an expert.
But now I had a hard deadline: the helicopter was coming back on April 22 and I needed to get it in the garage. That meant I needed to get my RV out so I could shift it to the right and make room. That meant I needed that pile of decking off my driveway apron. I got to work.
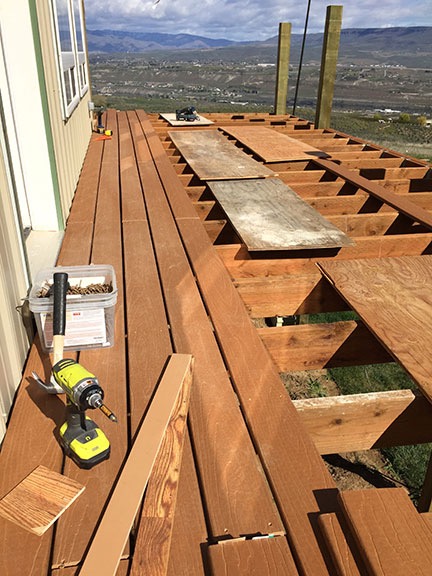
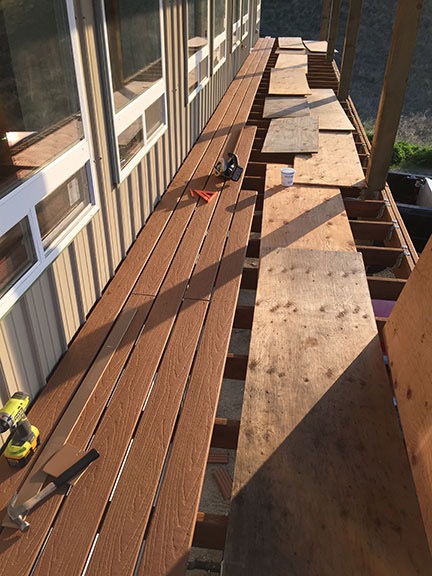
I shot this about halfway through my second day of laying decking.
For the next week, I worked on the deck almost every day. It became a tedious full-time job. Although you’d think it was like laying my floor, which I almost enjoyed, it wasn’t. Every single piece had to be trimmed, pilot holes had to be drilled, screws had to be driven. Lots of kneeling and crawling around and getting up. It was tedious. The only good thing about it was that I was able to work out in the warm sun and get some color back into my skin after the long, dark winter indoors. And dragging those planks up from down below helped me build (and feel) muscles I never knew I had.
I worked my way across and down the front deck, feeling a real sense of achievement when I could finally stand on a solid deck by one of the supporting posts. That’s when I started thinking hard about the rail.
The Guard Rails
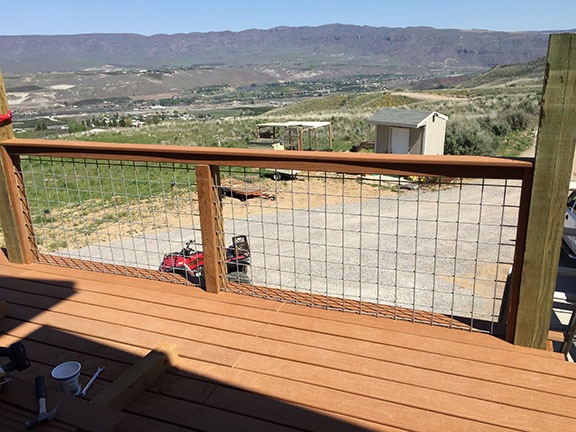
I know what I wanted: something that I could see through. I didn’t want to block the view with bars that the county required to be a maximum of four inches apart. I’d put tall windows in my home, set low so you could see out them even when sitting down. I wasn’t about to block that view with ugly vertical rails every four inches.
The obvious solution was clear tempered glass. I went to the home improvement show at the Town Toyota Center, a local venue, which seemed to be timed just perfectly to research solutions. I spoke to three guys who did decking and got a quote for the materials alone: more than $3,000. Ouch! I don’t know why I was so surprised. I needed 105 linear feet of rail.
My friend Bob and I had discussed using wire fence panels as an alternative. I did some research and found some 3 x 16 galvanized welded wire panels with 4 x 4 squares. I was quoted $59 each. I’d need eight of them. I already had several solid vertical posts, but I’d need other ones in the six 12-foot spans. (Posts in a pole building are typically placed 12 feet on center.) Bob and I worked the idea, tossing thoughts back and forth. We came up with a solution that would use pressure treated lumber to “pinch” the wire panels, holding them in place. We’d then use ripped pieces of the decking material to support a trimmed piece of deck as the top rail. The solution would not only be cost effective, but it would be just as maintenance-free as the rest of the deck.
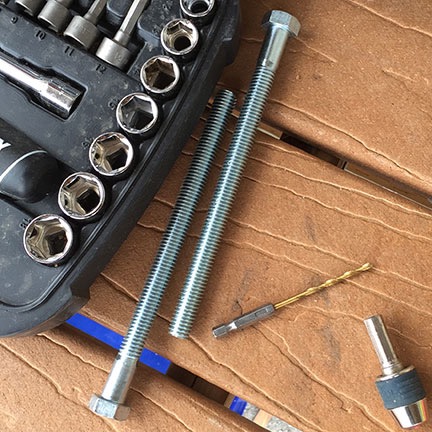
These are two of the 7-inch long 1/2 inch bolts holding the central vertical supports for my deck rails.
Bob went with me to pick up the panels. He has a small trailer with a lumber rack on it that was perfect to transport the 16-foot panels. When I picked them up, I discovered that the price quote had been wrong: the panels were only $25 each. ($200 saved!) He and I worked together on a “proof-of concept” section. This included a central vertical support made of a 2×4 and 4×4 that pinched the center of a panel. Those were attached by driving two large bolts through the header at the outside edge of the deck.
Although the end result wasn’t perfect — I’d tweak the design as I installed the remaining panels — it was pretty damn good. And it looked good, too — perfect for the building’s construction style. Rustic without being trashy.
The first rail panel for the deck looked surprisingly good.
Finishing Up
It was at about this point when I realized I didn’t have enough deck planks.
But before I could do the rails, I needed to finish the deck. As I wound around the corner to the north deck, I realized that I’d soon run out of planks. I’d made a minor miscalculation but also needed more pieces for the rail. I did some more math and ordered another 40 pieces. This time, I had them delivered to the north side of the building, leaving the driveway apron clear.

Composite decking makes saw “dust” when you rip it, too. Dog not included.
I kept at it. Every once in a while, to break the tedium, I’d do one of the side rails. I had two 6-foot lengths which didn’t need central vertical supports. They were easy to do. I realized that if I cut the decking planks to length before I ripped them, I didn’t need help pulling them through the table saw’s blade. (Duh.) I also had two 10-foot lengths; a discussion with the inspector assured me that I’d need central supports for those. Trouble was, that required climbing a 10-foot ladder and using a drill to drill through up to three 2x12s. I tried — I really did. I even bought a special drill bit that I thought might make the job easier. But in the end, I realized that I lacked the physical strength to do the job. I’d have to get Bob back for a marathon bolt installation session.
Any job is easy when you have the right tools — right, honey?
In the meantime, I finished the deck surface. My friend Barbara came by to help on the last day of that chore — she and I sped through the screwing process, assembly-line style.
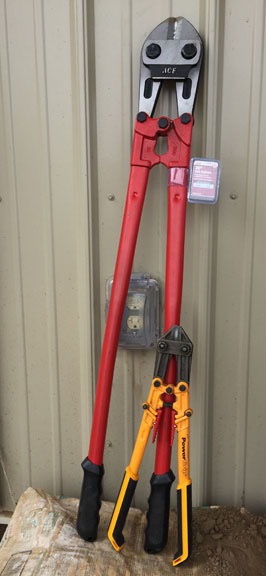
Then I measured, cut, ripped and installed as much of the rail panels as I could. I had to buy a humongous bolt cutter to get through the galvanized wire without having to stand on the handle of the smaller bolt cutter I already had every time I made a cut. I used the same technique to get the 12-foot long wire panels up to the deck as I’d used for the planks: stand them up, then go upstairs and pull them up one at a time. I put them into position and set up the vertical supports.
Then I got Bob back. He worked with me on a rainy morning, climbing the ladder to drill holes and fasten bolts, never complaining once as we buzzed through the job. When he was gone, the only thing left to do was the top rails.
Did I ever mention that I was a master procrastinator?
This shot shows the north deck with the rail panels waiting to be capped.
I don’t know why I didn’t just do it. I’d cut and ripped everything I needed and laid it out by each panel on the deck. Yes, some trimming was required, but I could use my little circular saw for that. All my tools were there, all the screws I needed. Everything. Yet it took more than two weeks for me to get the job done, doing a panel or two every few days.
I think it was the inspector requiring me to get the caps on that finally put a fire under my butt. Yesterday, while I was home waiting for it to rain (so I could get to the work that actually pays for this stuff), I finally did the last two rail caps.
I was done.
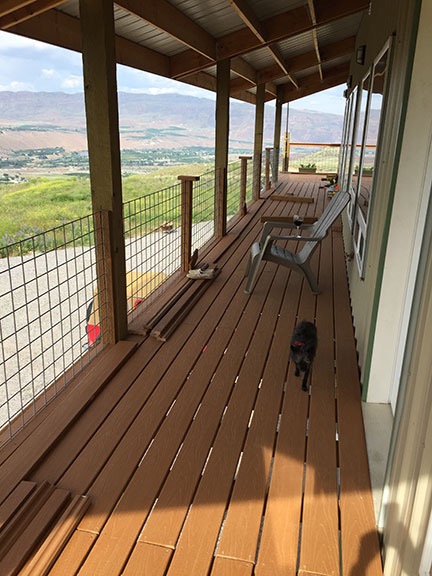
Here’s what the front of my house looks like today. I’ve got some cleaning up to do under the deck.
It was a lot of work and I did about 95% of it myself. I don’t regret it one bit. While I could have hired someone to do the labor — at a cost of at least $2,000 — there’s something so rewarding about doing a job yourself, seeing it done, and remembering what it took to get it done.
So much of my new home is like that. I worked hard to do most of the electrical work, all of the flooring (including bathroom tile), and all of the in-closet and shop storage solutions. To say that I’m amazed and proud of what I’ve accomplished is an understatement of epic proportions.
And I reap the benefits of all that hard work every day as I begin to enjoy my new home.
Video Tour
Want to see the new deck? Here’s a video tour. Sorry I look so ratty in the beginning, but I was tired when I recorded it.