The Toilet Repair

Why yes, I CAN “overhaul” my toilet tank — and here’s the video to prove it.

My toilet’s has been acting funky for the past 6 months or so. The main symptom was that I had to hold the flusher down for at least 3 seconds for a full flush. I got used to it. But when I returned from my trip, I found that the tank would not refill unless I opened the tank lid and poked at one of the parts so it dropped. That got old fast. I decided I needed to repair it.

I bought a Korky complete toilet repair kit which contained the complete guts of a toilet tank. They recommended that I watch a video on the installation and I did. It was helpful because although it was not narrated, it did cover all of the steps so I knew in advance what I’d be doing.

Do you like livestreams of cool things? Well, I’ve been wanting to do livestreams on my personal YouTube channel while I’m out and about in orchards, at airports, in boats, etc., but YouTube won’t let me stream from a mobile device unless I have at least 1,000 subscribers. I’m currently 45 subscribers short. How about going to my YouTube channel and clicking the Subscribe button? Thanks.

I should mention here — in case you don’t watch the narrated video below — that I knew I’d be doing this sooner or later. In an effort to reduce the accumulation of minerals inside the toilet, I’d been using bleach tablets in the tank. I was warned multiple times that it would eventually corrode the tank’s workings but I used them anyway — and will likely continue to do so. I think that the corrosion I found was a combination of those tablets putting bleach in my tank and the actual minerals in the water, which really screw up certain fixtures, like my shower head and sink sprays. The only way to resolve this issue is to install a water softener and, frankly, I don’t want to do that.

Anyway, I set to work at around 2 PM on Friday afternoon and was done by 3:30 PM. I think I spent more time fetching tools than actually doing work. I set up one of my GoPros to create a “hyperlapse” timelapse movie of the process so I could put it in this blog post. I then edited it in iMovie to make a simple, narrated video. Here it is:

The toilet works fine now and, somehow, it’s quieter — not that that really matters much to me. It’s nice to have done this on my own, considering a plumber would charge $75 just to come to my house.

Saving Money by Recycling Your Own Scrap Silver

It’s like getting silver sheet for 1/3 off the price.

I use a lot of silver when I make jewelry: fine (100%) silver, sterling (92.5%) silver, and Argentium (93.5%) silver. Although I used to work primarily with silver wire, I’ve begun doing more with sheets of silver. I generally use 22 gauge sheet to make pendants and 26 gauge to make earrings.

The Cost of Metal

As I type this, I can buy 22 gauge sterling silver sheet for $4.36 per square inch. That price varies wildly — just a few months ago it was about 30% less. More recently, it was about 10% more. You can track precious metal prices online in a bunch of places, but I track it on the Rio Grande website, since that’s where I buy my metals.

Silver Prices
Here’s a chart of the silver prices, which went nuts back in June 2020. It looks like it’s settling down now. You can track metal prices at the Rio Grande website.

The price I pay is a combination of market price (as shown in the graph above) and the type of processing applied to the metal. Sheet metal will cost more per ounce than just plain old lumps of silver. After all, the folks doing the processing have to get paid for their work, no? That’s value added pricing.

The Value of Scrap

Rio Grande has a scrap metal program that will take my scrap silver and pay me 85% of market value for it. So if I send them an ounce of fine silver and the current market price is $24/ounce, they’ll pay me $20.40/ounce. The values are different, of course, for sterling and Argentium. They do gold and platinum, too, but I don’t use much gold or any platinum in my work (yet) because of the crazy high price.

I’ve taken advantage of the recycling program at least twice. I save every single scrap of silver and try hard to keep the fine silver separate from the alloys. When in doubt about a scrap, I throw it in with the alloys. The first time, I got about $50 back. The second time I had more scrap and got over $100 back. I take it as a credit on my account because I generally spend well over $1,000 on metals every year anyway.

Recycling My Own Scrap

The first step was to prep the crucible. I posted this video on Twitter to share the sound of the cooling crucible.

Recently, however, I watched a few “YouTube University” videos that showed jewelers making their own wire and sheet from scrap. To do this, I’d need a good, hot torch (which I already had), a small crucible, a mold, and some borax (which I already had). I decided to give it a try. Invested about $40 in the equipment I didn’t have and started melting silver.

Ingot
My second try at an ingot.

It wasn’t as easy as it looked in the video — what else is new, right? — but I did manage to get a decent little ingot on my second try. (I melted down the first try so no loss.)

Malachite Pendant
The backing for this malachite cabochon was made with silver I recycled.

I rolled it through my rolling mill, periodically annealing it to soften it back up, and got it down to a sheet roughly between 21 and 22 gauge. I textured the resulting piece, then cut out a shape for a backing plate for a cabochon pendant. I added prongs and a hole for a bail, cleaned and polished the piece, and set the stone. It looked great (if I do say so myself).

The interesting thing about my recycled silver is that it’s a higher percentage of fine silver than Sterling (92.5%), but not nearly as high as fine silver (100%). Because it also contains some Argentium (93.5%), it might have some of the tarnish resistance properties of that alloy. Legally, I can stamp it 925 because that’s the minimum purity of the piece.

Doing the Math

Yesterday, I made two more ingots. It took quite a while because I was aiming for larger ingots and, for the second one, was trying to melt larger pieces of scrap. I actually had to stop and refill my torch to get the job done.

Ingots
Here are the two ingots I made yesterday. They weigh at least an ounce each. The darker one has been through the rolling mill about 20 times and is dark because it’s freshly annealed in this photo. The larger ingot has not been rolled at all yet.

I started wondering whether it was really worth the effort. So this morning, I did the math.

Suppose I want 22 gauge sterling silver sheet. I looked up the price on Rio Grande, where I would buy it, and came up with the number $4.36/square inch or $31.14/ounce. (Remember the added value of turning silver into sheet.)

Now let’s look at how much I’d get back from Rio if I recycled an ounce of silver. With a current market price of $24/ounce and a rate of 85%, I’d get $20.40/ounce. Because a square inch of 22 gauge silver weighs .14 ounces, the refund would equate to $2.86/square inch.

In summary:

Descriptionper sq inper oz
Cost of of 22 gauge silver bought new$4.36$31.14
Value of equivalent amount of recycled silver$2.86$20.40
Amount I save by recycling my own silver$1.50$10.74

Of course, it’s even more cost effective to recycle my own silver now that Rio Grande has instituted a $50 recycling fee (beginning October 15, 2020). This makes it completely impractical to send my silver back to them — I’d never have enough silver to make this worthwhile. In hindsight, it’s a good thing that I learned how to make ingots before this fee came into effect. I’m ready for it.

Making Art From Nature

Taking jewelry making to the next level.

I’m feeling rather tickled right now. I just finished this sterling silver and Dorset Marble pendant.

If you follow this blog, you might be rolling your eyes right now. Big deal, you’re probably saying. Another pendant.

But this one is different.

You see, this is a stone I found on my visit to Dorset Quarry in Vermont earlier this month. I figure that an old marble quarry might have a few small pieces of marble lying around and I was right. I picked up about ten thin pieces to take home with me.

Then, yesterday, I took three of those pieces into my shop and used my CabKing to shape and polish them into cabochons.

And then today I picked the largest of the three marble cabs and wrapped it in sterling silver to make this pendant.

This photo gives you an idea of the stages of the creation process, from dirty stone to finished pendant:

And that’s why I’m tickled. I took something I found in the dirt on the other side of the country and turned it into a beautiful piece of jewelry.

Homemade Brie

And other new adventures in cheesemaking.

Way back in September 2013, when I was still living in my fifth wheel RV (the “Mobile Mansion”), I got interested in cheesemaking. I took a class at a local cheesemaking facility (which closed down the following year when they lost the land lease they needed to graze their sheep) and even tried making a few cheeses myself. Trouble was, my RV kitchen was tiny and if there’s one thing cheesemaking requires, it’s space. So I packed up the cheesemaking gear I’d invested in and set it aside until I had a real kitchen again.

200 Homemade Cheeses
I highly recommend this book, 200 Easy Homemade Cheeses, to anyone just getting started making cheese.

Artisan Cheese
I also bought this book, Mastering Artisan Cheesemaking, but it’s a bit more advanced than I’m ready for at this point.

In the meantime, I bought and read (or at least browsed through) two cheesemaking books and heard more than a few Splendid Table stories on NPR about making various cheeses.

I should mention here that I’ve been making my own yogurt for at least five or six years. Making yogurt is similar to making cheese, but I think it’s a lot easier.

I moved into my new home in May 2015 and the kitchen certainly was ready for cheesemaking then. But I wasn’t. I’m not sure what finally got me to try again — maybe it was walking past the plastic bin containing all of my cheesemaking equipment that was stored in my garage? — but I finally pulled out my favorite cheesemaking book, ordered the necessary cultures, unpacked the stainless steel pots, etc., and bought four gallons of milk to start making cheese again.

Brie

I decided to start by making brie. I like brie. I can eat brie every day of my life and not get tired of it. What would be better than making my own?

I had two recipes. One was from the Splendid Table website. The other was from my favorite cheesemaking book.I can’t remember why, but I decided to go with the one in the book. It may have been because it provided instructions for adding calcium chloride, which is pretty much required when making cheese from homogenized milk. I didn’t have an affordable source of raw milk — no, I won’t pay the local health food store $10 per gallon for it — so I knew I’d have to add calcium chloride and I wanted detailed instructions on how much to add and when to add it.

The trick with making cheese is to heat the milk to the exact right temperature — in this case, 88°F — and, if necessary, hold it there. Fortunately, brie doesn’t need a temperature hold. It does require the cheese to drain for about 24 hours at room temperature. What you’re draining off is the whey, which some people drink and I used to give to my chickens (as a good source of protein). Whey from hard cheeses can be further processed into ricotta, but not whey from brie making. Such a shame to let it go down the drain, especially since it accounts for at least half the volume of milk — in this case, a gallon of the two I started with.

After draining, the cheese is ready to ripen in a cheese cave. I don’t have a cheese cave. (I suspect you don’t either.) I originally thought that my dorm-style cube fridge, which I’d bought for my Wickenburg hangar at least 12 years ago and now had in my garage, could be used if set so it barely cooled. Unfortunately, the lowest (highest?) setting still put the temperature below 42°F; I needed a range of 50°F to 55°F. On a whim, I threw the thermometer into my wine fridge. Bingo: 50°F. The ripening containers went right in.

Ripening Brie in a Wine Fridge
Brie in ripening containers in my wine fridge. I was not happy about evicting the wine that was in there and am looking at a new wine fridge to accommodate both wine and cheese. (My sister and brother bought me this wine fridge for Christmas 2016 to support my cheesemaking habit.)

I should mention here that although I bought open-bottom cheesemaking molds and cheese mats from a Cheesemaking supplier — I use The Cheesemaker website — I went local for the ripening containers. Wenatchee has a restaurant supply shop and I bought hard plastic food storage containers that can be stacked to use as ripening containers. I have them in a variety of sizes so I can make just about any size cheese.

Mold on Brie
This photo shows the mold just starting to cover one of the two bries I made. (I used a food mat for this; I’ve since bought real cheese mats.)

What you might not realize is that the white “skin” on brie is actually mold that’s created by the Penicilum candidum added as part of the cheesemaking process. This begins to grow on the cheese after a few days. It kept growing as I flipped the cheeses daily. When the cheese is wrapped, the mold gets flattened down to form that skin. And yes, you can (and should) eat it.

The cheese stayed in the “cave” for a few weeks. Then I had some friends over for dinner and decided to make up a cheese platter for them that included two of my cheeses. The brie was one of them. It wasn’t bad, but it wasn’t quite ready, either. Not ripened enough. Still, we all enjoyed it and I’ve been eating it slowly since then. Had some on my eggs this morning. The other cheese — I made two 7-in rounds — just went from “cave” to fridge. I consider it a success and plan on making two more to take with me on my winter travels.

Homemade Brie
This is all that’s left of that first homemade brie. I’m going to use smaller molds next time so the cheese is taller.

Chaource

I used another two gallons of milk to make chaource, which looked like an easy enough recipe in my cheesemaking book. This is also a soft-ripened cheese, but it does not get gooey in the middle like brie does. Actually, I’m not sure how it gets because I’ve never had it and honestly don’t know if the ones I made are really like chaource cheese.

Th difficult part of making this cheese was getting it to 77°F and keeping it there for 12 hours. I rigged up a double-boiler on the warming burner of my stovetop, using a BBQ temperature probe to give me an accurate reading. When it got too warm, I’d turn off the burner. When it got too cool, I’d turn it back on. This was not fun, and if I had to go out that day, I would have ruined the cheese.

Double boiler
I rigged up a double boiler with my canning pot holding water for a stainless steel cheesemaking pot. This sat on the “warming center” burner of my stove, which kept it as close to 77° as possible.

This particular cheese had to drain for about two days at room temperature. (Now you see why you need counter space to make cheese; cheese needs real estate before it’s ready to ripen.) It never got quite as firm as I expected to — it stayed sort of crumbly throughout. I managed to fit it all in one ripening container, where it joined the brie. But although it started second, it was finished ripening first. I served it up on that cheese platter and it seemed to go over well enough.

Would I make it again? Not until I try store-bought chaource to see how close I came. If I blew it, I’ll likely take a pass — unless the “real thing” is so good that it’s worth another try.

Fromage Frais

Just to mix things up a bit, I bought another gallon of milk and whipped up a batch of fromage frais. This is a fresh cheese a lot like cream cheese. Like all fresh cheeses, it was extremely easy to make and yielded quite a bit of cheese.

Greek Yogurt Strainer
A fine mesh strainer like this is a must-have when making greek yogurt or fresh cheese. I got this one on Amazon.

For fresh cheeses, you basically heat the milk and then add the cultures. Then you add the rennet to get curds. But instead of using a mold, you let the whey drain out in a cheese bag. I used my greek yogurt strainer. You then put it in a bowl, add a bit of salt, stir it up good, and refrigerate it.

The note on the recipe in the book said “This fresh, creamy cheese is so delicious, you’ll want to eat it on everything.” And they were right. I used it like cream cheese and like sour cream. I ate it on date nut bread and on butternut squash ravioli. I basically added it to anything I might add cream cheese or sour cream to. But after a while, even I’d had enough. If I do this one again — which I likely will — I’ll do a smaller batch.

More in the Future

As I mentioned earlier, I’m planning to make a few more bries before I leave; with luck, they’ll be ready to take with me on the road this winter. I might try a cheddar, too — it really depends on difficulty and whether I can leave it behind to age while I’m gone.

I do enjoy making cheese, but I won’t lie: it’s a lot of work. The only reward at this point — I’m definitely still a novice and not an “artisan” — is that feel-good feeling I get when I do something myself. Do I see myself making all my cheeses in the future? Hell, no. But I’m having fun with it now.

And who knows? Maybe I’ll come up with some sort of specialty cheese that only I make. Wouldn’t that be fun?

Construction: The Windowsills

Something a little different for a different kind of home.

On May 20, 2014, I began blogging about the construction of my new home in Malaga, WA. You can read all of these posts — and see the time-lapse movies that go with many them — by clicking the new home construction tag.

I’ve been living in my new home for about a year and a half now and although I’ve had my Certificate of Occupancy since this past spring, I’m still not quite done with the finishing touches. The windowsills were one of the projects I recently finished. I documented my work with video as I finished up.

The Backstory

Most people have their homes built by builders who are managed by a general contractors. At the end of the project, the general contractor hands over a set of keys to a finished home. For my home, I was the general contractor. Whatever I didn’t hire someone else to do, I had to do myself. While this saved me a bunch of money, what’s better is that it gave me an opportunity to add custom design elements that most general contractors couldn’t be bothered with. My windowsills are a very good example of this.

My building is a “pole building” built with post and beam construction. That means the building’s frame literally hangs on a series of thick, pressure-treated 6×8 or 8×8 posts. When the framers came to frame the inside of my living space, I had two options: frame just the inside walls and allow those wooden posts to appear on inside walls or frame the entire living space so the drywall would hide those posts. The posts weren’t very attractive, so I chose to hide them. This means that they had to frame a secondary wall inside the outer wall, creating a relatively wide space between the inner and outer walls. This was great for insulation purposes — I could fit much thicker insulation in that wall than was required by building codes. But it also left deep wells at each window.

Framed Windows
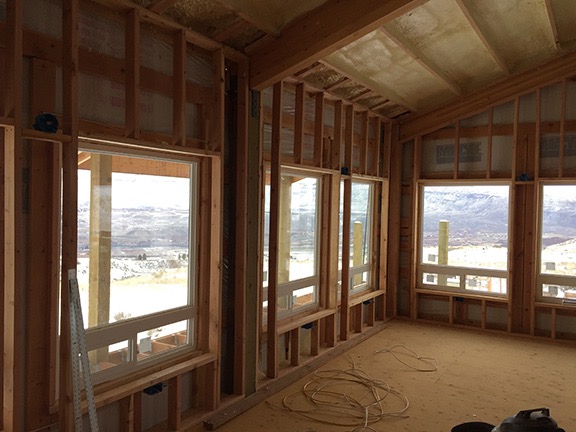
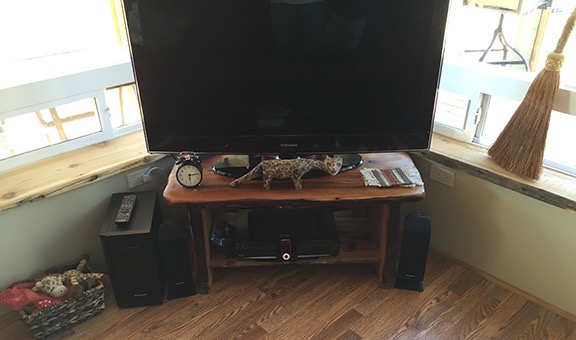
This photo was shot back on December 29, 2014 when I was working on interior wiring. It’s a pretty good illustration of how the framers framed my interior walls inside my building shell. This is my living room; my TV is currently in that corner.

Insulated Wall
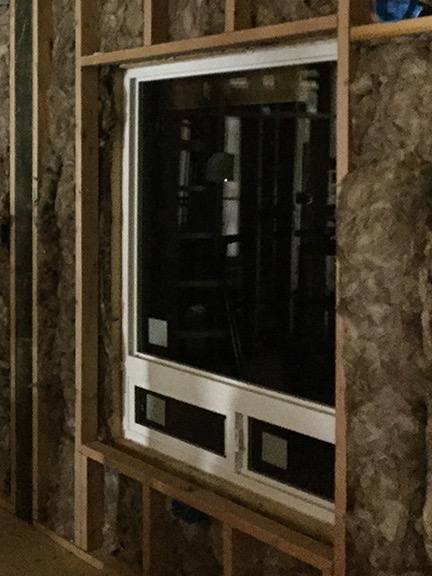
This is one of my living room windows after the insulation was put in place in mid January 2015.

When the drywall guys came, I had two choices. I could have them drywall the entire window well, including the bottom part, or I could leave the bottom part unframed and install wooden windowsills later on. I thought back to my old home, which used the first method for its relatively shallow window wells. When windows were left open in the rain or windows leaked — which was a problem with one window not long after we bought the home — the drywall windowsill was damaged and required a professional drywall guy to patch. I wanted to avoid that, so I went with installing wooden window sills later on. I should mention that my four clearstory windows, which are high on my south-facing walls, do have finished drywall window sills. But they’re rarely opened so I’m not worried about damage.

Drywalled and Painted
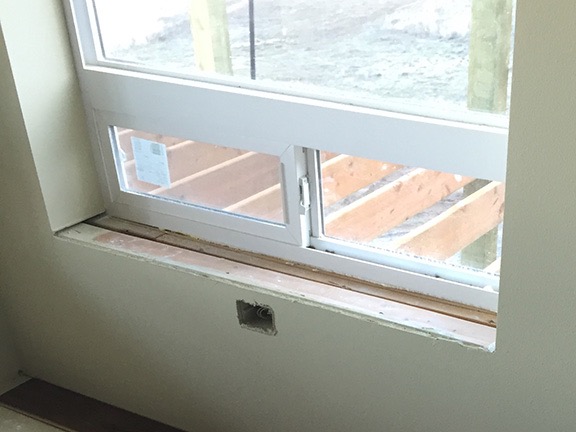
Here’s one of my living room windows on February 15, 2015, not long after being drywalled and painted. (If you’re interested in seeing what the drywall work looked like as it was being done, be sure to check out the walkthrough video in this blog post. And this blog post includes a video of my kitchen, after installation but before the windowsills were installed.)

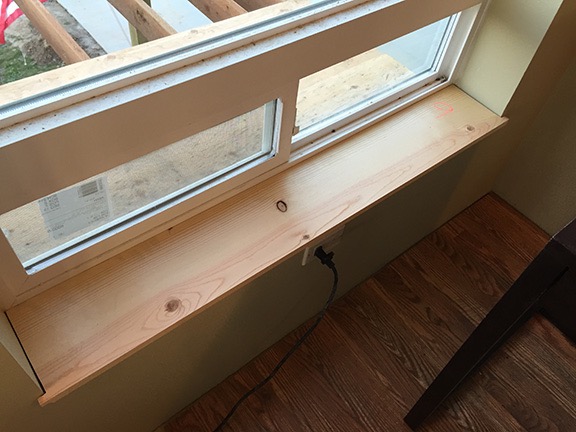
So this was what I was left with. Ugly, huh?

The Solution

My first attempt at wooden windowsills used 1×10 and 1×12 lumber that I cut to fit. This turned out to be a difficult job, mostly because the framer (and the dry wall guy) hadn’t created uniformly sized or shaped window wells. Getting the wood to fit perfectly and look good was a nightmare and, as you might expect, I procrastinated about getting the job done. When I finally did it, it looked like crap — at least in my opinion. I started regretting the wooden windowsill decision.

First attempt at a windowsill
This is my first attempt at a windowsill back in March 2015 — it’s the original one in my office area. There were no right angles in the window wells, making cutting the wood to fit perfectly nearly impossible.

Time went on. I cut wooden planks to fit most of the window wells as best as I could. I didn’t like the way it looked, but it looked a lot better than nothing at all.

More time passed. Lots of time. My friend Don built a custom wood cap out of driftwood logs for my stairwell that got rave reviews from everyone who saw it. I asked him to build some furniture for my living room: end tables, a TV table, and a coffee table. He used reclaimed wood and left natural edges. He finished everything with tung oil. They looked great; you can see them in a video in this blog post. He told me about some logs he’d had planed into planks. I talked to him about my windowsills. He asked me how many planks I needed. I told him eight — one for each of my great room windows. He came by one day and delivered 8 raw planks of wood.That was sometime in the autumn of 2015; I don’t know the exact date because I don’t have a photo of the delivered stack of wood, which lay across a pair of sawhorses in my garage. For months.

The trouble was, I didn’t know what to do with the wood. So when Don asked me this past summer how the project was going, I told him I was waiting for his help. So he set a date in July and when that date rolled around, we got to work.

The Job

Don did the first two windowsills for me, start to finish, while I watched and learned.

Wood Plank
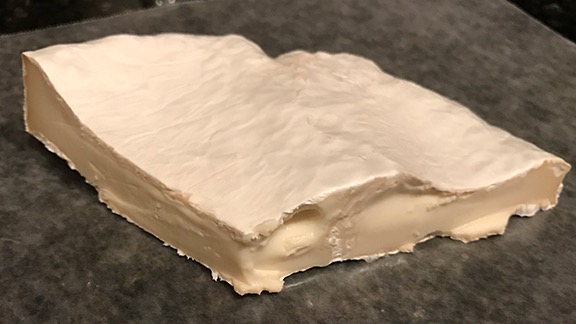
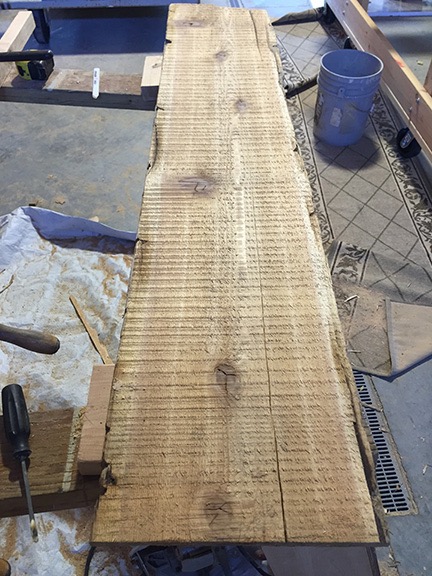
A typical wood plank. We began working it by closing up cracks, then cutting off a live edge for the back of the windowsill, trimming its length, and shaping its front edge.

Repaired crack
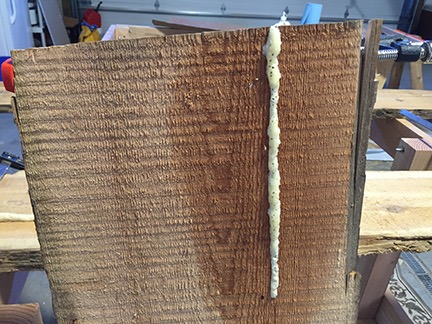
One of the cracks after gluing it. After scraping away the solid foam and sanding it, the crack disappeared.

The process began with repairing cracks in each piece of wood. The wood had arrived wet and had been stacked horizontally on sawhorses with each row of planks separated by some scrap lumber so they could dry. Cracks along the grain had formed in some of the logs. Don wasn’t concerned. He’d already developed a workable solution for this problem, which he encountered quite often. We wet down both sides of the crack, filled it with Gorilla Glue, and then used clamps to close up and hold the cracks together. Overnight, the glue would set, leaving orangish solidified foam on the outside, That would be scraped away and sanded down with the plank later in the process.

Then we needed to match a wood plank to a window. The planks were all longer than they needed to be, but they came in two basic widths. The wide ones needed to be used for the five north-facing windows while the narrower ones could be used for the east-facing windows, which weren’t quite as deep. We had to pick which side should be the top and which edge should be on the outside, facing the room.

Then Don made a template out of cardboard pieces for a specific window. This had the exact length, including the weird angles, and the depth, including the outer edge. We’d bring that downstairs and he’d lay it on the chosen plank, outline where he needed to cut. Then, using a circular saw, he’d cut off one live edge of the wood to form a straight back edge. He’d also trim the length of the plank and then, using the circular saw and a handsaw, cut the shape of the front with an overhang past the edge of the windowsill area.

Then we’d go back upstairs to see if it fit. And back downstairs to make some adjustments. And back upstairs to see if it fit. Repeat as necessary. When Don was satisfied, we came back downstairs to finish the live edge. That required using a special cutting tool to carve away the bark and shape the exposed edge of the wood. This is where it got artistic and Don did a fine job (as I expected). Finally, he used an orbital sander to sand the top and outer edges of the plank.

When it was just the way he wanted it, we brought it back upstairs, fit it into place one more time to be sure, and then removed it. Rather than use screws or pegs to affix it into place, he took out his trusty Gorilla Glue and spray bottle, moistened the wood, applied glue to both the unfinished windowsill area and the bottom side of the new windowsill, and slipped it back into place. We used a combinations of rags for padding and lengths of wood to hold the windowsills down until the glue could cure — at least 12 hours.

Don did two of these that first day. I paid close attention. He came back the next day and did the rough cuts for a few more, leaving all the finish work to me. A week later, he dd the last two. I paid him for the wood and his time. The rest was up to me.

Two Windowsills
This photo shows two of my windowsills. The one on the left was completely finished and installed by Don. All it needed was to be oiled. The one on the right is cut to size but not finished. I had to carve out the live edge (removing the bark) and sand it down before gluing it into place.

With the window framing exposed again — we’d taken off my makeshift windowsills — I was motivated to finish up. So although I had a bunch of other stuff going on — including the end of cherry season and a vacation in my new truck camper — I went to work at it and eventually got it all finished up. Along the way, I shot some video clips of the work I had to do. I put them all together in this video, so folks could get an idea of what had to be done. It’s a little long, but it covers all the steps I took.

By the way, I’m finding that creating and saving these videos in my blog is a great way for me (and others) to look back on the progress I’ve made in building my home. As I wrote this blog post, I stopped to watch some of the videos I linked to here. It was not only great tp see things partially done again, but interesting to hear my narration of plans — some of which changed over time. What a great way to document the evolution of this challenging and lengthy project!