After practicing for about two weeks, I’ve made the switch to real silver. This is an oval cabochon of polished K2 Granite (yes, from the mountain; yes, the blue spots are natural), wrapped in square and half round sterling silver. I think I’m really getting the hang of this now.
Tag Archives: design
The Last Chicken Coop
The last one I’ll build here, anyway.
I just built my third (and final) chicken coop.
The first coop was really more of a chicken lean-to. It was mostly open on one side, had two nice nests and two very rickety perches. I made it mostly out of pallets and scrap wood — and it showed.
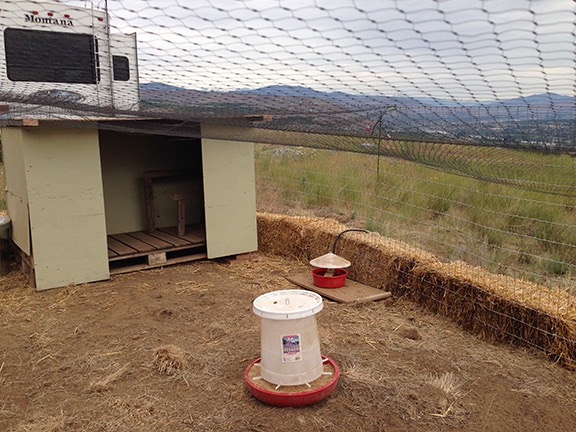
My original chicken coop and chicken yard. The coop lasted from mid 2014 through October 2015; the yard was rebuilt with better fencing early 2015. This photo was shot in early 2014, when I was still living in my “mobile mansion” fifth wheel.
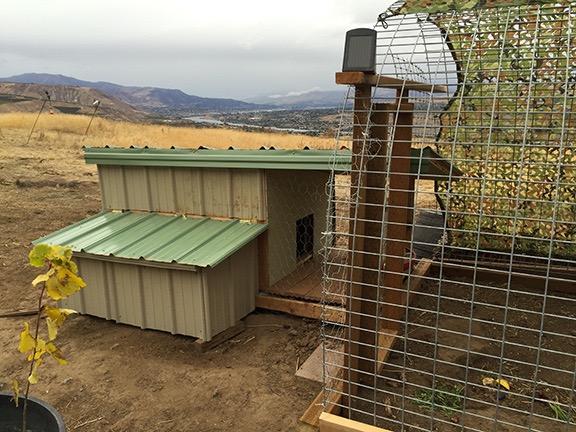
The second coop was way more ambitious. Also built with pallets as its base, it was designed to match the appearance of my home with an exterior finish using the same exact metal. It had three nests under a hinged lid and three sturdier perches. It was also insulated and had a covered porch so I could keep the chicken food out of the rain. It weighed a ton, though, and I had to drag it into place with my ATV. You can learn more about this project and my other efforts in this blog post from 2015.
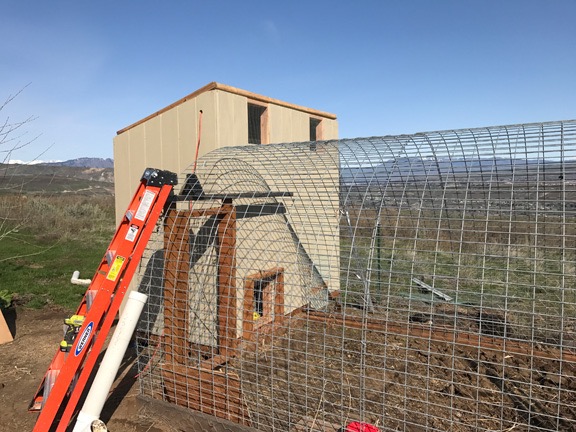
The second coop scored high on durability and insulation values, but low on practicality. I don’t think there was enough room inside for more than the 8 chickens I had at the time. This photo also shows part of my third chicken yard, a hoop affair made of 5×16 foot “hog wire” panels. I like the design and still use it.
What I wanted was a coop that was big enough to hold a lot of birds laying a lot of eggs. But I wanted one I could actually walk into, one that was easy to clean and had plenty of light and ventilation. Although I’d bought a small coop the year before, it was unsuitable for more than two or three adult birds. I wanted to raise chicks into laying hens and sell them when they started laying. To get started, I bought 18 chicks when I got home from my winter travel in March and set them up in a brooder in my garage. That gave me a time limit — I needed the new coop done before they outgrew the brooder.
I almost converted my existing shed into a coop. With a little interior modification, it would have done the job. But then I would have lost my garden storage area. And what about the controls for the irrigation? Did I really want my chickens crapping on it?
I looked into shed kits at Home Depot. They were not cheap and they were a lot of work to build. I could build a custom solution for a fraction of the price.
But no more pallets! I was going to build from scratch.
I sketched out a design. The footprint would be 4 x 8 feet. The roof would be 7 feet sloping down to 6 feet. I began disassembling the old coop. I think that was harder than assembling it. I managed to salvage the framed plywood roof and one of the trim panels. I wanted more overhang on the metal, so I scrapped what I had. I burned pretty much everything else, although I did have to throw away the Trex decking I’d used inside. (I did say it was heavy.)
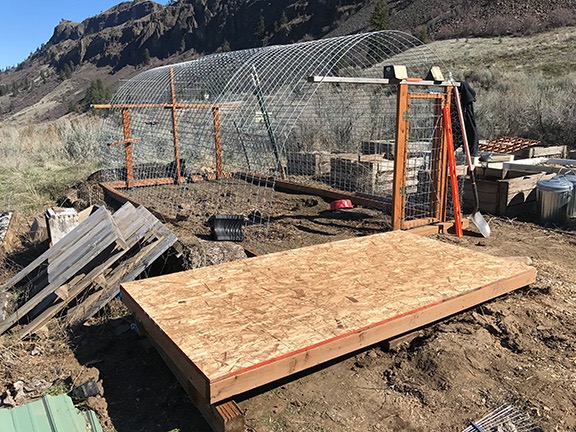
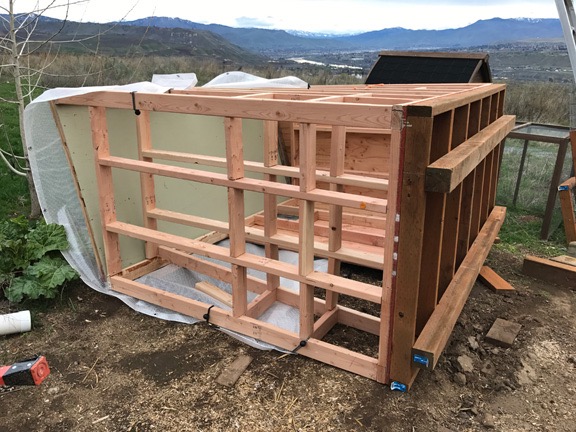
I started at the bottom, building the floor on 4x4s with 2×4 studs 16 inches on center. I used a heavy OBS sheet as the base and gave it two coats of oil based porch paint.
I started with a floor on 4x4s, leveled in place.
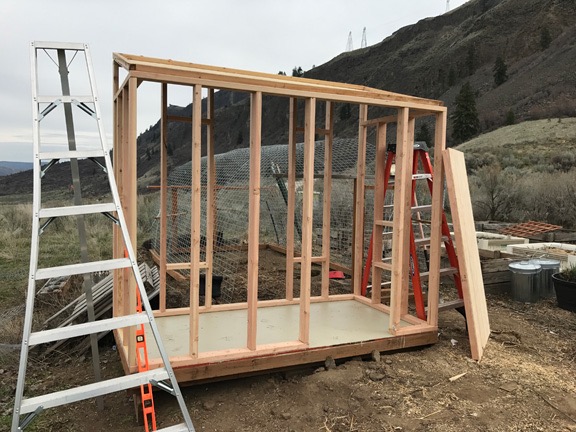
Next, I framed out the four walls. But instead of framing them on the floor, I built the frames on my concrete driveway apron. It was easier for me to work on level ground. I framed them with 2x4s 16 inches on center. Every time I finished a wall, I stood it up against a deck post. I knew that it would be impossible for me to carry the two long walls over to the coop and fasten them into place by myself, so I did as much as I could before prepping the building area with two ladders and a bunch of wood screws and my impact driver. Then I called my neighbor Elizabeth and made an appointment for her to come help me get the walls in place. I promised it would take less than an hour and it did. And not only did we get the walls in place, but we even lifted the roof into position and fastened that down.
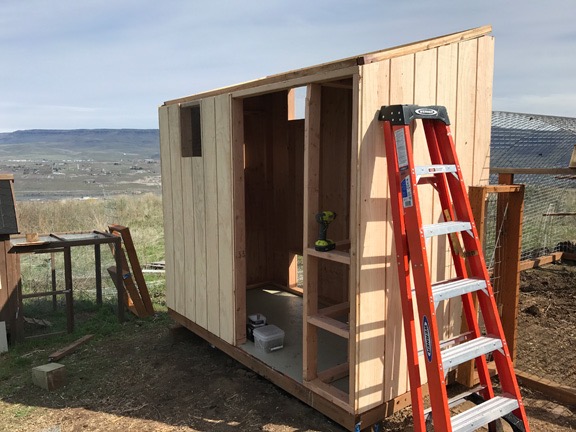
I shot this photo right after Elizabeth left. The ladders were still in place; the one on the left is an orchard ladder, which are pretty common here. The wood thing leaning against the building is the door, which I’d made while I was waiting to put the walls in place.
The coop design had a 32-inch wide door, three ventilation windows, and two chicken doors. I framed them as needed. The trick then was to cut the T1-11 wood — it’s like plywood paneling — so the openings would match up right. Measure twice, cut once. I think I must have told myself that a dozen times a day during construction. But it sunk in. I fitted the north side short wall and half the west side wall without any problems.
Weather came. We had an unusually rainy spring this year. I had some large tarps and fastened one over the coop’s roof and two wall panels. I hadn’t painted anything yet and I didn’t want the wood to get soaked or ruined. My camper, the Turtleback, was parked on the driveway near the coop, blocking it from view from my home. So I was very surprised to find the coop lying on its side when the weather cleared and I was ready to get back to work. Apparently, strong winds had come though and knocked it over as if it were a sail.
Oops. Did I mention that it gets windy here? The tarp acted as a sail on the top-heavy coop and it went right over.
Neighbors to the rescue. I had three of them meet me the next morning to right the coop. Damage was minimal. When they left, I got right to work.
I used 1/4 inch wire that I already had between the frame and the T1-11 for the windows. Later, I’d put sliding panels to close them off. I had two doors to the outside but planned on using only one for now; the other one was for expanding the chicken yard with another hoop enclosure. (It’s important to cover the chickens here to protect them from birds of prey.)
The original designed called for nests just inside the door that were accessible through hinged panels from the outside. I decided to do away with the outside access, mostly because I figured a single T1-11 panel would add to the structural integrity of the building. And after all, the building was big enough for me to walk into.
In this shot, only one wall and the door are left to install. The nests are just inside the door to the right.
Once the walls were in place and the door was hung, it was time to paint it all. I used the rest of that oil-based porch paint and even bought a second can. The paint guy had warned me that it would absorb into the wood and he wasn’t kidding. I’m going to need a second coat. But for now, the wood is sealed tough against the elements. A second coat before winter and it’ll be ready for any weather.
Here’s the coop right after painting it. By this point, the chicks were living inside. I drilled a hole in the wall and ran an extension cord so I could hang their heat lamp. I blocked off the exit to the chicken yard with a framed bit of fencing I already had. The two upper windows have 1/4 inch screen that doesn’t show in the photo.
I still had to finish the roof. I wanted so badly to get metal panels that match my home — after all, the walls of the coop match the walls of my home — but Home Depot had a limited selection of colors. So I chose the dark green. I dreaded cutting the metal — it’s no picnic, believe me — but it went a lot more smoothly than I expected it to. I had insulation leftover from the old coop and I put it into place. Then I painstakingly lifted the metal panels into place and screwed them down. Not perfect by any means, but functional.
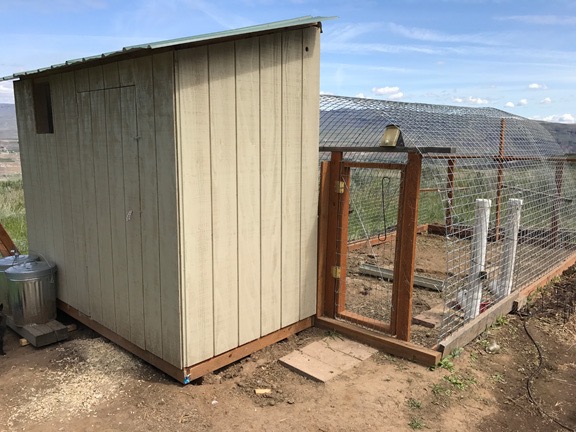
Here’s a photo of the outside of the coop and yard that I took just the other day. The door really blends in; I use a piece of rope as a “doorknob” and a hook to keep the door closed. The long white pipes are chicken feeders I made last year; they each hold about 10 pounds of chicken food.
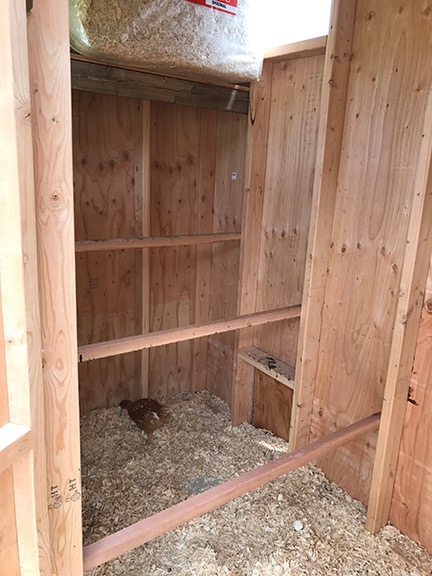
I used 2x2s with rounded edges for the perches. I also added a shelf on the north side, far above the highest perch, to store odds and ends like the pine shavings I use on the floor and in the nests.
By this time, the chickens were installed and able to come and go freely between the coop and their yard. I had put in some perches for them, but as they grew, I knew I could raise them and add more. So I did; they have a total of three perches now, each about 4 feet long. With 8 inches per bird, my 18 chickens (now 17 since one died) have plenty of space to roost. I could easily add 2-3 more if I had to since they’re spaced 16 inches apart.
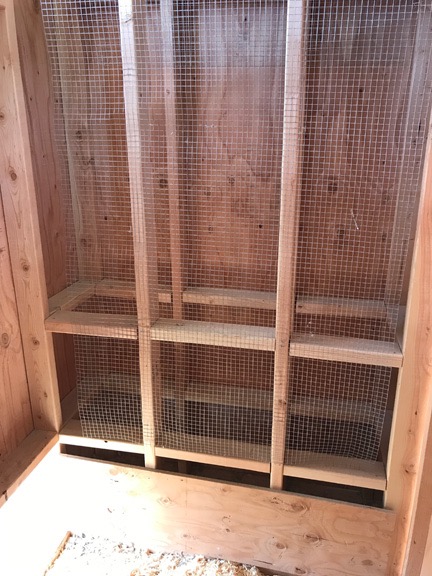
I had to block off the nest area with wood and wire mesh to keep the chickens out.
I still needed to do the nest boxes. The first thing I did was close off the nest area; the chicks were sleeping on the floor in there when they were still very young and I wanted to break them of that habit. They wouldn’t need the nests until they started laying, which probably won’t be until August.
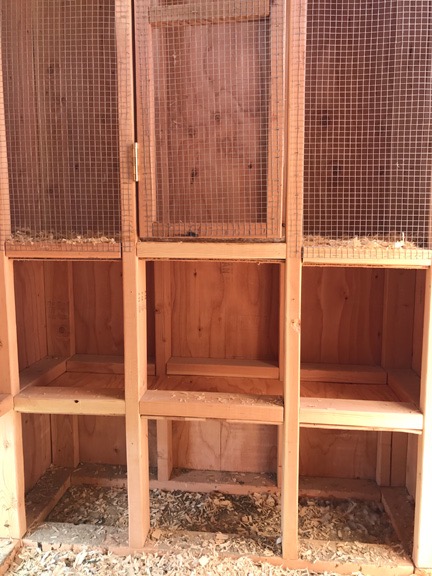
Here are the finished nests on the bottom with the bottom half of the brooding area on top.
Still, I wanted to get them done and create a brooding area above them. My design called for six nests — three on each level — so I had to build a floor for one level and then the brooding area level above it. This required me to take careful measurements of the 2×4 framing because I’d have to cut plywood around it. Then I’d have to lift it into place from below and screw it into the 2x4s I’d put in to hold them. It’s hard to describe and was hard to do, although my little jig saw did make the job easier than I expected. In the end, I had to cut each floor into two pieces to get them into the tight-fitting space.
Once that was done, I used a staple gun to securely fasten 1/4 inch screen to either side of the top brooding area. I framed a door with 2x2s and stapled more screen onto that. Then I put the door on hinges and added a hook to hold it closed. I’d be able to hang a heat lamp over the area if I needed to to keep chicks warm. I figure I can brood up to 6 chicks for up to a month in the space. Keeping them with the other chickens should allow them to get to know each other while they grow, hopefully preventing fights when they’re released into the flock.
When it was all done, I had to block off the nests again. The chickens really like snuggling up in corners when they’re indoors. I wouldn’t mind so much, but they crap where they hang out and it’s a pain in the butt to clean out the nests.
At this point, the chicken coop is mostly done. In July, I’ll pull the covers off the nests and put a fake egg — I usually use an egg-shaped rock — into one or two of the nests. With luck, they’ll get the idea and start laying in there when the time comes.
Although I’d originally wanted to add sliding panels over each of the windows, I think I’ll skip it. The ventilation is good. In the winter, I’ll fasten some heavy plastic over each window to prevent drafts. I’ll leave the door to the yard open for them.
Because this coop is not insulated — neither was the original one — I might buy a chicken coop heater for it. I already have a Thermo Cube that will turn power on when the temperature gets down to 35 and turn it off when it gets up to 45. Attaching that to the heater will run it only when needed during the winter. It’ll never get warm in there, but it’ll stay warm enough to prevent frostbite. You might think that’s nuts, but power is cheap here and from renewable energy (hydro and wind) so I have no qualms about using it to keep my chickens from freezing in the winter.
In the meantime, I’m just happy to have this project done. And even happier that I can’t find anything wrong with this design so I won’t have to build yet another one.

Construction: My Almost Finished Living Room
A video tour of my living room, which is now almost done.
Yesterday morning, I made a video of my living room setup. Thought I’d share it with folks who want to take the tour:
I admit that I sometimes refer to this as my “trophy room.” That’s because the red leather sofa, TV, and stereo surround-sound system came from the condo my wasband bought as a place to live during the week when he worked in Phoenix. To this day, I’m not sure why he agreed to let me have them. The only reason I included them on the list of personal property I wanted was so I could give them up in the bargaining process. But he agreed to the whole damn list — after stewing on it for months — in exchange for me moving out of the house. Joke’s on him: I had to leave anyway for my summer work and my RV and helicopter were already onsite in Washington.
My almost-finished living room; a very pleasant place to hang out.
The leather sofa is very comfortable and has a sofa bed tucked into it. My ex-sister-in-law, who I’m still in contact with occasionally, gave me two of the four pillows on it as a housewarming gift. The rug, storage “bar” behind the sofa, and black leather cushions on the chair are new from IKEA. The lamps are heirloom items — more on those in a future blog post. The rest of what’s in this video are a mix of new items I bought over the past three years and items moved to Washington from my old home in Arizona.
The room is almost done. I just need two things:
- Windowsills. I have temporary window sills in place under most windows. I was going to make them out of 1×12 lumber and actually finished a few of them, but my friend Don offered me slabs of wood that match the tables he made for me. I can then make windowsills out of that. Trouble is, Don needs to get his friend with the bandsaw on the program to get me the slabs. Then I need to cut, stain, and finish them. It’s a big project and I don’t expect to have it done anytime soon. So I have trimmed 1×10 and 1×12 planks for temporary use. I probably won’t bother staining them, so I can use them for something else in the future.
- Coffee table. Don made me custom TV table and end tables. They were cut from power poles that survived a fire back in 2010 or 2011 near the Rocky Reach Dam, upriver from Wenatchee. They have a lot of personality, with actual scorch marks on the live edges. I like them so much I’ve asked Don to make me a matching coffee table. We discussed it in some detail yesterday. I hope to get it within a month or so.
The jury is still out on the rug. I bought another one at Pier 1 that I’d like to try. This one might be okay with a coffee table over it.
And yes, I know I should get a universal remote. But honestly: I don’t watch very much television. The view out the windows is much more enjoyable.
The place is coming together. It’s already a far more pleasant home than the one I left behind in Arizona.
Construction: Choosing Colors
Too many choices!
I’ve been choosing colors for my new home since early December, when I ordered my appliances. That was an easy choice: brushed stainless. I had stainless in my old home and I liked its clean look, despite the fingerprints that always seemed to appear as if by magic on the refrigerator. I think it looks modern and timeless at the same time.
The next color choices weren’t so easy, mostly because there are so many choices I could make.
Kitchen Cabinets
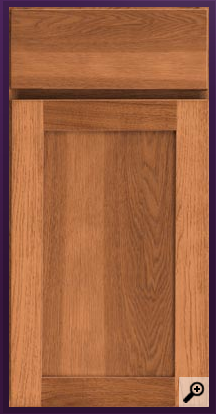
The cabinet style and color I ordered.
The kitchen cabinets were the next thing I ordered. I went with Kraftmaid ordered through Home Depot. They had a special offer going on that saved me about $1,000 on some good quality cabinets. Not only would I get soft-closing doors and drawers — a real step up from what I had in my last home — but the lower cabinets would include slide out drawers, making it easy to access items such as pots and pans.
Style and color were the tough parts. I knew I wanted a light color and I knew I wanted a more rustic look. So I went with something called Honey Spice on a Hickory wood. The style was simple, with a beveled panel in the doors. Easier to clean. Although my old home had an attractive southwestern trim on all the cabinets, they were a bitch to keep clean, with dust and grime accumulating in every single crack.
Kitchen Countertops
I’m really looking forward to having granite countertops. This color looks amazing with my cabinets.
Countertops needed to be ordered next. I knew I wanted a dark color and I knew I wanted a surface that didn’t need a lot of care and maintenance. My old house had tile, which was attractive and durable but it was a royal pain to keep the grout clean, required regular sealing (which I only did once in the 15 years I lived there), and was impossible to use as a surface for rolling out dough.
I went with granite. Again, Home Depot was having a special and I scheduled my purchase to coincide with the dates of that deal. Granite comes in multiple price levels and I saw absolutely nothing wrong with the lowest level, so I saved a bunch of money. The color I chose is called Ubatuba. It’s basically black with gold and greenish gray speckles. It looks amazing with the cabinets.
Wall Colors
This week, I needed to come up with my paint selections. The contractor I hired to do the insulation and drywall is also texturing the walls and painting for me. He’ll likely get started with that sometime next week. Right now, they’re still taping.
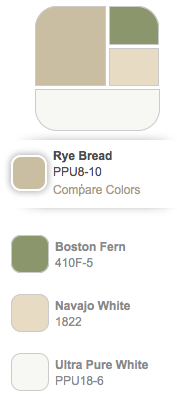
Although the painter will be using Sherman Williams paint and not the Behr paint shown here, he’ll match the colors from the chip I got at Home Depot. For a great online color tool, visit Behr’s Color Smart page. It’s a great way to see how colors work together and help you come up with eye-pleasing combinations.
My old house started out Navajo white through and through. It was mind-bogglingly dull, especially when paired with the off-white carpet and mellow peach colored tile. The first five or so years I lived there, I began repainting various rooms to add color. A friend helped. We used colors thinned out with glaze and applied with sponges or brushes. Some rooms came out great; others didn’t.
This time, I wanted to start with something other than white while keeping the color relatively bright. My new home has vaulted ceilings in every room, starting at about 10 feet high and going as high as 20 feet in the great room and my bedroom. Even the bathroom ceiling rises to at least 15 feet. There are lots of windows so the place is very bright. I like that. There’s nothing I hate more than living in a dark, closed-in space.
I toyed with the idea of using actual colors — green for the great room, rose for the bathroom, and possibly blue for the bedroom. I even bought paint samples to paint onto sheetrock pieces and hold in each room. But when I presented my samples to my friends at a get together the other night, the one they all liked best was the one I’d chosen first and then discarded: a color called Rye Bread. Even the painter liked it best — and he saw the painted out samples. When I put it with my cabinet and countertop sample, I agreed that it looked great.
But the real selling point was when a friend said that it would look great with red. The focal point of my living room area is a red leather sofa. I was sold.
Flooring
The last color decision is flooring and I’m still working on that.
Two options currently in the running for the floor in my home: inexpensive TrafficMASTER “Handscraped Saratoga Hickory” and more costly Bruce “Mineral Wood”.
I’d like wood look floors and will likely go with a textured wood laminate for durability and cost effectiveness. The snap-together planks are easy enough to install that I can do it myself. Everyone I know who has installed a floor like this loves it.
As for color, my biggest worry is having a wood floor that clashes in color with my wood cabinets. This is a serious concern. At first, I wanted a light colored floor, but have since been considering darker colors — even black or near black. My friends agree that my rooms are big and bright enough to support a dark colored floor. One friend said she loved the idea of black but warned me that it shows dirt. I have a Roomba I plan to run daily, so dirt isn’t really a worry for me. What I need are some samples I can hold next to my cabinet sample. I see yet another round of floor store visits in my future.
Although I was planning to put the same floor in every room, “floating” floors like this are not compatible with my freestanding bathtub. That means I either have to put vinyl or tile in my bathroom. I’m not happy about that. Not only does it change the overall look I’m hoping to have in my home, but I don’t like the look of vinyl and hate working with tile. Unfortunately, that’s the room I need to do first — I have to get all my plumbing finished before I get my kitchen appliances installed — so I need to make up my mind quickly.
Any suggestions for me?
Coming Together Quickly!
Although the actual construction of my home began in May 2014 and there were a few delays along the way, things are coming together quickly now. The insulation, drywall, and painting are a major step forward. It’s hard to believe that just two weeks ago I was looking at the same old framing I’d been looking at for months. Today, I’m looking at sheetrocked walls and, within two weeks, I’ll be looking at finished walls.
I’m already thinking about my first dinner party upstairs in my fully enclosed and heated space.
New Home Questions Answered
Your questions, answered in one place.
Since I began blogging day-by-day construction progress of my new home on May 20, 2014, I’ve gotten a lot of questions and comments from blog readers, Twitter followers, and Facebook friends and followers. I thought I’d respond to a few of the most common ones here.
“Not much in the way of foundations. Small wonder whole towns disappear when tornadoes hit.”
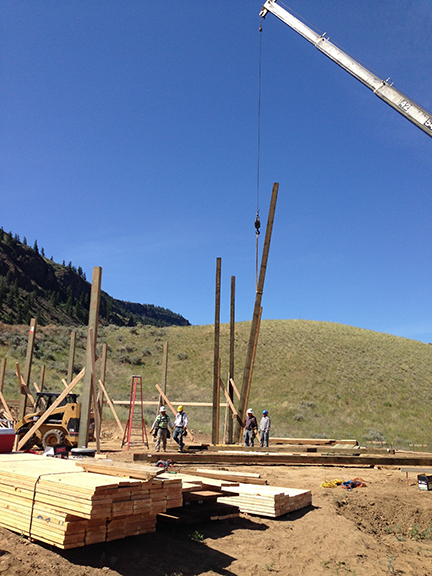
The long posts were hoisted with a crane.
This comment appeared on the blog post for Day 2, which showed the posts supporting the building in place. News flash: there is no traditional “foundation” and there won’t be.
I’ve repeatedly linked to a Wikipedia article about pole buildings in an attempt to educate readers about this type of construction. Unfortunately, the ability to consume web content beyond looking at pictures and video remains above the skill level of many blog visitors.
The posts supporting my building are 6×8 or 8×8 (depending on length and position). Each pole is sunk 3 feet into a hole 4 feet deep and 3 feet across. The holes and post placement were inspected by the county literally minutes before the concrete trucks arrived to fill each hole with concrete.
As far as tornadoes go, the chances of a tornado barreling down a path along the base of the cliffs in Malaga, WA are pretty slim. So slim, in fact, that you stand a better chance of winning a lottery jackpot, being struck by lightning, and being attacked by a shark — all in the same day.
But just in case it does get windy, the building is designed to withstand gale force winds. I don’t recall the exact number, but I do remember it being over 100 miles per hour.
And if you’re worried about seismic activity when Mount Rainier turns Seattle into an ash-covered scene from a futuristic disaster film, it’s also built to withstand earthquakes — not that we’ve had any serious ones here in a very, very long time.
Where’s the foundation?
See above.
When are they going to pour the foundation?
See above.
Please tell me they’re going to pour a concrete slab.
They’re going to pour a concrete slab.
Really. They are.
For some reason, they do this after the building has been constructed. I don’t know why. Maybe it’s so they can drive equipment around inside without worries about damaging new concrete. Does it really matter? The building is not attached to a foundation or a slab so it doesn’t really matter when they pour it. For some pole buildings, they don’t pour a concrete slab at all. In fact, I could save a bunch of money now by putting off the pouring of my slab until I’ve got some more cash. And believe me, I’ve been thinking about that for the garage side, which really doesn’t need concrete right away.
My building will also have a floor drain in the RV garage. That’ll make it possible to do something silly — like wash my car or helicopter inside. (Imagine that!) Or for the building to someday be used as a wine-making facility. (That’s thinking ahead.) The concrete in the RV garage/shop side will be gently sloped to that drain; the concrete in the car garage side will be gently sloped toward the garage doors.
I’ve got it covered, folks.
Who designed the building? Did you work with an architect?
I designed the building. I did not work with an architect.
This probably saved me about $10K in design fees.
It’s also one of the reasons I went with a pole building. Not only is it simple construction, but the folks who specialize in pole buildings can make whatever you dream up a reality without getting costly third parties involved. I brought my sketches to Western Ranch Buildings and Tanya patiently worked with me to fine-tune them for cost effectiveness without sacrificing my must-have features — such as the windows and huge RV garage door. Tanya, working with an in-house engineer for some components, drew up plans that would satisfy the county and give the workers something to work with. If you saw how simple my building plans are, you’d be shocked.
As for the design itself, I thought about what I needed in the building — space for all of my possessions and a modest living area. Then I thought about what I wanted in the building — a shop area, windows to let in light and air and show off the views from inside, decks to take in the views from outside. I knew I wanted that living space on the second floor and I knew it had to face the views. Since the RV garage side needed to be tall to accommodate my RV and helicopter, the living space had to be over the regular garage. I went with a four-car garage because that’s what fit in the 24 x 48 foot space I limited the living space above to.
(County ordinances allow me to have two homes on my 10 acres, as long as one of them is under 1,200 square feet. Since I can’t afford to build a garage and a home, I’m building the 1,200 square foot living space first and leaving the prime building location available for the construction of a real home, likely by the property’s next owner. When I had the septic system installed, I ran lines for both building sites, so the next owner will be all set to build that dream house.)
In a way, the design emerged on its own. Sketches evolved. The original design was a huge square building with a standard peaked roof. But when my neighbor put in a split roof, I realized that it would not only look better but also give me another interior wall for windows into my living space. I changed my sketches accordingly and the final design took shape.
Everything I did was well thought out — hell, I had enough time to think about it — with plenty of consideration for future needs — even a future beyond my ownership.
Why aren’t the builders doing the interior of your living space, too?
Two reasons.
One is that these folks specialize in pole buildings. Although they can do interiors, it’s not what they usually do. Not only that, but they’re very busy and I really can’t delay this project any more than it has been delayed. (I’m sick of living in a trailer and want a solid roof over my head, preferably one that doesn’t sway when the wind blows.)
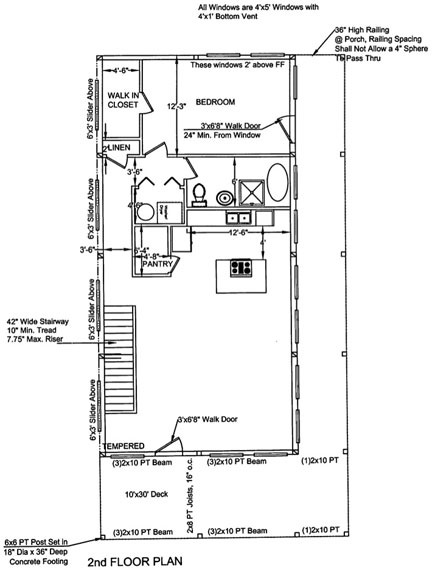
Here’s the living space floor plan as submitted to the county. It’s not 100% right, but it’s close enough for permitting purposes and to get bids on HVAC, framing, insulation, and drywall.
The other more important reason is money. I’m not quite sure what I can afford to get done. I know I can pay for the shell of the building; I’ve been saving for well over a year, living on the cheap in my RV to put aside every penny I can. The income I get from this season’s cherry drying work and the promise of a loan from a family member if I need it assures the shell will be done.
I’m not sure, however, how far I can stretch my money beyond that. I know I can save money by doing things myself; I have every intention of doing all the plumbing and electrical work, for example, and will likely do the floors and all the painting. But I also know that I need to hire professionals to do difficult things such as HVAC ductwork, framing, and drywall. By breaking down the living space project into sub-projects, I can do them one at a time, knocking them off as time and money allows.
With luck, heavy rain over the next few months, and a lot of hard work, I’ll be cooking up Thanksgiving dinner for friends in my new kitchen.
Can you share a conceptual drawing of what it will look like when done?
This question from a Facebook friend made me giggle. You see, they’re working so very quickly.
My response: If you wait two weeks, I’ll have a photograph.