Construction: Some Memorabilia

It might sound goofy, but I framed the pants I wore throughout most of my construction project.

Maria the Electrician
My pants didn’t look nearly as ratty here as they ended up.

Back in January, 2015, in a blog post about wiring my home, I shared a photo of myself dressed for winter wiring work inside my future home. In the photo, I was wearing a pair of Levi’s that would become my official work pants. Over the following months, I’d slowly but surely destroy them simply by wearing them while working.

They became my work pants when I wiped spray form insulation on them. Do you know the stuff I’m talking about? It comes in a can and you spray it through a narrow straw into cracks. I was working in the autumn of 2014 with my friend Barbara, spraying foam into the cracks around my windows and the doors to my deck. I got some of the spray on my finger and wiped it on my pants. Not sure why I did that — I should have known that it would never come off. It became a crusty yellow stain on the outside of my left thigh.

The pants, which I’d gotten from my brother for Christmas in 2012, already had a patched hole in the left thigh. The hole had manifested itself early on, almost as if by design. I know it’s fashionable — or maybe it was fashionable? — to have torn jeans, but I prefer mine intact. But this hole was just the first of many in that leg. (They don’t seem to make jeans the way they used to.) I patched them with iron-on patches as quickly as they appeared, but I never seemed to keep up with them.
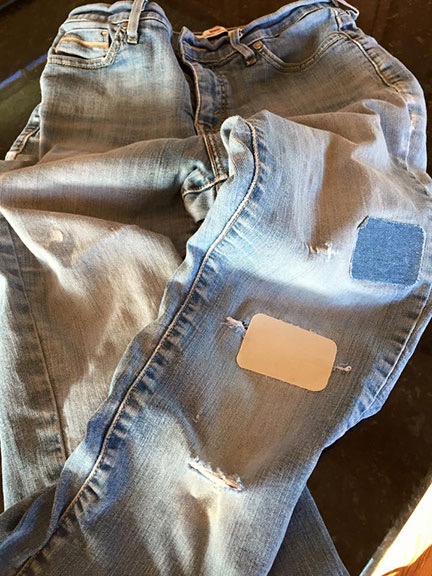
Jeans in May
Here’s what the jeans looked like on May 7, 2015.

On May 7, I shared another photo of the jeans, this time on Facebook. My update text read:

Heavily patched and washed three times each week, I’m determined to make these designated work pants last until my home is done. I might frame them when I’m done.

I think I was kidding about the framing.
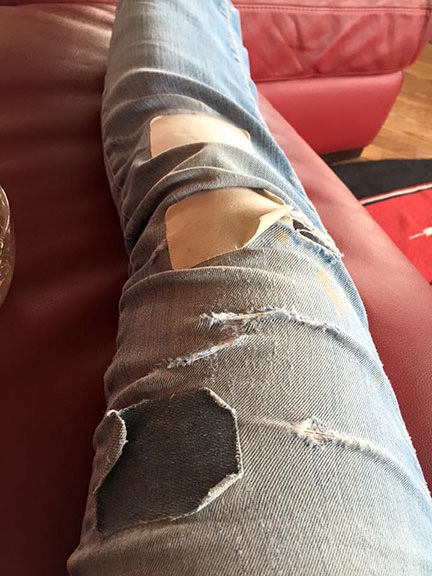
Jeans in June
Here’s a closeup of the torn up leg on June 1, 2015.

On June 1, I shared a closeup of the torn pants leg stretched out on my red leather sofa. I couldn’t seem to prevent them from ripping. By this point, the fabric on the legs and butt was so thin that I had to be careful putting them on. I said:

It’s a good thing this project is almost done — I don’t think these pants would last through many more washings.

Somewhere along the line, I’d managed to get paint on them. That was okay. The best thing about work pants is that you don’t have to worry about getting them dirty. They become the rag you don’t have handy when you need a rag. It kind of reminds me of when I was a kid and my dad painted houses as a second job. His old police work pants became his painting pants and were soon covered with all colors of paint.
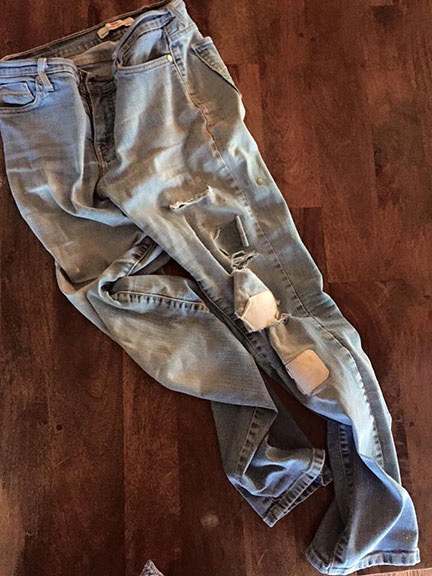
Retired Jeans
I took what I thought would be the final photo of the jeans in August 2015. You can see the original yellow insulation stain on the back side of the left leg’s outer seam.

By August 31, it was all over — even though my construction project wasn’t. (To be fair, it was mostly done and I’d gone into a slow motion completion mode fueled by procrastination, which I excel at.) I shared a photo on Facebook with the comment:

After much soul- searching, I have decided to permanently retire my work pants.

The comments came quickly.

One person (Mandy H) suggested cutting them up and sewing them together as a bag. But the fabric was so thin, I didn’t think it would last, even as a bag.

Another person (Mike B) suggested:

Frame them as a memento of your hard work to build your new home and life.

I replied that I’d thought about that but that I had enough stuff. (I actually have far more than enough stuff.)

He replied:

Nothing signifies the amount of hard work than worn out work pants.

I certainly couldn’t argue with that. The pants had seen every aspect of my construction project.

Another person (Jorja) said:

Save them…………they won’t take up much space………you worked hard……….they deserve to stay………..a while longer!

The clincher was when another friend (Shirley) added:

Yeah, I’m thinking you should frame them as part of your house building memories. :-)

I decided to look into framing them. I’d need a shadowbox frame for them, so I went to Craft Warehouse, which had done some framing for me before. The price quote I got gave me serious sticker shock: $350. Ouch!

So I went online. I wound up spending about half that for a shadowbox frame “kit” that included the completely assembled frame with glass, felt backing, and hanging hardware. The box came about two weeks later.

And sat in my garage for a few months.

Meanwhile, I’d washed the pants one final time and had folded them neatly to wait for when I had time to frame them.

Last week, I did some garage cleaning and stumbled upon the box with the frame in it. I brought it upstairs and opened it. It looked like a big project.

I put off doing it for a few days.

I needed a photo, I decided. A photo to put the pants in context. I found the photo at the top of this blog post and emailed it to the local Walgreens photo department. I ordered a 5×7 print. I picked it up the next day.

Yesterday, I got tired of seeing the frame standing in the corner of my living room. I laid it out on my big dining table, disassembled it, and stretched out the pants. I put a fold in one leg to make room for the photo. I attached the jeans to the felt board by punching holes in them and running black wire ties behind them, out of sight. I used tape behind the photo to attach it to the felt and stood back to admire my work.

It looked boring. Flat.

I thought about what I could add to liven it up. How about a piece of Pergo under that photo? After all, I’d been wearing them when I laid 1200 square feet of Pergo laminated flooring.

And wire, of course. I’d done about 95% of the wiring in my home. How many days had I spent on the floor, creating grounding wire pigtails for outlets to satisfy the electrical inspector? One of those pigtails would be nice to show.

I went down into my shop and started poking around at material scraps.

The deck. I’d laid about 600 square feet of composite decking material. Maybe a piece of that? I’d thrown most of the scraps away, but still had a piece I could cut for a cross-section.

And quarter round trim? I was still laying that around the house so there were plenty of tiny scraps around.

And some of the many different types of screws? Wall screws, wood screws, deck screws, self-tapping screws. T-25 heads, T-15 heads, Philips heads. I grabbed a few.

And a sanding wheel from my orbital sander? I’d been doing a lot of sanding lately, working on my loft rails. I had at least a dozen spent wheels in the trash.

And of course, the stub of a pencil which seldom seemed handy when I needed it. I found two small ones in a pencil jar on my workbench and grabbed one of them.
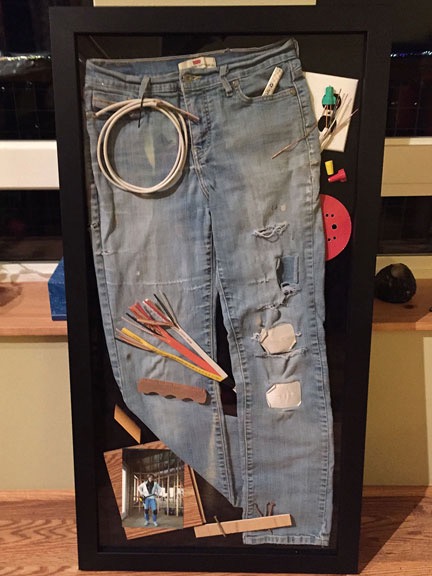
Mounted Jeans
Here’s the final piece, standing against the wall before hanging.

I began laying out all these things on the black felt “canvas.” I liked the way it was looking. But how to attach them? I had a small glue gun someplace.

I lost hours looking for it and getting distracted by other things. Just when I though I’d lost it and reached for a tube of silicone sealer, I decided to look into the toolbox drawer labeled “Adhesives.” Duh. I’d put it away. I brought it upstairs and got to work.

When I was done, it looked a lot busier. But not too busy, I think.
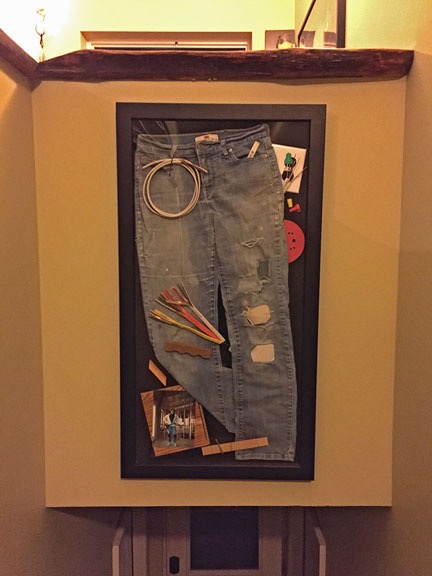
Hung Pants
The pants, hung on my wall.

I already knew where I was going to hang it. Although my first thought was to hang them in the bedroom, on the wall I was standing in front of in the photo at the top of this blog post, I wanted to put it in a place where everyone would see them, a place where they could become a conversation piece. There was a big piece of empty wall over the stairs that was the right size and shape. I did some measuring and used the heavy-duty picture hanger that had come with the frame to hang the finished piece there.

It looked good.

I’m very glad that my friends — especially Mike, Jorja, and Shirley — talked me into keeping these jeans and making them into a piece of personal memorabilia. I put a lot of work into my home and I’m still amazed, every day, at how good it came out. These pants, framed with a few other mementos of that work, will remind me what it took to get it done.

On May 20, 2014, I began blogging about the construction of my new home in Malaga, WA. You can read all of these posts — and see the time-lapse movies that go with many them — by clicking the new home construction tag.

Once free to do what I wanted to do, the way I wanted to do it, I made it happen. I’ll remember that every time I see this piece.

Would I do it again? A few months ago, I would have said no. But now I’m starting to think that this was just practice for my next home.

Construction: Organization Solutions

Keeping my things neatly organized is a major goal in my new home.

On May 20, 2014, I began blogging about the construction of my new home in Malaga, WA. You can read all of these posts — and see the time-lapse and walkthrough movies that go with many them — by clicking the new home construction tag.

I spent much of the other day working on organization solutions for my home. I want to be able to put things away neatly, organized so they’re easy to find. I want to open a drawer or closet and see things arranged where they belong.

Coat Closet

The very first thing I did was to hang a shelf and rod in my hall closet. This would be my coat closet. All of my coats, on hangars, were in a wardrobe moving box that was basically falling apart under their weight. It was March after the drywall was done and the kitchen cabinets were being installed — the same time I was using a variety of coats. Clearly, I needed a coat closet done.

Coat Closet
The shelf and rod in my coat closet was my first home organization project.

I used a pair of 1×6 boards, cut to the depth of a shelf I wanted on top and mounted rod holders on them. Then I cut a piece of dowel I had — former curtain rods from my Arizona home — and fit in in place. I painted the boards and shelf. Voila! My coat closet, which I’d also use to store my vacuum, was done.

The Pantry

I had decided early on that I didn’t want food in my kitchen cabinets and I didn’t want appliances on my kitchen counters. That meant putting in a pantry.

I call my pantry “the amazing shrinking pantry” because it originally appeared on my plans as a walk-in closet with shelves on three walls. During the framing process, as the skeletons of my future walls were set, it became obvious that if the pantry was that big, it would extend far into the great room and hide the top of the stairway from view of the kitchen island. So we cut it to about half the original size. That made it a deep closet. Later, when I realized that I needed a place to put the ladder for the loft, creating a cubbyhole in the wall where the pantry was could be a good solution. I hired a framer to modify the future walls, cutting space from the back of the pantry. The space that was left measured only 33×32 inches when the drywall went up. The pantry had gone from a small room on paper to the smallest closet in my home.

Melamine
Melamine board is durable and has a washable surface.

Undaunted, I put in shelves a few weeks ago. I bought a 4×8 sheet of melamine board. That’s basically particle board with a melamine resin coating. I had the Home Depot saw man cut it to size on the big saw, not only saving me the trouble of doing it myself but making the board movable. A full sheet is simply too heavy for me to handle on my own. I also bought some white 1×3 trim pieces. At home, I cut the trim pieces to the depth of the shelves and used wood screws to attach them to the closet walls at the studs. (First time I used my stud finder.) Then I laid the shelves atop the trim strips. I spaced the shelves with enough room at the bottom to fit my wine cooler and wine bottle rack (trimmed to size). The first shelf was tall enough to accommodate my countertop appliances: mixer, food processor, coffee maker, bread machine. The next few shelves would hold my food. The very top shelf, which required a stepladder to reach, would hold seldom-used entertainment items, such as a steamer, pitchers, and platters, as well as liquor bottles.

Finishing this first organization project was a real morale booster. I was able to move my food up from my RV, where I’d been living for nearly two years, and unpack my kitchen appliances. It was the first step to really making my kitchen usable.

Pantry Shelves
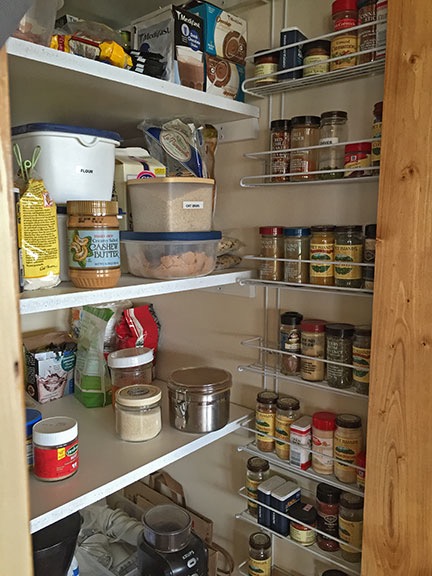
My nearly finished pantry includes shelves for food, small appliances, and spices.

Of course, I wasn’t quite done. After painting the board edges and screw heads with glossy white paint (to match the melamine), I started thinking about adding shelves along the wall in the very narrow space between the edge of the shelves and the doorway. I was mostly concerned with storing spice bottles — with a real kitchen at my disposal again, I had begun doing a lot of cooking and was accumulating small jars of herbs and spices at an amazing rate. I’d been storing them in a basket in the pantry, but every time I needed something, I’d have to dig through the basket to find it. I tracked down white wire spice racks on Amazon.com and ordered four of them. Although my original idea was to put two on each side of the doorway, I wound up putting three on one side. The spices fit nicely — and yes, I did put them in alphabetical order — on those shelves. That was the first project I finished last week.

The Bedroom Closet

My old house had a large walk-in closet in the master bedroom. While it was nice to have all that space, there were two reasons why I didn’t like that closet:

  • The upstairs heater/AC unit was in there. The house had two-zone heat and, because it didn’t have a basement, it had two separate HVAC systems, each of which had the air handler in a closet. This ugly, fully exposed thing stood in the back corner of the closet, taking up about 20% of its space.
  • There were ugly wire shelves for linens in there. The house didn’t have a linen closet. (Who builds a house without a place to put linens?) Our solution was to add shelves in the master bedroom closet. But instead of putting in nice, neat shelves, my wasband went with white, plastic coated wire shelves. The kind of shelves you might have in your garage. They were shoved into place right inside the doorway, like the afterthought that they were. Functional, but ugly.

(Looking back at it now, I realize that it’s just another example of the half-assed solutions I lived with for 29 years. Why do something right when you can do it cheap?)

I didn’t want to be unhappy with my new home’s closet. I wanted to do it right.

The closet is 100 inches wide and 35 inches deep with a 72 inch wrapped doorway. Eventually, I’ll hang a pair of sliding doors on it, but for now, it’s wide open.

I explored a lot of possible solutions, including a DIY shelf setup. Although my pantry shelf project wasn’t bad, I knew I lacked the building skills to create a satisfactory solution from scratch inside the closet. That meant either a kit or hiring a contractor.

I contacted California Closets. That’s a company that build (supposedly) custom closet solutions. I asked for a “free consultation.” I thought that meant someone would come to my home and talk to me about what I wanted. But instead, it meant that a woman would call me from her home or office in Spokane, talk to me about the size of the closet, and email me some sketches. She had no desire to come see me until she knew she had a sale. And with a materials-only quote of about $1500 for a closet design that wasn’t anything like what I wanted, she certainly wasn’t going to get the sale.

That meant a kit. I looked at the John Louis Home Deep Deluxe closet organizer kit several times before finally buying it. I found a coupon code online for 10% off and shipping was free. It arrived a week later in a big box that was too heavy for me to lift. My friend Tom helped me drag it up the stairs, where it sat in the hallway until the movers came. The movers moved it into the bedroom at my request where it sat until last week.

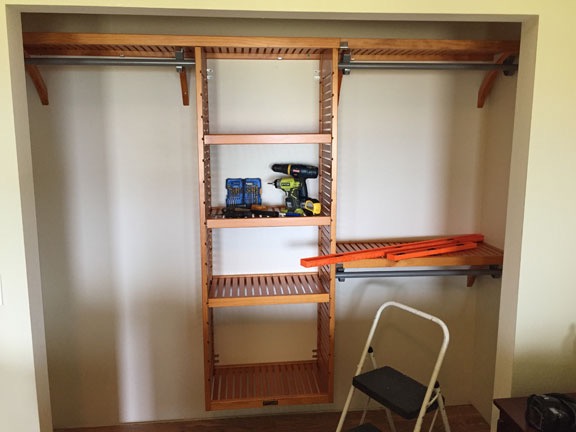
Assembling the John Louis system was not like assembling Ikea furniture. It required precise measuring, driving multiple heavy screws into the wall, and cutting shelves and garment rods. I started it late one afternoon, worked on it for about three hours, and then made the mistake of taking a break for a glass of wine while I watched the sun set. I picked up the task the next day. Although the instructions were clear and in plain english with plenty of illustrations, the installation video, which I watched on my iPad as I worked on each step, was invaluable. The system is extremely flexible and comes with enough shelving to do almost anything you like. I customized my closet with basically equal single and double bars on either side of the standard 24-inch shelves. The resulting organizer exactly filled the entire 100-inch width of the space, which lots of shelf space. It was affixed firmly to the wall, attached to studs wherever possible. And it looked awesome.

Closet Organizer
Here’s the finished closet organizer with the tools I needed to build it. (My chop saw, which I used to cut the shelves, is down in my shop.)

Laundry Room Shelf

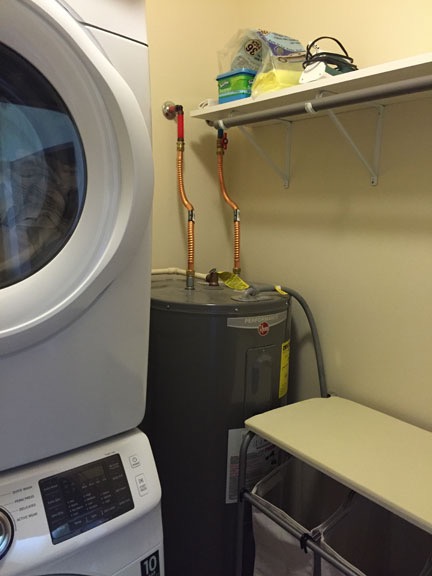
While I was on a roll, I figured I’d use my new shelf-installation skills to put up a shelf in my laundry room. My laundry room is remarkably tiny, only 5×6 feet, and houses a full-sized washer and dryer (stacked), water heater, and 3-bin hamper. I’d been putting laundry soap, clean rags, and other items on top of the hamper and the place was a disorganized mess. A shelf was the solution but because the plumbers had roughed in for a taller water heater, I had some weird water pipes running down the wall. The shelf couldn’t go from wall to wall.

The solution was to mount shelf supports on three studs of the wall and place a melamine shelf atop it. I’d already bought everything I needed. The shelf supports had cups at the end to support a clothes rod — I thought that might be a nice touch to hand dry shirts and other items. My bedroom closet had spare rod.

Laundry Shelf
It isn’t easy to get a picture inside such a tiny room. The other end of the shelf is where I put my laundry detergent. The top of the laundry bin doubles as an ironing board; I got it on Amazon.com.

I spent about an hour cutting the shelf, mounting the supports, hanging the shelf, and fastening the rod. While the result wouldn’t win any design competitions, it was functional and not nearly as ugly as the water heater below it.

Bathroom Storage

My bathroom needed storage, too. I had not designed it to have a medicine cabinet set into the wall. That was mostly due to my complete inexperience as a general contractor and the simple fact that I didn’t think of it. Wall mounted medicine cabinets were big and bulky — I didn’t find a single one I liked that wouldn’t cast a shadow with the over-sink light fixture above it. That meant any medicine cabinet items would have to go elsewhere.

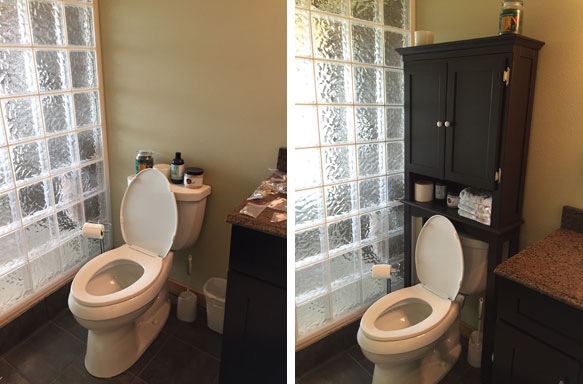
I saw an over-toilet cabinet that matched my bathroom vanity in Bed Bath and Beyond and picked it up on one of my trips into town. While I was still on a roll, I assembled it. Although it looks pretty good and it’s attached to the wall for safety — don’t want that falling down on you while you’re doing your business in the seat — I’m not 100% happy with it. It’ll either grow on me or I’ll find another solution. Perhaps a wall-mounted medicine cabinet over the toilet? With this in place for now, I have plenty of time to think about it.

Before and After Toilet Storage
I think these before and after shots do a good job of showing how much better the toilet area looks with the shelf unit in place. And its practical storage, too.

Remaining Projects

I have two big storage projects left to do:

  • Linen closet shelves. When I bought the melamine board for my pantry, I also bought board and had it cut for the linen closet. I just haven’t gotten around to putting in the shelves. I’ll use the same technique I used for the pantry.
  • Shop shelves. Although I bought and assembled some shelve units from Ikea for shop storage and was ready to buy and assemble more, Ikea no longer sells those kinds of shelves. My friend Bob showed me the shelves he assembled in his garage. They’re simple and sturdy. I already have 12 2×8 sheets of plywood that I’d been using on my deck until I got the decking down. Those will be repurposed for shop shelves. I bought the 2×4 lengths of lumber I’d need for the job. These shelves will go into the far back corner of my shop area, where my furniture was stored until it was moved upstairs. I’ll use them to store shop supplies, camping gear, and other equipment I need but don’t use regularly. I’m a huge fan of clear plastic bins for organizing related items; those shelves will be sized to fit the bins.

I have the materials I need to do these jobs. Now all I need is the time.

Guess I’d better get to it.

My New Wardrobe

A new wardrobe for a new me.

One of the good (and bad) things about losing a bunch of weight is the need to buy new clothes. Good because it’s always nice to have an excuse to buy new things. Bad because buying a whole new wardrobe can be costly.

As reported — or, rather, bragged aboutelsewhere in this blog, I lost about 45 pounds this past summer. Although my clothes closet was full of clothes I’d worn in my thin days and many of them fit me, most of them did not. And my dresser drawers had only clothes that fit me before I lost all that weight.

Taking Inventory

It took a long time to go through all those clothes and I’m just about done. The news was not good.

My much-loved Henley t-shirts — the ones with the super-soft cotton — which I wore almost all the time, were now large enough to wear as nightshirts. They were a men’s size large and a handful of them have been shifted to my pajama drawer. The 3X t-shirts I had been wearing as nightshirts were tent-like and went to the thrift store.

My long-sleeved t-shirts, which had been snug, seemed big enough to put two of me in. The shoulder sleeve seams hung at least two inches below my shoulders. They’ll go to the thrift store.

I tried on at least 20 pairs of denim jeans that had been hanging in my closet for up to 15 years. I gave at least 15 pairs of them to the thrift store. Of the remaining pairs, some of them were so worn or torn that they’d need repairs before being put back into circulation.

The three suits I’d kept from my corporate days were too large. They went to the thrift store. The same goes for most of the dress slacks, although a nice pair of fully lined wool slacks now fit me again.

And when I finally tried on my cold-weather clothes a few weeks ago, I discovered that all of them were too big for me — some of them ridiculously large. That’s long-sleeved t-shirts, turtlenecks, mock turtlenecks, sweaters, sweatshirts, and jackets. I was even heart-broken to discover that even the black denim logo jacket I’d gotten from Lynda.com — the one with “Author” embroidered on it — was now too large to wear. It had been painfully snug when I wore it just last year.

There was some good news in the closet. My formal wear, including a long satin skirt and several sequin tops and dresses, mostly still fit. I had no need for such clothing in the later years of my marriage — after moving to Arizona we never went anywhere that required that level of dress — so I never bought anything it that during my fat days. Fortunately, I kept the thin clothes and hope to wear it in the future — maybe as soon as this New Year’s Eve.

The New Wardrobe

In Color
This photo, shot during my Thanksgiving trip to California, shows off one of the brightly colored t-shirts I picked up on a shopping spree in Vegas earlier that month. (I’ve also been traveling quite a bit lately.)

Over the past few months, I’ve been buying new clothes to fill in the gaps in my wardrobe. I detailed one shopping spree in this blog; there have been other smaller ones since then. On those trips, I bought the things I needed for warm weather: t-shirts, shorts, tank tops, skirts, and casual shoes (to replace the canvas Keds I’ve been wearing for years). A lot of what I bought is colorful — something I avoided in the past.

I also bought a lot of understuff: panties and bras. None of what I had in my underwear drawer fit properly anymore. I discovered Victoria’s Secret, had a bra fitting, and bought a few lacy bras that not only fit perfectly, but also helped counteract the affects of gravity that all women experience after a certain age. Of course, with all those lacy bras, I needed lacy panties to replace the practical but not very exciting cotton undies I’d been wearing for years. My soon-to-be ex-husband didn’t seem to care much about my lingerie — or sex, for that matter — in the last year or so of our marriage but I’m sure his replacement will. And I love looking and feeling sexy again.

I spent the Christmas holidays in St. Augustine, Florida, with my mom and stepdad. It wasn’t until I packed for the trip that I realized I had problems with my cold-weather wardrobe. So two days after Christmas, at the height of post-Christmas sales but before all the good merchandise had been bought up, I hit the outlet mall there.

Sale!It was a real shop-till-you-drop experience. I bought 9 long-sleeved t-shirts, 2 short-sleeved t-shirts, 2 lace camisoles, 3 tank tops, 3 sweaters, 2 pairs of Levis blue jeans, and a belt. I also bought 2 pairs of shoes — one of which I put on in the store and threw away what I’d been wearing. The sales made all this possible. With sale prices and two coupons, I spent less than $350 and got quality merchandise from stores like Eddie Bauer, Bass Shoes, Levis, and Tommy Hilfiger.
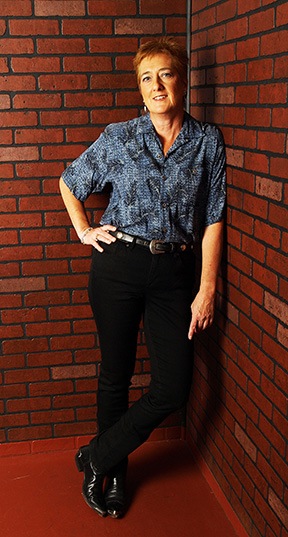

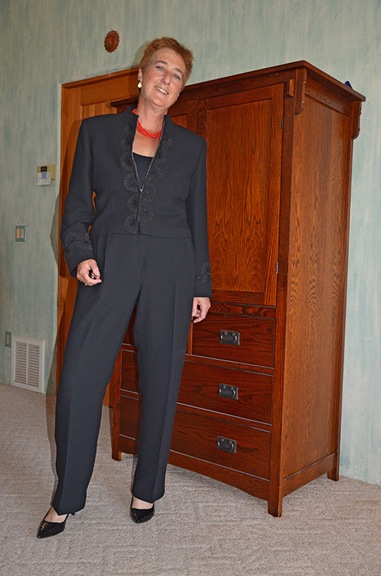
By the time I staggered back to the car, I was carrying 8 shopping bags. I had to ship most of my purchases home; the new clothes simply would not fit in my luggage.

Wearing Clothes that Fit

My new clothes all have one thing in common: they fit.

I know that sounds like an obvious goal, but you need to understand the kinds of clothes I was wearing before I lost weight. Back then, I didn’t like tight clothes because they showed off every bulge, so everything was loose-fitting. That just made me look even bigger than I was. And because ladies sizes weren’t always big enough for me, I bought a lot of my clothes in the men’s department — especially shirts. As a result, I always looked kind of big and shapeless.

Not so with my new wardrobe. All of my shirts are skin-tight, showing off my flat belly and new figure. Most of the jeans are “skinny” jeans — straight-leg and form-fitting. Even my shoes are cute and stylish; heck, just yesterday I got a complement on one of my new pairs.

Looking Lean
This shot, from my October 2012 Glamour Shots photo shoot — which was done before I finished slimming down — is a good example of my personal style.

And not only am I fitting into some of the old clothes I wore in my 20s and 30s, but I’m also dressing the same way I did back then — wearing clothes that accentuate my height (5’8″) and slim build. (That’s not as scary as it sounds, mostly because I never did go into the slutty look so many 20-somethings seem to like today.) I’ve resurrected my own personal style from the 80s and 90s: simple clothes in timeless fashions and basic colors. I look good, which, in turn, helps me feel even better.

It feels great to turn a few heads when I’m out and about.

What’s Still on My List

My wardrobe is nearly complete. The only thing I can still really use is a good mid-weight jacket. The few jackets I have — including my often-worn Robinson Helicopter jacket — are way too big on me. I already gave three jackets away, including a denim baseball-style jacket I got long ago for test riding a Yamaha motorcycle at Americade in 1991. (Did I mention that I seldom threw anything away?)

The good news is, my leather bomber jacket — the one with the sheepskin collar — still fits well enough to wear; I’ll put it to use on my upcoming photo gig at Lake Powell and Monument Valley. It’s freaking cold in the helicopter up there this time of year with two doors off, especially at dawn.

And my costly outback style oilskin duster — which I wore exactly twice on horseback rides during foul weather — fits fine. Now all I need is a reason to wear it again.