New Home Questions Answered

Your questions, answered in one place.

Since I began blogging day-by-day construction progress of my new home on May 20, 2014, I’ve gotten a lot of questions and comments from blog readers, Twitter followers, and Facebook friends and followers. I thought I’d respond to a few of the most common ones here.

“Not much in the way of foundations. Small wonder whole towns disappear when tornadoes hit.”

Hoisting with a Crane
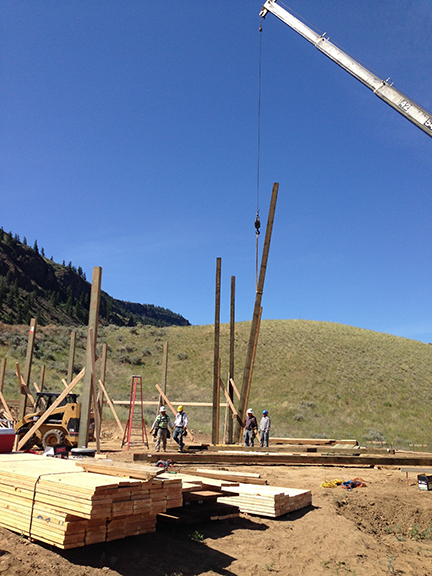
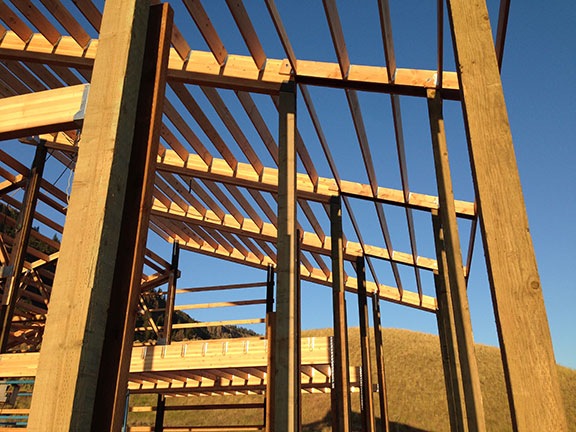
The long posts were hoisted with a crane.

This comment appeared on the blog post for Day 2, which showed the posts supporting the building in place. News flash: there is no traditional “foundation” and there won’t be.

I’ve repeatedly linked to a Wikipedia article about pole buildings in an attempt to educate readers about this type of construction. Unfortunately, the ability to consume web content beyond looking at pictures and video remains above the skill level of many blog visitors.

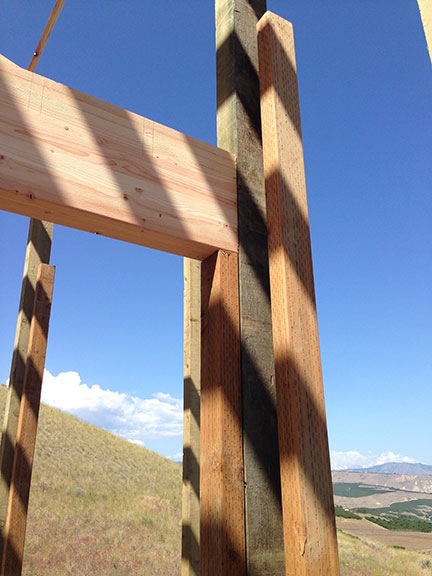
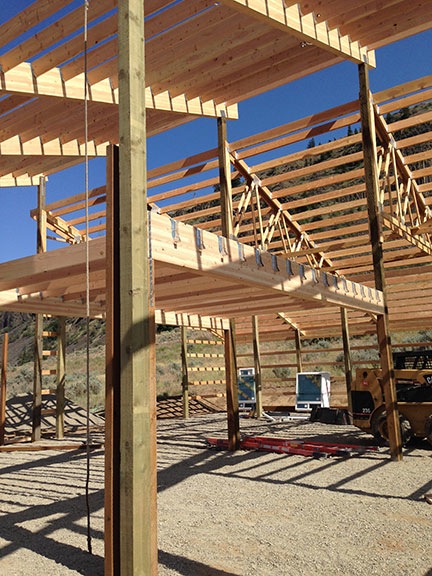
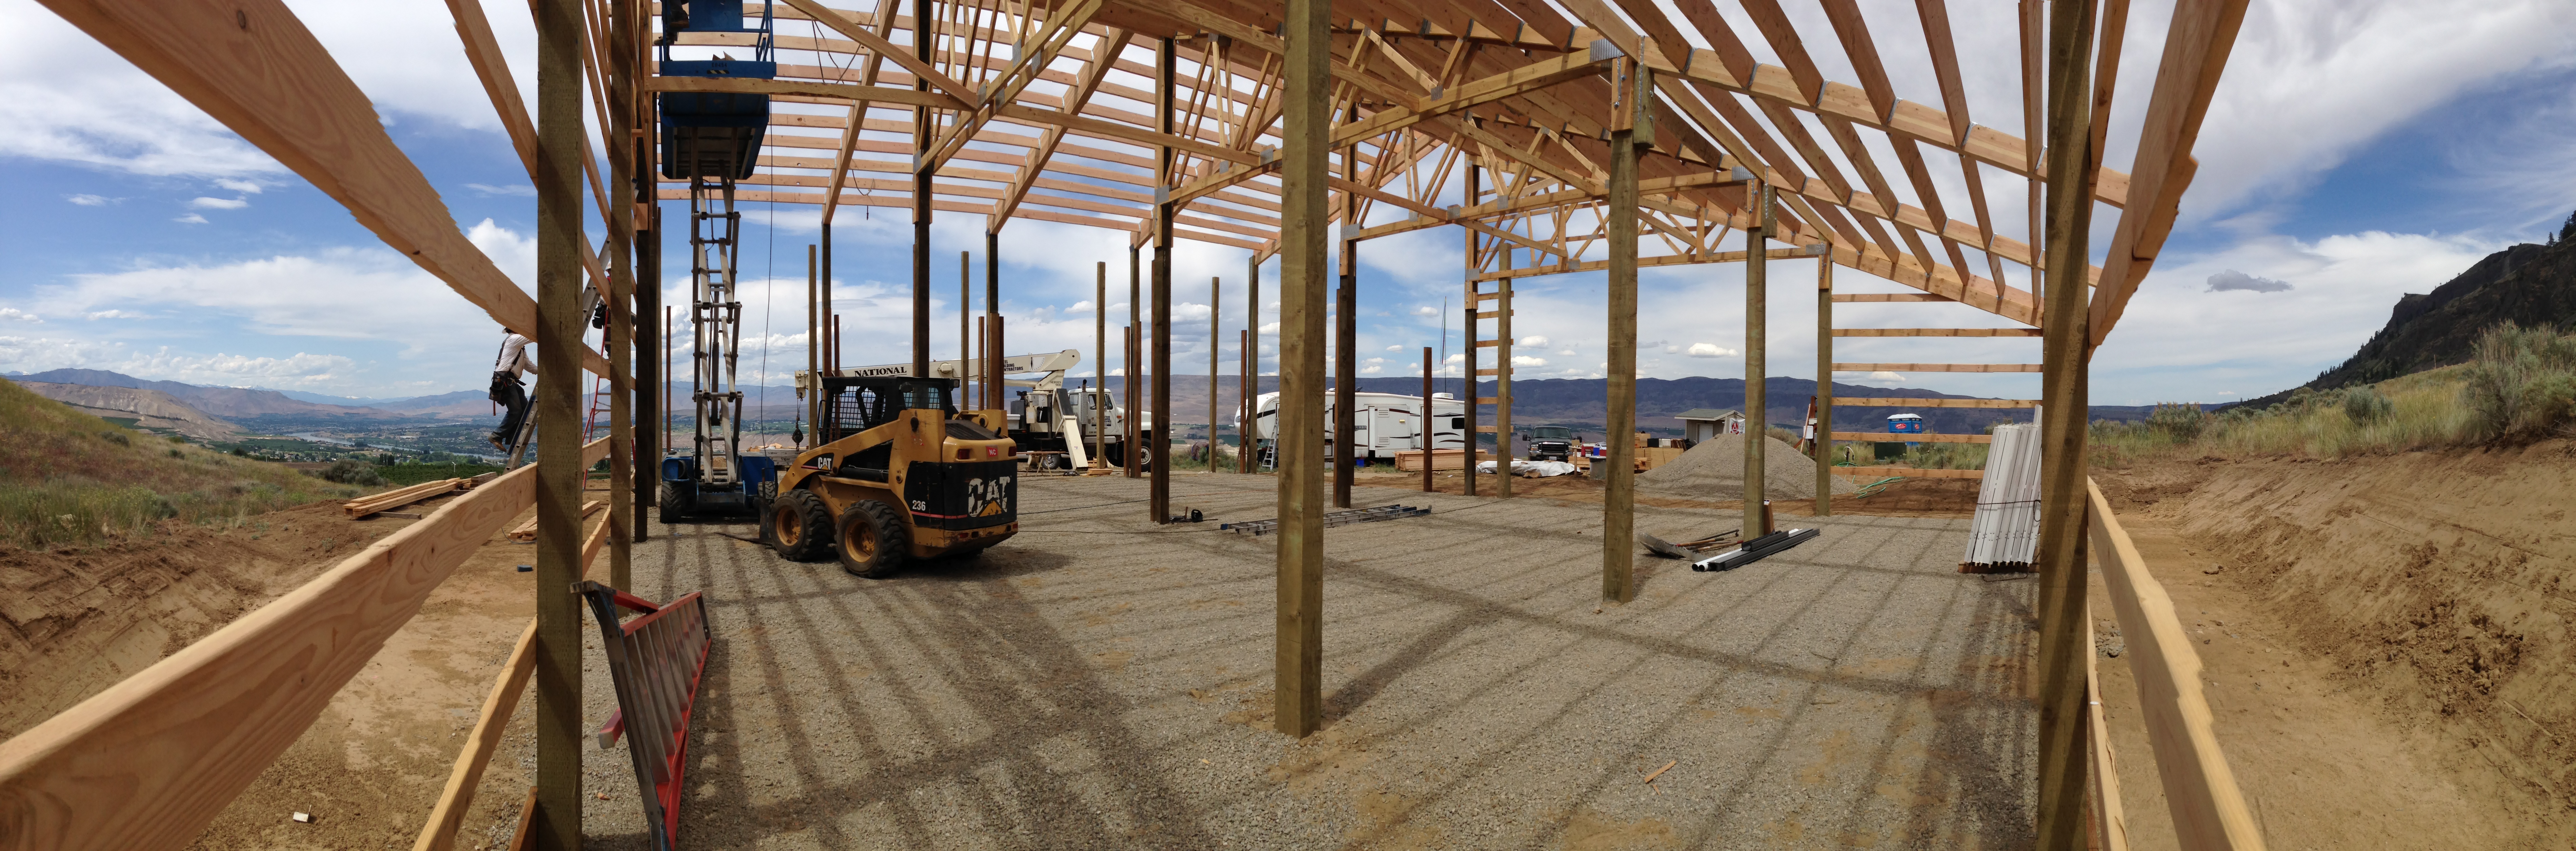
The posts supporting my building are 6×8 or 8×8 (depending on length and position). Each pole is sunk 3 feet into a hole 4 feet deep and 3 feet across. The holes and post placement were inspected by the county literally minutes before the concrete trucks arrived to fill each hole with concrete.

As far as tornadoes go, the chances of a tornado barreling down a path along the base of the cliffs in Malaga, WA are pretty slim. So slim, in fact, that you stand a better chance of winning a lottery jackpot, being struck by lightning, and being attacked by a shark — all in the same day.

But just in case it does get windy, the building is designed to withstand gale force winds. I don’t recall the exact number, but I do remember it being over 100 miles per hour.

And if you’re worried about seismic activity when Mount Rainier turns Seattle into an ash-covered scene from a futuristic disaster film, it’s also built to withstand earthquakes — not that we’ve had any serious ones here in a very, very long time.

Where’s the foundation?

See above.

When are they going to pour the foundation?

See above.

Please tell me they’re going to pour a concrete slab.

They’re going to pour a concrete slab.

Really. They are.

For some reason, they do this after the building has been constructed. I don’t know why. Maybe it’s so they can drive equipment around inside without worries about damaging new concrete. Does it really matter? The building is not attached to a foundation or a slab so it doesn’t really matter when they pour it. For some pole buildings, they don’t pour a concrete slab at all. In fact, I could save a bunch of money now by putting off the pouring of my slab until I’ve got some more cash. And believe me, I’ve been thinking about that for the garage side, which really doesn’t need concrete right away.

My building will also have a floor drain in the RV garage. That’ll make it possible to do something silly — like wash my car or helicopter inside. (Imagine that!) Or for the building to someday be used as a wine-making facility. (That’s thinking ahead.) The concrete in the RV garage/shop side will be gently sloped to that drain; the concrete in the car garage side will be gently sloped toward the garage doors.

I’ve got it covered, folks.

Who designed the building? Did you work with an architect?

I designed the building. I did not work with an architect.

This probably saved me about $10K in design fees.

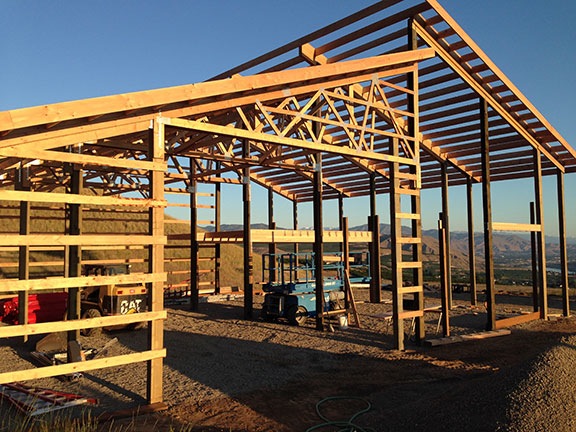
It’s also one of the reasons I went with a pole building. Not only is it simple construction, but the folks who specialize in pole buildings can make whatever you dream up a reality without getting costly third parties involved. I brought my sketches to Western Ranch Buildings and Tanya patiently worked with me to fine-tune them for cost effectiveness without sacrificing my must-have features — such as the windows and huge RV garage door. Tanya, working with an in-house engineer for some components, drew up plans that would satisfy the county and give the workers something to work with. If you saw how simple my building plans are, you’d be shocked.

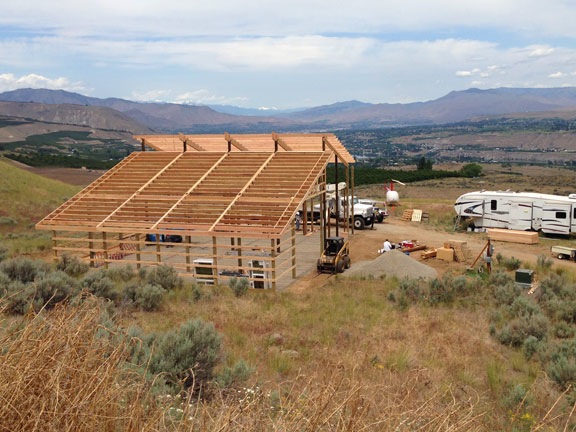
As for the design itself, I thought about what I needed in the building — space for all of my possessions and a modest living area. Then I thought about what I wanted in the building — a shop area, windows to let in light and air and show off the views from inside, decks to take in the views from outside. I knew I wanted that living space on the second floor and I knew it had to face the views. Since the RV garage side needed to be tall to accommodate my RV and helicopter, the living space had to be over the regular garage. I went with a four-car garage because that’s what fit in the 24 x 48 foot space I limited the living space above to.

(County ordinances allow me to have two homes on my 10 acres, as long as one of them is under 1,200 square feet. Since I can’t afford to build a garage and a home, I’m building the 1,200 square foot living space first and leaving the prime building location available for the construction of a real home, likely by the property’s next owner. When I had the septic system installed, I ran lines for both building sites, so the next owner will be all set to build that dream house.)

In a way, the design emerged on its own. Sketches evolved. The original design was a huge square building with a standard peaked roof. But when my neighbor put in a split roof, I realized that it would not only look better but also give me another interior wall for windows into my living space. I changed my sketches accordingly and the final design took shape.

Everything I did was well thought out — hell, I had enough time to think about it — with plenty of consideration for future needs — even a future beyond my ownership.

Why aren’t the builders doing the interior of your living space, too?

Two reasons.

One is that these folks specialize in pole buildings. Although they can do interiors, it’s not what they usually do. Not only that, but they’re very busy and I really can’t delay this project any more than it has been delayed. (I’m sick of living in a trailer and want a solid roof over my head, preferably one that doesn’t sway when the wind blows.)

Floorplan
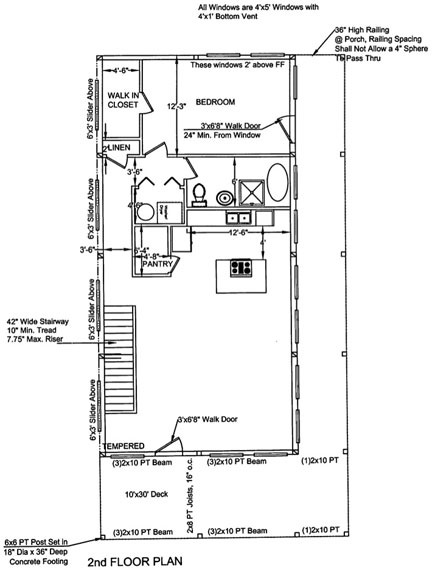
Here’s the living space floor plan as submitted to the county. It’s not 100% right, but it’s close enough for permitting purposes and to get bids on HVAC, framing, insulation, and drywall.

The other more important reason is money. I’m not quite sure what I can afford to get done. I know I can pay for the shell of the building; I’ve been saving for well over a year, living on the cheap in my RV to put aside every penny I can. The income I get from this season’s cherry drying work and the promise of a loan from a family member if I need it assures the shell will be done.

I’m not sure, however, how far I can stretch my money beyond that. I know I can save money by doing things myself; I have every intention of doing all the plumbing and electrical work, for example, and will likely do the floors and all the painting. But I also know that I need to hire professionals to do difficult things such as HVAC ductwork, framing, and drywall. By breaking down the living space project into sub-projects, I can do them one at a time, knocking them off as time and money allows.

With luck, heavy rain over the next few months, and a lot of hard work, I’ll be cooking up Thanksgiving dinner for friends in my new kitchen.

Can you share a conceptual drawing of what it will look like when done?

This question from a Facebook friend made me giggle. You see, they’re working so very quickly.

My response: If you wait two weeks, I’ll have a photograph.

Construction Day 11: Framing Second Story Floor, Garage Doors

A huge amount of work done.

On May 20, 2014, I began blogging about the construction of my new home in Malaga, WA. You can read all of these posts — and see the time-lapse movies that go with them — by clicking the new home construction tag.

I was out for a good portion of the work day, with a hair appointment in the morning and a meeting with the concierge at Cave B Estate Winery at lunchtime. While I was gone, the three-man work crew buzzed through piles of lumber, fitting them like puzzle pieces into the frame of my future home.

In looking at the time-lapse (below), I could clearly see the order in which the work was accomplished. First, they laid in the remaining beams for the second story floor. Then two men added girts to the front and back of the building while the third finished framing out the floor. They took a break for lunch and then the two continued adding girts, this time to the garage side of the building while the third man framed out the garage doors.

Day 11 Work
The “well-oiled machine” was working in peak form on Wednesday, framing floors, garage doors, and exterior walls.

They were almost done for the day when Tanya drove up. She wanted to review the window placement with me and Angel, the lead worker. We talked about it first, then walked around the building with Angel, who made notes in pencil right on the girts. It wasn’t until then that I realized my building would have 20 windows — not including the ones in the garage doors.

The next step will be framing the windows and getting the plywood on the second story floor. Once the windows are framed, they can be installed. Once the floor is finished, the stairs can be built. After the windows comes the metal roof and skin of the building — the metal was scheduled to be delivered the next day. The additional windows for the shop area would arrive Friday. Somewhere along the way, they’d add the poles for my front deck and put in the concrete pad. The garage doors would be last.

That’s my understanding of how the job would finish up. At this point, I’d say they’re more than halfway finished.

In 11 days.

Here’s the time-lapse for the day. I think this is one of the most interesting ones in a while. So much going on that its difficult to keep track of it all!

Construction Day 10: Deck Roof Framing

The roof is now fully framed.

On May 20, 2014, I began blogging about the construction of my new home in Malaga, WA. You can read all of these posts — and see the time-lapse movies that go with them — by clicking the new home construction tag.

On this tenth day of construction the crew of three guys mostly worked on the framing for the roof over the north-facing deck which will be just six feet wide but run the entire depth of the building — 48 feet. The final building will have decks on two sides, but the east-facing deck, which will be 10 x 24, won’t have a roof over it.

Deck Roof Framing
They framed out the roof over the north-facing deck. At this point, their roof framing work should be done.

The day started out nice enough, but soon got windy as thunderstorms rolled by on a northwest to southeast path, never quite going over us. I did hear loud thunder once, but never really saw the storm that it was advertising — it was south of me, beyond the cliffs.

I was out for a while, running errands in town, and when I got back a big truck was partially backed into my driveway. He’d just dropped off a load of roof insulation for the RV garage/shop side of the building. (The living space will have more substantial insulation.) Since he blocked my way in, I parked on the road. I chatted with him for a while about how great it is to live in the country — he lives in Cle Elum — before he got a phone call and then headed out for his next delivery an hour away.

Glulam Beam
Here’s one of the two glulam sections left in the scrap pile. The bottle is for scale. While pine can’t be true butcher block because it simply isn’t hard enough, I should get several years use out of it as a food prep surface beside my BBQ grill.

One of the bonuses of this construction project is the scrap wood being left behind. The beams supporting the second floor, for example, are glulams (glued laminated timber), created by gluing together standard pieces of lumber. A few of them are made from 12 2x6s. The builder ordered them slightly longer than necessary and the workers trim them as they use them. When they trimmed for the second floor support, they left me with two nearly perfectly square blocks of wood suitable for making small “butcher block” tables. I’ve already researched ways to seal the wood to make it safe for use with food; I’ve got a woodworking friend who’ll put legs on them for me. This creative use of scrap wood has been a lot of fun for me; I’m really looking forward to setting up my tools in my shop to hone my skills and do projects like this on my own.

The builders made progress on the building, but it seems to be going more slowly now. I think it’s because the novelty of this construction project out my back window has worn off. Seeing the second story floor start to go in yesterday really energized me, but they did very little work on that today. I think it’s interesting to note that they moved their lunch area into the building’s footprint; I think it’s because they’re looking forward to the shade they’ll get when they put the floor in.

Building Front
The front of the building, shot from the southeast corner.

There’s a good possibility that metal for the roof and sides will be delivered this Wednesday or Friday. With the insulation handy, once the roof metal comes there’s no reason why they can’t put on the roof. Got my fingers crossed!

Here’s the time-lapse for Day 10:

Construction, Day 9: Placing Second Floor Beams

Interior is starting to come together.

On May 20, 2014, I began blogging about the construction of my new home in Malaga, WA. You can read all of these posts — and see the time-lapse movies that go with them — by clicking the new home construction tag.

My building will have a second floor over a four-car garage. This 24 x 48 foot space will be my home.

The builders who have been working on my place for the past two and a half weeks are providing a shell — an enclosed but otherwise empty space. The only things they’re doing for the upstairs living space are providing an unfinished (plywood) floor and stairs. They’ll also be installing the windows and doors, and providing the basic framing (but not the floor) for my deck space.

Once the floor is in place, I can begin getting bids from contractors to do the interior framing — in other words, build the interior structure of that living space. The framing needs to be done before I can move in and install the plumbing and electrical systems. So the completion of the second floor’s floor and stairs are a key milestone for moving forward with my living space.

Yesterday, they began work on the second story floor by installing two very thick laminated beams and then hanging the framing between them.

First beam Installed
The second floor will be supported by a series of laminated beams like this one.

First Beam Support
The beam sits atop a 4×6 post on either end.

The laminated beams come from the lumber supplier a bit too long for the job. The workers had to trim them to size. The scrap piece from one of them is a serious block of wood that, with a little work, would make a nice butcher-block table. I’m thinking of fixing it up for just that purpose, perhaps for the east deck where I plan to put my BBQ grills.

Second Floor in Progress
Here’s where they left off on Day 9.

Framing between the two big beams really gives the second floor some structure. I found myself getting really excited, knowing that before the end of the week, I’d be able to walk inside the upstairs space I’d soon be living in.

Angel, the lead worker, told me that Tanya from the office would be by on Tuesday or Wednesday to finalize the locations of each window. Throughout the planning process, windows have been a huge deal and I’m happy that they’re as serious as I am about getting them just right.

The crew also prepped some other beams with hangers, getting a head start on the work they’d do the next day.

Here’s the time-lapse video:

Construction, Day 8: Framing the High Roof

A lot of work high above the ground.

On May 20, 2014, I began blogging about the construction of my new home in Malaga, WA. You can read all of these posts — and see the time-lapse movies that go with them — by clicking the new home construction tag.

Week 2 of construction on my future home was mostly done high above the ground, framing out the roof over my garage and living space. They used up quite a bit more of the lumber that has been stacked in piles all over the place; my pile of scrap lumber is getting very large indeed.

I was out running errands all morning and, when I got back around noon, took the usual photo from the road that runs along the south boundary of my property.

Building Site
Another look down on my building site.

I also wandered around inside the building. I do that a lot lately. As its frame is filled in, there’s a real sense of enclosed space. It’s a big space, a space with lots of room to store lots of stuff. I know that my biggest challenge will be keeping it all neat and clean — I hate dust and cobwebs and spiders. I suspect that my wimpy ShopVac from my Wickenburg hangar will need to be replaced with something more substantial.

Another big challenge: not acquiring more stuff to fill the space. I have enough stuff.

I experimented with my iPhone’s panorama photo feature and captured this image from the southwest corner of the building, in what will soon be my “shop”:

Inside Panorama
The wide angle view of this panorama makes two perpendicular walls seem parallel to each other. Click this image to view a much larger version.

The shop, by the way, will be 12 x 48 feet. I’ll eventually have a workbench and a bigger toolbox — but even that won’t come close to filling that space. I realized on my last trip to California that I’d have ample space to install a recording booth for training videos, podcasts, and voiceover work and may do that next year if I can find an affordable solution. It sure is quiet enough here most of the time to do recording work.

I also realized that because there won’t be many interior walls on the ground floor level — at least not at first — I’ll be able to pull my little boat, Honda, and Jeep straight through one garage door into the back of the building, making it possible to rent winter storage space for vehicles in three of my four garage bays.

These are the kinds of things I’m thinking about as I wander through this space. I designed it to be flexible — to meet my needs now and in the future — and to make it attractive for a future buyer.

Here’s the Day 8 time-lapse. Unfortunately, because of the camera’s angle, you really can’t see much of what the workers did. Full-screen helps.