Handmade vs Assembled: What Does Artisan Mean?

I try to define the concept of artisan goods and why they should be valued more than manufactured goods.

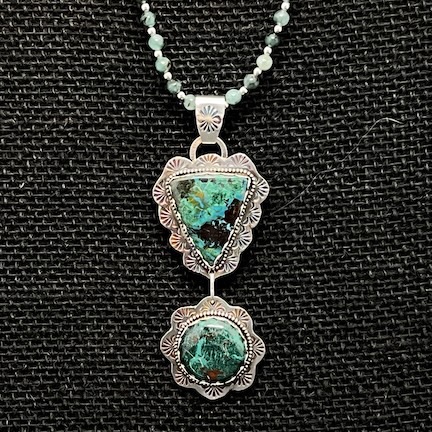
I have been dabbling in physical artistic endeavors — as opposed to writing, which is an intellectual artistic endeavor — for about six years now, when I started making jewelry from the rocks I began acquiring at the Arizona rocks shows I attended every winter. It wasn’t long before I got to the point where I wanted to sell what I made. The best way to sell art is either in a shop or at an art show. I didn’t have (or want) a shop so I started hunting down shows.

Art Show Tests

Art shows can be juried or non-juried. A juried art show is one where you need to provide details, samples, and/or photos of your work and the process of making it. A panel of people who are supposed to know what they’re doing and seeing judge whether your work is good enough for their show.

In general, artists want to be in a juried show because they will be among other artists who have passed the same test. Quality work means a quality show which also means buyers who are interested in quality work. It also makes a level playing field for the artists who participate.

One of the things art shows ask about when you apply is what percentage of your work contains manufactured items. For example, for jewelry you might use manufactured ear wires (for earrings), clasps (for bracelets and necklaces), jump rings, head pins, and bezel settings. But you might also buy manufactured stylistic components, like shapes, charms, rings, and mounted stones. A good art show wants your work to be mostly handmade — meaning that you got the raw materials and made the components yourself.

I can make ear wires, jump rings, head pins, and large (over 10 mm) bezel settings these days, but I won’t (or maybe can’t) make the kind of good, reliable clasps I want to secure my bracelets and necklaces on the wearer or the teeny-tiny bezel settings I need to set tiny stones. And although I do have the equipment and skills to polish rocks into the cabochons I use in my jewelry, that would make me a lapidary in addition to being a silversmith, and I’ve decided I don’t want to go there. (Fortunately, that isn’t expected.)

Each art show has its own standards, but the more handmade an item is, the more likely the work will get approved for a quality show.

(Of course, the actual artistic quality of the work is also considered. You can be an incredibly skilled artist but if your work looks like it was made by a kindergartener who’d been drinking espresso, you probably won’t get far. But that’s a whole other topic for discussion elsewhere.)

Unfortunately, not everyone is honest about how they make their “artisan” goods. People lie on applications. Sometimes they buy “handmade” items from overseas and try to pass it off as their own. Other times, they buy manufactured items and assemble them and pass off the results as handmade.

Assemblers are Not Artisans

The assemblers bother me a lot. Let’s take a look at this.

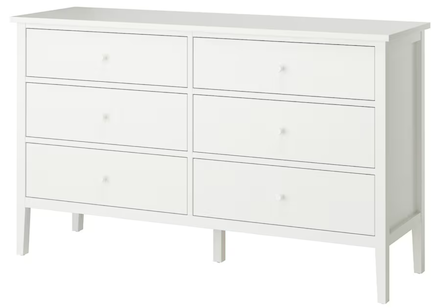
Gullaberg Dresser from IKEA
Here’s the Gullaberg dresser from IKEA. It won’t look like this when you buy it.

Say you go to IKEA and you buy a dresser. It comes in a flat box with instructions in an often-mocked format. You open the box and remove all the pieces, including laminated wood panels, drawer sliders, hardware, and maybe even a few primitive tools that you supplement with your own tools. You decipher the instructions and you assemble the parts into a dresser. Would you then tell someone you made that dresser? Would you bring it to an art show and try pass it off as a handmade item?

Of course not. (At least I hope not.)

So tell me this: what’s the difference between doing that and buying a bunch of manufactured jewelry components and putting them together into a piece of jewelry? Could you tell someone you made that jewelry? Can you bring it to an art show and try to pass it off as a handmade item?

Well, some people do.

The only distinction I see here is that the IKEA furniture comes with instructions and if you don’t put it together the right way, you won’t have the dresser in the picture. Or maybe any dresser or usable piece of furniture at all. If you assemble manufactured jewelry parts, you have more creative freedom. But that still doesn’t mean you made the jewelry. It means you assembled it.

Like that IKEA dresser.

Making the Parts

Step-by-Step, with Photos

A little side note here. If you follow my Mastodon account (@mlanger@mastrodon.world) and you pay attention on one of my jewelry shop days, you’ll likely see at least one thread where I discuss and illustrate the various steps for making a piece of jewelry. I do this because it interests some people and because I want people to understand the amount of work and often highly specialized tools that are required to make the jewelry I make.

Forgive me for using jewelry as an example, but that’s what I know best. So let me tell you a little bit about what goes into making the parts of a piece of jewelry.

I’ll start with something simple: an ear wire. An ear wire is the part of an earring that attaches a hanging earring to your ear. It does this by going through a piercing on your ear.

The first step is getting the raw material, which is wire. I need to know what kind of wire to get. While it’s true that I can buy stainless steel wire, which is cheap and will do the job, some folks are allergic to stainless steel — including me — so it’s an irritant for an ear piercing. There’s also silver plated, which is cheaper than sterling, sterling silver, or fine silver. Fine silver doesn’t tarnish as quickly as sterling but it’s expensive and soft so it will require extra work to harden. There’s also gold and white gold and rose gold and gold filled at different quality points. And platinum. And titanium. And copper and nickel and brass. A lot of choices! I have to know which one to buy to compromise between price and quality and help me achieve the artistic aesthetic I want.

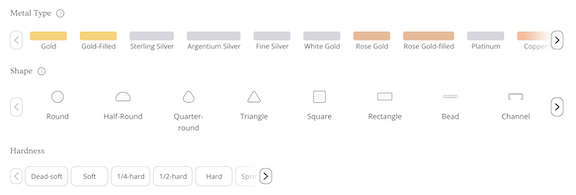
Wire Selector
My jewelry supplier now has this handy wire selector to help you find the wire you want. The trick is, you have to know which wire you want first.

I also need to know how thick that wire needs to be. Too thick and it will be too thick to comfortably go through an ear piercing. Too thin and it’ll bend when it’s put on or in use. And the hardness is important, too.

So far, these are all decisions. I haven’t actually made anything yet.

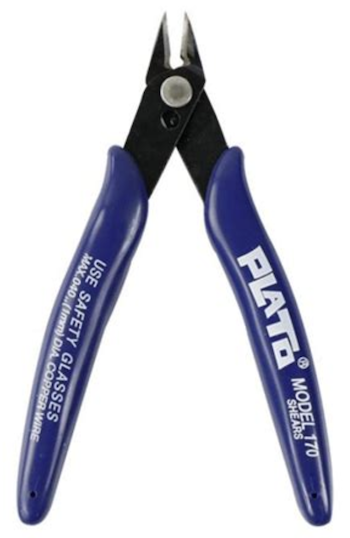
Plato Cutters
Yes, it’s true. My favorite jewelry making wire cutters are actually made for the electronics industry.

So I buy the wire. It’ll either arrive in a coil or on a spool depending on how thick it is. I have to cut off the length I need for the ear wire. The length depends on the style I want for the ear wire. That’s where the creative process comes in. I have to have a design for the ear wire that not only meets my artistic needs, but functions as an ear wire.

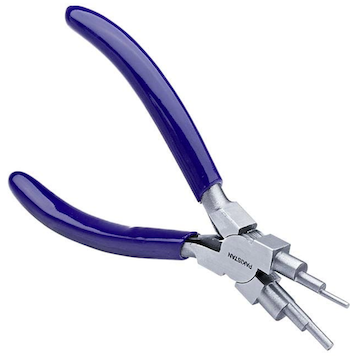
Bail Forming Pliers
This is my go-to tool for making ear wires. I rarely use them for making bails.

With the design in mind, I cut off the length of wire I need. I then get out my forming tools — usually a bail-making pliers — and shape the wire into the ear wire shape I need. Sometimes I include decorative elements, like beads, which need to be added before the ear wire is complete.

Does the wire need to be hardened? If it’s a soft wire, it will need me to perform additional steps which could include hammering or tumbling to prevent the wire from accidentally bending in use after it has attached to make the final earring.

Now this is just an ear wire, which is one of the three simplest components I can make. (The others are head pins and jump rings.) It’s easy to make and I’ve made hundreds of them at this point. Would it be easier to buy them pre-made? Sure! In fact, I used to do just that. But then I realized that the more manufactured components I had in my jewelry, the more I looked like an assembler instead of a maker. And the more art show juries thought the same way.

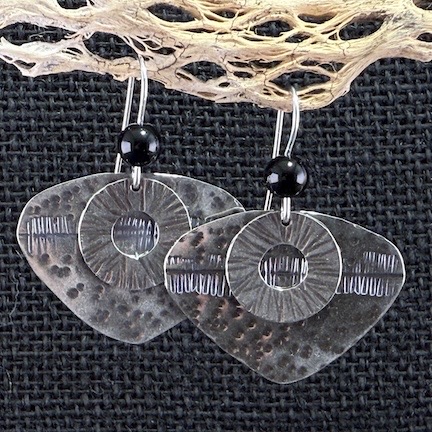
Earrings
These earrings have just three components each, but I use a variety of tools and techniques to make them.

And I need to point out here that the ear wire is only part of an earring. The photo here shows an example of a pair of earrings I designed and make entirely from sterling silver wire and sheet. Each earring has three components, each of which required cutting, shaping, texturing, and polishing using a wide variety of tools and techniques. I make these in batches, completing a batch of each component at a time, and can spend an entire day making just eight pairs. Figure an hour per pair on average.

Assembly is Quick

It’s not the assembly that takes all day. That takes minutes. It the manufacturing of each individual component that takes so much time. And I hand-make each component so it looks exactly the way my design — a function of my own creativity — needs it to look.

It Takes Years

My friend Janet LeRoy is an artist who has been making a living for more than 40 years painting mostly wildlife on mostly feathers. She does a lot of art shows ranging from crappy shows not much better than glorified flea markets (mostly for convenience; long story there) to extremely high end fine art shows in Scottsdale, Jackson Hole, and beyond.

One of the questions she gets a lot is “How long did it take you to paint this?” Her response these days: “40 years.” Every single thing an artist creates is the end result of the amount of time she has been working on her art, developing her style and techniques. Keep that in mind the next time you look at original art.

So yeah: I get pissed off when I’m put into an “artisan” fair among assemblers. It took me an hour working with tools I bought using skills I developed through training and practice and using quality materials like sterling silver and onyx beads to make one pair of these earrings. So yes, I have to charge $44/pair. Meanwhile, three booths down, an assembler who bought stainless steel and chrome-plated components made in a Chinese factory spent 5 minutes putting them together with a pair of pliers can charge just $15/pair.

A buyer might not see the difference. It’s a pair of earrings! It’s silvery and shiny! Why should I buy the $44 pair when I can buy the $15 pair? They don’t care if the finish starts flaking off in a few weeks or if the ear wire makes their piercing turn red or get itchy. They’ll eventually just throw them out. $15! Who cares?

At this point, I’m starting to wonder why I should keep making the $44 pairs of earrings.

My Most Recent Unpleasant Experience

I participated in a Holiday Artisan Fair yesterday at Wenatchee’s Pybus Market and walked away feeling angry and frustrated.

Pybus was the first place I sold my jewelry, back when I only had an inventory of about 10 pieces. I was only doing wire framed cabochon pendants in those days. (Wire work is generally frowned upon by art show juries — which is why I pretty much stopped doing it — but my work isn’t the typical “wire wrapping” you see in new age crystal shops. It still sells in certain markets, but I can do a lot better.) On some weekends, there were a lot of really crappy vendors at the day tables there, selling a mixture of amateurish “granny crafts,” assembled manufactured components, and obvious buy-sell merchandise. I didn’t care much because my work really stood out in that crowd and I was able to make the sales I needed.

I stepped away from Pybus for a few reasons, not the least of which was a management change and what I saw as unfair treatment of some artists. (They definitely had their favorites and I was not among them.) Around the same time I found other venues where my work was more appreciated and sold a lot better. Instead of making a few hundred dollars in a weekend, I could bring home a few thousand. Between that and selling my work in galleries and gift shops, I no longer needed to do small shows with questionable jury practices.

Fast-forward to this autumn. After nearly two years of full-time travel, I found myself back home and ready to start selling at art shows again. But I goofed! I should have applied in spring and summer for the autumn and winter shows. I totally missed my opportunity and had no shows lined up for the holiday shopping season.

Why not try Pybus? a fellow artist who used to sell there suggested. Okay, I thought. Why not? It had been more than four years. Surely management had changed. I got on their website and applied, very happy to see how concerned they seemed to be about items being handmade. They even wanted to know where we sourced our materials. This was promising.

After some email tag with no response from the folks running the day tables there, I started thinking it was a bad idea. I told them to cancel my application.

By some miracle, they not only responded, but offered me a spot at the two upcoming Holiday Fairs. While this should have thrown up all kinds of red flags — what kind of holiday fair has openings the day before it starts? — I decided to give one day a try. They tried to get me to sign up for the second fair in December, but I told them I needed to try the first fair first.

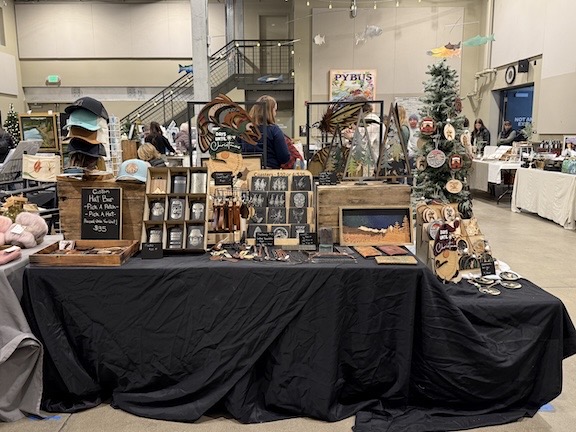
It’s a good thing I did. They put me in a back room that few shoppers visited and surrounded me mostly with assemblers, most of whom put very little effort into their booth display. The one across from me bothered me most: all of her stuff was buy-sell with the exception of laser-cut wood items she claimed to make at home. I know that kind of work. Put a piece of wood in your cutter, push a few buttons on your computer, and go get a cup of coffee while it makes “art” you downloaded from the laser cutter company. The “Custom Hat Bar” really bugged me: take a manufactured hat, iron on a manufactured patch and you’ve got a $35 piece of assembled crap.

Junk for Sale
The person across from me threw a black sheet over her table, letting it fall where it may on the floor, and just stacked up her items for sale. This was not uncommon in the back room they stuck me in.

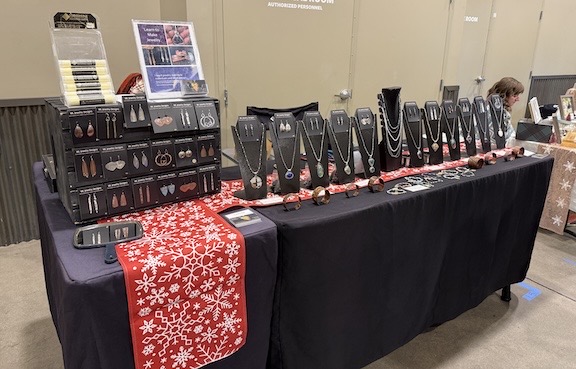
My Booth
Meanwhile, my tables featured fitted table covers, seasonal runners, and custom displays.

Next to me was a woman selling stickers and plastic cups with decals on them. Just about everything in her booth was buy-sell with little or no effort on her part. The woman on the other side of me made artwork with real butterflies, but on seeing all the buy-sell crap around us, told me that next time she was going to bring the used books she’d bought for resale. Her idea of “handmade” was taking scrap paper, laminating it, and hanging a tassel on it to make a bookmark. When she told me all this, I wanted to suggest that she have a garage sale.

And there I was, the sucker selling handmade silver and gemstone jewelry. Or trying to. I didn’t make my first sale until 12:30 PM and, by the time I started packing up at 2 PM, I’d taken in just enough to cover my booth fee.

Lesson learned. I won’t be back.

I’m Tired of Selling with Assemblers and Buy-Sell “Artisans”

My friend Janet keeps telling me that I should just do the high end fine art shows. She says I’m ready for them, that my work is ready. I’ve always hesitated, worried that the high booth fees would make it impossible for me to turn a profit. But now I’m not so sure. I think that if I focus on taking all of my work up to the next level and leave the mass market appeal stuff behind, I have a chance of making that work for me. I have six months to maybe next winter I’ll go back on the road and start doing the good shows in Arizona and California.

The snow that’s falling outside as I type this now makes that very appealing.

When Greed Backfires

A true story about the benefit of fighting back against lowball offers for the things you want to sell.

Heron
My stepmom made this gorgeous stained glass panel for the door between a bathroom and the pool area.

My stepmom is an accomplished stain glass artist. For years, she produced stain glass artwork ranging from simple window ornaments like angels and snowmen to gorgeous window panes depicting wildlife like herons, dolphins, and horses. She was serious about her art endeavors and, over time, accumulated a massive inventory of raw materials — glass, soldering lead, lead cane — and the patterns, equipment, and supplies she needed to do the work.

Stained Glass Inventory
This is about half the glass she had to sell. To the left, still covered in paper, are at least 50 very large sheets. And then she found a cooler (of all things) filled with more glass sheets. Even the scraps had value — and she had about 50 pounds of that.

She stopped working with glass a few years ago and, since then, all her materials and supplies languished in a shed off the patio and in various storage spaces around the house and garage. When I came by in late autumn on my way south, she talked a bit about selling all this stuff. When I returned in January on my way north, she had taken steps to do just that. She’d called the owner of a stained glass shop about 45 minutes away by car — we’ll call him John — and made arrangements to have him look at it and possibly buy it.

John warned her from the get-go that he would not be offering a lot of money for what she had, but he didn’t give her any dollar amounts. She and my dad decided that they wouldn’t take any offer under $1,000. There was a lot of stuff and it was all in excellent, if not perfect, condition.

The Offer

John drove up one afternoon with an assistant (presumably to help him carry everything out) when my stepmom was out but I was at the house with my Dad.

We showed him the shed full of glass sheets, some of them as large as 24 x 36 inches in size. (This isn’t the stuff you get at Hobby Lobby, folks.) There had to be hundreds of sheets of glass in there in a wide range of colors. He said, “Well, these are the colors your wife wanted,” he told my dad. “That doesn’t mean other people want these colors.”

Cane in Tubes
My stepmom had several PVC tubes of 5-foot lead cane lengths that hung in the garage.

We showed him the PVC tubes full of lead cane hanging from racks in the garage. “No one uses this stuff anymore,” John said.

While not everything else was out (yet), there were bezels and patterns and kits and soldering lead on a table for him to see. He didn’t seem to care about them.

He turned to my dad and said, “I’ll give you $250 for all of it.”

My dad had some trouble keeping his temper. It wasn’t just a lowball offer. It was an insulting offer. I think that at one point he said that he could melt down the lead and sell it as lead bars and get more money than that.

John was not happy. Apparently he thought he’d be able to breeze in and get it all for next to nothing. He said, “I told your wife I wouldn’t offer much. Did you think I would pay retail prices? I came all the way up here to buy this.”

But my dad wasn’t going to budge.

John left. When he got to his car, he called my stepmom. She reported later that he offered her $350 and sounded angry. She said no and apologized for making him come so far for nothing.

John left, but it would not be the last we heard of him.

Facebook Marketplace

Band saw
Need to cut glass? This bandsaw made for glass cutting was in like new condition with all instructions. There was also a grinder and cane stretcher.

As much as I absolutely detest Facebook, I have to admit that its Marketplace feature is a great way to sell stuff. My stepmom is on Facebook and posted a listing there later that day.

The responses started coming immediately. The buyers started coming the next day.

By that time, we’d gathered together everything she had to sell, putting it on folding tables inside the screened-in lanai. The shed with the glass was right there. So when people came, they could browse everything easily. After some uncertainty on how to price the glass, my stepmom settled on a price of $8/square foot. This was a lot cheaper than someplace like Hobby Lobby. And it was also cheaper than what John was selling it for in his shop.

We knew that because lots of the folks that came over the next week or so usually bought their glass at John’s place. Now they were buying it from my stepmom. Apparently, the glass colors she liked were the same glass colors other artists — including the artist’s that shopped at John’s place — liked. (Who knew? LOL.) As for no one using lead cane, well tell that to the woman who bought a whole tube of it — 30+ 5-foot lengths.

Although the first two sales were disappointingly small, when the real artists started coming, the sales got bigger. By the middle of the second day, my stepmom had already taken in more than John had offered for everything — and the shed full of glass looked as full as ever. (I took to yelling out, “Stuff it, John!” every time someone left with glass he could have sold.) Soon she’d taken in $1,000 and there was still a ton of stuff left. Then more than $2,000, with one woman buying $845 worth of glass and lead. Yesterday, my stepmom told me she’d taken in more than $3,000 and there was still stuff left.

Of course, all of these profits could have been John’s if he’d made a reasonable offer for what my stepmom had.

The Best Part

While it’s true that dealing with a constant stream of strangers coming to the house can be a pain in the butt, my stepmom and dad don’t really mind it. My stepmom is retired and is around the house most of the time anyway. My dad works part time and is home in the afternoon. They don’t have to have people coming through the house because everything is setup outside, on the lanai and adjacent shed. There were no weird characters. Everyone was a legitimate glass artist and everyone bought something.

And my stepmom and I think that my dad likes talking to the husbands that sometimes come along on the shopping trip.

My stepmom is happy about how things turned out. Not only is she getting rid of stuff she doesn’t need, but she’s bringing in good money to do it. Because she bought some of the glass so long ago, she’s actually profiting on some of the sales because the going price is higher than what she paid years ago. In the end, she might get back everything she spent on what she’s selling now.

And the buyers? They’re thrilled. They’re getting good quality glass at a good price. They’re chatting with my stepmom and learning from her. She’s giving away a lot of the pattern magazines she’s accumulated.

So it’s a win-win-win — for everyone except cheapskate John.

Stuff it, John!

Exploring Visual Art

I begin to explore visual arts: watercolor painting, drawing, and linocut printing.

In my previous post, I shared a lot of info about how I’ve been moving from creating with words to creating with my hands. In a quick review of that post, I realized that I didn’t share much about the art I’ve been exploring.

Painting

Bob at Easel
A publicity photo of Bob Ross.

It started with Bob Ross. You know — the white guy with the afro and soothing voice from the PBS The Joy of Painting series? I don’t recall when I started watching his videos, but I must have seen at least half of them. They’re all on YouTube and if you want something to calm you down or put you to sleep, I highly recommend them.

I wanted to try what he was doing. It looked so easy. But I had no artistic skills. I knew that if I wanted to follow along, I’d need the exact materials and tools he had. But the idea of working with (and cleaning up) oil paints was daunting, especially with so much time spent traveling every year. So I never hunted them down or bought any.

And then I started thinking about watercolor and how easy it was to clean up and how it didn’t matter if the paint dried in your palette. And I started watching YouTube videos about that, starting with videos by Jenna Rainey. I bought her book (as I’m prone to do), Everyday Watercolor, and started following along with her exercises, using her suggestions on brand and colors of paints, brand and sizes of brushes, and brands and types of paper. That’s how I wound up using Winsor & Newton Professional Watercolor paint in tubes, Princeton Heritage Series 4050 Synthetic Sable Brushes, and mostly 100% cotton cold press paper. Not the cheap stuff, but not crazy expensive, either.

It worked out well for a while — until I got bored painting leaves and flowers, which is apparently what she mostly paints. Around this time, I also saw a change in her videos. She’d obviously made the YouTube big time and had money to burn. She had a new studio and new camera set ups and was extremely self-promotional. As a YouTube creator — you know I have a YouTube channel of helicopter videos, right? — I know how they push us to bring in more subscribers, viewers, and money. I find it a turnoff when it goes beyond a certain level. She had gone beyond that level. So I stopped watching her videos.

(I’m so sick of YouTube creators caving to the demands of YouTube and video sponsors.)

I started watching other videos and reading other books and learning from other watercolor artists. Here’s a list if you’re interested:

YouTube Channels

I watch more YouTube than any other “television.” There is so much to learn online there if you are careful about what channels you watch for good info. Some are just plain crap. And I didn’t think I’d ever say this, but if you watch a lot of video, subscribe to Premium. It’s worth it just to get rid of those f*cking mid-roll ads that YouTube demands creators include. You can always fast-forward through the sponsor messages, which are prevalent on popular channels.

Anyway, here are the watercolor artists I watch most on YouTube these days.

  • Paul Clark
    Paul Clark looks like a nice guy, no?

    Paul Clark is a Brit who does a lot of line and wash painting, which I like. He explores other styles, too. He’s got a nice sense of humor and I enjoy watching him paint.

  • Karen Rice Art features another Brit who does a lot of abstract watercolor painting, which I like. She’s very down to earth, with a good attitude.
  • Erin Eno is a watercolor artist with lots of beginner and otherwise very easy tutorials. My only gripe with her is that she has a tendency to overwork her paintings — it’s like she can’t finish. I’ve also seen evidence that she experiments while she records video and has no idea how something will turn out. This occasionally leads her down a bad path, so beware if you follow along!
  • The Mind of Watercolor is Steve Mitchell’s channel. I think it’s more advanced than some of the others, but it does include beginner videos. I like his style, mostly because he’s just explaining things one artist to another.
  • Diane Antone
    Diane Antone. Not sure about the hat.

    Diane Antone Studio is an ambitious channel with lots of new videos every week — she promises a new one every day. These days, many of her videos seem to be the obligatory video created solely to reward a sponsor for sending her product. To make matters worse, I’m pretty sure she’s the one who gets preachy once in a while. (After a while, they all blur together in my mind.)

  • Paul’s Watercolor Studio (which is a new name for that channel) features another Brit named Paul. I don’t like his videos quite as much as Paul Clark’s and I noticed that he’s been doing a lot more promotional stuff than he used to. But he’s still a good resource.

There are a few more I watch once in a while, but I can’t really recommend any of them. So many of them are the same stuff over and over. Or “artists” talking about their life while they put blobs of paint on wet watercolor paper and then doodle on the result with permanent markers. Not something I can really learn from.

Books

I already mentioned one book. Here are a few others I like:

  • Watercolour Book Cover
    Paul Clark’s watercolor book. I bought the ebook version, which is easy enough to consult while I’m painting.

    Watercolour: Techniques and Tutorials for the Complete Beginner by Paul Clark. Yes, the same Paul Clark as the videos. It’s full of practical exercises that build on each other and are not limited to leaves and flowers. I’m working my way through them slowly in a watercolor notebook I have. Oddly, I can hear his voice in my head as I read the text.

  • Watercolor Workbook: 30-Minute Beginner Botanical Projects on Premium Watercolor Paper by Sarah Simon. The best thing about this book is the color mixing recipes with places to paing your own version beside or beneath a sample. It’s challenging to get it just right. The exercises are pretty much the same, requiring you to outline a drawing and then color it in with the colors you mixed for the exercise. The paper is not “premium watercolor paper” by any stretch of the imagination. It’s thick and rough (like cold press) but is definitely not cotton and does not handle water well. I’m about 1/3 done with the exercises but I’m bored with them. Too much like a coloring book.
  • The Complete Watercolorist’s Essential Notebook: A Treasury of Watercolor Secrets Discovered Through Decades of Painting and Experimentation by Gordon MacKenzie is basically a tips book, with a few exercises to illustrate each tip. It’s extremely thorough and has the kind of tips that it could indeed take decades to come up with. It’s the kind of thing I dip into once in a while to fill in the gaps of my knowledge.

The trouble is, watching videos and reading books is not the same as practicing what’s in those videos and books. I got immersed in other things in my life — traveling on my own boat, organizing my last season of flying work, prepping my house and packing for a prolonged trip (with a new house sitter to hold down the fort). I didn’t practice much and, when I did, I didn’t like the results. I was getting seriously discouraged no matter how many videos and books I consumed.

Drawing

And then there’s the simple fact that I can’t draw my way out of a paper bag.

I would never be able to make anything more interesting than blobs of color resembling flowers and trees viewed with my contact lenses out unless I learned how to draw the things I wanted to paint. I love the concept of line and wash — where you take a rough drawing done in permanent ink and add watercolor washes for color, highlights, and shadows — but the only way I could do such a thing was to start with someone else’s picture. That’s fine for practice, but I should be able to do better.

So I started watching videos and reading books about drawing. Here’s what I found helpful so far.

YouTube Videos

Artisto Videos
The Artisto Sketching Course on YouTube covers all the basics.

I’ve only seen one series of videos so far and I admit that I fell asleep watching them so I need to watch them again. It’s the Artisto Sketching Course on YouTube, which I discovered on a slip of paper that came in an Artisto notebook I bought. I can’t say much about it other than the fact that it’s a good primer that covers all the basics. Next time I watch them, I won’t be sitting on the sofa at the end of a long day. I’ll be sitting at a table with a sketchbook and sharp pencils in front of me.

Books

I’ve also looked at a few books, two of which I really like.

Again, watching videos and reading books isn’t enough. I have to practice all this stuff.

Enter Linocut Printing

As if I didn’t have enough art-related hobby stuff to neglect, I got interested in another type of artwork: linocut printing. It started when I watched a YouTube video suggested by The Algorithm: Artist Demonstrating Picasso’s Reduction Linocut Technique. I was fascinated.

Linocut is a method of block printing where you carve a picture or design into a piece of linoleum (or something similar). You then apply ink to the cut surface, put a piece of paper on top of the cut, and rub the paper into the ink (or put it through a press) to transfer the image onto paper. Whatever you carve away has no ink on it so the paper stays white. Whatever remains raised is inked and creates the image. In a reduction linocut, the original linoleum carving is carved away before each color is applied. If you’re having trouble understanding this, do watch the video. It’s very good.

Speedball Kit
The Speedball kit I bought. The only thing missing was drawing skills and paper. I had one of those things.

I probably wouldn’t have gone any farther with this, but I happened to be in Hobby Lobby — which I honestly do hate with a passion but it’s the only art supply store in town now — and they had a Speedball Water-Based Block Printing Starter Set on sale for just $19.99. It had everything I needed (except drawing skills; I wish they came in the box) to create and print a linocut image. I bought it. I carved a simple seascape drawing with a lighthouse and ocean and waves and a crescent moon. It printed okay. (Not good enough to take a picture of since I don’t seem to have any pictures of it and now it’s packed away so I can’t take a picture.)

I was hooked.

Watercolor of Berries

First Berry Print

Colored Berry Print
The inspiration for my berry linocut print (top), my first print with chatter (middle), and my first colored in print (bottom).

What I wanted to do was create single color linocut prints and then use my watercolors to apply color and shading. It would be a line and wash, but the line would be a block print.

But I had a problem. The kit came with water-based ink. Even after it dried, it smeared when it got wet. It would definitely not work with watercolor paints. I needed oil-based ink. That wasn’t available locally, so I bought some online at Dick Blick. I bought Speedball Oil-based Relief Ink because that was the only brand I knew.

Meanwhile, I saw a simple watercolor painting on Mastodon that inspired me. I printed a copy of it and traced it onto Speedball Speedy Carve Block. Since the oil-based ink hadn’t arrived yet — Dick Blick has a great selection, but shipping takes over a week — I printed it with my water-based ink. It came out ok, although there was more “chatter” than I wanted. I’d need to do more carving to get rid of it, but that could wait until the next print, with the oil-based ink.

Although I knew I couldn’t use my watercolor paints to color my print in, I did have oil pastels — we called them “cray-pas” when I was in elementary school and I loved them. I used them to color in the berries as blueberries and apply a gradient background over the chatter. I was pleased with the results. It wasn’t perfect, but at least I liked it. (Ask anyone and they’ll tell you that I’m my worse critic.)

Of course, I needed to learn more. So I started watching more videos and reading more books. And I started learning about more interesting techniques to apply the colors, like chine collé. There was so much to explore!

YouTube Channels

Here are a few very good channels with linocut content worth watching:

  • Handprinted has all kinds of videos about all kinds of printmaking. Very approachable.
  • Laura Boswell Printmaker has more advanced tutorials and demonstrations that really show off what you can do with printmaking.
  • Linocut Elina Artist is wonderful for demonstrations of reduction printing, although she focuses on the actual printing part and not the cutting part. The videos I’ve seen on this channel are not narrated, but they’re fun to watch. I especially like the “Red Rooster” demonstration.

Books

Block Print Magic Book Cover
I absolutely love this book and can’t wait to work through all the exercises.

I only have one book about linocut printing (so far) and I love it. It’s Block Print Magic: The Essential Guide to Designing, Carving, and Taking Your Artwork Further with Relief Printing by Emily Louise Howard. It covers all the basics about tools and materials, explains how to keep cutting tools sharp, and then launches right into several projects, with lots of illustrations and step-by-step instructions.

I’m looking at a few other books online, but I think I’ll hold off until I get to Dick Blick in Washington DC next month where I hope to be able to browse better.

It’s All Packed and Shipped

I can’t do any artwork right now because I’ve packed and shipped all my materials and tools to my boat. After a long, dull summer at home, I’m finally heading back to Do It Now next week. I’m spending these last few days packing and cleaning and getting the house ready for its live-in house sitter. I barely had time to write this blog post, which I started this morning and then finished after a long day mowing my lawn, taking my trash on its 2-mile drive to “the curb,” and prepping my garden for winter.

It’ll take a few days to unpack everything I’ve shipped to the boat — I’m thinking there should be about 20 packages waiting for me when I arrive — and reprovision for the first leg of my trip south for the winter. I’ll be spending more nights at anchorages and should have plenty of time to get some practice in. With luck, I’ll be able to show off more work in a few weeks, assuming there’s work to show. I’ve also decided to do block printed holiday cards this year and will be working on those.

In the meantime, if you have any insight into any of this and want to share some of your favorite resources, please take a moment to leave a comment on this post. I’m really interesting in learning as much as I can from as many good sources as I can. Can you help? Don’t be shy! Leave a comment!