I finally take my little boat to Arizona and get it out on the Colorado River for the first time.
Way back in 2011, when I was spending my fourth summer in Washington State for cherry season, a friend of mine sold me her little jet boat. It’s a 1995 Sea Ray Sea Rayder F-16 and I blogged about it here. It’s not much of a boat, but it runs reliably and it does get me out on the water. What else could I ask for?
The Boat’s Aborted Travel South

I was living in my fifth wheel for the summer, camped out at a golf course campground when I used my boat for the first time.
I used it for the first time in May 2012, out on the Columbia River. Although I’d been expecting my future wasband to join me in Washington that summer, he had other plans that included his request for a divorce. A (misguided) friend of mine assured me that I’d be able to patch things up when I got home in the autumn and I believed him, so I continued my summer without much thought about his request, especially since he didn’t actually file for divorce.
Near the end of the summer, I emailed him about my plans to bring the little boat home for the winter. I figured I (we?) would take it out on Lake Pleasant, as we had my jet skis years before, and possibly on other Arizona lakes and rivers. Maybe we could recapture some of the fun we’d had earlier in our relationship. When I got no response from him, I started poking around and discovered that although he hadn’t filed for divorce, he’d gotten a lawyer and was living with another woman. He hadn’t filed for divorce because he was hoping to get his hands on half the money I earned drying cherries that summer. I immediately did three things: filed for divorce, changed my will, and scrapped plans for bringing any of my assets home.
So the boat stayed in Washington, stored in a friend’s garage until I could return. There was a hilarious scene during the divorce trial when my future wasband’s lawyer tried to get me to admit the boat was worth more than it was by offering me too much money to buy his half of it. I took the offer but my wasband backed down — he didn’t really want the damn thing; it was just a failed stunt cooked up by his lawyer and the old whore managing his side of the divorce. I was awarded the boat in the divorce without having to pay him a penny for it — after all, it was mine — and was back on the Columbia River in it, even before the divorce papers came through.
Thoughts of Going South
Time passed. Although I loved my new home in Washington State and used the boat there in the summer, I didn’t like the short, dreary winter days when I had no flying work and little reason to stick around. In 2014, I began wintering in Arizona, mostly in a generous friend’s guest house and in my RV on BLM land.
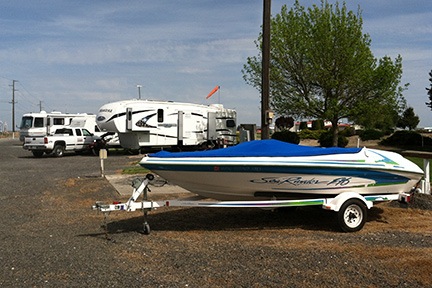
I started seriously thinking about bringing the boat south with me for the winter in 2016. I’d sold my big fifth wheel and had replaced it with a truck camper. This gave me the ability to tow something behind me when I went south. In preparation, I took the boat on its trailer to the local Discount Tire shop to get the tires replaced. That’s when I discovered that they were the original tires and were 21 years old. Can you say “dry rot”?
But when it came time to go south that year, I didn’t feel comfortable about bringing it. The camper was still pretty new to me and I was going to be covering a lot of miles with stops along the way. Did I really want to deal with a boat behind me on a complex trip? The answer was no. So I left it home and made the trip without it.
I began regretting that decision in January when we camped out along the Colorado River at a campsite with a boat ramp and easy access to the river. I had my kayak with me, but it was a royal pain in the ass to get on and off the roof of my truck camper. It would have been nice to launch the little jet boat and use it to explore the river.

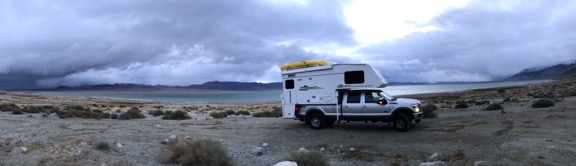
Here’s a shot of last year’s truck camper (the Turtleback) with my kayak on top. It was a PitA to get it back up there after using it.
But what really convinced me I needed the boat in Arizona was the day trip I made to Arizona Hot Springs on the Colorado River, just downstream from the Hoover Dam. I’d rented a boat to get there and wanted to go back, possibly to camp along the river near the mouth of the canyon downstream from the spring.
The Boat Goes South
Still, it wasn’t until early October 2017 that I committed to take it south. That’s the same time I committed to getting a booth at Tyson Wells Sell-A-Rama in Quartzsite for 10 days in January. The boat would do double duty: I’d also use it as a utility trailer to haul the additional gear I’d need to set up my booth.
I had to make some preparations.
First, I had to buy a hitch extender that would enable me to hook up the boat behind the truck with the camper on top of the truck. You see, the back end of the camper extends at least a foot and a half behind the truck’s back bumper. I searched online and found an extender that would work for the boat’s relatively light load. I had to get it cut down to size at a local metal shop; the guy did the work in exchange for being able to keep the part he cut off.
Next, I had to load up the boat with all of the items I wanted to bring for my Quartzsite booth and possible boat camping along the river: canopy booth tent, extra tarps, tent camping gear (including a new tent), fresh water jugs, cooler. I also had to give the boat’s cover a good coat of water-proofing spray; although it lived in my garage, I remembered the cover getting soggy the few times it had been out in the rain. I didn’t want everything inside the boat getting wet if I hit rain or snow on my way south.
Once everything was stowed and the boat was covered, I used a pair of ratchet tie-down straps to firmly secure the boat to the trailer. I wanted to minimize bouncing which I knew the lightweight boat did when I trailered it anywhere. I had a long drive ahead of me and I didn’t want any problems back there.
Finally, I had to hook everything up. That meant getting the camper on the truck (after getting a firiend to help me get the truck’s tailgate off), and then getting the boat hooked up behind it. I wound up using my Jeep, which has a handy front tow hitch, to get the boat out of the garage and position it on the concrete driveway apron in front of my big RV garage. Then I carefully backed the truck with the camper on it to get it into position and hook it up. I needed a trailer wire extension piece to make the connection between the truck and the boat’s light system.
The last thing I did was set up my “poor man’s backup camera” so I could keep an eye on the boat while we made our way down the road. As it turned out, I only used it for part of the trip. My new truck camper had a window in the back door that made it possible for me to see out the back through my truck’s rear-view mirror. It wasn’t as good as the backup camera, but it was good enough to keep an eye on things.
And then I headed out with Penny.
My October Vacation
I know I promised a blog post about my October vacation, but I guess you can count that as a broken promise. If I don’t blog about something right after it happens, it doesn’t get blogged about.
The short version is this: I gave myself two weeks to get from Wenatchee to Wickenburg — a trip I have done in the past in just two days. We visited friends along the way: Jim and Teresa in Coeur d’Alene, ID; Ann and Robert in Torrey, UT; Janet and Steven in Hotchkiss, CO. I camped in all kinds of places, from nice riverside campgrounds to crowded National Park campgrounds, to remote roadside pullouts on BLM land. I visited several national parks, hiked for miles, wandered around prehistoric Indian ruins, and did some night photography. The boat trailered behind me like a champ, never giving me any trouble at all. Sure, I looked funny camped out in the desert southwest with a boat, but who cares? At least I gave people something to talk about.

Why yes, I did tow my boat through multiple southwest desert national parks and monuments last October. Here they are at Capital Reef National Park in Utah.
I arrived in Wickenburg at month-end, stayed in my friend Jim’s guest house for two days, and left my camper and boat parked out of the way in his yard with a new solar panel keeping the boat’s battery charged. Then I took my truck down to Gilbert and spent two days with my friends Jan and Tiffani there. I even got a chance to fly a Schweizer helicopter for the first time. By November 4, I was home, just in time to see the first snowfall for the season.
The boat and my camper and my truck waited five weeks for my return.
Take Me to the River!
I returned in early December, after my annual Santa flight. Although I’d originally planned to bring the helicopter south with me, I didn’t have enough guaranteed work to make the trip worthwhile. So I left it behind at home and flew commercial to Phoenix with Penny and a big bag of all the things I’d forgotten to pack in the camper in October.
I spent one night with my friends in Gilbert, reclaimed my truck, and met some other friends in Scottsdale for lunch and a Segway tour. (There’s a long story there that, at this point, isn’t worth telling.) Then I went back to Wickenburg and camped out for two days in Jim’s guest house again. I didn’t do much in the area other than prep my truck, RV, and boat for my winter travels. That included making sure the RV batteries were charged — they were since I’d left the rig plugged into Jim’s house for five weeks — and topping off the fresh water supply. The waste tanks had been dumped before I parked it.
I did take my friend Janet out for a boat ride on Lake Pleasant one day. I wanted to make sure the thing ran. It would be horrible to get it out to the river and then not get it started. But it started more quickly than I expected and we spent an afternoon out on the lake, tooling around, fishing, and exploring the Agua Fria Arm of the lake before it shut down for bald eagle breeding season.
It was the trip on the lake I’d envisioned five and a half years before, but with a different person. We probably had more fun.
Back at Jim’s house, I loaded the boat up again, covered it, and strapped it down.
Finally, on Monday, December 11, I had everything hooked up and headed out to the river. I was planning on staying at a campsite we called Janet’s Point which is about 8 miles south of I-10 on the Arizona side of the river. The campsite is a big flat area with its own boat ramp and access to both a backwater and the Colorado River. Unfortunately, a redneck loser was there — that’s another long story not worth telling — and I wound up in my second choice spot, which was on the same backwater about a half mile away. When Janet joined me with her little trailer and dog the next day, we launched my boat and I motored it over to our campsite.
Our First Outing
Still with me? Yes, I know my backstories can be long.
We quickly discovered that the level of the water in the river and the backwaters fluctuated wildly depending on how much water was released 70+ river miles upstream at the Parker Dam. The first morning, my little boat was mostly beached and didn’t start floating again until after noon. It was worse the next day. That’s when I got the brilliant idea of putting an anchor off the stern to keep the back end in the water. Problem solved.
Here’s our backwater campsite, from the air. You can’t really tell in this shot, but my little boat was half out of the water. Oops.
When the water was full up that day, we took the boat out. It was just Janet, me, and Penny. We motored slowly in the backwater for that half mile, got to the channel, and zipped out into the river. I brought it up to full speed and we headed upriver. My logic is that if the boat’s engine is going to crap out, I’d like to drift back toward where I want to be. But the boat ran great.
The only problem was shallow water, which was really freaking out Janet. She apparently had some bad experience running aground with a sudden stop that sent things flying. I wasn’t worried about running the boat aground nearly as much as I was worried about that 120 horsepower sport jet engine sucking up sand. But the boat, when planing at speed, had a shallow draft — seriously, I should look up just how shallow it is — and never ran around, although I had my finger poised over the engine kill button more than once. We motored all the way up to where we could see the I-10 freeway bridge cross the river. Then we turned around and headed back.
Along the way, Janet got a text from her friend Steve. He’d come down to our campsite to visit us, found us gone, used his chainsaw to cut come of the wood we’d gathered into usable pieces, and had headed back toward his camp near Quartzsite. We saw his van, with the bright blue fishing kayak strapped on top, as he drove up the levee road. Janet connected by phone and soon I was motoring toward where he’d stopped along the road.
Wouldn’t you know it? He stopped right by the shallowest part of the river. The boat’s hull scraped the soft sand and I hit the kill button. We were stuck momentarily and used that time to have a shouted out conversation with Steve. Then the river’s current pushed us free and we drifted away. When the water got deep enough, I started the engine and we continued back to camp.
We were a lot more confident about the water depth on the way back. We’d both paid close attention to where the sandbars were on the way upriver and I managed to maneuver between them as we headed south. We purposely passed the opening to the channel back to camp, going an extra half mile or so just to see what it was like down there. But then I turned us around and we rode back to the channel. It was a bit tricky getting in to the very narrow channel with the river’s 6-8 mile per hour current. I had to crab the boat in. Once I was out of the current, I turned the wheel hard to straighten out, zipped through the opening, and reduced power down to no wake speed. We puttered the half mile back to camp.
A Non-Event? Maybe, but that’s not the point.
It’s funny how a boat ride I’d imagined for years turned out to be such a non-event when it actually happened. But, in hindsight, I don’t think it was the actual boat ride that interested me so much. Instead, it was the logistics and challenge of getting my little boat down to Arizona, as I’d planned to do so many years before, and finally doing it. The boat ride itself wasn’t a big deal.
And I think this long and drawn out story illustrates something about me that I’ve only recently begun to be aware of: I live for challenges. Small or large, possible or impossible — my life seems to revolve around finding challenges that interest me and turning them into reality. Or, when I fail, learning valuable life lessons along the way.
Let’s face it: I’m a smart, healthy person with money in the bank, retirement funded, and a comfortable paid-for home to live in. There are no challenges to survival and maintaining the simple status quo of my life. It would be very easy to just kick back and live a boring life at home year-round, entertained by television and punctuated by carefully planned packaged vacations.
And that’s pretty much what I experienced when I was in a relationship with my wasband.
Although it didn’t bother me when I was younger, it ate at me as I got older and heard the ever-louder ticking of my life clock. There is more to life than just waiting around for the end of it.
Finally getting my little boat down to Arizona and taking it out on Lake Pleasant and the Colorado River was a challenge — admittedly a small one — and it feels good to have tackled it and succeeded in making it happen.
Postscript
I started this blog post in December — which is when I actually got the boat out into the river — and set it aside for a full two months. I thought I should trim it down a bit and I definitely needed to add photos. But I wound up keeping just about everything I’d written before adding links and photos and getting it ready to publish.
We took the boat out one more time before the forward/reverse cable decided to seize up and limit the boat to idle speed. I was fortunate to have that; it made it possible to limp back down to the boat ramp and get it back on the trailer. It took a week in Blythe to get the parts and have it repaired. Then it was back in the water for Christmas and a few more rides on the river. I had the throttle cable replaced, too, and the boat runs more smoothly than ever.
I parked it for nearly a month in a back parking lot at Tyson Wells while I camped out there with my booth. Then, last week, I hooked it back up and headed back into the desert, finally ending up at Buckskin Mountain State Park upriver from Parker, AZ. I had it out a few times, including all the way down to Parker for lunch one day and up to the Parker Dam another day. I enjoyed the luxury of being able to park at a real dock at the campground during my stay.

Parked at the Bluewater Casino’s Cantina boat-in restaurant.
I’ll leave Buckskin for Cattail Cove State Park later today and, of course, bring the boat with me. There’s a boat ramp there that’ll give me access to Lake Havasu. Although I’d love to take it all the way up to Laughlin — as I did years go via jet skis with my wasband — I’ll likely limit my explorations to Topok Gorge.
Next weekend, I’ll be at Willow Beach Campground just downriver from Hoover Dam. I’m looking forward to taking it up to the hot springs every day during my stay.
Will I bring the boat with me next year on my travels? Probably not. Although it hasn’t been much of a burden to tow it around with me, it is a lot simpler to travel without it. I know I can do and that’s apparently enough.
Besides, I’m not sure whether I’ll be coming back to then Colorado River next winter. I have other, more challenging travel plans in mind.