Glue? In a Silversmithing Video?

I vent a little about people who should know better showing junk jewelry shortcuts in their jewelry-making videos.

I watch a lot of videos about making jewelry. I must have seen hundreds of them by now. Most were on YouTube, but I’ve also purchased in depth jewelry making videos on DVD or streaming services. I learn a lot from these and they can inspire me.

My favorite jewelry makers on YouTube

Want a few suggestions for getting started? Here are my top 5 favorite jewelry makers on YouTube:

  • Soham Harrison. Soham makes no-nonsense videos that really teach techniques. His camera setup isn’t fancy but it does the job. Lots of his videos are great projects for beginners, but there’s some advanced stuff, too. Soham is based in Australia but his accent is American.
  • Online Jewelry Academy. This one uses a set to record videos on a wide range of topics. The host, Professor John Ahr, is knowledgeable and a little weird. Lots of great videos for beginners here.
  • Andrew Berry. Andrew Berry is another jeweler who teaches jewelry making. His videos cover a wide range of topics. I believe he’s based in the UK.
  • Estona Metalsmithing. I recently discovered this channel and have watched quite a few of her videos. She seems to be making an effort to build up her subscriber base with quality tutorials. There’s a great beginner’s series and a bunch of other videos that go beyond the basic. She’s based in the Netherlands and speaks with a heavy accent, but her English is perfect. Just be aware that her terminology doesn’t always match the terms we use here.
  • Rio Grande. Rio is a jewelry making supplier and they’ve got a bunch of videos that teach techniques, many of which are related to items they sell. While some are strictly marketing videos, there’s lot of good how-to material, too.

Before I go any further, however, I need to warn wannabe jewelry makers that there are a lot of crap videos out there. Videos that show you how to make junk jewelry or videos made by people who obviously don’t know what they’re doing and make videos out of their experiments. I also occasionally have trouble with the personalities (or voices, even) of some of the video makers. I have zero tolerance for people who spend more time talking about how smart they are than actually showing you how to make something great. And that woman who talks like Cindy Lauper? Sorry. I just can’t keep tuning in. So although I encourage you to watch videos to learn, be prepared to wade through a lot of crap to find gold.

All that said, yesterday I watched a video from Durango Silver, which is a well-known turquoise and jewelry seller seller based in Durango, CO. The video covered making a basic gemstone pendant and although I’ve seen dozens of videos on that topic and have made many of my own, I checked it out, hoping to learn a few new tricks.

The guy who was making the piece — John — definitely had experience and knowledge. His narration was better than average, but far from perfect — for example, he occasionally used the wrong word for something or left sentences unfinished as he was working. It amazed me when he started talking about how much he loved a particular pair of pliers, pointing out that they were made in Pakistan (like 75% of jewelry making tools) and struggling to get the name Wubbers out with a laugh. Why did that amaze me? Well, Wubbers is generally recognized as a quality brand of tool and I really think he should have been familiar with the name.

The camera work was excellent. Most videos are one-person affairs where the camera sits on a tripod that may or may not be in the best position; this video had a camera guy who did a great job staying focused (literally and figuratively) on what we needed to see.

The video was long — 50+ minutes — and I watched it on my new bedroom TV setup. That means I fell asleep before he was done. (I cannot read or watch TV in a horizontal position without falling asleep.) In the morning, however, I finished watching it on my iPad while I had breakfast. I did learn something — a new (to me) technique for attaching a bail — and, because of this, I consider watching the video time well spent.

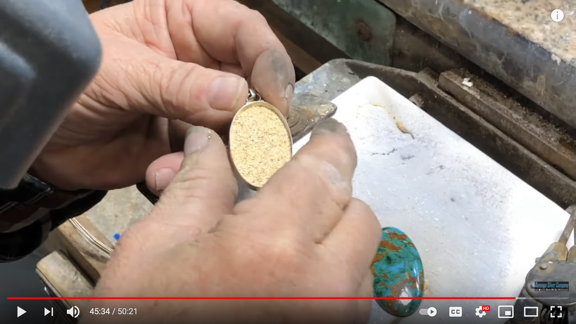
Stick Soldering
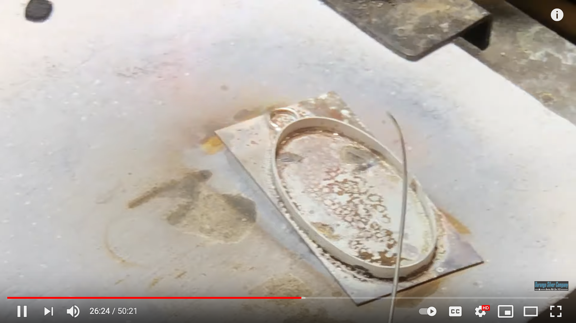
Screen capture from the video showing John soldering the bezel and a jump ring to the back plate. One of the things I learned in this video was a new (to me) technique for using a jump ring to connect a pendant bail. He also demonstrated stick soldering, which I’ve seen a few times but haven’t tried yet.

That is, until I got to the end. You see, John was creating a bezel setting for a cabochon. A bezel is a strip of thin metal — silver, in this case — that is formed to fit the stone and soldered onto a back plate. When all the soldering and polishing is done, the very last step is to fit the stone into the prepared bezel and use a variety of tools to bend the top edge of the metal down around the stone to hold it in place. This is a standard bezel setting technique. Look it up, take a class, watch a bunch of bezel set videos and 99% of them will show you this correct way.

The video started going off the rails for me when John reached for a coffee mug full of sawdust and put some into the bottom of the finished piece, under where the stone would go. Sawdust. A wood product. In a piece of sterling silver jewelry.

Sawdust in a Bezel
Here’s another screen grab from the video. This one shows the layer of sawdust at the bottom of the bezel.

He then put the stone on top of it. The sawdust’s job was to raise the stone a bit so the bezel wouldn’t come up too high on the stone.

Let me take a moment to explain how getting the bezel the right height for the stone is usually done. There are two techniques to choose from:

  • Before shaping and soldering the bezel, cut it to the right height. This is the correct way to do this. It’s a pain in the ass because you’re normally only trimming off a millimeter or two and it’s important to make a good, level cut. If your cut is bad, you can level it out with sandpaper after soldering it closed.
  • Put something under the stone to raise it. Folks who do this normally use some sort of material that will not decay in any way. Tiny cut up pieces of credit cards are popular. I have, in the past, used copper sheet cut to size. (I once made a pair of earrings with bezel set cabochons and although the stones matched in appearance, one was definitely thicker than the other; I used copper under the thinner one to make it match its mate.) I’ve never seen anyone use a biodegradable product like sawdust.

Okay. So this guy used sawdust. He called it “jeweler’s sawdust.” I’ve never seen it before — and I’ve shopped at a lot of jewelry supply sites and stores. Maybe that’s acceptable in the business? I didn’t know but I also wasn’t going to switch.

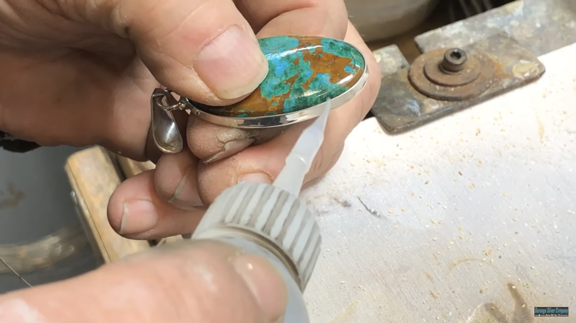
What he did next, however, floored me. He pulled out a bottle of liquid glue and, using the needle-tip applicator, glued the stone into the bezel.

Glue
He called that stuff “superglue.”

I screamed at my iPad: “Not glue! Don’t fuck it up with glue!

Of course, he kept gluing. I turned it off. I couldn’t bear to watch him permanently affix, with “superglue,” a beautiful cabochon to a very nice sterling silver setting and the sawdust beneath it with glue.

(I later watched the end. He did use a bezel setting tool to close up the bezel over the stone. But why the glue? Ugh.)

Later, I went back to look at the comments people had left on the video. Everyone loved it. Half of them said that they’d been wanting to try something like this and now they thought they were ready to do it.

I was horrified. He was teaching new jewelry makers a lazy way to do a bezel setting. A way that allowed makers to rely on glue instead of design and skills to set the stone.

But what was worse was that he was showing me that the jewelry made and sold by Durango Silver is likely held together with glue rather than the skill of the jewelry artist.

I guess the moral of the story is this: don’t just watch one video about how to do something. Watch a bunch. Pay attention to the details. If there’s a technique that most of the video makers are using, maybe it’s the right technique.

With very few exceptions, glue has no place in fine jewelry.

My Old TV: Rejuvenated by Roku

I get a new Roku for my old TV and it’s like getting a new TV.

I’m not a big TV-watcher. I probably spend less than 10 hours a week in front of the tube, and a lot of that is watching late night TV hosts and educational content on YouTube. I don’t have cable or satellite TV and can’t bring in any over-the-air channels. I subscribe to Netflix and Disney Plus, have Amazon Prime video because I want free Amazon shipping, and recently added a one-year free subscription to Apple TV+ because it came with my new iPad.

I got my wasband’s circa 2008 45″ Samsung HDTV in our divorce. (It’s a funny story how I got it, but I blogged about that in passing elsewhere.) At the time — 2013 — it was still a decent TV and it had a surround sound system that worked great when I watched DVDs. I used the Roku stick that I got with it to connect to the Internet for my content. It was slow — like push a button on the remote and wait for Roku to react — but good enough.

I eventually sold the surround sound system on Craig’s List, bought a Blu-Ray player for the TV, and got a Samsung sound bar. (The TV had terrible sound without it.)

Time passed.

After seeing bigger, better TVs in the local Fred Meyer’s electronics department for two years, I finally broke down and bought one. Fred Meyer sells previous years TV models for dirt cheap; I bought a 65″ Samsung UHD smart TV for less than $500 when I combined the sale price and the “senior discount” I got for buying it on the first Tuesday of the month. I felt that I got a pretty good deal on something I would use less than 10 hours a week.

New TV
My new TV — which is at least two years old at this point — sits in the corner of the living room. I had to swap the coffee table for the TV table to get it to fit; the legs have quite a spread. The reflection is my red leather sofa — also an unexpected divorce acquisition — with the pillows and dog bed on it.

What to do with that old TV? Well, I wound up putting it in my bedroom, right across from the brown leather sofa that had (ironically) been in my old house’s TV room. I had to buy a table for it that matched the furniture. I attached the sound bar I’d bought for it to the new TV so it had crappy sound again, but that didn’t matter. By that time, the Roku was so agonizingly slow — especially compared with the new TV — that I lacked the patience to use it. I should add here that other than the little black and white TV I’d had in my first apartment after college (circa 1982), it was the first time I’d ever had a TV in the bedroom so I wasn’t accustomed to watching TV in bed anyway. But what else would I do with it?

Time passed. I rarely used the TV in the bedroom. The Roku stick made it unbearably slow.

I started talking to a neighbor about giving it to her. Literally giving it to her. She had a TV in her guest room that was on the fritz. Although my old Samsung was a lot bigger than what she wanted/needed, she said she’d take it. We just needed to wait for her husband’s cousin to get into town to help us carry it downstairs.

But I started thinking about other possibilities. It seemed to me that the thing that was slowing the TV down and making it an ordeal to use was the old Roku stick that was now 13 years old. Maybe a newer Roku would speed it up?

I asked on Twitter. Some folks said it wouldn’t be any better. Someone else suggested the Roku Streambar, which combined a sound bar with a Roku receiver. I looked it up. It happened to be on sale for $109 (from a normal price of $129) with free shipping and a 30-day money-back guarantee. I had nothing to lose. I’d give it a try and if it was still slow, I’d return it and get rid of the TV.

Roku Streambar
The Roku Streambar and its remote. It’s actually pretty small and doesn’t sound nearly as good as my Samsung sound bar on my new TV, but it’s good enough for me.

It arrived last week. I set it up Thursday night.

And I was (eventually) amazed.

After a few tries, the Roku connected to my 5G wifi network. (I’d tried connecting it to the two other networks first and it apparently didn’t like them, even though the signals were stronger.) I went through the setup process. It worked great — super fast, too — and even configured itself with the same channels I’d had set up on the old TV. At first, it didn’t play sound through the speaker and I couldn’t figure out why. I fiddled with the TV settings and cables and other stuff, and then restarted the Roku by mistake (I pulled out the wrong cable). When it started running again, the sound came through the Roku speaker. It worked just as it should.

The TV could be controlled by the small Roku remote — although I assume I’ll have to change the source with the TV remote if I ever want to watch a DVD. The remote even has a push to talk voice controller for switching channels and changing the volume.

And did I mention that it was fast?

I’m not exaggerating when I say that it was like getting a new TV.

TV w/Roku
My old TV in the bedroom. Yes, I do have to clean up those wires. The reflection in the TV is the window behind the sofa; you can see the top of my head, too.

Unfortunately for Terry, I’m going to keep the TV, at least for a while. I suggested she check out Fred Meyer. They’re still selling great TVs for great prices and she’ll likely get a better one than mine.

Mesa to Sedona by Helicopter, Part 2

Another video from the FlyingMAir YouTube channel.

Join me and fellow helicopter pilot Dave as we fly from Falcon Field in Mesa, AZ (FFZ) to Sedona, AZ (SEZ) along the Salt and Verde Rivers and through the Verde River Valley. I’ve cut this hour+ flight into multiple parts, each highlighting a specific area of our flight. In this video, we begin just north of the confluence of the Salt and Verde Rivers and detour for a close look at the fountain at Fountain Hills. From there, it’s over Rio Verde and back along the river for a low-level flight over the autumn colors and Bartlett Dam. The video ends over Bartlett Reservoir, where we’re continuing along the lake and river beyond. Along the way, you’ll hear our in-cockpit conversation about what we’re seeing and more.

Dave is an airline pilot who is working through his helicopter ratings. At the time of this flight, he was a private helicopter pilot; he got his commercial helicopter rating a few weeks later. Dave and I split the cost of this flight; I flew to Sedona and he flew back.

Many, many thanks to channel members and Patreon patrons. It’s your membership dollars that made this flight in Arizona possible.

NOTE: This is the 1080 HD version of this video. A 4K UHD version without the Member Wall is available to channel members at the Sponsor and Funder levels.

How to Follow Just the Content You Want on This Blog

I explain how to follow this blog in a way that weeds out the content you don’t care about.

One of the things in my life that I’m proud of is that I’m interested in a lot of things. My friend Bill refers to this as curiosity — I’m curious about things so I learn more about them. But while others might be content with getting quick answers to any burning questions about a topic, I’m often willing to do a deep dive and learn more, sometimes firsthand by doing. That’s what got me involved in things like beekeeping, jewelry making, glass fusing, and other “hobbies gone wild.”

And then I blog about it to share some of what I’ve learned.

I’ve been blogging since 2003 — yeah, I’m coming up on 20 years now! — and this blog’s 2300+ posts cover a lot of topics in a wide variety of ways. Back when I first started blogging and people were writing about making “successful blogs,” they all recommended one thing: stick to a topic. If you’ve explored this blog at all, you know that’s a recommendation I have been unable to follow. I write about lots of topics because I’m interested in lots of topics. And while it is possible to maintain multiple blogs, I simply don’t want to do that.

What does that leave my readers with? A hodgepodge of posts about all kinds of things: jewelry making, flying helicopters, cooking, computers, reading/writing, video creation, etc., etc. The list goes on and on.

I’m not too naive to realize that not everyone is interested in everything that I am. And not everyone comes here to read every word. In fact, I’m sure I lose a lot of new readers by delivering up posts about topics that don’t interest them nearly as much as the topics that originally brought them here. I get it.

I addressed this the other day after a comment from a reader named Susan brought it up:

Comment
An exchange on this blog between me and Susan, who likes the fact that I cover a lot of topics here. That weird symbol is supposed to be a shrug emoji.

With all that said, I thought I’d take a moment to help readers zero in on just the new content that interests them using several techniques.

Subscribe and Choose

Subscribe Form
Here’s what the form looks like. You can find it near the top of the sidebar on any page of this site.

The easiest way to learn about new content that might interest you is to subscribe to the blog via email. You’ll find a form on the sidebar on every page. Put your email address in it and click the button. You’ll get a confirmation in email to make sure you really want it.

From that point forward, you’ll get an email message every time I post something new — generally two to 20 times a month. See a topic that interests you? Click the link in the email to come here and read it. Otherwise, just delete the email.

And you can always get off the list. The unsubscribe feature really does work.

I don’t use this for anything other than blog post updates. I don’t share email addresses. I don’t spam.

Follow Me on Twitter

If you’re on Twitter and you don’t want your inbox to take in any more subscriptions, you can follow me on Twitter. I’m @mlanger there. All of my new blog posts are automatically tweeted to my account, so it’s the same as subscribing to the blog. But you also get a running commentary of maximum 240-character posts of what I’m thinking about or doing.

(Some folks would likely prefer the blog subscription.)

Bookmark a Topic

All the blog posts here are assigned a category (topic) and most are assigned at least one tag. (Topics are listed on every page in the sidebar; tags are listed on the home page in a cloud format in the sidebar.) This makes it easy for readers to find the content they want that interests them. But did you know that you could bookmark a category (topic) or tag?

Share This
You’ll find a Share This area at the end of each blog post.

On a post that interests you, scroll down to the Share This area. In addition to icons you can click to share the post on various social media and via email — which I do encourage you to use if you think your friends might enjoy it — there is a “Posted in” section and a “Tagged” section, each of which are followed by links. Click the category (topic) or tag link that closely matches what interests you. You’ll see a page with the most recent posts with the same category (topic) or tag.

Bookmark that page. This is something you do in your browser and I’m not going to explain how because there are lots of browsers and each has its own method. I know that in Firefox, which I use on my computers, the shortcut key to get started in Command-D (I’m on a Mac).

New Jewelry Making Topic

If you’ve got sharp eyes, you may have noticed the new Jewelry Making topic in the sidebar. I added that the other day. I’d been using the Hobbies Gone Wild topic for posts related to jewelry making and realized that that particular endeavor had progressed far beyond what one would consider a hobby. So I pulled those posts out into their own category, mostly to make it easy for folks interested in jewelry making to find them..

Once you’ve bookmarked the category or topic, you can check in periodically to see if there’s anything new of interest to you. I recommend once a month, although you could come by more frequently. You might want to do the same thing with any other sites/blogs that interests you. Then make check in part of your routine — maybe a rainy Saturday morning coffee routine.

And do you see that Add a Comment link in the Share This area? Here’s a tip: you can click that and add a comment about what you’ve just read and maybe encourage me to write more about it. After all, it was Susan’s comment (shown above) that got me to write this.

Subscribe to an RSS Feed of a Topic

In the old days we used Feed Readers to follow blogs without having to go to the blog itself. Do those things still exist?

Although I know I’ve written extensively about feeds in the past, I’m not going to do so again here. Instead, I’ll share this from the WordPress glossary:

A feed is a function of special software that allows “Feedreaders” to access a site automatically looking for new content and then posting the information about new content and updates to another site. This provides a way for users to keep up with the latest and hottest information posted on different blogging sites. Some Feeds include RSS (alternately defined as “Rich Site Summary” or “Really Simple Syndication”), Atom or RDF files. Dave Shea, author of the web design weblog Mezzoblue has written a comprehensive summary of feeds. Feeds generally are based on XML technology.

If you’re a bit of a techie and want to use feedreader to follow topics in blog, be aware that you can modify a blog’s feed URL to specify a specific category (topic) or tag. For example, if you’re interested in flying and want to subscribe with your feedreader to a feed about that category (topic), you might try

http://www.AnEclecticMind.com/category/flying/feed

(Too techie for you? Me, too. When I stopped writing computer how-to books around 2012, I stopped being a techie and became a mere user. Now I don’t research and write about any tech unless it’s related to something I need to do with my computers.)

The idea is to set up your feedreader with all the blogs that interest you and open that application when you want to check in on your favorite blogs.

The Point

The point of all this is that you don’t have to visit the blog and wade through whatever’s new that doesn’t interest you to find something that might. You can either get a list of new posts delivered to your inbox and click links to explore the ones that interest you or use various techniques to bookmark or subscribe to a feed for the categories (topics) or tags that interest you.

Whatever you decide, don’t be discouraged by the wide range of topics here. If you found this blog, it’s likely because there was something here you liked. There may be more now and in the future. Any of these techniques will help you keep on top of what’s new.

B&S Gauge Thicknesses, Saw Blades, and Drill Bits

Another handy chart for jewelry makers.

The other day, I published a chart of Minimum Metal Gauges for making jewelry. I’d made the chart for my own use, based on information I got from the Rio Grande website.

But what I’ve really wanted for a long while was a single chart that listed B&S gauge sizes, the corresponding measurements in millimeters and inches, and the correct jeweler’s saw blade and drill bit sizes for each gauge. For some reason, I could not find all of this information on one chart anywhere.

So I made one by combining information from the Contenti and Livingston Jewelers websites. Here’s the result:

Thicknesses, blades, and bits
This is the chart I’ve been looking for! In the end, I had to make it myself from multiple sources of information.

You can download this chart as a PDF from my public Dropbox folder.

Keep in mind that although I do have a set of jeweler’s drill bits, I don’t use them. Instead, I have a set of bits in various fractional mm sizes — I pick the drill bit I need from that set because I can get a much closer drill bit size for my needs.