First Art Show of the Season

Surprisingly successful.

This past weekend was my first art show of the season. It’s at a venue which is usually good for me, but this time, it was surprisingly good. I thought I’d blog a bit about it.

But before I go into a report of this past weekend’s art show, let me begin by explaining how I sell my work. (You know me; there’s always a back story.)

My sales channels

I sell most of the jewelry I make in three different channels:

  • My Art Show Booth
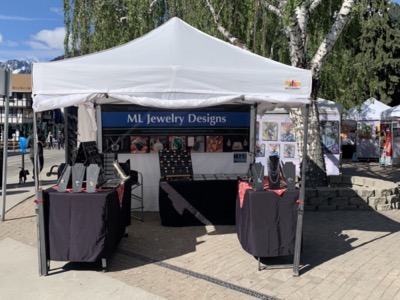
    My art show booth as it appeared this past weekend in Leavenworth. I was fortunate to have an end spot and be open on three sides.

    Art Shows. This accounts for far more than half of my sales, but it’s the hardest work I do. I (normally) pay a free up front for booth space and then, on the day of the show, arrive early with a 10×10 foot tent, tables, table covers, signage, and merchandise displays. I set everything up — it takes roughly 90 minutes — placing my work as artistically and practically as I can. Then I sit in the booth all day — sometimes for as many as five days in a row — to sell what I’ve brought, make more inventory (when possible), and take/make orders for custom items. Then, at the end of the show, I pack everything back up. The benefit: I (normally) get to keep 100% of the selling price for each item.

  • Wholesale and Consignment Sales. This accounts for maybe 15% of my sales and involves a lot less work — but at a cost. My wholesale price is 50% off the retail price; consignment fees are typically 35% to 40%. Even though it costs more, I prefer wholesale sales — once an item is sold, I can pretty much cross it off my inventory and forget about it. (The exception is the trade-in policy I offer for my wholesale clients; if something doesn’t sell in their shop in 6 to 18 months, I allow them to trade it in for another item.) Consignment is a royal pain in the ass. Not only am I letting a consignment shop hold onto my inventory (so I can’t sell it myself), but I need to keep track of all that stuff. And if an item is lost through theft at their shop, I’m pretty much screwed. Or if they go out of business while they have my stock, I have to worry about getting it back. Needless to say, I really don’t do much on consignment. What’s nice about these channels, however, is that they do often lead to a regular stream of sales with monthly income. So there’s that.
  • My Online Store. This accounts for another 10% of my sales. Right now, I’m using Etsy, but I hope to switch to a more professional solution soon. Etsy takes a small cut of each sale — it’s less than 10% (unless the sale is related to a special ad they’ve placed) — so it isn’t the cost that bothers me. It’s being in an online retail space with people selling cheap, imported junk that they’re trying to pass off as their own work. The only thing that keeps me with Etsy is their integrated shipping feature, which not only makes it easy to ship to addresses all over the world, but gives me a discount on USPS postage costs.

The rest of my sales are face-to-face to friends and acquaintances. That’s a tiny percentage of the total.

This Weekend’s Show

This past weekend I was at Leavenworth Art in the Park. This is a weekly art show in the center of town that has been fine-tuned over the past year for COVID. Right now, it’s operating with only 15 artist vendors in widely spaced outdoor booths; when restrictions ease a bit more, I suspect it’ll go back to its previous capacity which was about 20.
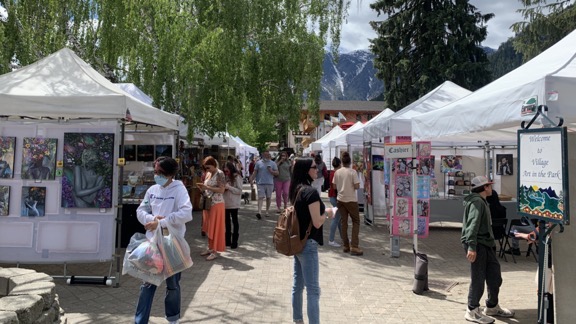
Art in the Park
With spacing for COVID, booths are able to be open on all sides.

Leavenworth, Washington, is a small town in the foothills to the Cascade Mountains. It’s a gorgeous location, nestled near mountains that remain snow-capped for much of the year. Its Bavarian Theme is what brings tourists in all summer long. The town also has (or had before COVID) lots of festivals, including a three week long Oktoberfest and big Christmas celebrations. The area has tons of hiking, white water rafting, camping, and other outdoor activities. It’s a nice place to visit, although admittedly a bit too touristy in town for my taste.
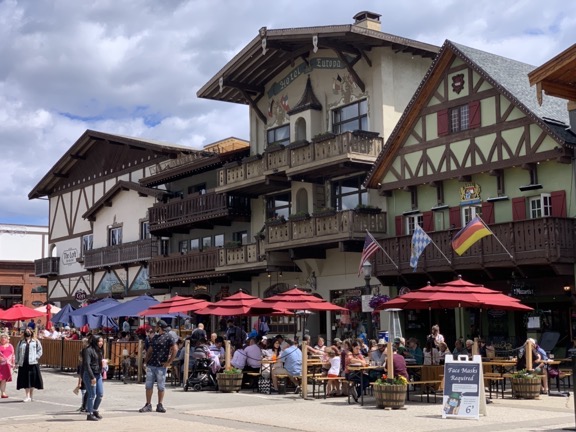
Leavenworth, WA
Downtown Leavenworth, WA was completely redone years ago to require Bavarian style architecture. One of the nice things about COVID — there are silver linings if you look for them — is that it got the town to close down the main street to vehicle traffic to make room for outdoor dining.
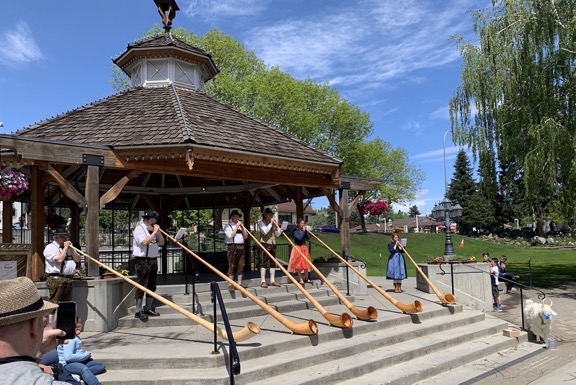
Elk horns
One of the draws to Leavenworth is entertainment, like this elk horn group. I shot this photo from my booth; it was very close to where the entertainment was.

I started showing/selling my work at Art in the Park in 2019. I attend on a limited basis because my primary work, which is cherry drying with my helicopter, requires me to be close to the helicopter in the Wenatchee area from roughly June 1 to August 15 every summer.

In a way, my limited time there is a good thing. Leavenworth is 50 miles from my home and the days there are long: 9 AM to 6 PM. Add that to my one hour (each way) commute and I’m looking at 11 hours. Spring and early autumn can be cold, summer can be hot. Parking is a pain in the ass. There are long lines at restaurants and, often, for the restrooms.

The reward of being there, however, is great sales. Folks who come to Leavenworth come to be entertained and to spend money. They shop in town and at the Art Show. They eat and drink in countless restaurants and bars. They stay in local hotels. They are in money-spending mode. And because most of them come from the Seattle side of the mountains, they have a bit more disposable income than the local folks I used to sell to at smaller venues in downtown Wenatchee. A pendant priced $59 isn’t a big expenditure for these folks, so I can actually sell and make money on my work.

This weekend was a great example. Although it was the second weekend of the show, it was my first weekend attending. I set up on Friday morning and began selling almost immediately. By 6 PM, I’d sold more than I had in an entire weekend on my last show. I did even better on Saturday and almost as well on Sunday.

Overall, it was the best weekend I’d ever had at any show anywhere.
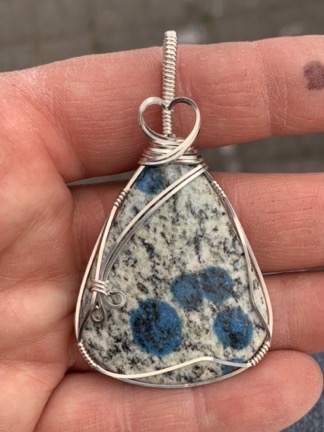
Pendant
Here’s one of the pendants I made while I was sitting in my booth on Sunday morning. I made a total of six pendants that day.

It was so good that I spent most of Saturday and Sunday making more inventory. My wire work pendants continue to sell well in Leavenworth and I made five custom pendants for customers while I was there. I also made a bracelet and three beaded necklaces. This week I’ll be making a lot of earrings in my shop.

Now although the booth fee at Art at the Park is remarkably low, the non-profit organization that runs it does take a cut of sales: 21%. So I don’t get all of the money I brought in. But 21% is a lot less than the 35% or 40% I’m paying two galleries to show and sell my work. And I sold a lot more this past weekend than I’ve sold in my three year relationship with both galleries combined. So I’m definitely not complaining.

I’m doing two more weekends at Leavenworth this month. Then I’m stuck in Wenatchee for most of the summer. I applied to a show in Wenatchee in June and another show in Chelan in July. (I had to find a booth sitter for the July show in case rain is possible and I need to stay home.) I’m scheduled to go back to Leavenworth in August and September, but I may need to cancel that because of a conflict with another opportunity that I’m not quite ready to discuss here yet.

And if you’re a Leavenworth tourist reading this, I sure hope you’ll stop by Art in the Park while you’re in town. It’s open on Fridays, Saturdays, and Sundays from about 9 AM to 6 PM (or 5 PM on Sundays). I believe it’s also open on Thursdays between Memorial Day and Labor Day. Support local artists and makers!

On Ghostwriting

There are only two reasons to do it.

Yes, I’m a helicopter pilot and jewelry artist now. But my second career, which has pretty much wound down at this point, was as a freelance writer. That career, which was in full swing when I started this blog in 2003 (not a typo) was successful enough for me to buy multiple investment properties, completely fund my retirement, take flying lessons, and buy a helicopter.

So yes, I think it’s fair to say that I know a bit about the business of writing.

The Crazy Ghostwriting Offer

So imagine my surprise when I see a tweet from a wannabe writer offering to “ghostwrite your sci fi, fantasy story, ebook, novel” for $5.

My first thought was what kind of desperate idiot would write someone else’s book for $5?

Let’s be clear here: writing may not be terribly difficult — it wasn’t for me — but it is time consuming. The fastest I ever churned out a book was a 280-pager in 10 days. It was my third or fourth book. Would I have taken $5 for 10 days of work? Hell no.

Would I have taken $5 for any piece of writing that had someone else’s name on it? Fuck no.

Ghostwriting Explained

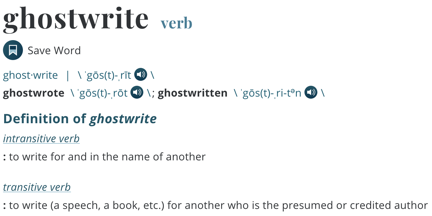
Ghostwrite definition
Definition from Merriam-Webster: ghostwrite.

That’s what ghostwriting is all about: writing something for someone else and having that person’s (or another person’s) name on on it as the author. In most (or probably all) cases, copyright goes to the person or organization who hired the ghostwriter. This is a work for hire, which is relatively common in the publishing world.

Ghostwriters are commonly used by famous people with a story to tell — often biographical in nature — who lack the skill, time, and/or desire to sit down and write it. Remember, writing isn’t easy for everyone, there are lots of really crappy writers out there, and writing takes time, no matter how good or bad a writer is. Ghostwriter names don’t usually appear as author, although sometimes they’ll appear in smaller print after “as told to” or something like that.

There’s no glory in being a ghostwriter.

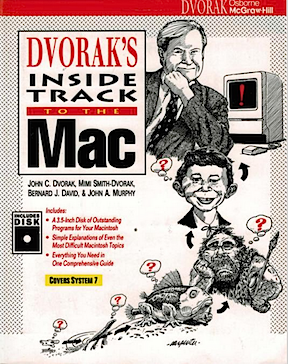
Dvorak's Inside Track
This is the first book I was involved in; I was a ghostwriter on 4 chapters and am mentioned in the acknowledgements.

I know this firsthand. My first book project was as a ghostwriter for John C Dvorak and Bernard J David on Dvorak’s Inside Track to the Mac back in 1991. Bernard hired me, after his agent suggested me, to write one chapter of the book. They liked what I turned in so much that they hired me for another three chapters. (You can read about this in a post titled “Freebies” on this site. I highly recommend reading this if you’re starting out as a writer and hope to make a living at it.)

Much later in my career, I ghostwrote a chapter or two for someone else’s book — was it the Macintosh Bible? I can’t even remember. In that case, I had expertise that the author lacked and the writing experience to get the job done right and on time.

Why Be a Ghostwriter?

Would I ghostwrite something today? Well, that depends. In my mind, there are only two reasons to ghostwrite a book:

  • Money. Plain and simple. That’s the only reason I did that second ghostwriting job. They paid me. And it wasn’t $5. (I honestly can’t remember what it was, but at that point in my career, it must have been at least $2,000.) Even that first ghostwriting gig, when I was a complete unproven unknown writer, paid me $500 per chapter — that’s $2,000 total.
  • Relationship building. This one is a little grayer. Suppose a publisher/editor contacted me about ghostwriting a book for a famous pilot. Suppose they were willing to pay (more than $5) but it wasn’t quite enough to get me to drop what I was doing and get to work. But suppose that this publisher/editor was building a book series by a bunch of pilots and the series was already popular. There was the definite possibility that ghostwriting this book could lead to more offers. And, if they liked my work enough, I’d be able to negotiate higher fees or other benefits — like an “as told to” byline on the cover — or even royalties on future work. If I thought this offer was a relationship builder that could lead to more or better opportunities in the future, I might go for it. It’s relationship building that I really got from those first four book chapters for Bernard. I co-authored my first book with him and that launched a solo writing career that spanned 85 books and hundreds of articles in just over 20 years.

At every writing opportunity, every writer should be asking one big question: what’s in it for me?

(Haven’t read my “Freebies” post yet? This is a perfect time to go do that.)

Why is this guy offering to write someone else’s book for $5? I can’t imagine — unless he just doesn’t have any ideas and wants someone to feed them to him?

Otherwise, why wouldn’t he just write his own damn book and self-publish it? Then at least his name would be on the cover and he’d own the copyright. He might even make more than $5.

Writers Write

I’ve been a writer since I was 13 years old and wrote stories and book chapters in spiral ring binders. Back then, I tried entering short story contests and failed miserably, not really knowing how to get started, and honestly, not being a very good writer. (I have those old notebooks to prove it; they make me cringe!) But I wrote anyway because I was a writer and the more I wrote — and read, don’t forget that! — the better I got.

(By the way, I write in this blog because I’m a writer. Real writers write. We can’t help it. I just don’t need to make a living as a writer anymore.)

Meanwhile, my family pounded the idea of having a stable career into my head. Writing was not a stable career — at least not in their minds. Being young and foolishly believing that they knew best, I made a wrong turn into a career in auditing and finance, losing 8 years that I could have spent building a writing career. By the time I became a freelance writer back in 1990, I had a home and financial responsibilities. I had to make a living as a writer. There was no going back.

Could I have made a living as a writer if I didn’t analyze every opportunity I found? Of course not. Instead, I’d be banging away at an office job, writing stories, likely never to be published, on evenings and weekends — as I did during my 8 year wrong turn.

The Take-Away

The takeaway is this: if you want to write, write. If you want to make a living as a writer, make sure you don’t sell yourself short. Take only the jobs that will move your career forward — or at least help pay the bills.

Winter Helicopter Flight to McMinnville Pt 1

Another video from the FlyingMAir YouTube channel.

Guess who flew back down to McMinnville in March?

Join me for the first part of this flight, where I leave Wenatchee Pangborn Memorial Airport (KEAT) and head south over winter terrain. This flight has both nosecam and instrument cam views, as well as cockpit narration and radio chatter. I’ll release additional parts of this flight throughout the summer.

Note: This is the 1080 HD version of this video. A 4K UHD version without the animated subscribe button and Member Wall is available to members at the Sponsor level or higher.

Handmade Items: It’s NOT Just Materials Cost

I explain why I charge $39 for a pair of earrings with less than $10 worth of materials.

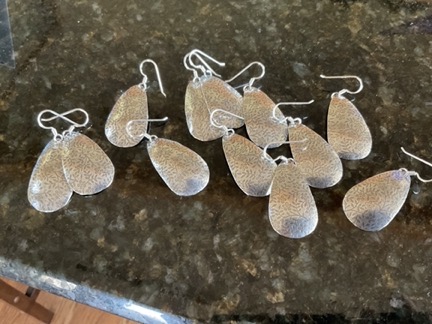
Yesterday, I went down into my jewelry shop and made 6 pairs of earrings out of roughly $55 worth of sterling silver sheet metal and pre-made ear wires. I’ll sell each pair for $39. Sounds like a great deal for me, right? Well, if you read on, you’ll learn more about the actual cost of these earrings.

I tweeted my progress while creating these earrings, using a Twitter thread with photos. I skipped tweeting the first step, which was getting the pattern onto the silver — I don’t buy sheet silver with a pattern already on it (although I do sell it that way) — but got most of the other steps. They make up good documentation for this blog post’s purpose, which is to talk about what actually goes into making something from scratch: materials, tools, skills, and time.

Materials

The materials for this project were pretty basic:

  • 26 gauge sterling silver sheet. I buy the metal I plan to apply a pattern to in 6″ x 2.5″ pieces because that’s the size of most of my texture plates. I learned (the hard way) that you can ruin a texture plate by using it to texture a smaller piece of metal than the plate. Because of a 75% or so increase in the price of silver last year, this small piece of metal cost just over $42.
  • Sterling silver ear wires. I buy these in bulk, but they still cost nearly $1 each. I can save money by making them myself out of 20 gauge half-hard sterling silver wire, but I like the look of the ones I buy and they’re less likely to bend out of shape than the ones I make. I’ve even had one of the galleries I provide inventory to tell me that they prefer manufactured ear wires for the very same reason.
  • Rubber ear nuts. These are tiny pieces of rubber that go onto the end of the ear wire, making them less likely to fall out of your ear (or off the jewerly display card I use when selling). I buy them by the gross and they cost a fraction of a cent each. (I don’t understand why all jewelry makers don’t include them with ear wire earrings. Such a tiny, inexpensive little thing can prevent the loss of earrings.)

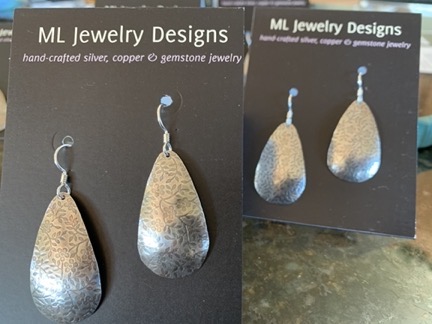
In addition to these materials. I also have the printed cards I use to display and sell the earrings. These cost just pennies apiece and are part of my marketing/selling expenses, but they shouldn’t be overlooked. Ditto for the specially sized, clear plastic zipper bags I put the earrings and cards into when I sell.

Tools and Equipment

It’s the tools and equipment that really add to the cost of the jewelry I make. As an accountant might tell you, these are fixed costs that need to be considered as part of anything you make with them. The more you use a tool or piece of equipment, the less the per-piece cost of that equipment is. An analogy from my day job as a pilot would be something like insurance: if it costs you $15K/year and you fly 100 hours a year, that’s $150/hour; but if you fly only 10 hours, that’s $1500/hour. Ouch.

Going through the steps to create these earrings, I used the following tools and equipment:

  • Rolling mill. This is the device I used to impress the pattern onto the silver. Rolling mills vary in cost. I have a Durston, which is made in the U.K. and isn’t cheap. But mine is small, so it wasn’t too costly. I think I paid around $750 for it.
  • Texture plate. This is a piece of brass with a texture on it. The brass is harder than the silver so when the two pieces of metal are run through the rolling mill together, the texture from the brass is imprinted onto the silver. The texture plates range in price from about $5 for a single-use paper version up to $100 or more for steel versions. My brass plate cost about $10 and will give me about 50 impressions before it’s too flat to make more impressions.
  • Metal shear. Although I didn’t really need it for this project, I used my metal shear to cut off a 1/4″ by 2 1/2″ piece of the textured metal to use as a ring blank. You see, when the metal goes through the rolling mill, it stretches. So even though I cut 1/4″ off one end, I still had 6″ x 2 1/2″ of textured metal to work with. My metal shear, which I use a lot, cost about $250.
  • Shape template. I use shape templates to create earrings and other items in consistent sizes and shapes. The template I used for this project has about 30 shapes/sizes on it and cost $8. It’s made of heavy duty plastic so it’ll last a long time.
  • Fine point Sharpie pen. That’s a tool, too. I used it to trace the shapes onto the metal as close as I could without overlapping. What do they cost? About $3 each?
  • IMG 0028
    Here’s the cutting job in progress.

    Joyce Chen kitchen shears. I have a variety of ways to cut metal sheet — my jeweler’s saw, a pair of French shears — but I used these shears for this project. They’ll cut through any reasonably thin soft metal — and 26 gauge silver is pretty thin and relatively soft. The cost? $21.

  • Flex shaft. After cutting out all those pieces, I needed to smooth their edges. Being the machine person I am, I used my flex shaft, which is basically a Dremel-style tool with the motor at the end of a long shaft and a foot pedal to control the speed. Mine is a EuroTool and cost about $120. But don’t forget to add the motor hangar for it, which cost another $32.
  • Mounted sandpaper cartridge roll. I used a sandpaper roll to do the actual sanding. They cost about $1 each.
  • IMG 0032
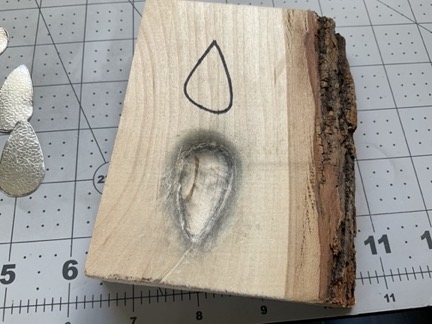
    Here’s my custom dapping block. The other drawn-on shape is for one I no longer use and never actually carved into the wood.

    Custom dapping block. A dapping block makes it possible to put a dome into pieces of metal. But because these earrings aren’t round, they needed a custom dapping block. I made mine from a piece of bass wood that only cost about $2, but I used a variety of Dremel bits to carve it out and I fine-tune it every time I use it. Still, we’ll say $2 for this homemade tool.

  • Nylon hammer. Although my photos on Twitter show me using a dapping punch with the block to put a dome on the metal, I actually used a domed nylon hammer that has always worked a little better for me. Cost: $14.
  • Hole punch. While I could have drilled holes for the ear wires into each piece before doming it using a center punch, flex shaft, and drill bit, I took the easy way with a 1.25mm metal hole punch. Cost: $14.
  • Scrap wire. I used a piece of thin copper wire to attach the earring pieces together for oxidizing them. The cost of this scrap is pennies and not even worth adding into the equation.
  • Using Liver of Sulfur
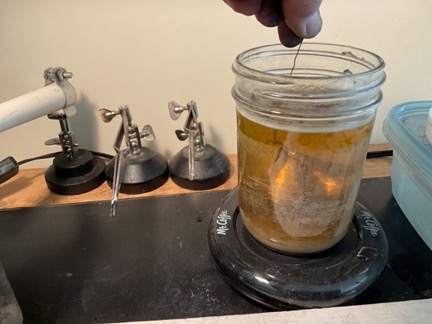
    In this shot, I’m dipping all 12 pieces of the earrings, on a copper wire, into the liver of sulfur. You can see the jar and mug warmer, as well as the side of the container next to it that I use for the baking soda rinse.

    Liver of Sulfur. Liver of sulfur is a chemical that, when dissolved in warm water, can darken copper or silver (but not gold). It’s widely used by jewelers who want an oxidized look on textured metal. The stuff I use costs $18/jar and that’ll last about a year.

  • Mason jar. I use a 1-pint wide mouth mason jar to mix, heat, and store the liver of sulfur. Because I do canning, I always have a bunch of spare jars — although once I use them for chemicals, I can’t wash and reuse them for food. Figure about $2 for this jar with the plastic lid.
  • Cup warmer. I use a coffee mug warmer to keep the liver of sulfur warm while working. The one I use costs $11, but you can sometimes find them cheaper in thift shops.
  • Baking soda. I mix baking soda and water in a glass bowl and use that to neutralize the chemical reaction of the liver of sulfur so the metal stops darkening. It’s the stuff you buy in the supermarket. How much? I don’t know. $3 for a box that’ll last a very long time?
  • Container. Of course, I need a container to put that baking soda and water solution in. I use reusable disposable plastic containers with lids. When I’m done, I cover it up so it doesn’t evaporate. Figure $2 for a container with a lid.
  • Tumbler. There are all kinds of tumblers you can use for jewelry, but I use a basic Lortone 3A 3-lb capacity rock tumbler. I paid about $110.
  • Ceramic tumbling media. This is my secret sauce and I’m not very motivated to provide details, mostly because it saves me a ton of work and provides consistent results every time I use it — which is vital when you need to make multiples that are the same. Let’s just say that it’s ceramic tumbling media that rubs the darkening off the raised part of the pattern. The stuff I use costs $45/bag and that bag will last at least a year. If you want to try it, find one that works for you. (Good luck.)
  • Dawn detergent. I add a drop or two of Dawn to the tumbler with the ceramic media and water. I always use dawn because everyone recommends Dawn. I buy small bottles that last a long time. What does that cost? Let’s say $2.
  • Extra tumbler barrel. Because it’s best to keep stainless steel shot separate from any other tumbling media, I had to buy an extra barrel. Add $36.
  • Stainless steel shot. Steel shot burnishes the finished jewelry. Don’t buy the cheap stuff; it’ll rust. I buy it by the pound for $26; because it doesn’t rust, it should last forever.
  • Burnishing compound. A few drops of burnishing compound in the tumbler with water and the steel shot helps achieve a nice polish. It’s $10 for an 8 oz. bottle that lasts at least a year.
  • Earrings
    I finished the earrings in my home at my breakfast bar while waiting for dinner to cook.

    Chain nose pliers. I use pliers to open the ear wire loops and close them once the earring piece is attached. My preferred brand: Wubbers. They’re not cheap but they’re heavy duty. $26.

  • Paper hole punch. I use a small punch to put holes in the cards that I mount earrings on. Figure about $9.

That’s everything I used directly during the course of this project. It doesn’t include rags or paper towels or the wipes I use to keep my workspace clean after sanding. It doesn’t include any of the furniture in my shop — my homemade jeweler’s bench, the tables where I keep my rolling mill and soldering station (where the liver of sulfur lives), or my adjustable height stool. It doesn’t include lighting and utilities for my shop space. Heck, it doesn’t even include the cost of constructing my shop space, which is an entire 12 x 24 foot room in my garage.

Let’s add these costs up:

ItemAcquisition Cost
Rolling Mill$750
Texture Plate$10
Shape Template$8
Fine Point Sharpie$3
Joyce Chen Shears$21
Flex Shaft$120
Flex Shaft Motor Hangar$32
Sandpaper Roll$1
Dapping Block$2
Nylon Hammer$14
Hole Punch$14
Liver of Sulfur$18
Mason Jar$2
Cup Warmer$11
Baking Soda$3
Container$2
Tumbler$110
Ceramic Media$45
Dawn Detergent$2
Extra Tumbler Barrel$36
Stainless Steel Shot$26
Burnishing Compound$10
Chain Nose Pliers$26
Paper Hole Punch$9
Total$1,275

Add that to the $55 in materials and you come up with $1,330. So if the only thing I ever made was those six pairs of earrings, their cost would be $222/pair.

Yes, that’s absurd. Of course I make more than six pairs of earrings with all this stuff. But how many pairs of earrings do I need to make and sell at $39/pair to cover my investment in tools and equipment?

Think about it.

Skills

And then there are skills, which come with training and experience.

I am not exaggerating when I say that I’ve spent thousands of dollars on jewelry making courses — in-person and online — as well as books and magazines. YouTube videos can only take you so far — what works best is one-on-one time with someone who has actually been doing this for a while.

And practice. How many times did I screw up a piece of metal in my rolling mill? Or cutting it apart? Or oxidizing it? (I’m still smarting from a bad oxidation job on 3 pairs of Keum-boo earrings where I used a new (to me) solution and darkened the gold as well as the silver. Ouch.) Or any of the other steps that went into this project? Practice really does make perfect — or as close to it as a person can get. Practice takes time and burns through materials and supplies. It’s no coincidence that we practice with copper instead of silver or — heaven forbid — gold.

Time

Time is easily quantified for this job since I know when I started and when I finished: 3 hours. That comes out to 30 minutes per pair of earrings. This is why I made stuff like this in batches; it’s a much more efficient use of time.

But how long did it take last time when I didn’t necessarily have everything as well organized? And how long will it take next time, when practice makes me a bit faster?

And shouldn’t I be compensated for my time? Clearly, I wasn’t compensated directly for the time I spent in training or reading up on new techniques or ruining materials because of inexperience or dumb errors. I should, at least, be compensated for the time I spent actually creating salable pieces of jewelry, no?

The Bottom Line

Finished Earrings
Some of the finished products.

Here’s the bottom line: I took 3 hours of my time and used thousands of dollars worth of training, hundreds of hours worth of practice time, and $1,330 worth of materials, tools, and equipment to make 6 pairs of earrings that I’ll sell for $39/pair.

I think buyers are getting quite a deal, don’t you?

Is This the Vaccine at Work?

I go through an afternoon of flu-like symptoms and wonder whether it’s the vaccine actually working to fight COVID-19.

I’m curious.

I got my COVID-19 vaccine about a month ago. It was the Johnson & Johnson one-and-done vaccine that isn’t on the top of most people’s list of choices for getting vaccinated. Its efficacy is supposedly lower than the other two vaccines approved in the US — the two-dose Pfizer and Modera vaccines — and it recently was put on “pause” (and then resumed) when it was tied to blood clots in younger women.

I had a reaction to the vaccine that started about 12 hours after I got it. First, every single muscle in my body — including ones I didn’t even know I had — ached. Some ibuprofen got me through that. Then, for the next 36 hours, I was completely exhausted by mid afternoon. After a total of 48 hours, I was back to normal.

I haven’t had any reactions since.

I still wear my mask when I’m shopping and doing other things around strangers, but I don’t wear one around friends. But this weekend, I was in close quarters, maskless, with friends I know were vaccinated and some of their friends who may not have been. (After writing this, I discovered that they were.) I didn’t think twice about it, but now I’m wondering.

For the past two days, I’ve been completely zonked out again in the afternoon. While it wasn’t bad on Tuesday, it was terrible yesterday. I wasn’t even that active during the day — I went asparagus picking and then shopped for garden plants. When I got home at 3 PM, I was wiped out.

Around 4 PM, I stretched out on my bed to rest and read and wound up falling asleep. I slept on and off while my pups used my bed as a playground. I was so out of it that even them running over my body and making growling noises at each other didn’t snap me out of it.

A phone call at 6 woke me up. I fed my pups, let them out, and lay down again. I slept for another hour and then let my pups back in.

Then I got my pajamas on and stretched out to read again. By 7:30, I was dead asleep. And I slept until nearly 4 AM.

That’s a total of nearly 12 hours of sleep.

In all fairness, I did take an allergy pill yesterday morning at about 7 AM. My nose had been running like a faucet for the past two days, with sneezing and some small amounts of phlegm. The pills are generics and their “best by” date was back in 2017. The bottle says take one per day. I’d expect that if a side effect was sleepiness, it wouldn’t take 9 hours for that side effect to kick in.

This morning, I feel awake but still tired. I’m having a little trouble keeping warm with the heat in the house set to 71°F. I’m achey, but not terribly so — it could just be the aches that are common from non-movement for long periods of time. (If you’re near my age or older, you know what I mean.) My allergies are not bothering me (yet).

I don’t feel sick, if you know what I mean. Just run down and achey. Kind of how I felt after I got my vaccine.

So my question is this: Is it possible that I was exposed to COVID-19 over the weekend and my vaccinated body is fighting it off? How would I be able to find out?

Again, I’m curious.