The Sprained Foot

Here’s how it happened and how it is three weeks later.

I didn’t blog about this when it happened. It may have been embarrassment. Or it may have been because my life got very busy for a while with house guests and day trips and life in general.

It was on Monday, August 5. I’d spent much of the day — the third or fourth day in a row — out at my future homesite in Malaga, clearing out invasive weeds along the driveway and the road in front of my house. It was hot, exhausting work, but I felt good at the end of each day. Like I was working toward a goal. (Am I the only person who feels that way while making progress on a project?)

That particular day, I’d been using a gas-powered hedge trimmer to cut weeds. I’d rented it from Home Depot. The tool did the job, but not as easily as I’d hoped. And it was a bitch to get started. I returned it that afternoon, contemplating the purchase of a chainsaw again.

On the way home — it was probably about 5 PM at the time — I stopped at the supermarket to buy groceries. Because I had so much junk in the truck I did something I very rarely do: I put the 5 or 6 grocery bags in the truck’s bed.

That was my mistake.

When I got home, I discovered that the grocery bags had shifted around in the back of the truck. So I lowered the tailgate and climbed up to gather them together. They were the usual plastic shopping bags and I grasped them by their handles with four in one hand and two in the other. I walked to the back of the truck, stood on the edge of the tailgate and crouched down with my butt about four inches off the tailgate. I put my right hand down on the tailgate and launched my feet off the back of the truck.

Keep in mind that this little jumping maneuver is something I do regularly. The distance to the ground is only about 3 feet. By crouching and launching like that, I minimize the impact of the landing. I do it all the time. I’ve never had a problem.

Except that Monday. As I launched my feet off, one of my feet — maybe my right? — got hung up on the rough surface of the spray-in bed liner. It could have been because I was tired from a full day at work, but it was more likely complacency — not thinking about what I was doing because I had done it so many times before. I didn’t make a clean jump. I realized this as I was falling and tried to recover.

I don’t know exactly how I landed, but I suspect my left foot took most of the impact on an angle. My left knee and the palms of both hands hit the gravel next. The grocery bags crashed all around me.

I immediately thought of the Tito’s vodka and Maker’s Mark bourbon what were in the bags. It would be a real shame to break the bottles of $50 worth of liquor.

But pain interrupted those thoughts. Lots of pain. I was hurting badly. I rolled over on my back and began taking inventory on body parts. One by one they checked in OK. Except my left foot. That was just registering pain.

I sat up and gathered the bags together. Neither bottle had broken. Whew!

I sat for a moment more. My left knee was bleeding but the palms of my hands were fine. That could have been worse, I thought to myself.

It was. When I tried to stand up, I realized I couldn’t put any weight on my left foot.

Oddly enough, I didn’t think much of the problem at first. After all, we’ve all gotten hurt in silly little accidents and after the initial shock wears off, everything works fine. I figured that my foot or ankle — whatever was sending those pain messages to my brain — was just whining a bit longer than usual.

In the meantime, it was hot and I was thirsty. I managed to get to my feet and sort of hop over to my RV. My porch was a bit of a challenge and I honestly don’t remember how I got up the stairs. I put down the bags of groceries and poured myself a glass of lemonade with lots of ice. I drank it all and refilled it.

My ankle was still sending those pain messages. What was up with that?

I sat down on the steps that lead up to my bedroom and pulled off my shoe. My foot seemed to explode into a swollen mass. I couldn’t move my toes.

This was not good. There was a chance, I realized, that I may have actually broken something.

I pulled out my phone and called my friend Kathryn, who lives in the orchard.

“What are you doing?” I asked once the greetings were over.

“Nothing much,” she replied. “Just hanging around, enjoying the weather.”

“Could you do me a favor?” I asked.

“Sure. What do you need?”

“Could you drive me to the hospital? I think I might have broken my ankle.”

The tone of the conversation changed immediately to once of concern and urgency. A few minutes later, Kathryn and her husband Donn were out in front of my trailer with their truck. I used a stepladder as a cane to meet them on the driveway and managed to climb aboard.

They took me to a local clinic, which they thought would be faster than a hospital. Donn fetched a wheelchair and wheeled me in. I did the paperwork at the desk. And then they waited 90 minutes with me. (I have such great friends.) Kathryn came into the examining room with me to keep me company. I was x-rayed, poked, and prodded. It was pretty obvious that the problem was in my foot — not my ankle. The verdict came from the nurse practitioner who’d been assigned to me.

“It’s not broken. It’s a sprain.”

“That’s good,” I said, relieved.

“No, it’s not,” she corrected me. “For people over 40, sprains are usually worse than breaks. They take longer to heal.”

She wrapped me up with an ace bandage, gave me a prescription for pain meds, and told me where to find crutches at 7:30 on a Monday evening. She also gave me a sheet with the standard RICE advice.

My friends took me to Fred Meyer. Kathryn went in and returned with a set of crutches. Then we went to Olive Garden for dinner (their choice). I had a terrible drink and an excellent meal, which I only ate half of. By the time I got home, it was after 9 PM. I was glad I’d remembered to put away the yogurt before leaving.

Sore Foot
The day after my mishap was spent in bed with my foot elevated. But it swelled up anyway.

In the morning, I was amazed by how bad my foot looked. I took a picture and put it on Facebook. I spent much of the day in bed, trying hard to keep my foot elevated above the level of my heart.

Do you know how hard it is for me to sit still when I have things to do? It was a miserable day.

The next day, I had things to do and I wasn’t going to let my swollen foot stop me. So I wrapped it up grabbed the crutches, and got on with my life.

Of course, during this time I was still on contract for cherry drying. I had some concern over whether I’d be physically able to fly. After all, flying a helicopter requires four limbs, preferably healthy ones. But I put those concerns to rest on Wednesday when I fired up my helicopter and flew it down to Wenatchee for some scheduled maintenance. Fortunately, my helicopter doesn’t require much pressure on the pedals.

I admit I didn’t follow the RICE advice to the letter. Although I slept — or tried to sleep — with my foot elevated on two pillows, I didn’t ice it as often as I was supposed to and I certainly didn’t rest it very much. I was on two crutches for just two days and then just one crutch for a week. After the first week or so, I realized that it looked almost normal when I got out of bed but swelled up to epic proportions within a hour of being up and around. The swelling included my foot and ankle — indeed, I had a chankle. I ditched the crutches entirely about 10 days after my mishap. That’s when I flew my helicopter to Seattle to pick up a friend and did the tourist thing around Pike Place Market and the Space Needle. It was pretty swollen that night.

I’ve turned down five invitations from friends to go hiking. You have no idea how frustrating that is.

But I’ve also been out on my boat three times. Not much walking involved there. Once, while fishing, I sat on the swimming platform and dangled my feet into the Wenatchee River. The nice, cool water was soothing.

I’m now starting week 4 of healing. I’ve found a good compromise. When I prepare to go out for the day, I wrap my foot firmly in the ace bandage, put a sock over it, and put on my good walking shoes — ironically, the same ones I was wearing when the mishap occurred. The shoe gives my foot the support it needs; it only hurts when I step on uneven surfaces. Because the flexing motion of walking also causes pain, I have a pronounced limp when I try to walk quickly. But around my home, it’s not that bad. Yesterday, when I unwrapped it, it didn’t even look very swollen.

If I behave myself and stay off the hiking trails, I’m pretty sure I’ll be 100% healed by the end of September. That’s a long time, but I just have to deal with it.

As for jumping off the back of my truck — well, I think this little incident has reminded me that I’m not 22 anymore. We’ll see if I remember this lesson in the months and years to come.

Temporary Power: Cleaning the Box

Prepping my hand-me-down temporary power box.

As I wrote yesterday, I decided to do the installation of the temporary power at my building site in Malaga. This would not only teach me more about how electrical wiring is done, but it would save me about $300.

The decision was made easy, in part, by a friend’s offer of his old temporary power pole which was about 80% wired for my needs. He’d built a home in Wenatchee Heights and had the permanent power turned on last summer. He didn’t need the box and offered it to me in trade for a few trees he wanted to plant on his property. He also offered to supervise my wiring of the box and took me shopping at Home Depot and an electrical supply store to get the few parts I needed to make it work for my purposes.

Yesterday, I went to examine the pole and electric panel, which he’d dug out and laid on the ground. I tried to move it but couldn’t — the post is an 8-foot long 8×8 piece of lumber further weighted down with the electrical box and some heavy wires and conduit. (I should point out that if I had to move it, I know I could — probably by fastening it to my Jeep’s bumper and dragging it to a new position. And when it comes time to bring it to my future home, I know my friend will help me get it in my truck and wrestle it into place in the 36″ deep hole I dug on Saturday.) But even in its current location, I could open it up and check it out.

Electric Box Before
The electrical box was full of twigs, left behind by an industrious bird.

Sometime during the past few years, a bird had built a nest in the box. The meter side was absolutely full of twigs, feathers, and dirt. It would all need to be cleaned out before I could do any wiring. So I donned a pair of latex gloves and got to work.

While a lot of the twigs were easy to get to and remove, others weren’t. I had to get a tool — a flat-head screwdriver, in this case — to partially disassemble the box where the meter would go so I could reach the twigs. I also used a needle-nose pliers to reach and grab where my fingers wouldn’t.

I got a phone call from a friend while I was working and took a break. While we were chatting — about, among other things, the latest crazy talk from Arizona, if you can believe that — I went into my friend’s house to track down a ShopVac. I have one, but it’s in storage, and I know my little battery-powered DustBuster wouldn’t be able to do the job. I found a big ShopVac with an extension cord and carried down to the back door.

Power Box After
This is as clean as this box is going to be.

When my conversation was over, I plugged the vacuum in and ran the cord out to the backyard where the power pole lay open. Five minutes later the electrical box was as clean as it would get.

I reattached the panel over the area where the meter would go and closed the box back up. Then I returned the ShopVac to its place in the house and put away all my tools.

Taking care of the box must have put me in the mood to clean because I spent the rest of the afternoon clearing out the miscellaneous stuff that had accumulated under the helicopter’s seats, washing the helicopter bubble cover, and cleaning out the RV basement.

(Now if only I could get through this stack of paperwork that never seems to go away.)

My friend returns later today. With luck, we’ll get that electrical box wired this afternoon — and maybe even bring it to my future home and position it in its post hole. There’s a good chance I’ll have electricity there by the end of the week.

The Little Dig

Hard work, but not a difficult task.

This past week, I made a radical decision: I decided to install my own temporary power box at my future homesite.

Chelan County Electric GuideTemporary power is what’s commonly installed at a construction site to provide power to the builders for their tools. It consists of a 4×4 post with a circuit box, meter, and outlets. Chelan County is very specific about how the box should be installed. It’s all detailed in their 74-page book, Residential Electrical Services Connection and General Information,” which is available as a PDF from the Chelan County PUD website.
I’d spoken to two electricians about doing the work. One wanted $500, which included “renting” me the post for six months. He never did say what it would cost if I still needed it after that. The other promised to come look at the site but never showed. I called him to follow up and left a message. But by the time he called back, I’d already made my decision.

A friend of mine had a power post he no longer needed. All I needed to do was buy some more outlets and wire and some conduit and a grounding rod. He went with me to Home Depot and an electrical supply place. I spent $120 for the items I needed, along with a electrical how-to book.

The biggest challenge, he told me, would be to get the hole dug and drive in the copper grounding rod. The rod was about seven feet long. It had to be driven all the way into the ground. He said that driving in that damn rod would be the hardest part of all.

I went out to the property the next day. I wanted to scout out where I’d put the pole. I also wanted to measure the distance from the pole to where I planned to park my RV during construction. I was hoping to run 30 amp power to the RV. I needed 75 feet of cable. I think I had 50. I began rethinking the parking space.

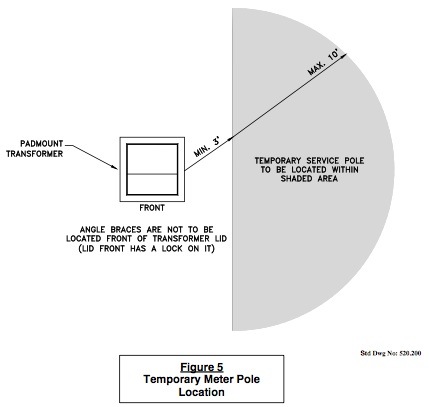
Pole PlacementYou see, the power pole has to be 3 to 10 feet from the transformer, which is already on the property. So I’m limited as to where I can put the pole. Fortunately, the transformer and pole location will be quite close to the building site. That’s good because the building must be within 100 feet of the transformer. So I’m all set for that.
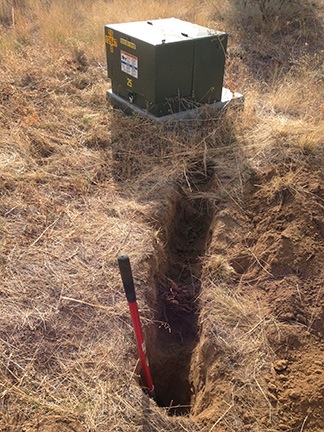
While I was there, I took a shovel and thrust it into the dirt, expecting to hit rocks. After all, I’d had a hell of a time driving the T-post for my name/address sign three weeks before. But the shovel went in smoothly. I dumped a shovelful of dirt to the side. Easy. The next one wouldn’t be that easy, though.

I dug again. It was.

I got out my tape measure and measured about 7 feet from the transformer, in a line almost abeam my city water spigot. And I dug.

I dug for a good 15 minutes, always expecting to hit rock. I didn’t encounter a single stone.

Start of my Hole
I got pretty far the first day, just looking for rocks I never found.

By that time, I had a good trench going but I was sweating hard. It was afternoon on a sunny day. I wasn’t dressed for digging. My foot, which I’d sprained more than two weeks before, ached. I’d have to come back earlier in the day, before it got warm out.

That day was yesterday. I showed up at 8 AM. After a little weed whacking to clear the area, I got to it.

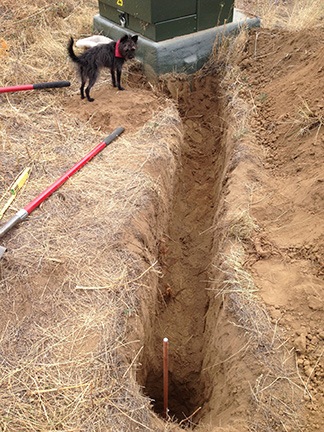
The trench needed to be 24 inches deep. The hole for the pole needed to be 36 inches deep. Unless you’ve actually dug a trench and hole that deep you have no idea how deep it really is. It’s deep.

But there were no rocks. The dirt came up easily, shovel after shovel. I had no trouble getting down to 20 inches on the trench and 30 on the hole. Then it started to get a little harder — the dirt was packed solid.

I drove down the street to where my friend Kathy lives. She’s an avid gardener. She was outside with her husband, talking about plans to add a new tasting room to their winery. I asked her if she had a “digging stick.” I described it as a long, pointed pole that was heavy. I had one back in Wickenburg but had left it behind. No problem. Kathy had one. And a post hole digger. We loaded both into my truck and I drove back.

I pounded with the digging stick to loosen up the soil. The post hole digger worked great to pull the dirt out of the trench and hole — after all, they weren’t much wider than my shovel — but was too heavy for me to work over and over. I went back to the shovel.

By 11 AM, after several breaks, I was done.

But there was one more thing: the copper rod.

I brought it over to the hole and lowered down onto one side. Then I got the post driver I’d bought to put in my name/address sign and put it over the rod. I rammed it down hard. The hit made a gawdawful clanging sound, but the rod must have gone in 6 inches.

I put on a pair of earplugs and got back to it. Soon I was kneeling beside the hole, banging away with the fence post driver. When the rod was about 4 inches out of the ground, I stopped. I could always finish it off later.

The Finished TrenchHere’s the finished trench and hole, approved by my tiny inspector.
I stopped and took a photo. When I put it on Facebook, my friends joked about using it to bury my wasband. We pretty much agreed that the ditch was so narrow he’d have to go in sideways. I told them I’d rather use it for its intended purpose since it was unlikely that I’d be able to cram his mommy in there with him.

On the way home, I stopped to chat with my next door neighbors whose home, the subject of my wasband’s investigation back in April, is nearly done. (I still giggle about that every time I drive by and see their RV parked there.) They were cleaning up after the builders — their way of saving some money. They’d loaded up their little flatbed trailer (another giggle) with scrap wood while their three sons played in the dirt. We exchanged phone numbers and talked about road maintenance.

Then I continued home, stopping just long enough to drop off the digging tools I’d borrowed.

Digging had been hard work, but it was surprisingly easy. As someone on Facebook mentioned, the lack of rocks was like some kind of good omen — it was meant to be. Still, you can bet I took plenty of ibuprofen last night.

Bees: The Drone Frames Really Do Work

A component of my integrated pest management system.

I started my beekeeping hobby in June 2013 and have been blogging about it periodically. If you’re interested in reading the other posts in this series, follow the Adventures in Beekeeping tag. Keep in mind that the most recent posts always appear first on this blog.

A while back, I installed a so-called “drone frame” in two of my beehives. A drone frame is a special frame with large cells embossed on a plastic foundation. The bees supposedly see this frame, realize that the big cells will be perfect for drones (which are larger than workers), build out the cells for drones. The queen lays drone eggs in each cell and the workers feed and cap them like any other drone cell. Varroa mites, which prefer drone brood, enter the cells before capping and do their parasitic mite thing — including laying eggs — on the drone larvae. The drones hatch and carry more mites into the hive to mix with the other brood.

Varroa mites are a bad thing for beehives and supposedly every beehive in North America has them. Not only does their blood sucking weaken the bees and possibly cause deformities in newly hatched bees, but they have been tied to colony collapse disorder (CCD), which has been getting a lot of press lately because of it’s potential to do serious harm to the food chain humans rely on for survival.

I checked the drone frame each time I opened my main hive. I try to inspect my hives every 10-14 days. The first time I looked there was no activity. The bees didn’t seem interested in the frame. The second time I looked, the bees had begun to draw out comb. A good sign. The next time I looked, the frame had been partially filled with capped and uncapped honey as well as a good number of capped drone cells.

That was August 11. I was unprepared. I should have brought along a second drone frame so I could have swapped them out. The idea with the drone frames is to remove the frame once it contains capped drone cells and to put it in the freezer for a few days. This kills the drone larvae as well as the mites. (Drones don’t do anything except fertilize the queens — kind of like some men I know — and my queens were already fertilized.) After a while, you put the frame back in the hive, the workers see the dead bees and clean them out, and the queen lays new eggs.

I went back with an empty drone frame only five days later. I was late. The drones had already begun to hatch. In fact, more than half of them were gone. Others were hatching as I watched.

Drone Frame
Here’s the drone frame as it looked today after a week in the freezer. You can see the capped cells where drones were emerging. The dark empty cells are where the other drones hatched from. There’s honey along the top of the frame. The reverse side looks pretty much the same.

I have to admit that it made me sad to do what I had to do.

I brushed the workers and newly hatched drones off the drone frame and back into the hive. Then I put the drone frame aside and replaced it with a brand new one. I have four of them and three hives so if I time everything right, I’ll only have one in the freezer at any time; I’ll just keep circulating the freezer one to replace the one I pull in a hive.

I put the drone frame in the back of my truck and went on with my day. I secretly hoped the drones would all hatch and fly away. I didn’t want to kill them.

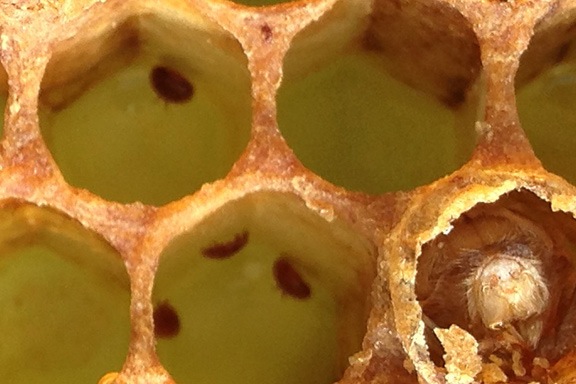
But the next day, when I inspected the frame, I found that many of the drones had half emerged and died there. I also saw the mites — they were quite easy to spot with my glasses on. There were a lot of them.

Varroa Mites on a Drone Frame
Here’s a closeup of some of the cells in the drone frame. Although my camera focused on the outer edges of the cells, you can clearly see the dead mites. The bottom-right cell has a dead drone bee that died while emerging from its cell. If I’d waited just one more day, they all would have hatched.

I put the frame in a plastic bag and stowed it in my landlord’s freezer. (I wonder if he noticed.)

I spoke to another beekeeper at a recent meeting of the North Central Washington Beekeepers Association. I admitted how I’d screwed up by pulling the drone frame late. He made me feel a little better when he admitted that he’d done the same thing.

This afternoon I pulled the drone frame out to take some photos. Tomorrow, I’ll bring it to my hives. I’ll check the second hive with a drone frame to see if there’s any capped drone cells in it. If there’s any, I’ll pull it and replace it with this one. Otherwise, I’ll put this one in the one hive that doesn’t yet have a drone frame at all.

I suspect that my mite problem is worse that it should be. I also ordered a miticide from the bee supply place. I need to get the mites under control before winter sets in. My friend Don blames the loss of his hive last winter on mites. I’d like to beat the odds of a 50% winter survival rate here in Central Washington and have all three hives make it through the winter.

Wish me luck!

Bees: Mid-August Update

I thought I’d take a moment to bring readers up-to-date on my bees and their hives.

I started my beekeeping hobby in June 2013 and have been blogging about it periodically. If you’re interested in reading the other posts in this series, follow the Adventures in Beekeeping tag. Keep in mind that the most recent posts always appear first on this blog.

I haven’t blogged about my bees in almost a month. That’s because there hasn’t been anything terribly interesting happening with them. But that doesn’t mean there isn’t anything to report.

Hive Move

I have a total of three hives. Two of them were with me where I’m camped out along the side of Squilchuck Canyon in Wenatchee Heights. The third (which was really my first) was at a fellow beekeeper’s house in Wenatchee.

The one in Wenatchee was doing great. So great that they filled seven frames of a deep hive box with capped honey. I extracted honey from six of those frames in July and got a total of about 2-1/2 gallons of honey. I replaced that deep hive box with a medium box and 10 new frames for the bees to continue making honey.

I used the deep hive box that had been on that productive hive as a home for the new hive I’d created a few days before via a hive split. The bees had been living in a nuc box until I could get a deep hive body for them. I set them up in Wenatchee Heights beside the hive I’d created by catching a swarm earlier in the season. I divided the extracted frames and partially filled frames between those two hives, removing any empty frames I had. The bees, I knew, would clean the beeswax cells of those frames and start using them for brood or honey storage. At least that was the idea.

As I discovered on two subsequent hive inspections, however, the bees weren’t producing much honey at all. They cleaned out those sticky frames very quickly, but didn’t refill the cells. One look around the area made it pretty clear why: there simply weren’t enough flowering plants to give them the food source they needed. Even though I was feeding them regularly with a 1:1 sugar water solution, they just weren’t making a noticeable amount of honey.

My beekeeping friend, Jim, confirmed this when he and his wife came over for dinner one night. He suggested that I move the hives down to his place with my other one. He had lots of clover in his grass and there were plenty of gardens in the area. A much better source of food.

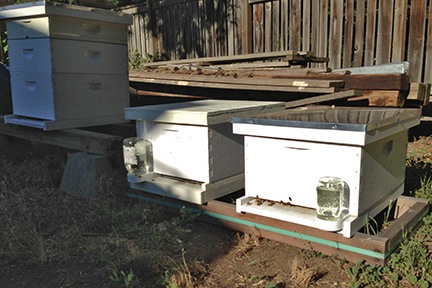
My Three Hives
My beehives are currently in a friend’s backyard.

So one late July evening, after the bees had gone in for the night, I stuffed rags in the hive entrances to lock them in and used ratchet tie-down straps to secure the bottoms and tops to the two boxes. In the morning, I loaded them onto my pickup truck and drove them down to Jim’s place. I set up some scrap wood to form a platform and positioned the two hives side by side on it. Then I removed the rags, added sugar water to two feeders, and left them.

At this point, all three of my beehives are in Jim’s backyard in Wenatchee.

I have to admit that I’m a bit worried about how they’ll fare when I move them to my future home in Malaga. Although the property is full of wildflowers in the spring and early summer, in late summer it’s about the same as Wenatchee Heights. I suspect that I’ll be feeding my bees quite a bit until my gardens are established.

The Main Hive

I’ll always consider my first hive my “main hive” simply because it’s the healthiest and most active. But I noticed a definite decline in honey production since extracting honey in July and replacing brood frames in the bottom hive body with empty frames when I made my hive split.

Indeed, the bees have yet to produce any comb or store any honey in the medium box that’s now their second level. And it’s been about three weeks.

Yesterday I did an exhaustive hive inspection. Although I didn’t see the queen, I did see fresh brood. And I was very pleased to see that they had begun putting brood in the drone frame. I could kick myself — I should have brought along a fresh drone frame to replace it with. I’ll have to go back sometime this week to do that; the idea is to freeze the frames with drone brood in them as part of a varroa mite prevention strategy. Of course, the frame won’t fit into my RV’s freezer. But there is a freezer in my “landlord’s” garage; I’ll ask if I can store it there.

I removed the queen excluder and Ross Rounds box from that hive to store them for the winter. There’s no way they’ll fill the Ross Rounds before autumn comes. At this point, I doubt they’ll fill the medium frame.

The Hive Split Hive

I blogged about my risky hive split back in July. The way I did the split was admittedly haphazard. I pulled brood frames that included swarm cells out of my main hive and put them in a nuc box with all the bees that were on them. Then I moved them away from the main hive with hopes that a swarm cell would hatch into a queen and the hive would continue. I also hoped that the queen was not among the bees I moved.

I was certain I had failed. The hive was not very active and didn’t seem to be growing. It certainly wasn’t producing much (if any) honey, as I reported above. Every time I inspected it, I’d look hard for a queen or eggs in cells. I did see developing and capped brood but never saw anything fresher.

But in yesterday’s hive inspection, I did something I never did before: I wore my reading glasses. Yes, I’m of “that age” when glasses are necessary to bring tiny things into focus. And what’s tinier than a bee egg?

Surprise, surprise! Not only did I see freshly hatched eggs, but I also spotted a queen. My risky hive split had been a success!

Now if only they’d start storing honey for the winter.

The Swarm Hive

I thought the swarm hive might have stored enough honey for me to add a medium hive body with frames to it. I even brought the hive body with me and unboxed it prior to making my inspection. But the bees simply aren’t working hard enough. There are plenty of empty areas in the frames in their deep hive body. Adding another box on top might coax them into storing honey in the top box before they’d filled the bottom one. I needed to wait.

I also checked the drone frame I’d put on that box. They’re just starting to build out comb. So I’m not very sure how effective the drone frames are for mite control. It seems that the bees are slow to accept them.

Prepping for the Winter

I know it’s only August and the summer’s hottest days are barely behind us. But I do need to plan ahead for the winter. That means ensuring that the bees store up enough honey to feed themselves during the coldest months. This will be especially important since I plan to spend much of the winter traveling and won’t be around to feed them.

With luck, however, I’ll find a good, sheltered spot for them on my new property. That’s one of the chores I face in the months ahead.