100 Coffee Filters

Tracking house-sitting time with cups of coffee.

As I blogged a while back, I had every intention of spending the winter in my RV on my property in Malaga. The winterization worked well and I had no trouble with water, electric, or sewer hookups. I had enough heat to keep me warm night and day. And I had all the conveniences of home — the same home I’d been living in full-time since May and every summer since 2010.

The big drawback was the cramped space. Let’s face it, the mobile mansion might be big for a 5th wheel RV, but it’s not big for a full-time living space. And with winter weather outside — often at freezing temperatures — there was no outdoor living space to complement it.

Still, I’m not home very much — I have a pretty active work and social life — and I was prepared to deal with it. After all, the winter wasn’t that long.

I went to Seattle on a Sunday in mid-December. I had some chores to take care of — new battery for my phone, shopping for cross-country skis, hiking with a meetup group — and I’d already decided that I’d make at least one trip into Seattle every month, just to insert a dose of city amenities. When I got home that evening, there was a note on my door. It was from a man I’d never met — we’ll call him Joe to preserve his privacy — who happened to be friends with one of my neighbors. “Don says you’re going to freeze,” the note said, referring to my neighbor. It then ended with an invitation to spend the winter in his house since he was going away to (ironically) Arizona. He’d be gone until February month-end.

I thought about if for three days before calling him. Then I said that I appreciated the offer but thought I’d be okay. Still, maybe we could meet in case I needed a Plan B?

Before meeting, I talked to two people I thought might know him. They both had nice things to say about him. He’d lost his wife in March and was working his way though that. They both told me that he lived in a nice house.

In the meantime, the weather forecast changed. It had been in the 40s every day and I’d been able to get work done outside on the path I was building and in my shed. For some reason, I thought it would stay like that. But no — it was going to get colder and those midday jaunts outside would soon end — at least until the snow came and I could take the skis or snowshoes out with friends.

I met Joe and told him I’d reconsidered. If the offer was still open then yes, I’d love to take advantage of it. He showed me around his wonderful three-bedroom home just two and a half miles from my place. Situated on a shelf — just like my lot two levels up the mountain — it had a wrap-around porch and nearly the same view I had of the Wenatchee Valley. Furnished with antiques, it had a few modern conveniences I missed: a dishwasher, washer, dryer, and satellite television. There was plenty of room and plenty of privacy. There was even a garage and space in a covered carport to park my Jeep and truck.

It was more than I could possibly ask for. And all he wanted in return for letting me use the place was for me to pay the utility bills while I was there, keep the place clean, and keep an eye on things.

Joe, in the meantime, was heading south with his trailer and a friend. They planned to leave on December 2. I was welcome to move in any time, but I honestly felt a little weird moving in before he left. That would make me (and Penny) a house guest instead of a house sitter. So I held off, prepping for the move back in the mobile mansion.

At November month-end, the forecast warned about bad weather on December 1 and 2. Joe’s friend, who was coming down from Canada, came early. They packed up and pulled out on November 30.

I was supposed to do shuttle flights between two wineries — Martin Scott in East Wenatchee and Malaga Springs in Malaga — on November 30, which was a Saturday. But low visibility and some freezing fog made that a dumb idea. With my afternoon suddenly open, I decided to start my move that day.

I made a few trips in my truck, bringing along the bare necessities like clothes and food from my fridge and cabinets. I wasn’t sure what I’d need and, at first, I also brought along linens and towels and my electric blanket. I wound up bringing all these things back to my RV. I wanted to keep things simple so it would be easy to move out at the end of my stay.

I went out that evening with some friends and returned to my new (temporary) home around nine. I’d already picked one of the guest rooms. I put Penny’s bed on my bed, atop the comforter I’d brought along, and and climbed between the covers. I turned off the light and lay on my side, facing out one of the room’s two big windows, looking out at the lights of Malaga, Wenatchee, and East Wenatchee. My new home would have windows just as big. I felt as if I were getting a preview of what was to come.

Coffee
Coffee, coffee brewer, filters. What else do I need?

The next morning, I made coffee, just as I did every morning wherever I lived. I’d brought along my little one cup coffee brewer and a brand new pack of #2 cone coffee filters. I opened the pack of filters and brewed some coffee. I let Penny out and she did her business somewhere out in the yard, which she’d already explored the previous day. When she came back in, I fed her — I’d also brought along her placemat, dishes, and food. It was life as usual for the two of us — just in a different place.

But we’re used to that. For the past 18 months, we’ve been sort of gypsies. We lived in at least 20 different places, including various homes and hotel rooms. Even the RV had been parked in six different places in three different states. Penny and I adapted as necessary, settling into each of our temporary homes with ease. I loved the variety our gypsy lifestyle offered us and Penny didn’t seem to mind one bit. I think she’s come to expect it.

I spent much of Sunday morning prepping the RV for winter vacancy. That meant blowing out the water lines, putting antifreeze down the drains, and disconnecting the power for the heat tape on the water line. And packing up and moving a few more things. The weather was still iffy, with low clouds and mist. I had a gig flying Santa into Pybus Public Market later in the day and, for a while, wasn’t sure if I’d be able to do it. But by 12:30, I decided to give it a try and headed out to take care of it, leaving Penny behind for the first time, alone in Joe’s house.

After the flight, I met up with some friends at a wine tasting room and we wound up going to dinner. I didn’t get home until after 9. Penny was excited to see me. I checked the house out thoroughly to make sure she hadn’t had any “accidents” while I was gone. All was okay.

By Monday morning, life had already settled into a routine. I let Penny out, made coffee, let Penny in, and fed her. I caught up with email and Facebook while having breakfast at the kitchen table, watching the valley light up as the sun rose. (The view really is magnificent.) I showered and dressed. I already felt at home.

I ran out to do some errands that included dropping off my Jeep for service. It had been leaking from the transfer case for about a year and I needed to get it fixed. After all, it would eventually run out of whatever was leaking. But what really prompted me to get it taken care of was that I wanted to park it in Joe’s garage and I didn’t want it leaking in there.

I’d arranged for a neighbor to pick me up on her way home from errands in town and I had time to kill. After dropping off the Jeep, I had another breakfast in town — Sassy’s Dinner makes the best breakfast! — and then walked to Caffé Mela for a latte and to update the software on my iPad. On the way, I noticed that there was fresh snow on the hills north of town. Then I wandered to a used furniture store to browse for a dining table and chairs — the only thing I needed to furnish my new home when it will be built next year. My neighbor and her son picked me up and we drove up to where the mobile mansion and my truck were parked. I was surprised to see fresh snow on the ground — it had snowed during the three hours I was gone.

I decided that I didn’t trust my RV winterization. So I set up a heater in the basement and inside the RV. Power was cheap enough that the two heaters would be cost-effective insurance. I also had the added benefit of having the place kept warmer than freezing if I had to come back and fetch anything I’d left behind. I still had one more trip to make — to get my computer, printer, and camera gear — and then I’d close up the slides. That would make a smaller place for the inside heater to keep warm and minimize the amount of roof space exposed to the snow.

I should mention here that my hangar is large enough for me to park the RV in it, too. But it’s a pain in the ass to move and I did an excellent job parking it right where it is. I’ll admit it — I’m too lazy to move it and then move it back in February. (There’s also the very real possibility that snow on the ground would make it impossible to move in February.) And because of that, the mobile mansion will spend its very first winter outdoors.
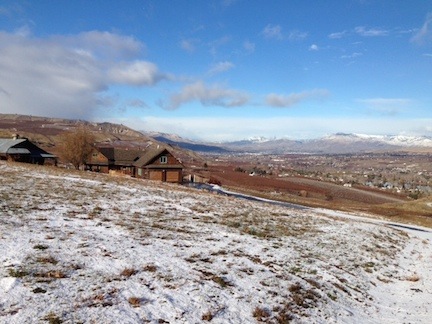
Joe Miller Road
Joe’s place is truly wonderful.

When I got back to Joe’s place, I stopped at the end of the driveway to snap a photo with the dusting of snow all around and the valley off in the distance. It really is a beautiful place and I know I’m very fortunate to be here.

More errands yesterday afternoon, including a quick visit to where my helicopter is parked inside Pybus Market. Then home to Penny and dinner. I set up my Christmas tree for the first time in three years. We even watched a DVD.

This morning, I got right into my routine.

As I pulled a coffee filter out of the package, I consulted the label to see how many were in there. 100 coffee filters. I thought about my stay at Joe’s house. Three months. Pretty darn close to 100 days. I realized that I could see at a glance how much time was left of my stay just by looking at that package of coffee filters.

It’s still very full.

Helicopters 101: Hover Charts

What the hover charts mean, how to read them, and which one to use.

Articles in the Helicopters 101 series:
Flight Planning
CG
Weight
Hover Charts
Ground School

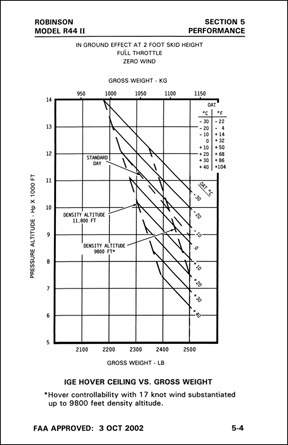
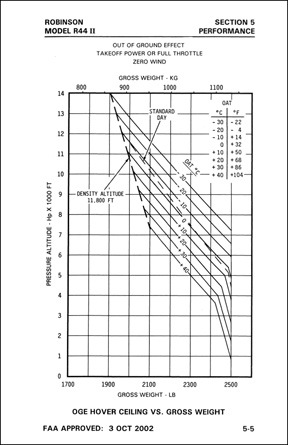
The “Performance” section of a helicopter’s Pilot Operating Handbook (POH) includes two charts related to hover power: IGE Hover Ceiling vs. Gross Weight and OGE Hover Ceiling vs. Gross Weight. (The exact names of these charts may differ by helicopter manual; these are the names in the Robinson R44 Raven II manual I have handy.) These are perhaps the most important charts in the book — they help you understand the amount of power a helicopter will have under specific operating conditions.

What the Charts Mean

The hover charts enable you to plot your operating conditions to see whether performance is possible. The operating conditions include altitude, gross weight, and temperature — all of which you should be familiar with prior to flight time. You should consult the charts before every flight using the information that applies for that flight.

There are two charts and they work much the same way, although they do provide different data:

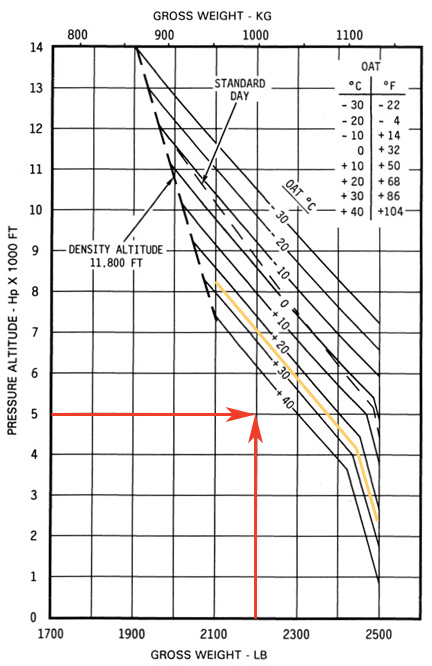
  • The IGE Hover Chart (below, left) indicates expected performance in a ground effect hover. A note near the chart should get more specific than that. In the example here, the chart is for a 2 foot skid height with full throttle and zero wind.
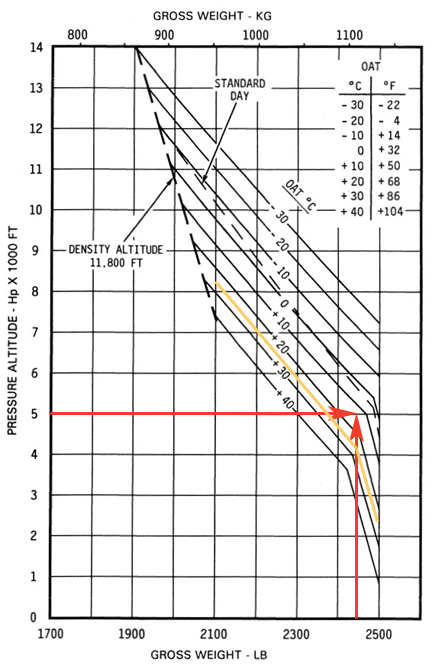
  • The OGE Hover Chart (below, right) indicates expected performance in an out of ground effect hover. Again, a note gets more specific. In this example, the chart is for takeoff power or full throttle with zero wind.

Generally speaking, the IGE chart is for hover operations very close to the ground while the OGE chart is for all other hover operations.

I’ve provided these two charts side by side here, but you can zoom into either one in separate browser window or tab by clicking it.

IGE Hover, R44 II OGE Hover, R44 II

If you fly a different helicopter, you might want to pull out the charts for it and consult them while reading this. No sense in learning about my helicopter if your helicopter’s charts are handy.

How to Use the Charts

In order to use the charts, you need three pieces of information:

  • Altitude of where you’ll be operating. This should be the pressure altitude, but in most instances the elevation above sea level will be close enough.
  • Aircraft weight. This is the weight of the aircraft at the time of the operation.
  • Temperature. This builds density altitude into the chart so you don’t have to calculate it.

The best way to explain how to read the charts is to provide a few examples.

IGE Hover Chart

Suppose your local airport is at 2500 feet MSL. It’s a pretty warm day and forecast for flight time is 35°C. You’ve done your weight and balance and you know that with you (the pilot), fuel, two passengers, and some added equipment, your weight at takeoff will be 2300 pounds. You want to make sure you have enough performance to do a regular takeoff from a hover, so you consult the IGE Hover Chart. The first thing you notice is that the chart starts at 5,000 feet. Since your airport is below that level, you’re done; the chart only addresses higher elevations so you’re good to go.

IGE Landing Example 1
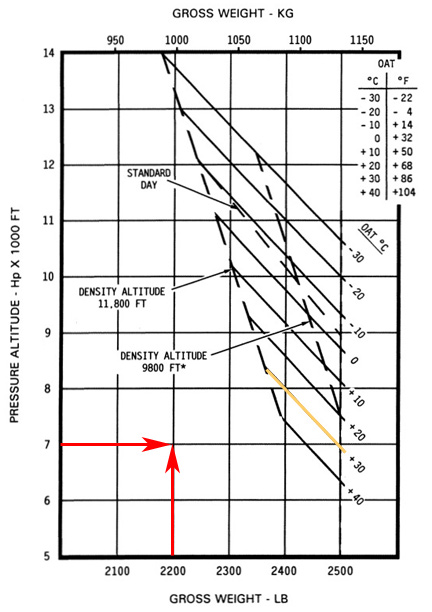
Plotting the altitude and the weight in this example keeps you below and to the left of the temperature line, so you’re okay in these conditions.

Now suppose you’re flying to Flagstaff, AZ, which sits at 7014 feet MSL. It’ll take you an hour to get there and the forecasted temperature there is 30°C for your arrival time. You want to make sure you have enough performance to do a regular landing to a hover and then to the ground, so you consult the IGE Hover Chart. If you burn 16 gallons per hour and each gallon weighs 6 pounds, you’re now nearly 100 pounds lighter or 2200 pounds. You plot the point where the altitude meets the weight. Because you’re still below and to the left of the 30°C temperature line (highlighted in yellow here), you have enough performance. If you follow the 7000 foot line to the 30°C line, you can see that you’d even have enough performance at that temperature and altitude if you were just about max gross weight (2500 pounds).

IGE Takeoff Example 2
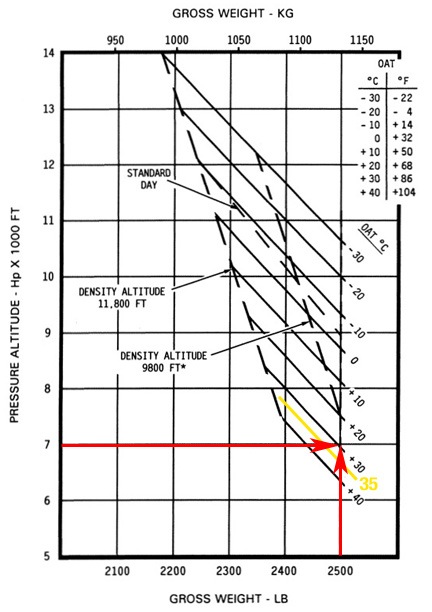
In this example you have a problem: the plotted point falls above the temperature line. This means you might not have enough performance to hover in ground effect under these conditions.

Now let’s say that when you get to Flagstaff, you’re picking up another passenger and he’s a big guy. You also have to put on some fuel — enough for you to be at max gross weight for takeoff. In addition, takeoff will be at 3 PM when the forecasted temperature is 35°C. Plotting that indicates a problem — the plotted intersection of altitude and weight is above where the 35°C line would be (as estimated in yellow in this example between 30°C and 40°C). This means that under these conditions, the helicopter may not have the performance you need in a ground effect hover.

What could you do about this? A few things:

  • Lighten up the aircraft. Take on less fuel (if possible) or leave behind a person or some equipment (good luck with that).
  • Wait until the temperature drops. The temperature will likely drop again later in the day. Wait until it drops below 30°C.
  • Perform a running takeoff. But is that possible? Because you need less power to fly at speeds in excess of ETL than to hover, it could be. The only way to know for sure is to try. (A serious question here, though: do you really want to take off if you know you don’t have enough performance to even hover in ground effect? Think long and hard about that before doing it.)

OGE Hover Chart

It’s the next day. A photographer wants you to take him and his client around a marina at the lake so he can get video footage of the new dock and some boat races that will be going on. The lake is near Prescott; it sits at 4900 feet and is surrounded by desert mountains. The forecasted temperature in Prescott for the early morning flight is 25°C. You get the passenger and equipment weights and calculate your fuel load for the flight. The total aircraft weight at the time you’ll be on point to start the shoot will be 2200 pounds.

You’ve worked with this videographer before. He likes you to fly very low and slow — usually less than ETL, sometimes only 100 feet off the ground. (You’ve already warned him of the potential danger of this, being sure not to refer to the height velocity diagram as the “deadman’s curve.” But you’re willing to take the risk and he likes flying with you because you’re the only area pilot who will.)

OGE Hover Example 1
In this example, you’d have enough performance to hover out of ground effect in the plotted conditions.

You pull out the POH and turn to the OGE Hover Chart. Why that chart? Well, you know that you’ll be flying at speeds less than ETL. That’ll likely take at least as much power as hovering out of ground effect. You plot the altitude and weight, as shown here. The resulting point is below and to the left of the temperature line (sketched in yellow). You should be good to go.

OGE Hover Example 1
With the fatty client on board, you simply wouldn’t have enough power to hover out of ground effect.

Now let’s say that the photographer calls an hour before the flight. His client wants to come along, supposedly to provide instructions. You ask how much he weighs and the photographer tells you 240 pounds. A big guy. You recalculate the aircraft weight at the time of the flight adding 250 pounds for the client because you know everyone lies about their weight. Now you’re at 2450 pounds, which is pretty darn close to max gross weight. You plot the points and what do you find? With the client on board, you’d be too heavy to hover out of ground effect.

What can you do? A few things:

  • Lighten up the aircraft. Assuming you can’t leave the client behind, you might be able to operate with less fuel on board.
  • Wait until the temperature drops. Of course, the photographer picked that flight time for a reason and probably won’t take a time change.
  • Don’t drop below ETL when out of ground effect during the flight. If you keep your speed above ETL, you should have plenty of power to fly. But will the photographer accept that?

IGE vs. OGE

In these examples, I used both charts. You might be wondering why I used the OGE chart for a flight that didn’t necessarily require hovering. After all, you reason, if you don’t have to hover, you don’t need a hover chart, right?

Wrong.

As I mentioned earlier, operating at speeds less than ETL — which is about 25 knots in an R44 — requires about as much power as hovering. That’s why you need to consult a hover chart. And since you’ll be 100 feet up or higher, you’re not in ground effect so you need the OGE hover chart.

Let’s look at what could happen in the photography example if you conducted the flight when the OGE hover chart told you hovering wasn’t going to be possible.

You get into position for the photographer to start videoing the new dock. You’re about 100 feet off the lake surface, doing 40 knots. “Slower,” the photographer urges. You drop speed little by little. Finally, you’re at about 15 knots. The helicopter starts to settle. You pull up the collective and either you get a low RPM rotor horn (in a piston helicopter like the R44) or you over-torque or over-temp the engine (in a turbine helicopter). Either way, the settling doesn’t stop. You push the cyclic forward, trying to fly out of the vortex ring state you’ve put yourself into, but you’re now less than 100 feet off the lake. Are you wearing floatation devices? I hope so. You might be going swimming.

Think this doesn’t happen? It does. It even killed people in this accident and this accident — both of which were for aerial photography missions. (And yes, the pilot in the second accident was also impaired.)

Throughout this blog I refer over and over to the OGE hover chart. This is why. It gives you worst case scenario performance for your operating conditions. If the OGE hover chart says you can operate, you can operate at any speed. Indeed, if you consult the OGE hover chart first and it says you’re good to go, you don’t even need to consult the IGE hover chart.

Conclusion

My advice: consult the OGE hover chart before every flight. It gives you a good feeling for the kind of power you’ll have available throughout various phases of a flight, even if airspeed drops below ETL.

This can become vitally important, especially if you’re doing an off-airport takeoff or landing in rough terrain. Think about it. Suppose you’re sitting on the ground near that marina in the last example, with the fatty client on board. Maybe that’s where you picked him up. You pick the helicopter up into a hover; it’s possible but perhaps you need nearly full allowable power to do it. You push the cyclic forward only two or three feet off the ground. What happens as you begin to go through ETL? The helicopter’s nose might dip. If you’re close to the ground, you could hook a skid. Add rising terrain and/or a tailwind and you might find yourself in serious trouble. That’s what happened to a pilot in Easton, WA in 2007 and it killed her and her three passengers.

If the OGE hover chart says you don’t have the performance you’ll need for an OGE hover at your expected flight conditions, at the very least you should consult the IGE hover chart to make sure you can hover in ground effect for takeoff and landing. If you don’t have the performance for that, consider what you can do to increase performance before taking off, even if a run-on takeoff is possible and you’re certain you’ll be able to hover when it’s time to land.

These charts are your true performance guides. Operating when they say you can’t is just plain stupid.

Julia’s Thanksgiving Cranberry Recipe

The real recipe; not the lazy-cook knockoff circulating among her family and friends.

My mother-in-law Julia may not have been the best all-around cook, but there were a few things that she made extraordinarily well. One of them was her Thanksgiving cranberries. For a kid who grew up with cranberries served out of a can — still shaped like the can, mind you — this was an amazing revelation that cured me of canned cranberries for good.

Thanksgiving 1996I first made Julia’s cranberry recipe for Thanksgiving dinner in 1996. This was an amazing meal served in my New Jersey home. Our Salvation Army-acquired dining table, expanded to its full length with the help of a homemade leaf fully five feet wide, made it possible for all 15 of us to sit together. Amazing timing with the help of a standard sized oven and the microwave I still own made it possible to serve the entire meal at the same time, fresh and hot. If there is such a thing as miracles, this was one of them. I’ll never be able to top that feat again.
Anyway, Julia gave me her cranberry recipe for that meal and I prepared the cranberries a day or two in advance to her specifications. It came out perfectly.

Recently, I obtained a copy of the recipe that was distributed to family and friends on the back of a card handed out at her funeral. I was shocked to see that it included canned cranberries. The recipe Julia shared with me didn’t have cranberries out of a can. It had fresh cranberries prepared on the stove — the way a real cook would prepare them.

Here, then, is the recipe Julia shared with me back in 1996. I’ll be making this for my friends to enjoy at Thanksgiving this year.

Ingredients:

  • Cranberries
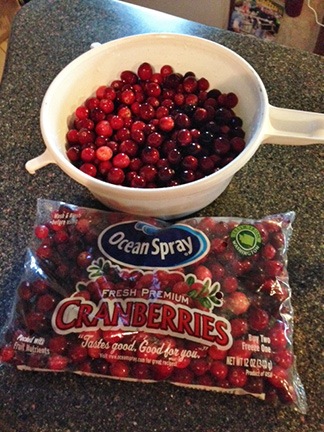
    Julia’s real cranberry recipe started with fresh whole cranberries.

    2 12-oz bags fresh, whole cranberries

  • 2 cups water
  • 1-1/2 cups sugar
  • 1 12-oz can crushed pineapple (packed in natural juice; do not drain)
  • 1 10-oz can Mandarin orange pieces (drained), crushed or chopped
  • 3 or 4 figs, fresh or dried, chopped
  • 1 stalk celery, diced (optional for crunchiness; I usually omit it)
  • 1 small apple, peeled, cored, and chopped
  • 1/2 cup walnuts, chopped
  • 1/4 cup Grand Marnier, Cointreau, or orange juice

Instructions:

  1. Rinse the cranberries and place them in a pot.
  2. Add the water and one cup of the sugar and stir.
  3. Bring to a boil, then lower heat to simmer, stirring occasionally.
  4. Listen for the cranberries to “pop.” When about two thirds of them have popped, remove them from the heat and allow to cool for at least 10 minutes.
  5. Drain away the cooking water and place the cranberries in a large bowl.
  6. Add the remaining half cup of sugar and still well. Sugar should dissolve.
  7. Cool thoroughly.
  8. Add remaining ingredients and stir well.
  9. Cover and store in the refrigerator at least overnight so the flavors will meld.

Finished Cranberries
Here’s what my cranberries look like this year.

Serve with turkey (for Thanksgiving!) or pork (any time of the year).

If you’re looking for something different with your turkey this year, try homemade mango chutney. That’s also good with pork.

By the way, the other thing Julia made so perfectly was a New York style cheesecake. I dreaded when she made it in my kitchen because she made an enormous mess. But it was worth it: creamy, delicious, and just sweet enough — if you could convince her not to top it off with something silly like cherry pie filling.

I miss you more than I thought I would, Julia. Rest in peace.

Roasted Pumpkin Seeds

Fresh, tasty pumpkin seedy goodness.

I bought a bunch of pumpkins in October — all kinds of pumpkins — from a local pumpkin farm. I bought them mostly because I could pick them myself and it was fun. I liked the seasonality of having pumpkins around. And I figured I might carve them and put candles in them and do the whole Jack ‘O Lantern thing, even though I knew damn well I wasn’t going to get any trick or treaters.

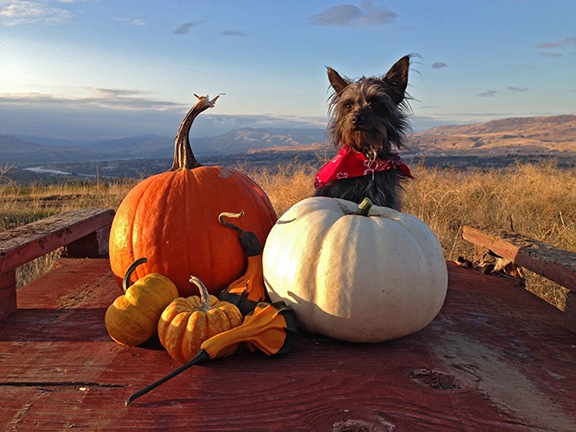
Penny with Pumpkins
Penny posed with the pumpkins the day we brought them home.

But then my godfather got sick and died and I went to New York. When I got back, right before Halloween, I didn’t really feel like carving pumpkins.

So they sat outside. Halloween came and went. We had a warm spell and then it turned cold. Very cold. “Frost on the pumpkin,” as my stepdad would say, cold.

I got the idea that I wanted to pull seeds from the pumpkins to plant them in my own garden next year. (Don’t tell Monsanto.) So one-by-one I bought them in, cut them open, and scooped out the seeds. I cleaned them and dried them and put them in labeled plastic bags.

Of course, I don’t need that many seeds to plant and the orange pumpkin had plenty of them. So I decided to roast them — just as I did most years that I carved pumpkins in Arizona and New Jersey.

Here’s how.

  1. Preheat the oven to 350°F.
  2. Using oil or spray oil, lightly grease the bottom of a large pan. (I used olive oil because that’s the way I roll.)
  3. Cut open the pumpkin and remove the seeds and loose pulpy stuff around them from the inside.
  4. Separate the pulpy stuff from the seeds. This could take some time. Be patient. Drinking wine or chatting with a friend or loved one is a good multi-tasking activity.
  5. Put the seeds in a colander and rinse them. Don’t rinse them too well; they’re better with just a little bit of pumpkin on them.
  6. Put the pumpkin seeds in the prepared pan and spread them evenly.
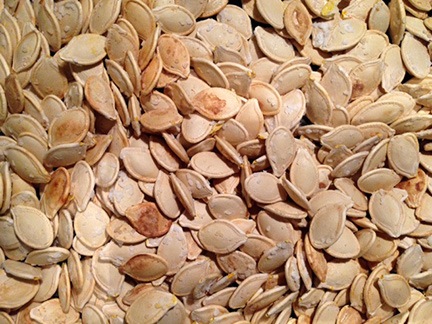
  7. Roasted Pumpkin Seeds
    Roasted pumpkin seeds, straight from my oven.

    Sprinkle the seeds with a generous helping of salt. (I used Kosher salt because I had some. Regular salt works, too.)

  8. Put the pan in the oven and roast for at least 10 minutes. If necessary, stir the seeds to prevent uneven browning, spread them out again, and continue to roast. You might have to do this more than once, depending on how many seeds there are and how big the pan is. The seeds should be light brown and kind of crispy when they’re done.
  9. Remove from oven.
  10. Enjoy as soon as they’re cool enough to eat without burning your mouth.

And yes, you do eat the entire seed.

Enjoy!

Just Because the Helicopter Has Four Seats Doesn’t Mean You Have to Fill Them

Or why I won’t do aerial photo/video flights with three passengers on board.

It’s that time of the season again: time to go through the NTSB reports to see how and why helicopters are crashing. As I’ve mentioned elsewhere in this blog, it’s usually due to “stupid pilot tricks.” Here’s yet another example.

The full narrative is a bit lengthy to quote here, but I’ll summarize:

R44 Raven I helicopter with four people on board. The pilot estimates the weight of the aircraft at the time of the accident was 2,391 pounds — just 9 pounds less than max gross weight for that aircraft. The accident occurred 25 to 30 minutes after takeoff. If the aircraft burns 15 gallons per hour (as conservatively estimated by Robinson), it burned at least 7 gallons during the flight. 7 gallons x 6 pounds per gallon = 42 pounds. So yes, the helicopter was over max gross weight at takeoff. No wonder the pilot “was concerned with the density altitude at the departure airport.”

Speaking of density altitude, the temperature was 31°C at the closest weather station, which was 12 miles away and sat at 4,964 feet. The calculated density altitude was 7,721 feet. The wind was 17G32.

The purpose of the flight was aerial photography. As any commercial pilot can tell you, that often means low and slow flights. So slow, perhaps, that the helicopter began to settle (under power) during a turn about 100 feet above the ground. There was a close call with two sets of power lines, which the pilot was able to clear while the low rotor horn blared. But the pilot was unable to gain enough speed and keep enough altitude to prevent settling into the ground. The helicopter rolled and three of the four occupants received minor injuries. The helicopter was totaled.

Out of Ground Effect Hover R44A look at the performance chart for an R44 (Raven I) makes it pretty clear why the pilot had trouble maintaining altitude at slow speed. At max gross weight on a 30°C day, the helicopter can’t even perform an out of ground effect (OGE) hover at sea level, let alone nearly 5,000 feet. That means it would have to continuously fly above ETL (approximately 25 knots airspeed) to stay in the air. At slow speed, a turn into a tailwind situation would rob the aircraft of airspeed, making it impossible (per the performance data, anyway) to stay airborne.

(It’s important to note that the R44 Raven II helicopter has much better performance at high density altitude. That’s why I paid the extra $40K to buy a Raven II instead of a Raven I.)

How could this accident have been prevented? Lighten up the aircraft. One way is to take just the passenger with the camera. Leaving two passengers behind would likely have lightened up the aircraft by 300 (or more) pounds. According to the OGE hover chart, at 2,050 pounds, the helicopter could (barely) hover out of ground effect. But even in that situation, the high density altitude would have made the helicopter sluggish and limited its performance. While an experienced pilot may have been able to pull it off, not every pilot could.

But this doesn’t excuse the pilot from doing his homework. A quick look in the pilot operating handbook (POH) would clearly show the aircraft’s limitations. The chart is in there for a reason.

Still, I could put myself in the pilot’s shoes and envision his situation. He knows density altitude could be an issue. But there are three guys and they see a helicopter with three empty seats. Why can’t they all fly? The pilot does a test flight with two of them on board and doesn’t have any trouble. What’s one more person, the passengers ask. Joey really wanted to come, too. The pilot succumbs to the pressure of this passengers and does something he knows deep down inside is probably very stupid.

And he pays for it.

How many times has this happened to you? Once?Twice? Ten times? I know that some version of this has happened to me. Every time it’s happened, I walked away without any problems. But during the whole flight, I worried. I knew what could happen. And I was relieved when things didn’t go wrong.

Is that the way we should be flying?

Hell, no!

Now I personally have a hard and steadfast rule: maximum of two passengers for aerial photo/video flights — preferably just one. And if I don’t feel like I have enough reserve power under the flying conditions — keeping the OGE Hover Chart in mind — I won’t do any hovering or very slow flight.

In my opinion, it’s not worth risking the safety of flight just to make a client happy.

Think about this the next time you’re preparing for an aerial photo mission.