The Turtleback

Downsizing…because I can.

One of the great things about being single — and believe me, there are lots of great things — is the fact that you simply don’t need as much living space. While two might be able to live as cheaply as one, two can never live comfortably in as little space as one. So not only can I live in a smaller home (1200 square feet vs. 2400 square feet), but I can also travel with a much smaller RV.

And travel is something I love to do. Whether for a weekend, a week, or an entire season, nothing beats hitting the road and exploring new places or revisiting old places with friends. That just wasn’t as easy as it should be when I was towing a 36-foot fifth wheel with four slides. Yes, when I parked, I was extremely comfortable, with enough living space to throw a party for a dozen friends. But getting the damn thing parked took a lot more effort than I wanted to put into it. And finding a place where it could fit wasn’t always easy.

I bought the Mobile Mansion back in 2010, after my then-husband promised he’d hit the road with me during the summer months when I came north for cherry drying. I needed enough space for two full-sized people and a mid-sized dog to live comfortably for four to six months. The Mobile Mansion was perfect for that use. Unfortunately, I wound up not needing all that space, since my husband apparently had no intention of joining me as he’d promised. In 2012, he started the wheels turning to become my wasband. (That turned out to be the best thing that happened to me in a very long time.)

I lived in the Mobile Mansion while I built my new home — so it was a very good thing I had it. It was comfortable, except during the winter months when I made other arrangements. Last summer, after moving into my new home, I used it as an AirBnB rental parked right on my driveway, getting $79/night with a two night minimum almost every weekend from July 4th through October 15. Then it went on a sale lot in East Wenatchee.

Quartzsite Campsite
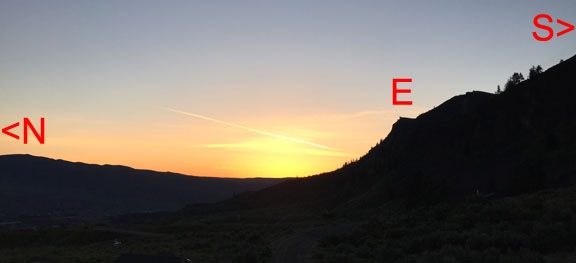
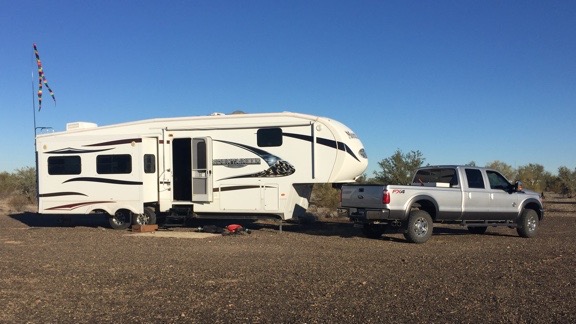
The Mobile Mansion parked in the desert near Quartzite in January 2016.

By December, I decided to spend the winter snowbirding and fetched it off the lot for a trip south. I spent a happy six weeks in Arizona, Nevada, and California, living mostly off the grid along the Colorado River with friends between stays in another friend’s guest house. Truck problems got it stuck in California for a while, but I brought it home again last month, cleaned it up again, and put it on a sale lot in North Wenatchee.

Over the winter, I’d been thinking hard about options for replacing the Mobile Mansion with something smaller and easier to travel with. My first inclination had been to go with a small — think 16 to 20 feet — bumper pull trailer. Then I happened to take a look at a truck camper for sale in Quartzsite. I struck a deal to trade the Mobile Mansion for the camper and pocket about $12,000, but I hesitated. I hadn’t wrapped my brain around the huge downsizing yet. By the time I was ready — only a week later! — the rig was gone. So I stuck with the Mobile Mansion for the rest of the winter.

But that truck camper had planted a seed. When I got home and placed the Mobile Mansion in the sale lot, I started looking for a truck camper I could live with.

My truck is huge. It’s a 1-ton diesel with 4WD, a crew cab, and a long bed. They don’t get much bigger than this and still fit in a regular garage. Because of its size, I could get a large truck camper. In fact, I sort of had to get a large truck camper.

I looked at a few dealer lots in the Tri-Cities area, then started combing Craig’s List. And that’s when I found the 2005 Lance in Moses Lake.

I went down to look at it. Moses Lake is about a 90-minute drive, although it’s only 55 miles away. The couple who owned it were the original owners and they had taken very good care of it. It was parked in an RV garage when I saw it. It was clean and it was loaded.

The Slide
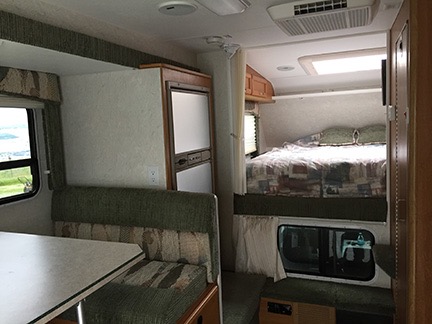
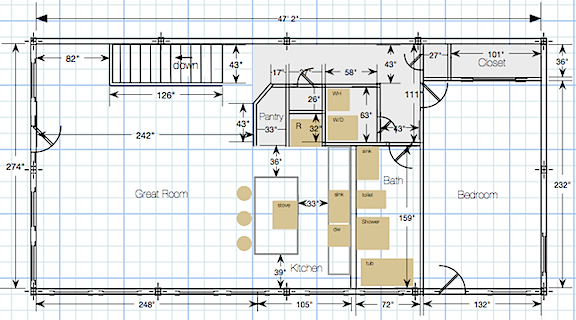
The dinette and refrigerator are on the slide.

Storage
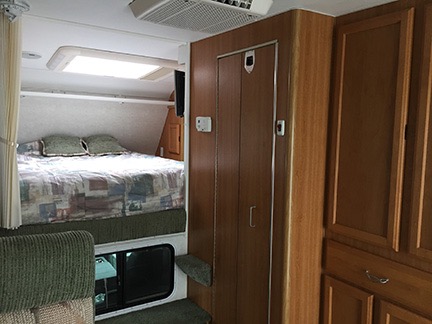
There’s plenty of storage beside the bathroom.

Want a list of features? Here are the highlights: slide for dinette and large refrigerator with separate freezer, queen sized bed, double sink, convection microwave, three-burner stove, television, satellite dish antenna, regular antenna, AM/FM stereo with CD/DVD player, landing gear with remote, two awnings, 2500 watt generator that can be started with the push of a button, tons of storage, skylight in bedroom, lots of windows, day/night shades on most windows (they’re not allowed in kitchen areas, probably due to fire hazard near stove), outdoor shower, wet bathroom (that’s where you shower in the same space as the toilet and sink), air conditioning, heat, two 7-gallon propane tanks, ladder to roof, solar panel that keeps the batteries charged. These are just the things I can think of off the top of my head. The slide is quite large — when it’s open, there’s a ton of floor space. So even if I did happen to go camping with a friend, we wouldn’t be tripping over each other.

Kitchen
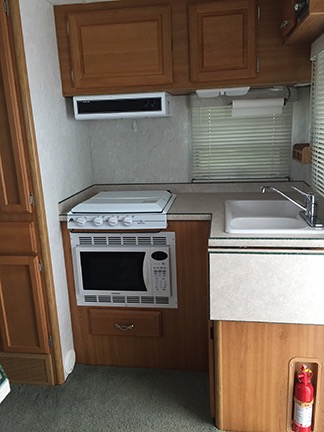
The kitchen is small but functional.

Wet Bath
“Wet bath” means you shower in the same space as the toilet and sink.

The price was a bit more than I wanted to spend, but it was in line with Nada RV Guide pricing for a unit its age. And it was in very good condition. The couple was nice. They clearly loved the RV and had made a lot of memories in it. They were sad to sell it. But they’d just bought a fifth wheel almost as big as mine and although they thought they’d use the truck camper once in a while, they realized they wouldn’t. After a year of owning both, they’d decided to sell.

We talked money. I suggested lower price. I hate haggling but he accepted my offer. I got the feeling that they wanted to sell it to me.

I told them I needed to sleep on it and research the truck modifications I’d need to get done to get the camper fastened down on my truck. On the way home, I stopped for dinner at Cave B Winery. Before I was done, I’d decided.

It took me two weeks to get the hardware I’d need on the truck installed. In the meantime, I built a small trailer for the 100LL fuel tank that was in the back of my truck and had the tank moved to it. The tank would come in handy in Quincy, where two pilots would be working for me in June. Then more delays as I had a multi-day aerial photo gig for a favorite client in the area. Finally, with rain forecasted for Wednesday, May 4, I called the owners and made arrangements to meet with them.

The owners were just as gracious to me that day as they were when I first came to see the camper. The husband spent at least an hour with me, showing me how to hook it up and pointing out all kinds of things I’d need to know. (Of course, they had all manuals for the camper gathered up in an envelope under one of the dinette benches.) He backed the truck up under the camper, gave me a wooden rig he used as a spacer to prevent himself from backing up too far, and showed me how to retract the legs. Then we pulled it out onto his driveway and fastened it down to my truck, using fasteners he threw in at no extra charge. Then, while I was doing the paperwork with his wife, he checked my tire pressures and even added air to the airbags at the back end of my truck. Before I left, he took a picture of it — he said he wanted to show his friends the truck he’d put it on. Oddly enough, he has the same truck as me — just one year newer.

When we were all done, we parted ways and I started the long trip home.

The camper, which probably weighs about 3,000 pounds, rides well on back of my truck. I can definitely feel its weight and the higher center of gravity. But my truck gets much better mileage than when I towed the Mobile Mansion and parking it was no trouble at all.

After a stop for lunch in a neat little bistro in George, WA, and a quick trip to the supermarket, I drove over to the RV dealer where I’d left the Mobile Mansion. Way back when I first bought it, I’d replaced the mattress and I wanted to swap them out. That done, I made a stop to pick up some oil for the helicopter before heading home.

The Turtleback
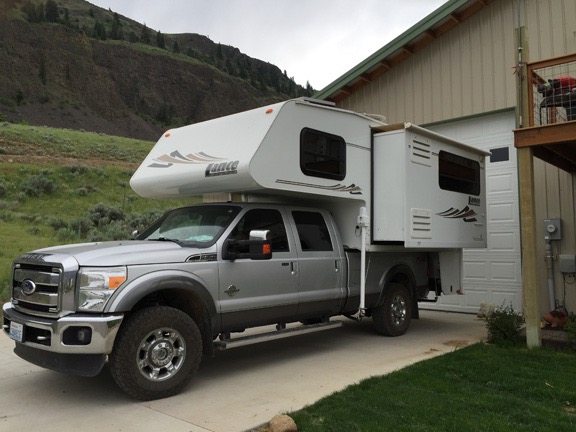
The Turtleback, parked in my driveway with the slide out. And yes, it will fit in the RV garage. After all, the Mobile Mansion fit in there and this is a heck of a lot smaller.

I spent a few hours loading some of the Mobile Mansion’s gear — hoses, cords, cookware, dishes, etc. — into the new RV, which I’d christened the Turtleback on the long drive home. I still need to make the bed and store some extra linens. Most of what I needed from the Mobile Mansion fits into the Turtleback — it has a surprising amount of storage space.

At this point, I’m thinking about taking it up to the National Forest at Leavenworth for a few days on a maiden voyage. There’s a nice campground about 17 miles up Icicle Creek with a good 3-mile loop trail running through it. I’m sure it will be mostly empty mid-week. If I go, I’ll report back here.

Blender Bullshit

Do people really fall for this crap?

I used to own a Kitchenaid blender. It was a pretty simple model with a glass jar. I didn’t use it often, but it worked well enough when I did. Until it broke.

I’d bought one of those Magic Bullet blenders to use in my RV when I traveled. Because I didn’t replace the Kitchenaid, I started using it at home, too.

Magic Bullet
A Magic Bullet blender

A Magic Bullet is basically a blender base with two different blade assemblies and a bunch of plastic cups that the blade assemblies screw into. You fill a cup with what you want to blend, screw on the blade assembly, turn the whole thing upside down, and stick the bottom of the blade assembly into the blender base. When you push down and twist, the blender turns on.

Nowadays the “original” Magic Bullet comes with only a few cups and lids. But when I bought it, it came with about a dozen. I’m not sure why. They were a pain in the ass to store so I threw most of them away, keeping just one of each size. Ditto for the rings that turn the screw-top cups into smooth-top cups. (I’m not going to drink out of a plastic blender cup.) And the lids.

Let me be clear: the Magic Bullet is junk. It’s the same kind of disposable appliance so many Americans bring into their lives. Cheap and functional, but not exactly reliable. I knew mine would break and I knew I would throw it away. The only thing that surprised me is how long it lasted before it finally broke: maybe 8 years?

But it did break. And I was left blenderless.

Immersion Blender
My Braun immersion blender is part of a set that includes a chopper and whisk. I often use the whisk to make fresh whipped cream. I don’t think I’ve ever used the chopper. Maybe I should?

Well, that isn’t exactly true. I have one of those immersion blenders. It’s like a stick that you put blade side down into a pot of soup to puree it while it’s cooking. Mine’s a Braun and it works very well. I didn’t use it often until my Magic Bullet broke. Then I started using it to make smoothies. It got the job done — I’d just stick it into a big cup full of the ingredients and whir it until it was smooth — but I had to be careful if I didn’t want smoothie all over my kitchen.

Clearly, it was time for a replacement blender.

I mentioned it to my Facebook friends and the recommendations started coming in. Apparently, there are a lot of folks out there willing to pay in excess of $300 or $400 for a blender. I think they must use it a lot more than I do. I just wanted a small and functional kitchen appliance that I could store on a shelf in my pantry when not in use.

I was in Costco last month and saw that they had a Nutri Ninja, which another smoothie-making friend had mentioned. Yesterday, I went in to look for it. It was there, next to the $350+ Vitamix, selling for just $99. But it had a lot of parts — those damn blender cups — and I seemed to recall another model with fewer cups and a lower price. I found it hiding behind the Vitamix display for $69. Less parts, less money. I put it in my cart with the other things I’d come to Costco for.

NutriBullet
Not the blender I thought I was buying, but I honestly don’t care.

It wasn’t until I got home that I discovered I’d bought another Magic Bullet.

What fooled me was the larger size and the prefix “Nutri” in the product name. It was a NutriBullet, not a Nutri Ninja. Sheesh. I really should pay attention when I shop.

Another person might have taken the damn thing back to Costco. But I honestly didn’t care. All I wanted was another cheap blender and that’s what I got. This one was bigger and beefier with bigger plastic cups than the old one. If I got 5 years out of it, I’d be happy.

The Cookbook
On the surface, this looks like a recipe book, right?

What surprised me, though, was the hard-covered book that came with it. On the surface, it looked like a cookbook. Later, when I went to bed, I took it with me to browse it before I went to sleep. It took only moments to realize what it really was: a piece of marketing material designed to fool people into thinking that they’d bought some kind of special nutrition machine that would make them healthier and help them lose weight like no regular blender could. After all, they’d bought a “nutrition extractor,” not a blender!

Nutrition Extractor!
“Nutrition extractor”? It’s a freaking blender.

Yes, the book had recipes, but it also had a lot of nutritional information about trendy “superfoods” like cacao nibs, organic chia seeds, organic goji berries, and organic maca powder. There were pages and pages about these “foods,” along with information on how you could order them from the NutriBullet website.

And the testimonials! Pages and pages of them from people praising the NutriBullet to high heaven. Here’s an example closing line for one that stretched two full pages:

It has touched my life in more ways than I can explain.

Seriously? A blender? You really need to get out more, Daniel.

I especially liked the recipes that required you to cook a bunch of ingredients, wait for the mix to cool, and then “extract” it in batches before reheating it again. News flash: an immersion blender like my Braun can do it without cooling the soup down, saving hours of food prep time.

In all honesty, I found the recipe book offensive. Cover to cover, it was full of marketing bullshit, touting the mostly imaginary benefits of a crappy blender. I couldn’t believe anything I read inside it and felt insulted that someone thought I might. And the stock photos of the attractive 60+ men and women enjoying their healthy lifestyle were a real turn off. Is this blender for old people?

It amazes me how low marketers will stoop to sell an inferior product.

Anyway, I’ve already tossed the book into my Goodwill box. Maybe someone more gullible than me will find it worth reading.

And yes, today I’ll give it a try. But I won’t be making a “nutriblast.” I’ll be making a good, old fashioned smoothie, just like I always have. And you can keep the goji berries.

A Craigslist/PayPal Scam

Too many people are playing this game. I played along to see what it was all about.

Last week, I re-listed my RV, the Mobile Mansion, on Craigslist. I decided I didn’t want to deal with email responses, so I listed my phone number, which happens to be for my cell phone.

Text Message
The first text message I got about the camper.

The text messages started coming almost immediately. The first wasn’t too odd — except that the person texting me wanted me to reply via email, claiming she wasn’t contacting me from her cell phone. Huh? But I didn’t want a long, drawn out email discussion. So I replied that she should call me.

I never heard back from her.

By the time the second text message arrived the next day, followed almost immediately by another one with nearly the same wording, I knew something was up. (I was born at night, but it wasn’t last night.)

Here’s the one I decided to investigate. It started off pretty weird:

BUYER: Good Day,i searched on CL and saw your< 2010 Keystone Montana Mountaineer 324RLQ - $29900 (Malaga, WA) >which i highly have interest to purchase from you now kindly let me know if it’s available and in Good Conditions ?

Note the deplorable English. It reeked of scam. I played along:

ME: It’s still available. It’s in very good condition. If you want to discuss it, call me.

The response came nearly 12 hours later at 10:11 PM:

BUYER: Sound excellently to me I am from Yakima WA how i wish to come over and view it in person but am currently out of town right now.I work as a Marine Engineer busy sailing on ship right now in U.S naval base.I’m really satisfied with the conditions about it,please kindly text me your actual price that you’re selling it for me ??

Yeah. He’s sailing on a ship in a U.S. naval base. I believe that. I decided to stick to my asking price, figuring that a real person would try to bargain:

ME: $29,900

If there was any lingering doubt about this being a scam, it disappeared with his response:

SCAMMER: Okay i have agree with the price of $29,900 and would have love to pay you via cash but am not around at the moment and i have no one to send to you that’s why i choose Paypal cos its safe,reliable and guarantee transaction safety of funds…so I will want you to get back to me asap with your Paypal email address so that i can proceed with the payment and you will be notify by the Paypal customer care immediately the payment is made and My Mover will be there to pick up and sign all necessary papers as soon as I make the payment …thanks for your consideration.Await your Response

So this guy is supposedly going to send me $29,900 via PayPal and “PayPal Customer Care” will notify me when the payment arrives. Without any paperwork. I don’t even have a name for the guy. I decided to see how far I could string him along.

ME: Don’t you want to see it?

Apparently not.

SCAMMER: In order to enable me to proceed with the payment could you please provide me with the following information below :
Your Full Name:
PayPal Email address:
once i receive the details i will go ahead with the payment and then i will contact my shipping agent for pick up
am okay with it that is why the pickup agent company will contact you for the pick up after payment is made and cleared and take care of the necessary paperwork for the registration after you get the payment. I will need your home address for the Picked

I should mention here that his text messages appeared in 160-character max segments that didn’t always arrive in the correct order. I had to jumble them around to figure out what he was saying. I’m not even sure I got the above quote right.

ME: I think you should see it first. Or do you trust your shipper to inspect it for you?

I heard nothing for nearly 24 hours and figured that he’d realized I knew I was being scammed. I decided to poke him a bit:

ME: I have another person interested but only offering $28,000. Do you still want it? I haven’t heard from you.

Eight hours later, he replied:

SCAMMER: are u there
i am interested have been wating for you to get back to me with your paypal email address and your full name so i can go ahead to make the payment

I made him wait two hours before replying:

ME: I’m not comfortable selling to you sight unseen. I am willing to deliver to you at no cost.
You can give me a deposit on PayPal and pay the rest in cash when I deliver.

A real buyer would be an idiot to turn down an offer like that. But he wasn’t really interested in buying. He just wanted my name and email address to continue his scam.

SCAMMER: PayPal is one of the best ways to make a payment online simply because it’s fast, easy, secure and reliable.

ME: Not as reliable as cash.
And I’m willing to deliver for free. That’ll save you a lot of money!

He replied 28 hours later:

SCAMMER: dont worry about that am okay with it and dis is not my first using them okay
all you do is to get back to me with your paypal email address and your full name so i can go ahead to make the payment right away thanks ‘

At this point, I knew I wasn’t going to get any farther with him unless I gave him what he wanted. But I also wanted to see what he’d say when I insisted on a deposit and cash on delivery. I waited until the next morning before I replied with a fake name and a throwaway email address:

ME: Send me a $2000 deposit. I’ll deliver it to you or someone you designate to accept it. He can inspect it and give me $27,000 cash. Maria Sarducci, zip98828@gmail.com. Be sure to send me delivery info.

Sarducci? Like Father Guido?

Text 2
What idiot would actually believe this message came from PayPal?

Less than an hour later, the next part of his plot arrived in the form of another text message from a toll-free number. I have to say that I wasn’t surprised. I expected to hear from “PayPal,” although I did expect it to arrive as an email message. I also expected the message to include a link which I had no intention of clicking.

The way I saw it, the link could do one or both of two things:

  • It could run an app that somehow installed malware on my computer. That malware could do any number of things that would make me unhappy.
  • It could take me to a page that looked like a real PayPal page and prompt me to enter my PayPal user ID and password. They’d then have access to my PayPal account, which could be catastrophic — if I had a PayPal account with that address.

So the scammer had played his hand: a link supposedly from PayPal that I was supposed to click to get my money. How many people fall for this crap every day? I bet it’s quite a few — over the past week I received text messages from five different phone numbers that were likely going to lead me thought this same script. It must work if they keep doing it.

I decided to pretend I’d never gotten the text message from “PayPal.” I waited until that afternoon and sent another message:

ME: Did you send the $2000 deposit? That other buyer called. If I don’t get the deposit by tomorrow, I’ll have to sell to him.

This morning, I added:

ME: Hello? I’m still waiting for the deposit. You seemed so anxious to buy. What are you waiting for now?

I don’t really expect a response. I suspect he’ll either give up. But if he does respond, it’ll likely be to draw my attention to the text message from PayPal. If he does respond, I’ll tell him I haven’t seen any money come into my account. That should chase him off.

But I don’t expect to hear from him at all again. I suspect he’s got a few suckers on the line — or people like me who are playing him for fun — to keep him busy.

Why did I blog this? I just want people to understand that there are scammers out there and they will rip you off if you’re not aware of the possibility of a scam. When someone texts you and agrees to pay full price for an expensive item you’ve listed online, sight unseen, alarm bells should ring.

This isn’t the first time someone tried to scam me when I was selling a high-priced item. I’d listed my old R22 helicopter for $110K back in 2004 when a scammer tried to con me. You can read about that here.

Don’t be an idiot. If it’s too good to be true, it probably isn’t true.

April 19 Update: I got another message from a different toll-free number this morning. Actually, two identical messages arriving about 30 seconds apart:

You have 2 new messages for 2010 Keystone Montana Mountaineer 324RLQ Fifth Wheel : 15096998044.accmobusr.com/clrv1

Same domain, different link. In the meantime, I wrote back to the scammer:

ME: I’m still waiting to hear from you. The money did not arrive in my PayPal account. If you’re not interested anymore, kindly have the courtesy to tell me.

Again, I don’t expect a response. But if I get one, I’ll update this blog post.

Dawn Time

When first light is first light.

For the past 20 or years, I’ve lived in a place where I could see the horizon and watch the sun rise and set. This wasn’t the case when I lived in New Jersey or New York, in places surrounded by either tall trees or other buildings. It’s nice to see the horizon, to greet the sun when it makes its first appearance for the day, to see the way first light touches the landscape around me, to watch weather move through, to see last light and watch the sun dip below the horizon at the end of the day.

The sun, in a way, is my clock. Not having a scheduled life, I let it tell me when to get up in the morning and, during long summer days, often go to sleep not long after it sets.

I live at the base of some tall cliffs on a hillside overlooking the Wenatchee Valley and Columbia River. The cliffs are to the south of me — the view from my home is about 180°, basically from east to to north to west. To the east, the cliffs rise up from the east to their full height due south.

Pre-Dawn Horizon
The horizon, as shot from my front deck before dawn this morning. The E marks the point that is approximately due east.

During the winter, when the sun is low in the sky and rises more to the south — remember, I’m in Washington State at about 47° latitude — there’s a 6-week period when the sun doesn’t even clear the cliffs at my place (although it does shine down in the valley). I call that the Shadow Time and blogged about it here.

As the days get longer, the sun shifts north, eventually, at the spring equinox, rising due east. As long as it rises behind the cliffs, I don’t get direct sun until after it clears the tops of the cliffs. But this week, about 3 weeks after the first day of spring, the sun began rising far enough north that it appears at what I think of as the true horizon — the place where the horizon isn’t blocked by nearby hills or cliffs. From that point on, I see the sun when it makes its first appearance of the day — and will continue to see sunrise until about three weeks before the autumn equinox.

If all this is meaningless to you, you should explore some of the excellent articles on the web that explain the sun’s movement in the sky and seasons. Here are a few links to get started:

Astronomy is a lot more than stars and constellations. Just saying.

Since I have a name for the time when there’s no direct sun (Shadow Time), I thought I needed a name for the time when I can see the sun rise out of the far horizon. I’ve decided to call it Dawn Time.

If there’s a corresponding Sunset Time — the time I can watch the sun set into the far horizon — that would probably be a bit before the spring equinox. I can see due west from my home — the snow covered peaks of the Enchantment Range out beyond Leavenworth — and that’s where the sun’s setting these days.

Western Horizon
I shot this photo at first light from my side deck a few weeks ago. The sun touches the mountaintops to the west before it rises high enough to shine into the valley. This is probably my favorite part of sunrise.

But for some reason, I’m more interested in sunrise, the start of the day, than sunset. I’m a morning person, through and through and get my best work done before noon. By 5 or 6 PM, I’m pretty much spent. That’s when it’s nice to sit out on the deck with a glass of wine and watch the sun set — and the light show that often goes with it.

Construction: The Loft Rails

One of the last big projects to finish prior to final inspection.

On May 20, 2014, I began blogging about the construction of my new home in Malaga, WA. You can read all of these posts — and see the time-lapse movies that go with many them — by clicking the new home construction tag.

The living space in my home is small — less than 1200 square feet. I designed it to have a vaulted ceiling which climbs from about 10 feet on the north side to 18-20 feet on the south side. (One of these days, I’ll measure it.) My floor plan is simple, with a large great room on the east side and the bedroom, bathroom, and laundry room on the west side. A hallway on the south side connects these two spaces.

Floor Plan
Here’s one of my working floor plans with some measurements. North is down in this image.

Because it made absolutely no sense to have 20-foot ceilings in the hallway and the bedroom closet and because I needed some way to access at least two of the four clear story windows at the top of the south wall (so I could open and close them for ventilation), I added a “storage loft” to the design. You can see it as the gray space in the above floor plan. While I was doing the design work, I envisioned this as a sort of shelf where I could store things that I didn’t want in the garage. But when the framing and drywall work was done, I wound up with a nice-sized room that I figured I’d use for my library — I have a lot of books, including 85 that I wrote — with a futon I had brought from Arizona that could be used for guests. Although the ceiling on the north side of the loft was only about 5-1/2 feet, there was plenty of headspace at the rest of the loft.

That put the loft into a sort of limbo area as far as the county’s building inspectors were concerned. It was clearly not a shelf, but it also was not a room. This was good and bad for me. Good, because I didn’t have to worry about putting in stairs, which I had not designed space for and bad because I still had to surround the entire loft with a guardrail that met county code specifications for height (at least 32″), openings (no larger than 4″), and durability (able to support the weight of a 250 pound person leaning against it. I basically had to build a rail like the one I’d put around my deck outside.

I was not looking forward to this job and, like most jobs I don’t want to do, I put it off. I put it off for a long time. Part of me was trying to figure out how to do it so it would be aesthetically pleasing — I didn’t want anything ugly in my home. The other part of me was just too damn tired of building. I’d already done a bunch of huge projects: I’d wired my shed, my shop, and my living space; I did 95% of the electrical finish work; I’d tiled the bathroom floor; I’d laid 1,200 square feet of Pergo flooring; I’d laid the composite decking and built rails for my 600 square foot deck; I’d set up shelves in various closets and rooms throughout my home; and I’d gotten about 75% finished with baseboard and door trim — a project that’s still in progress. I was worn out.

But putting a job off doesn’t make it go away. This was a job I needed to get done if I wanted a certificate of occupancy for my home — which I did. So by autumn 2015, I was trying to move it to the front burner of my life.

The Hard Part: Design

The hard part about the job was coming up with a solution that would not only be aesthetically pleasing but also allow airflow — some of my HVAC ductwork is up on the loft — be affordable, and be relatively easy to construct. Making that difficult was the fact that the larger of the two spaces was not rectangular, as shown in the above floor plan. I needed to make some adjustments during the framing stage to accommodate a ships ladder to access the loft. For various reasons, that required a sort of cut out. That meant that if I wanted to enclose the entire space, I’d have to have a rail that followed that cutout, with a gate at the top of the ladder.

I have to say that I wasted a lot of time thinking about that. And making measurements. And stressing over how I was going to adequately support each vertical post I needed when I didn’t really have anything to fasten it to. In the end, I decided to just run the rail straight across the top of the ladder, cutting off some of the loft’s floor space to form shelves. Since most of that space was in the low ceilinged area anyway, it wasn’t a big deal.

Railing
The railing system I originally bought. Ick.

As for how I’d build it, I started by looking at the easiest solution: a packaged railing system. Home Depot had one and I actually ordered enough to do the easier of the two rails: the one over the shelf in the bedroom. This was clearly a “shelf” — it was only 4 feet wide, over my closet and the linen closet — but because it was accessible from the larger part of the loft, it also had to be safeguarded with a rail. I bought a white metal railing kit on a special order from Home Depot and even managed to bring it all up to the part of the loft where it would be installed.

It sat there for at least four months. I just couldn’t bring myself to start installing it.

Why? It was ugly. It was designed for outdoors and it was white metal. Everything inside my building was mellow earth tones and wood. Why the hell would I put an ugly white metal railing inside my home?

Wire Railing
Another, more attractive but also more costly option for the railing.

I went to Marson and Marson, the folks who had sold me my doors and had also provided much of the building materials — trusses, lumber, posts, etc. — that the builders had used to build the shell of my home. Rita, the special order lady, priced up another solution: horizontal wire railings. The wire could be combined with hemlock — the same wood I’d chosen for my doors and door trim — for vertical supports and top rails to give me the look I wanted. But by the time she priced up the wire, the special hardware and tools needed to secure it, I was looking at thousands of dollars and a ton of work.

When I balked, Rita suggested another possibility to work with the wood: powder coated “hog panels” from a company called Wild Hog Railing. This would give me essentially the same look I had on my deck outside, but the powder-coated metal would be a bit more polished looking than galvanized wire. I ordered up some panels with black powder coating and then started to think about holding them all together.

The wood was easy. My doors were hemlock and I’d been trimming them with hemlock trim pieces I bought at Home Depot and cut to size. I’d finished the doors and the trim around them with Danish oil (at Rita’s suggestion) and I really liked the way they looked. On a trip to Home Depot, I realized that they sold hemlock lumber — 2x4s, 4x4s, etc. I’d use 2x4s for the top rail, bottom rail, and side rails affixed to the walls. I’d use 4x4s to create support posts on either side of the gate, in the main loft corner, and at the center of the bedroom loft.

Fixing the vertical supports to the walls wasn’t a big deal — I’d find studs or use anchors. But the four 4×4 posts were a problem. I needed a way to fix them to the floor. I’d been looking for appropriate hardware for months and had been coming up empty. But the folks at Marson came to the rescue. They suggested a pair of brackets for each post that could be attached with lag screws to the 4×4 and through the Pergo floor to the underlying wood floor. I bought eight of the brackets and a box of lag bolts.

Trouble was, the hardware was metal colored. The wire for the railings would be black. When I pointed this out to the guy at Marson who was helping me, he suggested getting them powder coated. So on my way home, I dropped them off at Cascade Powder Coating. They had a bit of a backlog, but thought they could have them done within two weeks. That worked fine for me, since I didn’t have the wire panels yet anyway. The total cost to powder coat the brackets and lag bolts: $70.

Putting It All Together

Once I’d assembled the panels, hardware, and lumber, it was just a matter of doing a lot of measuring, cutting, and assembling.

I figured that I’d fit the panels into a grove I’d cut on the inside of the supports. So I went out and bought a dado saw blade set. For my table saw. If you’re not familiar with dado saws, they basically make it possible to cut a groove of just about any width into a piece of wood. But on assembling my new dado blades to give me the right width, I realized that the plate covering the blades didn’t have enough of a gap for the blades. Some research made it clear why: my table saw could not be used with dado blades. This is one of the drawbacks of buying low-end, home improvement grade tools.

Grooves in Wood
I had the guide set so that I could run the wood through once in each direction to create two grooves like this.

I realized that I could simulate a dado set by running each piece of wood through the table saw’s regular blade two or three times, shifted a tiny bit over for each pass. So that’s what I did. It wasn’t difficult, but it certainly wasn’t fun. And, when I had to do the 11-foot long 2×4 length for my bedroom loft’s top rail, I had to wait until I had company who wasn’t afraid of table saws. (There was no way I could get that long piece through by myself.) My electrician friend Tom and one of his buddies, who’d come by to help me with an outlet for my new freezer, helped guide that long piece through the saw three times.

Grooved Wood
I then adjusted the guide and ran the wood through a third time to cut away the piece between the two grooves.

Here’s the process I followed to prepare each part of the wood frame:

  1. Measure the space to be fitted. Then measure again. Do something else and then come back and measure one more time.
  2. Cut a length of wood to size.
  3. Run the wood through the saw blade 3 times to cut the groove. I got really good at setting the guide bar on my saw.
  4. Sand the length of wood with 80 grit and 160 grit sandpaper using an orbital sander. I have a belt sander but don’t like to use it.
  5. Wipe all the sawdust off the wood with a damp cloth and allow to dry.
  6. Coat the exposed sides of the wood with 2-3 coats of Danish oil. Allow to dry between each coat.

Prepping the metal was more straightforward: all I had to do was cut it. Fortunately, I had a 36″ bolt cutter I’d used to cut the fencing for my chicken yard. Still, it was hard work to cut it accurately. And if I screwed up, I’d be looking at buying another $50 panel. So I was very careful.

Gate
The gate was my proof of concept. I think it came out pretty good.

I assembled all the panels with screws, with two in each corner. I drilled pilot holes in every single one. The gate was the first panel I finished, since it did not have to be affixed to the wall or floor. In a way, it was a proof of concept. I was pleased with the way it turned out.

The rest of the rail had to be installed in place. That meant doing a lot of measuring on the loft, cutting and finishing in my ground-floor shop, and then carrying pieces up the stairs and the ladder I’d put in place for temporary access. By this time, it was mid-December and cold downstairs. It was hard to stay motivated. For some reason, I got it in my head that I wanted final inspection done before year-end, so that drove me and I got a lot done very quickly.

I worked through the main loft in just a few days. I had it down to a science. For each section, I followed these steps:

  1. Install the vertical posts against the walls. I used 2x4s and ran the screws through the groove so they’d be invisible in the finished product.
  2. Posts
    Here’s the post at the top of the ladder. And yes, I screwed right through the Pergo. I know you’re not supposed to do that, but at that point, I really didn’t care.

    Install the freestanding posts. I used 4x4s and bolted each one in using two brackets and 8 lag bolts.

  3. Install the bottom rail. I used a pair of blocks cut from 2x4s to prop up the bottom rails while I screwed them into place.
  4. Measure, measure, measure, and cut the wire panels.
  5. Slide the cut panel into place.
  6. Set the top rail over the posts and wire panels and screw it into place.

Panel
Here’s the first panel installed.

I drilled pilot holes for every single screw I put in. I was not interested in splitting wood or stripping screws. I wanted it done right the first time. I had my drill set up with two drill bits I could quickly swap out and my impact driver set up with a screw driver bit and a socket that could be easily switched out. (Someone I knew once used to say that any job is easy if you have the right tools. It’s one of the few things he said that are worth remembering.) Because these tools are cordless, I didn’t have to deal with wires up there. But I did do a lot of crawling around on the floor.

I finished the main loft area just before I went away for Christmas. I go cross-country skiing up the Methow for Christmas. It’s become a bit of a tradition for me — this was my third Christmas away. Just me and Penny, winging it.

Loft Rails
Here’s what the main loft’s rails looked like before I went away for Christmas. The gate is installed and ajar. As you can see, I still have a bit of trim to do up there in the shelf area.

When I got back, I still had the bedroom loft rail to do. All I had installed was the side and central vertical posts. The wood was grooved and cut, but hadn’t been sanded or oiled. But by this point, I’d run out of steam and was thinking only about my upcoming snowbirding trip. It was unlikely any inspector would come during the week between Christmas and New Year. So any thoughts I had about having the project finished by the end of the year were gone. I figured that if it waited this long, it could wait a little longer.

So I left everything just as it was and went on my trip.

Bedroom Loft Rail
The finished loft rail in my bedroom. The top rail is one continuous piece 130 inches long. It’s the one I needed help getting through the saw three times.

My trip included a week home, mostly to relieve my house-sitter so she could go on a trip and to check on things. But while I was home that last week in January, I figured I may as well finish up the rail. It only took about 6 hours split over two days. And then I was done.

It’s a funny thing about the jobs I’ve done at my home. Before I even start, I spend a lot of time thinking about them, planning them out to minimize the chances of doing them wrong and then having to redo them. Then I eventually get to work and, in many cases, work on them for days or weeks or even longer. And then one day, I’m just done. It feels weird to be done because I’ve been so consumed with the project, thinking about it and working on it for so long that there’s suddenly a hole in my life when I don’t have it to work on anymore.

But then I get on to the next project and it’s all forgotten.