The Odd Thing about My Old Eyes

Can vision problems reverse themselves with age?

I’ve been nearsighted for most of my life. I began wearing glasses in the fifth grade and switched to contact lenses nearly full time when I was in college.

Over the years, my vision has gotten progressively worse. Each eye exam resulted in a slightly stronger prescription. I was lucky, though. Even though my natural far vision is bad, it’s very correctable. The contact lenses I’ve been wearing for at least 20 years — Acuvue disposable daily lenses — fit me like they were made for my eyes’ size and shape and bring my vision to 20/20 or better.

My near vision, on the other hand, is amazingly good. With glasses and contacts off, I can see nearly microscopic detail of things within 4-5 inches of my face. I can even read the micro text on $100 bills.

Of course, with contacts on, that close vision disappears. And as my far vision prescription got stronger and stronger, my close vision with contacts on got worse and worse.

At first, I combatted the close vision problem by letting my stronger eye do distance and my weaker eye do close vision. The ophthalmologist did this by prescribing a strong lens for my right eye and a much weaker lens for my left one. This worked pretty well, at least for a while. But then I realized that what it was really doing was making both my far vision and near vision less than satisfactory. So I went with contacts for good far vision in both eyes and began using reading glasses for close vision when my contacts were in. My back up eyeglasses were progressive lens bifocals.

Last year, my contact lens prescription was -6.50/-7.00 (right/left). My understanding is that that’s the equivalent to 20/650 and 20/700. Again, with the lenses in, my vision was about 20/20.

This year, however, I began having trouble with my vision. It started in the autumn when allergy (?) issues made it impossible to wear my contacts for more than a day or two. My eyes were itchy and teary. I wore my glasses quite often. I could see okay through them, but not great.

Then I started my drive south for the winter. I was wearing my contacts again and should have been seeing great. But I wasn’t. Everything in the distance was a bit blurry. I was having trouble reading signs. Objects in the distance on the side of the road that I thought were shrubs turned out to be cows. Oops.

What really confused me, though, is that when I wore my sunglasses and looked through the reading lenses at the bottom of the glasses, I could see distance better. That wasn’t right. I should see distance worse. Sure enough, when I put my readers on, I could see distance better than without them.

Eye Prescription
My current eye prescription shows a remarkable improvement in my vision.

So when I got to Arizona, I made an appointment at the same eye center I’d visited the year before, which is the same one I’d used when I lived in Arizona. After the usual eye health check up, I told the doctor what I’d noticed. He didn’t seem terribly surprised. We went through the usual exercise with the machine and eye chart to figure out what my prescription should be. The result: -5.50/-5.75.

My far vision had greatly improved over the past year.

He fetched some sample lenses and I popped in a pair. It was amazing. I could see perfectly again.

But what was even more amazing was that my close vision was also somewhat improved. Although I’d still need readers for small print, I could see good enough for most reading in good light. The doctor confirmed this: instead of +2.50 for readers, I could now use +2.00 readers.

I left the doctor’s office looking around me like a blind person who has just been given sight. I was drinking in everything I saw. The detail amazed me.

Needless to say, it really made my day.

The question both the doctor and I have is why my vision might have improved. He says that vision is often tied in with blood sugar levels and asked if I’d had any blood work done lately. I told him I had, about a month before, and that the doctor had given me a clean bill of health. He said that high sugar levels usually cause vision to get worse, not better. So now I’m wondering if I had high sugar levels last year when tested and they’d come back down gradually since then.

But I have to admit that I honestly don’t care. As long as I can see as clearly as I do now, I’m happy.

On Saturday, I treated myself to a new pair of good quality readers. On Sunday, I ordered two new pairs of bifocals, one of which includes snap-on sunglass lenses. For those interested in saving money on glasses, do check out Zenni Optical; I ordered two pairs of glasses for 1/4 of the price of one pair at Walmart Vision Center. You can’t beat that.

Glasses Order
My eyeglasses order. I decided to treat myself to two pairs: one just for indoors and the other for outdoors/flying. The pair with the snap-on sunglasses is a reorder with my new prescription. For some reason, they automatically applied a 10% discount so even with priority shipping, my order was less than $130.

My Poor Man’s Backup Camera

If a poor man happens to own a wifi-capable GoPro and spare smart phone.

One of the things I really like about my 2012 Ford pickup is its backup camera. Incorporated into the tailgate, it automatically shows an image on the rear view mirror every time I shift into Reverse. It helps me see what’s behind me in tight spaces or parking lots and, when used in conjunction with the obstacle warning system, makes it impossible for me to hit anything while coming as close as possible to it.

Trouble is, when the truck’s tailgate is off — as it is when I’m traveling with my truck camper (the Turtleback) — I don’t have a backup camera anymore. And when the Turtleback is on board, I can’t see out the back at all.

Clearly I needed a backup camera that would work with the Turtleback.

Commercially Available Solutions

There are some options I could buy to give me the setup I want.

The first is the Lance backup camera, which installs over the back door. The Turtleback was already wired for it, although the camera wasn’t installed. I had to buy the camera and then buy the cable that would connect the camera to my truck or some sort of monitor in the truck. I was spared the ordeal (and cost) of putting this system together by the simple fact that Lance no longer sells the camera. At least that’s what I was told and it works for me.

I could also buy a Ford backup camera just like the one in my tailgate. After spending $800 for that, I’d have to figure out how to mount it on the Turtleback and run the wires to the truck’s existing plug. That would be great because it would work just like my tailgate camera. But $800. And how the hell would I mount something that was designed to fit into a truck tailgate?

There were various wired and wireless options I could buy from various online sources. Prices ranged from $50 to close to $1,000. All of them had one thing in common: they would likely be a bitch to install, the biggest problem being getting power to the camera. This, however, would be the avenue I’d travel if I couldn’t come up with a better idea.

The DIY GoPro/Smart Phone Solution

Camera Mount
The window over the Turtleback’s sink with the GoPro mounted and plugged in. I can close the blinds without disturbing the camera. In this photo, the Turtleback is parked in my friend’s backyard in Arizona.

Reading about all these wireless cameras and receivers reminded me that I already had a wireless camera: my GoPro 3. It also had a suction cup mount that made it possible to mount on the inside of the Turtleback’s back window (so I didn’t have to worry about it falling off or getting stolen when parked). And because I’d had a USB power center installed in the cabinet over the sink (where the stereo is), I could run a power cord to the GoPro to keep it powered all the time, thus enabling me to keep the WiFi feature turned on and ready all the time. That gave me the camera component without spending a dime.

But I still needed a monitor.

Sure, I could use my iPhone and just run the GoPro Capture app every time I wanted to look behind me. But did I really want to deal with pushing buttons every time I shifted into Reverse or just wanted to see what was back there? Not really.

And that’s when I remembered my iPhone 5. I’d sold it to Amazon when I bought my iPhone 6 two years ago. They’d rejected it. There was nothing wrong with it. In fact, it was in remarkably good condition since I’d had a skin on it the entire time I owned it. I tried again. They rejected it again, on different grounds. I called up and complained. They looked at my Amazon purchase history. They saw the thousands of dollars I spend on Amazon every year. And they gave me a credit for the value of the phone. When I offered to send it to them, they told me to keep it.

And it had been sitting in a box inside another box in my garage ever since.

By some miracle, I found it. I charged it back up. And then I set it up to work with the GoPro. Sure enough, the rear view picture was almost exactly what I needed. Certainly close enough.

I poked around in my box of RAM mount parts. I found a suction cup mount and an iPhone 5 cradle and all the other parts I needed to mount the old iPhone over the truck’s dashboard beside the mount I already had for my iPhone 7. Then, because I knew the now 6-year-old iPhone 5 wouldn’t hold a charge as well as a new one, I attached a power cable to it.

The result: a dedicated monitor showing a live image of whatever’s behind the Turtleback.

Backup Camera Monitor
Here’s an example image from my backup camera “monitor.” In this example, I was parked at a campground in Washington. The empty phone cradle to the left of the monitor is the one where my iPhone 7 lives in transit; I was using my phone to take this picture.

All without spending a dime on any equipment I didn’t already have.

Best of all, when the Turtleback is removed from my truck while traveling, I can set up that camera in the truck’s back window to give me some of the same benefits as the backup camera in the tailgate I left home.

Keep in mind that although I’m unlikely to use that old iPhone for anything else, I can grab the GoPro and use it while I’m on my trip any time I don’t need it back there. In fact, I brought an assortment of GoPro mounts and SD cards, as well as my GoPro 3+, to use on my trip.

A Word about Having “Too Much Stuff”

My friends constantly rib me about having too much stuff. After all, they’ve seen my garage and the seemingly countless labeled bins and still unpacked (but labeled) boxes of things I’ve collected throughout my 50+ years of life.

But there’s a lot to be said about having all this stuff and this blog post offers a perfect example. Because I kept that old iPhone, I had an easy monitor for my camera solution. And because I had later model GoPros with wireless built in, I had an easy camera setup. And because I had that old RAM mount stuff, I was able to put together a solid and reliable mount for my monitor.

In other words, this solution cost me nothing because I already had all the components I needed. And I had those components because I don’t throw much of anything out if there’s any possibility I might be able to use it in the future.

So yes, I have a bunch of labeled bins with old electronic equipment in it. So what?

It’s what made my poor man’s backup camera possible.

Traveling with a Truck Camper

The nuts and bolts of snowbirding with my new(ish) home away from home.

Camper at Home
Here’s the Turtleback, parked on my truck in front of my RV garage. I usually stage it for a trip here, where I have easy access to water, power, and sewer connections.

Back in April of this year, I bought a 2005 Lance slide-in truck camper that I’ve dubbed the Turtleback. This was a huge step down in size from the fifth wheel I bought back in 2010, the Mobile Mansion, which I sold in September of this year. I wanted something more convenient to travel with and I got it. My 2012 Ford F350 SuperDuty Diesel carries the Turtleback like it’s nothing, making it easy to drive and park nearly anywhere I like. I tested it out on an overnight trip in the Leavenworth area not long after getting it and then again on a week-long foray in the North Cascades of Washington state and southern British Columbia. It’s the perfect rig for any spur-of-the moment trip; I can have it on the truck in about 30 minutes and put it away in my cavernous RV garage even quicker.

But how would it do on a very long trip? Like a 3-month trip?

That’s what I’m learning this snowbirding season. So far, so good. Although most of my traveling has involved overnight stops in a variety of locations ranging from a gravel side road overlooking a relatively remote Nevada lake to a partial-hookup campsite on the Columbia River, I’ve also parked it for two of more nights and disconnected it from my truck so I could drive while leaving it behind. My “postcards” that allude to this have generated a few questions and I thought I’d answer them here.

Hooking Up the Camper

Setting a slide-in truck camper atop a truck isn’t difficult to do, but it does require care and patience.

The most difficult part is getting the truck tailgate off. Due to the weight, I can’t do it by myself. I usually grab a visiting friend and enlist his or her help. First unplug the cable for the backup camera in the tailgate, then disconnect the cables that hold it up when it’s dropped, then angle it out of its pin hinges. I have a cart roughly the same height as the truck bed that I’ve covered with an old saddle blanket and we lay the tailgate on that. This makes it possible for me to move it around the garage without help. I use the same cart to store the hardware needed to secure the camper to the truck.

Sometime before putting the camper on, I visit the local Discount Tire shop and have them inspect the tires. They’re relatively new — I bought them last February while traveling and have been getting them rotated on schedule. I ask the guy to inflate them to the maximum pressure. We usually do 70 pounds for the front tires and 80 for the rear ones. Of course, I could do this at home — I have a good compressor in my shop — but I like the idea of having the tires looked at, especially before a long trip.

When I get home, I use my own compressor to inflate the air bags under the truck bed. There are two of them and I inflate each to about 50 pounds. This cranks up the back of the truck a bit, but the weight of the camper will bring it back to level once installed.

Next, I need to install the four support bars on the truck. They’re marked with their positions: passenger front, driver, rear, etc. They slip into slots I had installed on the truck and are secured in place with pins. This takes about five minutes. Once I put these on, they stay on until the camper is put away after a trip.

When I’m ready to put the camper on the truck, I begin by using a remote control to crank up the camper so that its bottom is higher than the truck bed. This utilizes the four camper “legs,” which have electric jacks on them. The control can raise or lower them all together or individually. Obviously, it’s a lot quicker to extend the legs (thus raising the camper) all at once, but I do have to be careful that all four legs are on the ground. Occasionally I’ll have to extend one a bit more by itself to keep them all grounded.

Then I slowly and carefully back the truck under the camper. The truck has to go straight back with the camper centered over the bed. There’s only about two inches of clearance on each side. I watch my progress through the back window — I have to put down the rear seat to see clearly. Sometimes I get out and check my progress; rushing is never a good idea. When I’m about 3/4 finished, I get out, climb on one of those support bars, and reach into the truck bed to plug in the camper’s power cable. This not only keeps the camper’s battery charged while I’m driving, but it also powers and controls the camper’s running lights and brake lights. Then I get back in the truck and back the rest of the way in.

Spacer
Here’s the spacer, made with 2x4s, that the camper’s previous owner gave me when I bought it. It prevents the camper from damaging the taillight lenses.

Normally, you’d back up until the front of the camper bumps the lip of the truck bed right behind the cab. But because my truck has somewhat bulging taillights, if I backed up that far, the camper’s overhang would rub on my taillight lenses, scratching or breaking them. The previous owner’s truck was a 2013 Ford F350 nearly identical to mine. He’d taken short lengths of 2×4 lumber and had built a rectangle spacer that sits upright against the cab. He gave it to me when I bought the camper. So when I back up, the front of the camper bumps this 2×4 spacer, thus keeping the camper at least 2 inches back from where it would otherwise be. This makes it impossible for the camper to damage the taillight lenses.

Once the camper is in position, I shut down the truck, get out again, and use the remote to retract the camper’s legs. Little by little, the truck takes the full weight of the camper. The back end of the truck comes down. And then the legs of the camper start rising off the ground. I keep retracting them until they’re all within 4 inches from their stops. Again, sometimes this requires me to raise them individually. When I’m done, I can put the remote away in a little pocket I installed inside the camper door.

The last step is to use four spring-loaded screw tie-downs to attach the camper to the bars I installed earlier on the truck. This is the most time-consuming part because they always need to be adjusted. To adjust them, I use two 3/4 inch wrenches that I keep in a special bin with other tools related to the tie-downs in a compartment on the outside of the camper. I use the wrenches to loosen a bolt, then twist the spring up or down on the screw. When the screw’s length is long enough to keep the tie-down tight but not too tight, I tighten the bolt back up to keep it in place. I figure it takes me about 10 to 15 minutes to install all four tie-downs.

Tie-Downs
Here’s what the tie-downs on the driver’s side look like when installed. I leave the handle attached to the front driver’s side tie-down so it’s easy to disconnect when I refuel.

At this point, everything is done and I’m ready to roll. I figure that the active loading time (not including removing the tailgate or tending to the tire/airbag pressure) is about 30 minutes.

Prepping the Camper for Travel

Like any other RV, you need to prep the interior for travel. That means making sure all cabinets are securely latched, all loose items are secured, all windows and vents are closed, the antenna is cranked down, and the slide has been slid in. If there’s food in the fridge, I need to make sure it’s set to Auto mode so it automatically switches to propane when it’s not plugged in.

On the outside, I obviously need to make sure all water, sewer, and power is disconnected and all hoses and cables are stowed. Then I walk around and make sure all outside storage spaces are latched, the back door is securely closed, and the back step is up.

The last step is to tug on each of the tie-downs to make sure they’re still tight. As I drive, the camper shifts and one or more of the tie-downs can loosen up. That’s why I keep the wrenches handy. It takes about 5 minutes to adjust them before starting out for the day.

On the Road

The truck is definitely top heavy when I drive with the camper on board. I drive at the speed limit — never have to worry about getting a ticket! — and take curves and corners slowly.

I have to watch headspace. I’m not sure exactly how tall the rig is, but I figure 12 feet maximum to the top of the air conditioner. That means no drive-throughs or parking garages.

As for width, the rig is definitely wider than my truck, but its no wider than any other road-legal RV (8-1/2 feet). That means there’s no problems on any roads or going through any gates.

As for length, the camper adds about 2 feet to the back of my truck. That makes my already long truck even longer. Still, I can usually fit it in a parking space. This is a real joy when I make stops along the way for hikes or visiting other places of interest. With the Mobile Mansion, I was kept out of far too many places because I wouldn’t be able to fit in, park, or even turn around.

Trailhead parking
Want to go for a hike? No problem. My rig fits into trailhead parking spots, just like any other full-sized pickup.

And since the truck has high clearance and four wheel drive, I can drive it just about anywhere I like without worrying about getting stuck or bottoming out.

Another benefit of the setup is having easy access to my living space any time I’m stopped. Although it has a slide that must be closed in transit, I can still get into the camper to use any of its features while the slide is in. More than once, I’ve stopped for a hike or a rest and used the bathroom or made a meal in the kitchen. I recently reheated some leftovers in the microwave while at a scenic view area; prep the food on a plate, stick it in the microwave, push a button to start the onboard generator, run the microwave, turn off the generator, pull the plate out of the microwave. Can’t get any easier than that.

Overnight Parking

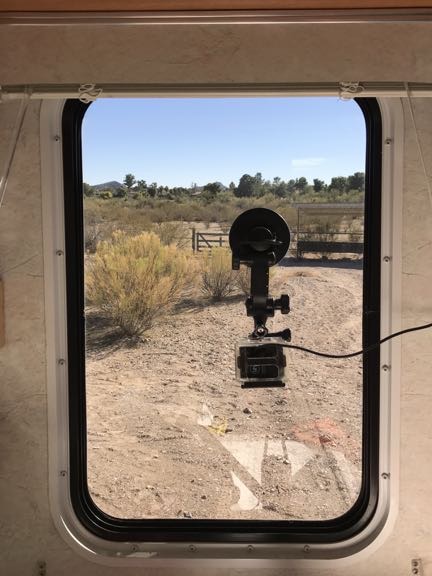
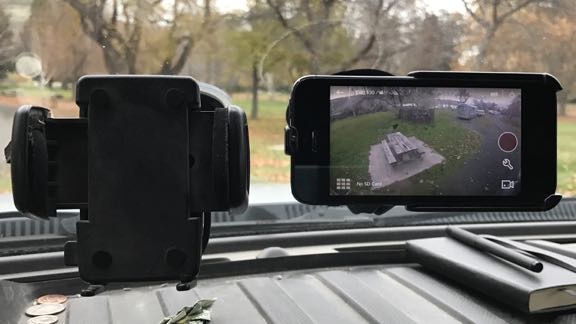
When I stop for the night, I can pull into a site any way I like. I usually park with the best view out the back. It easy enough to back up or park on any sort of angle in relation to a parking spot or campsite. (You can find a blog post about my “poor man’s backup camera” here.)

Level
Two levels like this help me keep the camper level, whether it’s on the truck or on its own. This indicates the front end is high.

Legos
In this photo, I’ve used my leveling blocks to make a ramp that I’ve driven up to raise the driver’s side back wheel. I left it parked that way overnight.

My mail concern is getting the camper relatively level. This helps the refrigerator work more efficiently, but it also makes it more comfortable for my stay. No one likes to live in a space that’s slanted. If I can’t find a level spot to park on, I have Lego-like blocks I can use under one or more truck tires to help level it out.

If I’m parking for the night and plan to leave in the morning, I don’t need to offload the camper. I just shut off and lock the truck and move into the camper. Opening the slide is as easy as turning a key. If my overnight parking space has utility hookups, I can connect water, power, and even sewer with the camper still on the truck. If I don’t have a hookup, I can use battery power, propane, and the onboard generator (if needed) to operate the refrigerator, stove, water heater, furnace, etc. Only the microwave and air conditioner require more power than the batteries can provide; the generator can run either one. The camper holds 30 gallons of fresh water; a battery-powered pump delivers it to any faucet or the toilet. There’s even a solar panel on the roof to help keep the batteries fully charged during daylight hours.

Overnight Parking
Here’s my rig parked for the night in the desert near Wickenburg, AZ.

Off-Loading the Camper

If I plan to park for more than just one night, I’ll likely want to be able to drive the truck without the camper loaded. This means off-loading the camper. Again, this isn’t very difficult to do.

Once I’ve got it parked where I want it, I remove the tie-downs. In most cases, this means removing the securing pin and using a detachable handle to loosen it. I must remove them from the truck but can leave them dangling from the camper if I like. I usually completely remove them, however, and stow them in a safe place where they’ll stay clean and dry.

Then I use the remote to extend the legs so the camper is completely raised at least two inches off the truck. I get in the truck, pull forward a few feet, get out, unplug the camper’s power from the truck, get back in, and pull out the rest of the way. I must be completely clear of the camper.

Next, I use the remote to retract the legs so the camper is lowered back down. The lower it is, the more stable it is for moving around inside. The only thing I need to be careful of is the pipe for the generator’s muffler. Normally, I stop lowering when that’s at least a foot off the ground. I then consult the level indicators on the side and back of the camper and use the remote to raise or lower legs individually to get the camper level, again being careful to ensure that all four legs are solidly on the ground.

Parked at KOA
Here’s the camper and truck parked side by side at the KOA in Las Vegas. Note that I had a full hookup so I had all my hoses and 30 amp cable out. I’ve since bought a much shorter hose.

Sawhorses
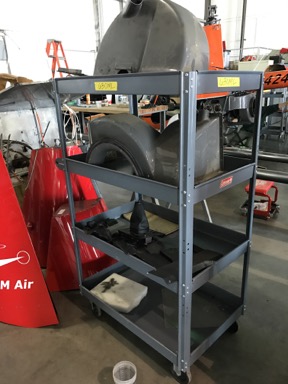
Here are the saw horses I bought at Home Depot. They collapse down into a small package and have handles to move them around.

If the camper will be parked for more than just a few days — as it is now and will be again at least a few times later in my travels — I help stabilize it by placing three collapsable saw horses under it. I bought these at Home Depot for about $50 each. Each one can (supposedly) support 1300 pounds. Since the camper (supposedly) weighs about 3500 pounds, I figure three should support it comfortably. The trick is to position them properly and adjust them to the proper height on ground that might not be level. Then I lower the camper onto them to the point where the sawhorses are taking about half the weight. All the legs are still within contact of the ground and (hopefully) supporting some of the weight. This prevents the camper from rocking when I move around inside, thus preventing damage to the legs. (I should mention here that I built a wheeled platform that performs the same function in my garage at home. That can actually take all of the camper’s weight.)

Sawhorses add stability
Here’s the camper on its sawhorses while parked in my friend’s backyard. It’ll be set up like this for at least two weeks and I’ll be in and out to clean and unpack/repack it. I have to confess that I lowered it onto one of the sawhorses before the others could share the weight and two of the sawhorse legs bent; I exchanged it for a new one at Home Depot yesterday and will be more careful in the future.

I figure that it takes about 15 minutes to offload the camper. Add about 10 minutes for the sawhorses, when used.

Why this Works for Me

As you can see, it’s pretty convenient for traveling. On the road, it’s like driving a big (but not huge) truck. When parked long term, it’s like living in a small trailer.

While towing a trailer might be easier for hooking up or unhooking when parked, having a pull trailer has two drawbacks. First, it isn’t as easy to get into tight parking lots or into campsites. Second, you can’t really tow something behind a pull trailer.

Although I’m not towing anything on this trip, I do have the ability to tow if I want to. I debated for months on whether I should bring my boat with me on this trip. In the end, I decided against it, mostly because I didn’t want the bother of having a difficult to park rig. But if I were going on a trip up to Roosevelt Lake or Lake Powell or anyplace else where it would be nice to have both an RV and a boat, I’m all set to do it. All I need is a tow bar extender, which is widely available online and in RV stores. My truck definitely has the power to pull it all.

So far, I’m very pleased with the way this has been working for me. But let’s see how I feel in three months after another 2,000 miles. I’ll have to report an update then.

Helicopter Overhaul in Progress

Stripped down and waiting for “the kit.”

Regular readers of this blog might remember my October series of posts about flying my helicopter from my home in Malaga, WA to Quantum Helicopters in Chandler, AZ.

Robinson helicopters are required to be overhauled at 12 years or 2200 hours, whichever comes first. January 2017 would be 12 years for Zero-Mike-Lima, but because I need the helicopter back in time for my late winter frost work and I don’t fly it much during the winter anyway, I dropped it off early to give the shop plenty of time to do the work they needed to do. At this point, they’ve had it for about a month and a half. They’ve had the money they needed to get started for about a month.

I’m back in Arizona now, enjoying the first part of my annual migration to the south. (After 15 years living in Arizona, it’s hard to take the short, dreary days of a Pacific Northwest winter.) I had errands to run in the Phoenix area today, so I thought I’d head down to Chandler to visit Zero-Mike-Lima. I had a part to drop off — a starter that’s part of the “core” that needs to be replaced. The mechanics will pull the existing starter, which was replaced only a few months ago, and I’ll keep that as a spare. The helicopter will get a brand new starter among the many brand new parts that come in the overhaul kit.

And that’s what it’s waiting for now: the kit. The maintenance shop draws up a list of the parts needed for the overhaul and sends it to Robinson Helicopter, along with a huge chunk of my money. The parts folks at Robinson pack up the parts that go into the kit. This takes about six weeks. They then put it all on a truck and ship it to Arizona.

Blades
My main rotor blades sit atop a pair from an R22, along with the “candy cane” bar that protects the tail rotor area. I’ll go back for the blades once I figure out how I can get them home. I think they’ll look good hanging on the wall in my living room.

In the meantime, the mechanics disassemble the helicopter and pull out the parts they need to send back to the factory as cores. I’ll get some money back for those — possibly as much as $50K. (I sent them $175K.) They send the engine to a shop to be rebuilt. They send other parts out to another shop to be inspected. They take the time-limited parts that have no value and literally thrown them on a scrap pile.

So the helicopter is mostly disassembled at this point. Most of its parts are on carts where the tailbone should be. Its doors are on another cart. One of its skids is temporarily on another helicopter that had a hard landing the other day and broke a skid. (I saw the video and it’s amazing that helicopter ended up on its skids.) The other skid is shoved underneath of it.

Fuselage
The helicopter’s fuselage is sitting on a rolling wooden cart right now.

Cart full of parts Cart full of parts
Rolling carts full of parts occupy the area where the tailcone should be.

Helicopter Interior
They stripped out the carpet and removed the seats. None of the avionics will be replaced.

No one was working on it when I got there. They’re waiting for the kit. They had plenty of other helicopters to keep them busy, though. Quantum is a large operation.

I’ll go by and visit again later this month or after the kit has arrived. I’ll bring cookies or pizza for the mechanics. (I really regret not stopping for at least cookies today.) I don’t want to be a nuisance, but I do want to keep apprised of the progress. I want to take photos along the way.

And I can’t wait to go flying again.

About the “Postcards” Posts

Lazy blogging at its best.

At this point I think I owe regular readers a quick explanation. 

I normally write very long and drawn out blog posts about cooking, flying, traveling, etc. All kinds of topics — after all, the site is called An Eclectic Mind and I cover an eclectic assortment of topics.

Lately, however, I’ve been on the road traveling south for the winter and I’ve been doing a lot of driving. Although I have my laptop with me, I honestly don’t feel like sitting in front of it typing long blog posts about my travels. Instead, I’ve decided to share short stories about my travels with pictures I’ve taken along the way. That’s with the “postcards” are all about.

I will eventually sit down in front of my computer and write more substantial blog posts about the things I’m doing and thinking. There’s a lot going on in the news and I’m actually following it when I’m on the grid. I just spent two days in Las Vegas and I got really tuned in again. Soon I’ll be housesitting in Wickenburg and have a lot of time on my hands to get some writing done.

So I guess what I’m trying to say is this: don’t give up on me. If you come here to read my long, thought out blog posts, you will eventually see them again. But it might not be for a few more days. Until then, I hope you enjoy the postcards.