I’m going HD.
Captain Video is one of my “personal nicknames” — a name I apply to myself when I do something that’s silly or dumb or, in this case, an attempt to explore something new that’s currently beyond my skill set.
I’ve been interested in video for the past 10 or 15 years. I write for a living and I always thought it would be interesting to be involved with a video documentary project. Although one of my dreams has been to work on the research and composition of a documentary’s narrative, I really wanted to be part of the project throughout the video acquisition process, watching the cameramen and other professionals at work, seeing interviews conducted, listening to the director explain his goals for each shot.
I also toyed with the idea of doing my own video. We’ve owned various video cameras from the time the first shoulder mounted VHS machines hit the scenes. Cameras have been getting better, cheaper, and smaller. Over the past five or six years, I bought two different Canon video cameras. I used them a lot when I first bought them, then put them aside. Now their batteries never seem to be charged when I want to use them.
But earlier this year, I did make the big plunge into video production. I did it what I thought was the smart way: I hired a production team. Their job was to acquire the video that I could not shoot — mostly because I was flying a helicopter while the shots needed to be made. They would then take the video and put the best shots in the proper order using the proper transitions and adding the proper music and narration. The result: not one but three final broadcast-length/quality videos.
I won’t go into detail on how this is working out. It’s still to early in the process to say. In general, we have a lot of good footage — almost every bit of it in true high definition taken with professional video equipment. But there are gaps in the footage — scenes I need to tell my stories. And I simply can’t afford to get the video crew back up on location for a few days to get the shots I need.
 Enter the Sony HDR CX12 video camera. It’s small, lightweight, easy to operate, and shoots true high definition footage on Sony memory sticks. My production crew has one of these cameras and a lot of the footage shot with it was very usable. While not exactly cheap, it was affordable. I ordered it on Amazon.com yesterday, along with a spare battery and an 8 GB memory stick.
In December or January, Mike and I will head up to Page, AZ to pick up the video clips we need. We have some other business up there to attend to anyway, so we’ll be able to kill two birds with one stone. We’ll watch the weather and pick a weekend with calm winds and clear skies. We’ll fly the helicopter up with doors off on a Saturday, picking up needed clips along the way. Then we’ll do some late afternoon flying over the lake, spend the night in a motel, and follow it up with some early morning shots. Mike and I will take turns shooting, using the camera on the side of the aircraft with the best view of what we need to shoot. Then we’ll fly home, where I’ll put all the footage on a hard disk or series of DVDs and send them to my production crew for inclusion in the final videos.
At least that’s the plan.
Realize that I’m very worried that once this project is over, this camera will sit in a drawer with the others. The power will drain from its battery and I’ll be frustrated every time I take it out to use it. It’s going to take real effort on my part to keep using it. Probably a few small projects. None of those projects require HD, but it will be nice to save the footage in that format for future use.
I do need to mention here that I’ve been sitting on the fence about buying this camera since I first heard of it. My fears of not utilizing it and the price tag were the main things holding me back. But the need for HD video to complete my projects was a big motivator. It’s a lot cheaper to buy the camera and get the footage myself than to transport a video crew from San Diego to Page, AZ and back. To be honest, I’m also worried that they won’t get the footage I need on this second try, either. (You know what they say about wanting to get things done right.)
The thing that convinced me was the September 3, 2008 review on Amazon.com by Allen C. Huffman. It’s the first review that appears — probably because everyone who voted on it said it was helpful. He gave the camera 4 out of 5 stars and then provided some extremely helpful details and advice about using the camera with a Mac. He listed pros and cons about the camera, comparing it to another Sony model he owned and liked. This “real life” review by someone who is obviously not easily impressed helped convince me that this was the right camera for me.
Anyway, I’ve taken the plunge. Let’s see how much use I get out of this new piece of equipment.


 If you don’t know what Antelope Canyon is, you’ve probably never read Arizona Highways or seen any of the “typical” Arizona photos out there on the Web. As
  Lower Antelope Canyon is downstream from upper. It has far fewer visitors. I think it’s more spectacular — with corkscrew-like carvings and at least two arches — but I also think it’s harder to photograph. It’s also far more difficult to traverse, requiring climbing up and down iron stairs erected at various places inside the canyon, clambering over rocks, and squeezing through narrow passages. For this reason, the Navajo caretakers don’t really limit your time in Lower Antelope Canyon. You slip through a crack in the ground — and I do mean that literally (see photo left) — and are on your own until you emerge from where you descended or from the long, steep staircase (shown later) that climbs out before the canyon becomes impossible to pass.
 I went to Lower Antelope Canyon with my next door neighbor and fellow pilot, Robert, today. It had been a whole year since
  We arrived at about 11:20 AM and the place was unusually crowded. But Lower Antelope Canyon is large and everyone spread out. Most folks only made the walk one way, taking the stairs up and hiking back on the surface. We would have done the same, but we ran out of time. We were in there until 2:30 PM; Robert had to be at work by 4 PM.
 We made our way through the canyon slowly, stopping to take photos along the way. Positioning the tripods was extremely difficult sometimes, as the canyon floor was often only wide enough for a single foot to stand in it. My tripod really hindered me, but I made it work. I think Robert (shown here) had an easier time with his. We were two of dozens of photographers, most of which were very polite and stayed clear of other photographer’s frames. This is the biggest challenge at Upper Antelope Canyon. I find it stressful up there, as I told a trio of photographers from Utah. Lower Antelope Canyon is much more relaxing.
 Near the end of the canyon walk, I was worn out. It wasn’t the hike as much as the struggle to find the right shots and get the tripod into position. I felt as if I’d had enough. So when we reached the last chamber before the canyon got very narrow (and muddy) and I laid eyes on those stairs, I realized it would definitely be better to take the easier route back. I took this shot with my fisheye lens, which was the only way to get the entire staircase in the shot. If you look closely, you can see Robert’s head poking out near the top.
 I took about 95 photos while in the canyon. Some of the better ones — along with some to illustrate the story — are here. There’s a better collection in my Photo Gallery’s new
  The September 2008 issue of
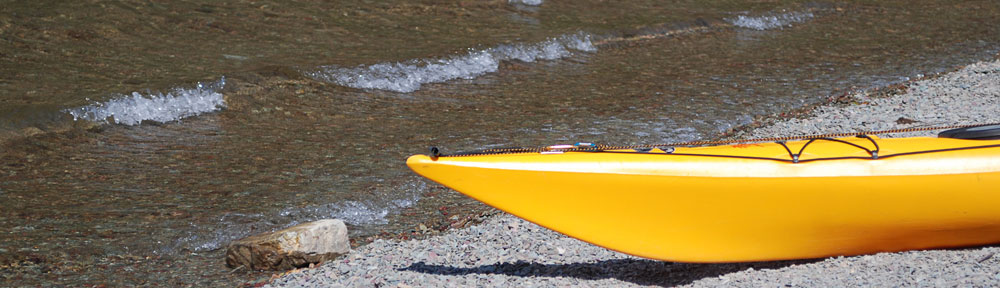
  Here’s an example. This photo, which I call “Mercury,” is one of my favorites from the trip. The light is bad, but I really love the reflection of this boat. When you consider I snapped over 300 images in two weeks on this trip and I saw some amazing things along the way, I find it odd that this should be one of my favorites.
 I think it was in 2003 that Mike and I decided to try our hands at aerial photography. I bought a book about it (as I usually do, when I want to get a jump start on learning something) and the book said the best kind of camera for this kind of work was a