Construction, Day 16: Garage Doors Framed, Windows In

Another minor problem fixed along the way.

On May 20, 2014, I began blogging about the construction of my new home in Malaga, WA. You can read all of these posts — and see the time-lapse movies that go with them — by clicking the new home construction tag.

The crew spent most of Thursday installing the windows. But there was a small problem.

I discovered it on Wednesday evening when I was showing a framing contractor the space. That’s when I realized that the windows on the garage side of the second floor were roughly the same height as the bedroom window on the hill side.

And that was wrong.

You see, I wanted the windows as low as possible. I did not want to look through a screen or a window part. I wanted to look through plain glass, no matter whether I was standing or sitting. That’s why I asked for windows with one big pane and a small slider for ventilation at the bottom. I got exactly what I wanted.

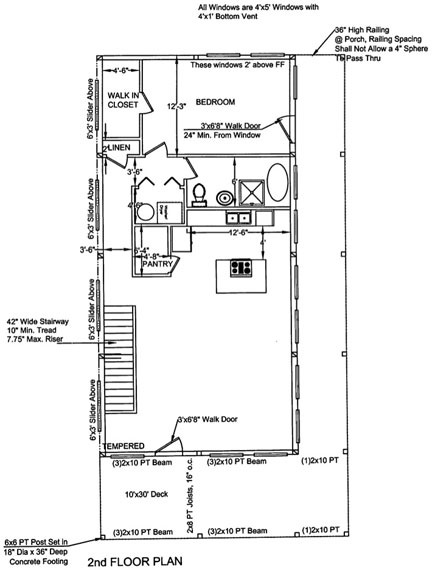
Code allowed the windows to be as low as 18 inches from the floor if on the ground floor or if there was a deck outside. That meant all the windows on the second floor except one could be 18 inches from the floor. The one on the hill side, which didn’t have a deck outside it, had to be at least 24 inches from the floor. Because that was the only window on that wall, the difference in height shouldn’t be noticeable.

But because the idea was to align the tops of the windows with the two doors to the deck and those doors would be 6’8″ tall, we decided on 20 inches for all the windows except the one on the hill side.

But that’s not what the crew did. They framed the one window properly at 24 inches but framed the others at about 23 inches. That’s 3 inches too high.

Now you might say, “Three inches? You’re going to make a big deal about that?”

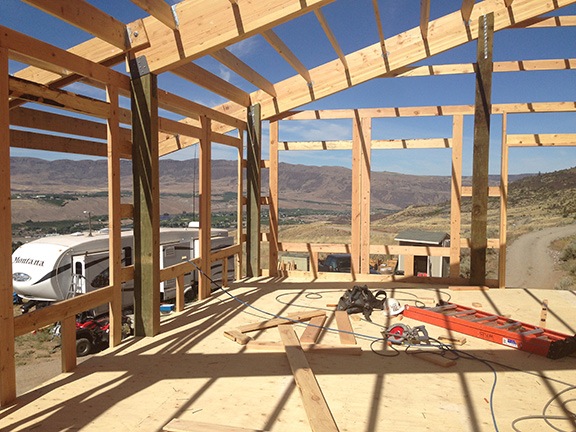
The way I saw it, it wasn’t 3 inches higher than I wanted. It was 5 inches higher — I wanted them at 18 inches. Standing on the second floor, looking though the empty window frame, I realized that the top of the window looked out at the deck roof overhang. That was wasted window space. There would be less wasted window space if the windows came down.

That’s the back story. I figured I’d talk to the builders when then arrived on Thursday morning.

Of course, I forgot. They got to work and immediately installed the four highest windows that faced south. They did them so quickly that I didn’t even know they were done.

Top Window In
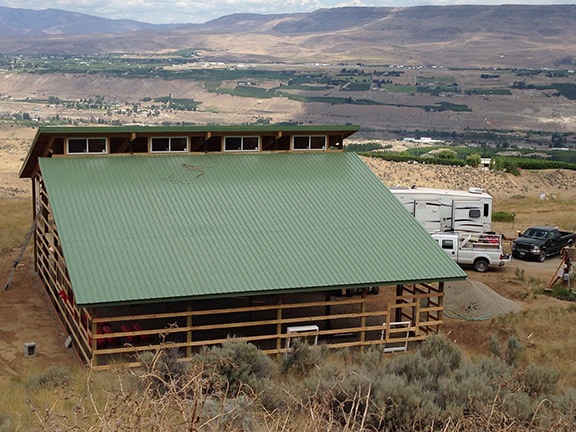
The top windows look out to the south and are primarily for light and air circulation — if I can get them open!

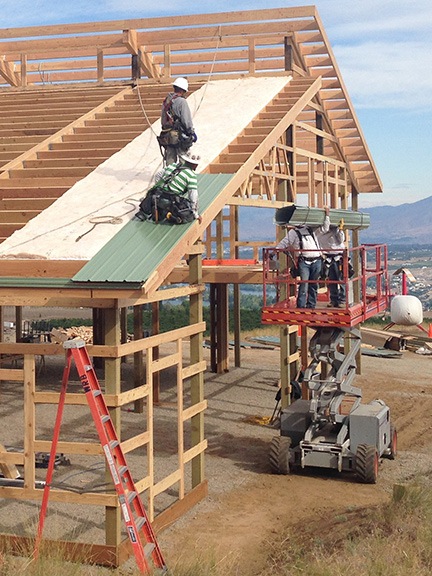
I came outside to do something in the yard — I can’t even remember what — and saw them installing the window on the hill side. My brain kicked into gear and I dropped what I was doing to talk to Angel, the crew boss.

I don’t think he liked what I had to say. He was very confident that the door was taller than I’d been told and that he’d done it right to align the door and window tops. But I knew that if I let them move forward with the window installation in a place I didn’t want them, I’d regret it forever. So I told them I’d call the office and check with Tanya. He said they’d get to work on the garage door framing, which had to be adjusted to account for the planned slight slope (for drainage) in the garage floor.

I called Tanya’s office. It was 7:10 AM; the guys had started early again. Tanya wasn’t there. I left a message.

By 8:15 AM, I still hadn’t heard from her. I talked to Angel. I was conflicted on how I felt about it, wondering if I was being dumb. You know that feeling of self-doubt you get once in a while? I don’t get it often — which may actually not be such a good thing! — but when I do get it, I listen to it. It’s times like these when a real partner — someone with the same goals — can be helpful. (At least I assume so; I haven’t had that in a very long time and can’t quite remember what it was like.)

Angel suggested we call Corey, the boss. He gave me Corey’s cell number and I called. No answer. I left a message.

A while later, Corey called back to say he was on his way. I didn’t mean for him to come all the way to the job site, but apparently he felt he needed to.

He worked with the guys on the garage door issues and got them set to do what was needed. Then he and I climbed up to the second floor — on a ladder, since the man-lift was being used — and did a lot of measuring and talking about the windows. He was interested in two things: code and making me happy. In the end, I told him I definitely wanted the windows lower. I told him I preferred 18 inches but if 20 inches aligned the window tops with the door tops, I’d take 20. But if the door was so much taller that alignment required the windows to stay in their current position, I’d prefer 18 inches.

He said that it was a good thing that I’d brought this up now, before the windows went in. He said that once the windows and metal went in, it would be very difficult to fix. I knew that, of course, which is why I’d stopped Angel’s crew when I did. It wouldn’t be costing me money to fix it since I hadn’t made the mistake and this wasn’t technically a “change.” (Remember, the windows were supposed to be 20 inches off the floor.) But who cares about that? It made no sense to let them move forward when a fix was so obviously needed.

Corey talked to Tanya for clarification on code and told me they’d set the windows 18 inches above the floor. I told him I didn’t really care if the window and door tops didn’t align — as long as all the window tops aligned. “Curb appeal” is very low on my list of priorities.

Corey issued the orders and left. The crew finished up their work on the garage doors, moved all the window frames down about 5 inches, and put the windows in.

Building with Windows
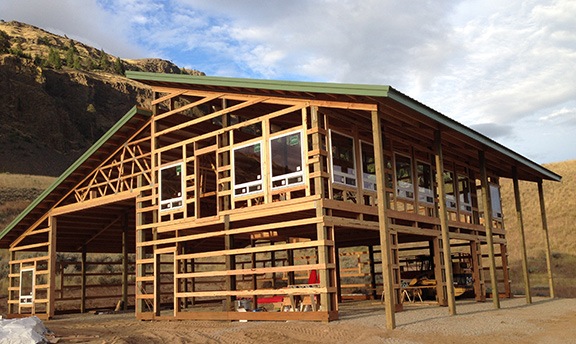
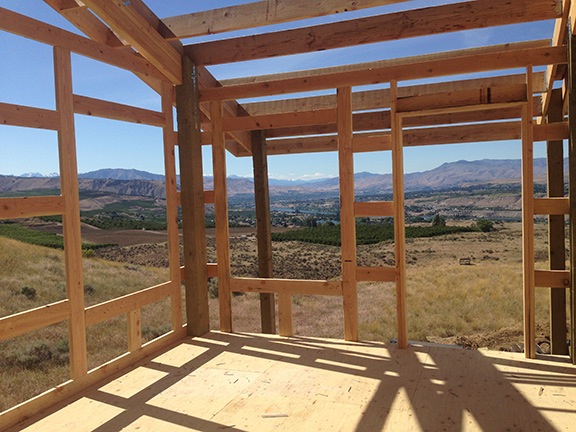
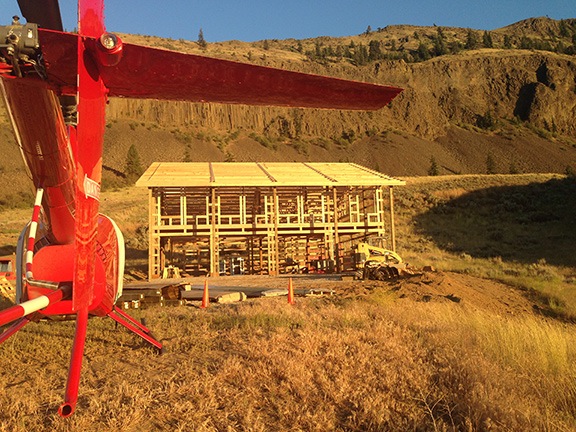
Here’s the building early the next morning with the windows in. I went up there to check them out from the inside and am very happy I had them shifted down.

In the meantime, I went flying, doing my first cherry drying flight of the season. (Hell, despite appearances, I do work for a living.)

I should mention that while Corey was onsite, he gave me the progression on how the project would be finished up. The guys would continue working on the metal and then frame out the deck. In the meantime, a plumber would come to stub out the water and sewer lines. Once that was done, they could install the drain in the RV garage floor and pour the concrete floor and the concrete for the front deck post holes. The guys could frame the front deck. Then they could put the stairs in. Then I guess they’d be done.

Two weeks? Looks like that to me. Should be done right before the party.

Here’s the time-lapse for Thursday. You can see them lowering the window frames right before lunch.

Construction, Day 15: Roofs Finished

The roof is done.

On May 20, 2014, I began blogging about the construction of my new home in Malaga, WA. You can read all of these posts — and see the time-lapse movies that go with them — by clicking the new home construction tag.

The crew arrived early on Wednesday — only minutes after I popped a fresh SD card into my time-lapse camera and started it up. Now that the days are very long — we get almost 16 hours of sunlight, and even more light if you include twilight hours — and starting to get very warm, the builders want to work early. They asked if they could come as early as 5 AM and I told them they could — heck, I’m awake at that time. They rolled into my driveway at about 5:40 AM. The earlier they start, the earlier they can leave.

The day was perfect for construction on a rooftop — very little wind and relatively cool. As usual, the crew got right to work. I was home all day, doing odd jobs around the yard and working on a writing project on my computer. I came out a few times for a peek at where they were, amazed, as usual, at how quickly this “well-oiled machine” worked.

Roof from the Roof
At one point, I climbed up onto the roof of the RV for a better look at what they’d done — and a photo, of course.

They finished the metal on top of the roof before lunch. Afterwards, they went back outside and worked on the trim, which I’m sure has a special construction name I’m not aware of.

And then they left.

Afterwards, I repositioned the man-lift and used it to go up to the second floor. I was meeting with a builder to start getting bids on the framing job and wanted another look around before he arrived. With the roof on, the building was beginning to really feel like the big shelter it would soon be.

Second Floor, Covered
Another look from the second floor, this time with the roof on. There’s no insulation under this roof yet; it’ll be done with the framing and drywall. The framers will put a wall between the second floor and the shop. I’ve decided to leave the roof beams (but not the purlins, of course) exposed.

Once again, the time-lapse camera isn’t in the best position to see exactly what they did. But you can watch them progress from left to right across the rooftop and then see them put up the trim.

Construction, Day 14: One Roof Finished

Despite moderate to heavy winds, the workers manage to finish one of the building’s two roofs.

On May 20, 2014, I began blogging about the construction of my new home in Malaga, WA. You can read all of these posts — and see the time-lapse movies that go with them — by clicking the new home construction tag.

Monday’s high wind postponed roof work. The wind was also supposed to be a factor on Tuesday, but when the workers arrived around 7 AM, the wind wasn’t much more than a breeze. They decided to go for it.

Starting on the Roof
In this shot, you can see the first roll of insulation and first roof metal panel placed. Two workers are delivering a rolled up sheet of roof metal to the guys waiting on the roof.

There were four workers in the crew that day and you could tell that they’d obviously done this many times before. They started by using the man-lift to get two of the workers and a roll of insulation up on the roof beams. The workers unrolled and placed the insulation. Then the two men on the ground rolled up one of the many long sheets of roofing metal and tied it securely. They used the man lift to get it up to the workers on the roof. They unrolled it and fastened it into place.

The very edge of the roof, where it overhangs the outside of the building by about two feet, did not get any insulation. As Angel and I discussed later on, there’s no reason for it and it’s basically all taken away by birds, over time, for nesting material. (Note to self: keep garage doors closed during bird nesting season.)

I busied myself with work around the yard for most of the morning. I needed to construct a latticework for my peas and beans to climb as they grow. I needed to haul off some sage I thought I’d burn but realized was an eyesore. I needed to retrieve a 20-in by 14-ft culvert pipe someone had left on my property years ago and put it on Craig’s List to earn a quick buck. My 1999 Yamaha Grizzly ATV, which I bought new in 1999 for “yard work” in Arizona, was a huge help. I’m so glad I brought it with me, along with the “farm trailer,” I’d bought in Arizona all those years ago to use with it.

At one point, I drove the Grizzly up the road for a look at their progress from above. In only a few hours, they’d done more than half the roof.

Roof progress
I can’t believe how quickly the roof metal went up.

Meanwhile, the wind was picking up. I really expected them to call it quits, but if there’s one thing I noticed about this crew, it’s that they like to finish a whole job in a day. You can clearly see this if you go back through the day-by-day posts I’ve written about the project. So even after breaking for lunch at about noon, they went back to the roof to finish up.

I had a meeting at the airport to attend at 2 PM. Although I toyed with the idea of flying over, I had some errands to run in town so I drove. I passed the workers on their way home when I drove back around 4:15. When I reached the overlook for my building, I saw that the roof was done.

Finished Roof
The larger of my two roofs is done.

I have a time-lapse for the day (of course). It doesn’t clearly show what they did because of the camera angle. Although I toyed with the idea of moving the camera, I didn’t want to deal with the problem of getting power out to it. So I left it where it was. The other roof work, which should be done today, will be more visible.

Construction, Day 13: Framing the Living Space Windows

Ten of the last 11 windows get framed.

On May 20, 2014, I began blogging about the construction of my new home in Malaga, WA. You can read all of these posts — and see the time-lapse movies that go with them — by clicking the new home construction tag.

The builders were supposed to put on the metal roof today. In fact, on Thursday they even warned me that they might come as early as 6 AM to get started.

But the weather didn’t cooperate. The usual work crew arrived without the roofing guys. It was just too damn windy. No one wants to be standing 30 feet above the ground holding a sheet metal sail.

So Angel and his crew went to work on framing the windows and doors to the deck for the second floor living area. With the floor in place, it was easy.

I was out most of the day. With the construction of the building shell nearing completion, it was time for me to get to work on the interior. The first step was the HVAC. I met with four contractors to talk about options and got promises for bids by Wednesday. I made some other stops, too, including a very nice lunch at a farm stand up the road from East Wenatchee.

When I got back, most of the windows had been framed. I watched them work on a few while doing some odd jobs around my property. They would have finished them all, but they ran out of lumber.

Later, after the builders had gone, I used the man-lift to go upstairs. (My friend Bob, who had come for dinner the night before, had shown me how to get the darn thing started and that was all I needed to make it my personal elevator.) I wandered around my future home, checking out the views from my future windows. I liked what I saw.

Bedroom View
Here’s the view from the doorway of my future bedroom. There will be two 4×5 windows and a glass door leading out to a long deck.

Great Room View
In this shot, I’m standing right about where my stove/breakfast bar island will be in my future kitchen looking out across my future great room. This room will have eight 4×5 windows and a glass door leading out to the front deck.

Still later, as the sun was getting ready to set, I wandered out by where my helicopter was parked to take a photo from a different point of view. I realized that my home was really starting to look like a home.

Sunset Helicopter
Home is where the helicopter is.

Here’s the time-lapse video for the day:

New Home Questions Answered

Your questions, answered in one place.

Since I began blogging day-by-day construction progress of my new home on May 20, 2014, I’ve gotten a lot of questions and comments from blog readers, Twitter followers, and Facebook friends and followers. I thought I’d respond to a few of the most common ones here.

“Not much in the way of foundations. Small wonder whole towns disappear when tornadoes hit.”

Hoisting with a Crane
The long posts were hoisted with a crane.

This comment appeared on the blog post for Day 2, which showed the posts supporting the building in place. News flash: there is no traditional “foundation” and there won’t be.

I’ve repeatedly linked to a Wikipedia article about pole buildings in an attempt to educate readers about this type of construction. Unfortunately, the ability to consume web content beyond looking at pictures and video remains above the skill level of many blog visitors.

The posts supporting my building are 6×8 or 8×8 (depending on length and position). Each pole is sunk 3 feet into a hole 4 feet deep and 3 feet across. The holes and post placement were inspected by the county literally minutes before the concrete trucks arrived to fill each hole with concrete.

As far as tornadoes go, the chances of a tornado barreling down a path along the base of the cliffs in Malaga, WA are pretty slim. So slim, in fact, that you stand a better chance of winning a lottery jackpot, being struck by lightning, and being attacked by a shark — all in the same day.

But just in case it does get windy, the building is designed to withstand gale force winds. I don’t recall the exact number, but I do remember it being over 100 miles per hour.

And if you’re worried about seismic activity when Mount Rainier turns Seattle into an ash-covered scene from a futuristic disaster film, it’s also built to withstand earthquakes — not that we’ve had any serious ones here in a very, very long time.

Where’s the foundation?

See above.

When are they going to pour the foundation?

See above.

Please tell me they’re going to pour a concrete slab.

They’re going to pour a concrete slab.

Really. They are.

For some reason, they do this after the building has been constructed. I don’t know why. Maybe it’s so they can drive equipment around inside without worries about damaging new concrete. Does it really matter? The building is not attached to a foundation or a slab so it doesn’t really matter when they pour it. For some pole buildings, they don’t pour a concrete slab at all. In fact, I could save a bunch of money now by putting off the pouring of my slab until I’ve got some more cash. And believe me, I’ve been thinking about that for the garage side, which really doesn’t need concrete right away.

My building will also have a floor drain in the RV garage. That’ll make it possible to do something silly — like wash my car or helicopter inside. (Imagine that!) Or for the building to someday be used as a wine-making facility. (That’s thinking ahead.) The concrete in the RV garage/shop side will be gently sloped to that drain; the concrete in the car garage side will be gently sloped toward the garage doors.

I’ve got it covered, folks.

Who designed the building? Did you work with an architect?

I designed the building. I did not work with an architect.

This probably saved me about $10K in design fees.

It’s also one of the reasons I went with a pole building. Not only is it simple construction, but the folks who specialize in pole buildings can make whatever you dream up a reality without getting costly third parties involved. I brought my sketches to Western Ranch Buildings and Tanya patiently worked with me to fine-tune them for cost effectiveness without sacrificing my must-have features — such as the windows and huge RV garage door. Tanya, working with an in-house engineer for some components, drew up plans that would satisfy the county and give the workers something to work with. If you saw how simple my building plans are, you’d be shocked.

As for the design itself, I thought about what I needed in the building — space for all of my possessions and a modest living area. Then I thought about what I wanted in the building — a shop area, windows to let in light and air and show off the views from inside, decks to take in the views from outside. I knew I wanted that living space on the second floor and I knew it had to face the views. Since the RV garage side needed to be tall to accommodate my RV and helicopter, the living space had to be over the regular garage. I went with a four-car garage because that’s what fit in the 24 x 48 foot space I limited the living space above to.

(County ordinances allow me to have two homes on my 10 acres, as long as one of them is under 1,200 square feet. Since I can’t afford to build a garage and a home, I’m building the 1,200 square foot living space first and leaving the prime building location available for the construction of a real home, likely by the property’s next owner. When I had the septic system installed, I ran lines for both building sites, so the next owner will be all set to build that dream house.)

In a way, the design emerged on its own. Sketches evolved. The original design was a huge square building with a standard peaked roof. But when my neighbor put in a split roof, I realized that it would not only look better but also give me another interior wall for windows into my living space. I changed my sketches accordingly and the final design took shape.

Everything I did was well thought out — hell, I had enough time to think about it — with plenty of consideration for future needs — even a future beyond my ownership.

Why aren’t the builders doing the interior of your living space, too?

Two reasons.

One is that these folks specialize in pole buildings. Although they can do interiors, it’s not what they usually do. Not only that, but they’re very busy and I really can’t delay this project any more than it has been delayed. (I’m sick of living in a trailer and want a solid roof over my head, preferably one that doesn’t sway when the wind blows.)

Floorplan
Here’s the living space floor plan as submitted to the county. It’s not 100% right, but it’s close enough for permitting purposes and to get bids on HVAC, framing, insulation, and drywall.

The other more important reason is money. I’m not quite sure what I can afford to get done. I know I can pay for the shell of the building; I’ve been saving for well over a year, living on the cheap in my RV to put aside every penny I can. The income I get from this season’s cherry drying work and the promise of a loan from a family member if I need it assures the shell will be done.

I’m not sure, however, how far I can stretch my money beyond that. I know I can save money by doing things myself; I have every intention of doing all the plumbing and electrical work, for example, and will likely do the floors and all the painting. But I also know that I need to hire professionals to do difficult things such as HVAC ductwork, framing, and drywall. By breaking down the living space project into sub-projects, I can do them one at a time, knocking them off as time and money allows.

With luck, heavy rain over the next few months, and a lot of hard work, I’ll be cooking up Thanksgiving dinner for friends in my new kitchen.

Can you share a conceptual drawing of what it will look like when done?

This question from a Facebook friend made me giggle. You see, they’re working so very quickly.

My response: If you wait two weeks, I’ll have a photograph.