Pro Writing Fundamentals: Editors

Who are these people and what do they do?

Posts in the Pro Writing Fundamentals Series:
Editors
Contract Negotiation

Since writing my multi-part series about copy editors, I’ve been thinking about taking a step backwards, for the benefit of new writers, to discuss the various types of editors a writer may work with on a book project. Copy editors are just one type, but there can be quite a few others.

So here’s that discussion, along with a summary of how they all work together in the book production process.

Acquisitions Editor

The first kind of editor you’re likely to work with is an acquisitions editor. This is an editor whose job is to acquire new books.

When you write a book proposal and send it to a publisher, this should be the person you contact. After all, this is the person who knows what the publisher is looking for. It’s also the person who is able to make you an offer and get the contract process going.

Keep in mind that not all publishers have acquisitions editors. These days, as many publisher trim the fat, they’re combining multiple jobs to make them one person’s responsibility. Also remember that although “acquisitions editor” is a standard title, not all publishers use standard titles. When I talk about an acquisitions editor, I mean the person acting in that capacity, no matter what her title is.

(I use feminine pronouns to refer to editors throughout this article. That’s not because I’m a feminist. It’s because the vast majority of my editors over the past 15 years have been women.)

Here’s how it works. You approach an acquisitions editor with a book proposal. If she likes it, she starts talking dates and money. If things continue to move smoothly, she’ll make an offer. You’ll make a counter offer. You’ll meet somewhere in the middle, likely closer to her number than yours.

Then she’ll get the legal department involved. They’ll draw up a standard contract with your money terms and dates. You’ll go over the contract and either ask for certain points to be changed or sign it. Throughout this whole time, you’ll be working with an acquisitions editor.

Of course, if you have an agent, your agent will do this stuff. Heck, he should. After all, he’ll be taking 10% to 15% off the top on your advance and royalty checks. This is how he earns his keep.

(And no, I don’t have, and never have had, an agent.)

Project Editor

Next, you’ll work with a project editor. Her job is to keep you on track, review your work as it comes in, and guide you in terms of content and style. She’s also responsible for making sure you meet your deadlines. Later in the process, she’ll coordinate all phases of the book’s pre-production work, including your interaction with other editors.

Your project editor may also act as the impartial judge if disagreements between you and your other editors arise. So it’s very important to treat your project editor with all the respect she deserves and to not be a pain in the ass. Remember, you’re not the only one she’s dealing with. She may have half a dozen or more other books and authors and production teams to deal with at the same time.

These days, I work primarily with two publishers. At both publishers, my project editor is also the acquisition editor. So I work with her for the entire project. I like it that way. I feel that the publisher has someone with a vested interest in the project from start to finish.

Technical Editor

If you write technical books, like I do, you might have a technical editor. Your technical editor’s job is to make sure your text is technically correct.

A good technical editor will repeat every instruction you wrote in the manuscript to make sure it works as you said it should. She’ll check all your screenshots to make sure they reflect what she’s also seen on her screen.

Some technical editors go a step further by suggesting topics they think are important that you may have omitted. For example, if you’re discussing the use of a software program’s dialog box and there’s a check box in there that you haven’t mentioned but she thinks is important, she’ll query you in the manuscript, asking if you want to mention it.

As the author, you get to review all of the technical editor’s comments. You should make changes as needed to correct errors. You can also make changes per the editors suggestions — or blow them off. But if you blow off a suggestion, you should have a relatively good reason for doing so.

If your technical editor makes a lot of suggestions that you don’t think are worth dealing with, you might want to mention it gently to her or to your project editor. Make sure you have a good excuse. Page count always works: “If I covered every option in ever dialog box, the book would need an extra 50 pages.” (Some publishers are very sensitive to page count and want to avoid adding extra pages at all costs.)

Copy Editor

The copy editor is the person who goes through the manuscript, checking for grammar, spelling, and punctuation errors. She’ll also look for sentences that don’t make sense or aren’t as clear as they could be. I discuss copy editing in a lot of detail in my Copy editing article, so I don’t want to repeat it here. Read that. You might want to read the other parts of that series, which include my thoughts on copy editors in general.

When the copy editor is finished reviewing your manuscript and making changes, you’ll get a chance to review it. Keep your temper. Your job is to make sure she didn’t change the meaning of anything. (Believe me, it does happen.) If there’s a change you can’t live with, make a note in the manuscript to indicate why it’s objectionable. Your project editor will make the final call.

Production Editor

The production editor is the person responsible for turning the files you submitted into files that can be sent to a printer. Sometimes, the production editor does the layout herself. Sometimes she’s in charge of a production pool, of sorts, where your book is laid out by a team of layout people using a template.

Hope for the first kind of production editor. This person will ensure consistency in the appearance of pages. (I’ve had instances where I could tell which chapters of a book were laid out by each of its three production people, just by the way small images were placed on pages. Not good.)

The production editor should not — I repeat, not — make any editorial changes. By the time the manuscript gets to the production editor, the content is engraved in stone (so to speak). A production editor that changes content — for whatever reason — is not doing her job. (I once had one who changed the content to make it easier for him to lay out. You’d better believe I wigged out when I saw the proofs.)

When the production editor finishes her work, she’ll print out proofs for review. These are sometimes referred to as “galleys” or “galley proofs.” For my books, they’re usually printed by chapter and I get a bunch of chapters at a time. For other kinds of books that aren’t so time sensitive, they’re probably printed out as entire books so they can be reviewed as a whole.

The proofs will go out to a bunch of people, including you, the project editor, a proofreader, and an indexer.

Proofreader

A proofreader isn’t exactly an editor, but she does have an editing responsibility. She goes through the proofs and reads every single word and looks at every single image and caption. Her job is to identify typos and other errors that slipped by the editing process.

A good proofreader will find problems. There are always problems in the proofs. I usually find them when I revise the book for the next edition. (Do you think I actually read my books once they’re printed and bound as books?)

My role as a proofreader is usually to make sure that the figures and illustrations are in the right place and are called out properly in the text. (I hate seeing “as shown next:” at the end of a paragraph when a small screenshot is placed beside the paragraph instead of after it.) I’ve also occasionally caught incorrect screenshot placement.

The problems found are marked up and sent back to the production editor, who fixes them. She then turns the book into files and either uploads them to the printer’s FTP site or sends them to the printer on a CD-R disc.

Indexer

The indexer is also not really an editor. But she is, in a way, because she also reads the proofs and occasionally finds problems. In fact, I fired a proofreader I’d hired for a book when the indexer found more problems than the proofreader did!

The indexer usually uses indexing software to create the book’s index. She submits it to the project editor, who has it edited by the copy editor. It then goes to the production editor to be laid out with the rest of the book.

You probably won’t see the index until the book is printed and bound. That’s ironic, since many book contracts require the author to pay the cost of indexing the book.

How Long?

How long this takes varies from publisher to publisher. It also varies depending on the kind of book. Computer how-to books are extremely time-sensitive, so the process seldom takes more than a month from the time you submit the last chapter’s original manuscript to the time the production editor sends it to the printer. For other topics and books and publishers, the process can take months or even years — which is something I simply can’t imagine.

That’s It in a Nutshell

That’s the editorial process for publishing a book — at least as I’ve experienced it. Has it been different for you? If so, share your experiences in the Comments for this post.

And if all this is new to you, don’t be afraid to use the Comments to ask questions.

Geomagnetic Survey by Helicopter

Helicopter with Long LineWeird things flying around Wickenburg.

No, this isn’t me. It’s an A-Star helicopter (I think) belonging to Prism Helicopters. Its pilot and observer are using the device dangling from it to survey the area for minerals.

I believe they said it was geomagnetic, but I could be wrong. I wasn’t listening very hard. I think there will be coverage in the local paper this week.

The device weighs 1,000 pounds and it’s at the end of a standard long line. The pilot cruises at about 50 knots in a standard search pattern over the desert. Although they weren’t specific on what they were looking for, they may be looking for uranium, since that’s the rumor going around the Williams area when the same helicopter was there several months ago.

This photo was shot shortly after takeoff from Wickenburg Airport, where the pilots refuel. The pilot flew straight up until the rope was taut, then slowly gained altitude, lifting it off the ground.

The helicopter was working south of Wickenburg last week and may be working to the west this week.

Web Site Redesign: Fitting in My Photos

With 90+ photos appearing randomly in my old site’s header, I wasn’t about to leave them behind.

CutlineOne of the reasons I chose the Cutline 3 Column Right theme for my site’s redesign is because I wanted a three column layout that was wider than my old site. Studies — including stats from all of the sites/blogs I operate — showed that the vast majority of Web site visitors have their screen resolutions set to 1024×768 or wider. I even use that setting on my little 12″ PowerBook. So the old site’s redesign was throwing away 200+ pixels of screen real estate that could be better used providing content or navigation features.

How Do I Use Those Images?

The problem I faced was the header image. Since I built my blog in WordPress nearly two years ago, I had been displaying images that I’d taken during my travels. The images had to be cropped and fit into pre-established format. I used the Random Header plugin to randomize the display. Over 18 months, I’d added nearly 100 images to the header image collection. I’d even begun writing about them in the About the Photos topic. They had become an integral part of my site and I didn’t want to lose them.

So while I continued working on my Leopard book during the day, this little problem was in the back of my mind. For days. One option was to rework the CSS and change the header image so it only took up a portion of the width and use the space beside it for a Web site description. Unfortunately, I don’t know enough CSS to do this successfully without spending hours on trial and error. With a deadline approaching, I couldn’t afford to waste time experimenting. I had to have an answer and be ready to implement it.

About the Photos Images

Then I remembered the smaller images I use in About the Photos to show the images I’m discussing. What if I put three of them side by side and displayed them with some sort of randomizer? Would they fit? What would they look like?

Example ImageThe images in question were 324 pixels wide. The space I had to work with was 970 pixels. 3 x 324 = 972. My luck, sometimes.

I reduced the size of three images to 322 wide and began some quick experiments to replace the existing header image (the street scene you see in the screenshot above) with the three images. I could get them to fit and they didn’t look bad. But I couldn’t get the spacing between them just righ. And I didn’t like the way they fit right up against each other.

A Short Film History Lesson

Then I came up with the film sprocket idea.

For those of you who began using a camera in the digital age and aren’t familiar with 35mm film, let me explain. Before everyone started using digital cameras, serious photographers used 35mm film. The film comes on rolls and has tiny holes along each side. A camera has gears that line up with the holes. You feed the film into the camera and it grabs the holes with its gears. A mechanical lever pulls the next blank piece of film from the film canister to the place in front of the shutter for the next photo. When the roll was finished, the photographer (or his camera) would roll the film back into the canister and the photographer would drop it off for processing. When he picked it up, he’d get prints and negatives. The negatives are the actual film, with inverse (or negative) images on them.

If a photographer had his own darkroom, he’d likely make a contact sheet. This was created by putting the negatives right against a sheet of photographic paper in the dark, then exposing the paper to light for a short time and developing it. The resulting images were tiny (at least they were from 35mm film) and clearly displayed rows of black boxes on either side of the image with black lines between them — like you see here in the header of my redesigned site.

So anyone who has worked with film should recognize these little holes. Of course, my images are considerably larger and wider, so they’re not exact representations of contact strip images. They’re just borrowing the idea.

When I modified the three images to include the borders and fake sprocket holes, I liked what I saw. I created a Photoshop action to modify the 89 remaining images so they were smaller and included the tiny black boxes and borders.

Randomizing

On my old site, the random header image was randomized with a WordPress plugin named Random Header. But since I had three images to show in my header, I needed a different solution. So I turned to the software I used on Flying M Air’s Web site to randomize some of the images there: Random File.

Random File enables you to display random files anywhere on a template. (If you use a plugin like Exec-PHP, you can even display them within posts.) What’s neat about it is that you can tell it how many random files — well, in my case, images — to display and it will display that quantity without repeating them.

After some fiddling around with the CSS used in header.php — remember, I’m no expert — I added the following code in place of the existing header image code:

< ?php $files = array(); for ($i=1;$i<=3;$i++) { $file = c2c_random_file('/wp-content/foldername/foldername/', 'jpg png gif', 'url', $files);
echo 'Random image #' . $i . '';
$files[] = $file;
}
?>

The result is what you see here.

The Hard Part Was Done

With the tough design decision done, I was ready to put the new theme into place. I did that on Saturday, taking most of the day to get it 90% functional. I’m pleased with the results.

Comments? Questions? Use the Comments link or form for this post.

January 3, 2009 Update: I’ve since updated my site’s Web design again and adopted a new theme that does not include photos in the header. So although this information may still be useful to WordPress users, there’s no live example for you to see what it looks like. Sorry.

Web Tools: Color Wizard

An online tool helps a non-designer pick a color scheme for a new blog.

I am not color blind. I know I’m not. I see colors and I know when certain colors look good together. But I can’t, for the life of me, come up with a color scheme on my own.

Color, of course, is a major part of any Web site’s look and feel. So when I found a blog post months ago that listed a few online color tools, I bookmarked them for later use. On Saturday, one of them came in very handy as I decided on a color scheme for my blog’s new look.

The Color WizardThe Color Wizard is a Flash application by Donald Johansson. This excellent online tool helps you find colors that work well together.

From the Color Wizard page:

The color wizard lets you submit your own base color, and it automatically returns matching colors for the one you selected.

It returns a set of hue, saturation and tint/shade variations of your color, as well as suggests color schemets to you, based on your color’s complementary color, split complementary colors, analogous colors and other variations. The color wizard also has a randomize function that lets you generate color schemes you might not have thought of on your own.

It’s the randomizer that helped me. I just kept clicking the Randomize button until I found a few schemes I liked. When I had about eight of them, I went back and reviewed each one, eliminating the ones I liked less until I had one I liked a lot. I then picked the blue color from the theme and generated another scheme from that, so I could get the colors I planned to use for my links.

What was also handy for me was the print feature. Although it’s not obvious on the application, if you right-click the Flash app, a Print option appears in the shortcut menu. I used that to print my two color schemes on my color printer. So not only can I visualize what the colors look like — or at least approximately what they look like; I don’t have a great color printer — but I have a document that clearly lists all the hex codes for all the colors.

I’m so pleased with the results that I clicked the Donate link at the bottom of the Color Wizard and used my PayPal account to send the developer some lunch money. (As usual, I urge everyone who uses great free software like this to thank the developer with a donation or at least a visit to his advertiser’s sites.)

Looking for a color scheme? The Color Wizard is a great place to start.

My First Solo Flight in My First Helicopter

A cool shot taken by my husband.

This is an old photo but one I cherish. I can even tell you the date: October 11, 2000.

Why is it special? It was the first time I flew my own helicopter by myself.

I’d bought the helicopter only a few days before. We’d picked it up and flown it home — Mike and I together. I only had about 80 hours of flight time back then and was nervous. But not nearly as nervous as when I took off from Wickenburg to fly it back to Chandler by myself!

Helicopter Overhead
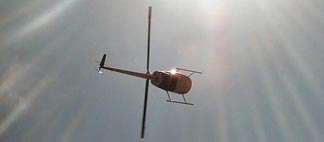
Mike took this shot as I flew by.

I owned the helicopter from October 2000 to October 2004 and put over 1,000 hours on it. It’s an R22 Beta II, which is an excellent one-person helicopter. (That’s a joke, of course. It does have a second seat if you feel like bringing a lightweight friend along.) It’s relatively inexpensive to fly — as far as helicopters go, anyway — and I flew the paint off it (so to speak). I wanted to build time so I could get a job up at the Grand Canyon, which I eventually did.

I sold this helicopter to buy my current ship, a red R44 Raven II. I went nuts for the 2+ months that I had nothing to fly while waiting for the new helicopter to be built. I miss this ship and wish I could have kept it. But I couldn’t swing the two loan payments. (Someone once asked me what it was like to buy a helicopter. My reply: It’s like buying a house and paying for it over 5 years.)