The search is ended, the RV has been purchased.
Yesterday, after five months of checking out possibilities, I purchased my fourth RV. It’s 2010 Keystone Montana Mountaineer, Hickory Edition, model 324RLQ. (The name is almost as long as the titles of some of my books.)
What Came Before
To understand what I wanted in an RV, it’s interesting to note what came before it. For years, we camped in tents on the ground. But as many readers will probably confirm, you reach a certain age when sleeping on the ground — even on an air mattress — takes away much of the pleasures of camping out. So about 10 years ago, we decided we needed something to “camp” in that allowed us to sleep off the ground.
I bought a used 1984 Coleman pop-up camper. The previous owner was meticulous with maintenance and the damn thing was in near perfect condition. The model was so old that it still had real canvas sides. It had two beds: a queen and a single, a table that could make another bed, a two-burner stove, and a microscopic sink. That’s it. We used it primarily on our Howard Mesa property, where we kept it parked and closed up. We’d go up there for a weekend, open it up, and camp out. It was perfect for summer days and nights. But it eventually fell into disuse. We left it at Howard Mesa as spare living space in case anyone came up there to visit with us. Years later, I “sold” it on Craig’s List for $1.
 But then we got the horses and decided we wanted to be able to go camping with them. So I bought a 35-foot horse trailer with living quarters. For those of you who aren’t familiar with the concept, the trailer has stalls for the horses in back — mine held three. It also had a sort of closet for storing saddles and other tack. The other half of its length was dedicated to living space for people. It had a queen sized bed, sofa, sink, two-burner stove, good-sized refrigerator, and full (although tiny) bathroom. All this stuff was crammed into a very small space. We added a screened-in room to expand our living space. This photo shows what it looked like parked on our Howard Mesa property with the screen room attached. I lived in this space every other week in the summer of 2004 when I flew at the Grand Canyon. Sadly, we rarely used the camper as it was designed — to take our horses camping with us.
 In 2006, I sold the horse trailer and purchased a Starcraft Antiqua hybrid camper. To me, this was the best of both worlds: a hard-sided camper with the usual amenities (kitchen, bathroom, dining area, sitting area, bedroom) plus the outdoorsy feeling of tent camping. I bought this primarily because I thought we were going to go “on the road” with the helicopter in the summer of 2007. I’d do cherry drying and rides at events, Mike would help and do some of his work via “telecommute.” But Mike had a job change and cherry drying did not materialize that year. I subsequently took this camper to Washington State for cherry drying in the summers of 2008 and 2009 and wound up living in it for 4 months one year and 3 months the next.
The best way to determine whether an RV is right for you is it live in it. After a total of nearly 8 months living in this space, I was convinced that it was not right for me. It was time to stop screwing around and buy the “perfect” RV.
What is the “Perfect” RV?
You notice that I keep putting the word perfect in quotes? I’m doing that for two reasons:
- You might argue that there’s no such thing as a “perfect” RV. I might have to agree with you. RVs are designed for groups of people, not individuals. That means no RV will have a “perfect” feature set.
- What you want or need in an RV is not the same as what I want or need. So what you might consider the “perfect” RV might not look anything like what I think is the “perfect” RV.
Once you decide what kind of RV you want — pop-up camper, pull trailer, toy hauler, fifth wheel, motorhome, etc. — there are three main considerations:
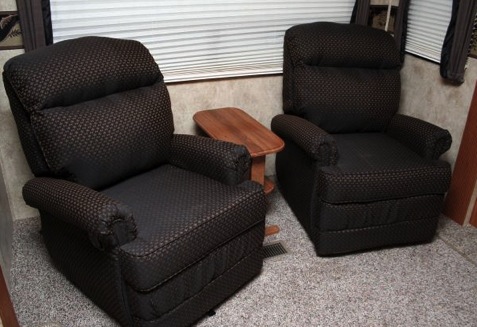
 Floor plan. The layout of the RV is likely to determine what amenities it has. If you’ve never shopped for an RV — or haven’t done it lately — you will be amazed at what they can cram into a space. For example, the RV I selected is 36 feet long and 8 feet wide. Yet it has a private bedroom, private bathroom, kitchen, dining area, living area with sofa and recliners, and desk. In many cases, it does this with slide outs. You drive along, park, and push a button to expand your living space.
 Being the picky person I am, certain elements of the floor plan were very important to me. I wanted to be able to access the refrigerator and bathroom without having to expand all the slides. For example, suppose I’m cruising down the road in the middle of nowhere and need/want a cold drink. I can pull over, climb into the RV, and grab one out of the fridge. And even take a leak in a bathroom I know is clean. I also wanted what’s called a “side aisle bath” — a bathroom with all components in the same little room. Other floor plans actually put the bathroom sink in the bedroom. I didn’t want that. And finally, I wanted working space that wasn’t the same place I ate. That means I needed a desk or space for a desk. An RV with a good desk is hard to find and I was perfectly willing to pull out a recliner or even a sofa to put in my own desk. But the model I wound up with actually had a good, usable desk and even had drawers (see photo below). So as far as floor plan is concerned, what I bought is pretty darn close to “perfect” — for me.
Features and Amenities. Every RV manufacturer and design has its own set of features and amenities. For example, a toy hauler includes a garage-like space in the back. A family model RV might include a separate bedroom — and even an additional half bathroom! — with bunks for the kids. Many luxury RVs have surround sound entertainment systems with wide screen televisions that rise out of a panel or fill an entire wall space. Some units have electric fireplaces. You can find kitchens with two refrigerators and bathrooms with bathtubs. Dining can be in a booth or table and chairs. Sofas can become second beds. Bedrooms can have televisions, closets can be cedar-lined, cabinets can have washer/dryer hookups. The list goes on and on. Just when you think you’ve seen it all, you walk into an RV with yet another feature you didn’t think you’d ever see in an RV.
For us, less was more — on the inside, anyway. All the RV dealers in the world can assure us that an electric fireplace is a good feature because it gives off heat using the campground’s electricity rather than onboard propane. I can remind them all that we do a lot of off-the-grid camping where there is no campground electricity. A fireplace was a feature we simply didn’t want — yet it appeared in more than half the RVs we looked at! I was extremely pleased, therefore, when we found the unit I’d buy and saw that instead of a fireplace (see photo of typical configuration), there was an empty cabinet.
I did want lots of cabinet space, a dining table with chairs instead of booth, and a sofa or a pair of recliners. I wanted lots of big windows — and I’m thrilled that my desk has windows on two walls rather than just one — and I wanted all the windows to open. I wanted “day/night” shades on all the windows; I hope I never have to deal with a cheap metal venetian blind again.
 On the outside, however, I wanted some of the newer modern features that were not available in the 2009 model I almost bought. At the top of the list was an electric awning — something I could roll out or back in with the push of a button. (If you’d manually rolled in an awning in your pajamas in the middle of the night when the wind kicked up as many times as I have, you’d understand why.) A remote control to deploy the slide outs was also useful when setting up the RV by myself, as I’m likely to do this summer. Ditto for electric stabilizer jacks and “landing gear.” And it seemed to make a lot more sense to have all hookups (except electricity) and sewer dump/flush controls in one place rather than scattered all over the side of the RV. These features were the primary reason I went with the 2010 model rather than the 2009 (which actually had more cabinet space in the kitchen).
But there are a few things I wanted that I didn’t get. A window in the kitchen, for example. The floor plan didn’t make that possible, but there are plenty of other windows. A night table — even a tiny shelf! — beside the bed. There is none in this floor plan because the bedroom is relatively small. (How much time do you really spend in the bedroom anyway?) Heck, I can’t think of anything else. In this model, I even got the file drawer I wanted at the desk!
 Quality and Price. Quality and price really do go hand in hand. You get what you pay for. A low-end fifth wheel that you might be able to pick up for $25K is simply not going to be as sturdy or well-built as a top-of-the-line fifth wheel that’ll cost you nearly $100K.
Where you’ll see differences in quality are in the walls, floors, cabinets, furniture, and fixtures. A cheap RV’s walls will be covered with inferior wall covering that’s likely to shrink in hot weather (as it did in my Starcraft) and show the staples that hold it together. The cabinets will be some kind of processed wood that’s light weight and easily broken. There might be fewer plastic light fixtures than you need for good illumination. Kitchen and bathroom fixtures will be plastic; countertops will be a formica laminate. Things will break quickly and often, especially if you’re careless. Of course, if you only use the thing a week or two a year, this shouldn’t be an issue. But if you plan to spend several months a year actually living in it, quality becomes important.
In my case, I wanted good quality but knew I couldn’t afford — or, more accurately, were not willing to spend enough for — the best. So the very first part of my search was to determine which brands were below my quality needs or above my budget. This should be the first step in anyone’s search for an RV; you can waste a huge amount of time looking at units that simply won’t work for you because of insufficient quality or expensive price. I also cut from the mix any manufacturer what was in bankruptcy or had gone out of the business. 2008/09 killed a lot of them. That limited us to about ten different brands by three different manufacturers. Mountaineer is a mid-range Keystone product. Montana by Keystone is one step above it and I could have made that step if I found one I liked. Heartland’s Big Horn and Big Country were also in the running.
My Perfect RV
 The Mountaineer I bought won on all three factors:
- It had a floor plan that worked for me, given that when my husband joined me on the road with our dog, we’d need lots of space to be comfortable long-term.
- It had a list of features and amenities that were in line with what I wanted and needed in an RV.
- Its quality was acceptable while its price was within my budget.
I also got a smoking deal on the unit. Keep in mind that I had a quote in hand for a new 2009 model on a lot in Surprise, AZ. I didn’t like the salesguy there — he’d made the fatal error of talking down to me. (Tip for salesmen: never tell a woman shopping alone that she should go home and talk to her husband about a purchase decision.) Mike and I were ready to climb into the car and work him over on price, but I didn’t really want to give him my business at all.
 I started calling some of the RV dealers I’d met with over the past few months — I kept all their cards — to see if they had the same model available. One, in Quartzsite, said he had a 2010. I told him I’d consider driving out to take a look if we could agree to a price over the phone. I told him about the 2009 I were prepared to buy. He asked me to make an offer. I did. He came back with a slightly higher offer that was still below retail. We were there by 2 pm and I had all the papers signed by 4:30 PM.
(Another tip for salesmen: Make sure all prospective customers get your card. You never know when one will call back and you’ll get the sale.)
Is a 2010 Keystone Montana Mountaineer, Hickory Edition, model 324RLQ the perfect RV? For us, it’s about as perfect as I’ll get right now. But for you? The answer isn’t that easy. If you want your perfect RV, you’ll have to do your homework to find it.

 Yeah, I know. In the old days, calling a phone number outside your area code would likely cost you a few bucks for a few minutes. “Long distance” phone calls were pricey, often 25¢ or more per minute. Cost conscious folks had no interest in following up on a vendor or service by calling in. Thus, toll-free (originally “800” numbers in the U.S.) were born. By the 1990s, they’d run out of area code 800 phone numbers and added 866 and 877.
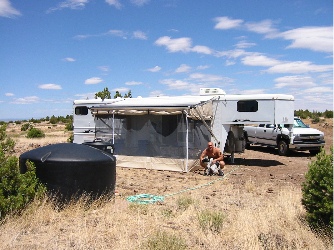 But then we got the horses and decided we wanted to be able to go camping with them. So I bought a 35-foot horse trailer with living quarters. For those of you who aren’t familiar with the concept, the trailer has stalls for the horses in back — mine held three. It also had a sort of closet for storing saddles and other tack. The other half of its length was dedicated to living space for people. It had a queen sized bed, sofa, sink, two-burner stove, good-sized refrigerator, and full (although tiny) bathroom. All this stuff was crammed into a very small space. We added a screened-in room to expand our living space. This photo shows what it looked like parked on our Howard Mesa property with the screen room attached. I lived in this space every other week in the summer of 2004 when I flew at the Grand Canyon. Sadly, we rarely used the camper as it was designed — to take our horses camping with us.
 In 2006, I sold the horse trailer and purchased a Starcraft Antiqua hybrid camper. To me, this was the best of both worlds: a hard-sided camper with the usual amenities (kitchen, bathroom, dining area, sitting area, bedroom) plus the outdoorsy feeling of tent camping. I bought this primarily because I thought we were going to go “on the road” with the helicopter in the summer of 2007. I’d do
  Floor plan. The layout of the RV is likely to determine what amenities it has. If you’ve never shopped for an RV — or haven’t done it lately — you will be amazed at what they can cram into a space. For example, the RV I selected is 36 feet long and 8 feet wide. Yet it has a private bedroom, private bathroom, kitchen, dining area, living area with sofa and recliners, and desk. In many cases, it does this with slide outs. You drive along, park, and push a button to expand your living space.
 Being the picky person I am, certain elements of the floor plan were very important to me. I wanted to be able to access the refrigerator and bathroom without having to expand all the slides. For example, suppose I’m cruising down the road in the middle of nowhere and need/want a cold drink. I can pull over, climb into the RV, and grab one out of the fridge. And even take a leak in a bathroom I know is clean. I also wanted what’s called a “side aisle bath” — a bathroom with all components in the same little room. Other floor plans actually put the bathroom sink in the bedroom. I didn’t want that. And finally, I wanted working space that wasn’t the same place I ate. That means I needed a desk or space for a desk. An RV with a good desk is hard to find and I was perfectly willing to pull out a recliner or even a sofa to put in my own desk. But the model I wound up with actually had a good, usable desk and even had drawers (see photo below). So as far as floor plan is concerned, what I bought is pretty darn close to “perfect” — for me.
 Features and Amenities. Every RV manufacturer and design has its own set of features and amenities. For example, a toy hauler includes a garage-like space in the back. A family model RV might include a separate bedroom — and even an additional half bathroom! — with bunks for the kids. Many luxury RVs have surround sound entertainment systems with wide screen televisions that rise out of a panel or fill an entire wall space. Some units have electric fireplaces. You can find kitchens with two refrigerators and bathrooms with bathtubs. Dining can be in a booth or table and chairs. Sofas can become second beds. Bedrooms can have televisions, closets can be cedar-lined, cabinets can have washer/dryer hookups. The list goes on and on. Just when you think you’ve seen it all, you walk into an RV with yet another feature you didn’t think you’d ever see in an RV.
 For us, less was more — on the inside, anyway. All the RV dealers in the world can assure us that an electric fireplace is a good feature because it gives off heat using the campground’s electricity rather than onboard propane. I can remind them all that we do a lot of off-the-grid camping where there is no campground electricity. A fireplace was a feature we simply didn’t want — yet it appeared in more than half the RVs we looked at! I was extremely pleased, therefore, when we found the unit I’d buy and saw that instead of a fireplace (see photo of typical configuration), there was an empty cabinet.
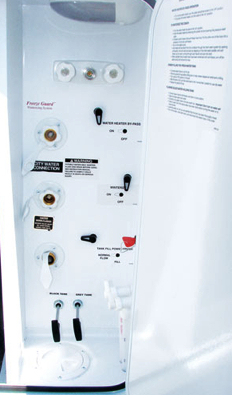 On the outside, however, I wanted some of the newer modern features that were not available in the 2009 model I almost bought. At the top of the list was an electric awning — something I could roll out or back in with the push of a button. (If you’d manually rolled in an awning in your pajamas in the middle of the night when the wind kicked up as many times as I have, you’d understand why.) A remote control to deploy the slide outs was also useful when setting up the RV by myself, as I’m likely to do this summer. Ditto for electric stabilizer jacks and “landing gear.” And it seemed to make a lot more sense to have all hookups (except electricity) and sewer dump/flush controls in one place rather than scattered all over the side of the RV. These features were the primary reason I went with the 2010 model rather than the 2009 (which actually had more cabinet space in the kitchen).
 Quality and Price. Quality and price really do go hand in hand. You get what you pay for. A low-end fifth wheel that you might be able to pick up for $25K is simply not going to be as sturdy or well-built as a top-of-the-line fifth wheel that’ll cost you nearly $100K.
 In my case, I wanted good quality but knew I couldn’t afford — or, more accurately, were not willing to spend enough for — the best. So the very first part of my search was to determine which brands were below my quality needs or above my budget. This should be the first step in anyone’s search for an RV; you can waste a huge amount of time looking at units that simply won’t work for you because of insufficient quality or expensive price. I also cut from the mix any manufacturer what was in bankruptcy or had gone out of the business. 2008/09 killed a lot of them. That limited us to about ten different brands by three different manufacturers. Mountaineer is a mid-range Keystone product. Montana by Keystone is one step above it and I could have made that step if I found one I liked. Heartland’s Big Horn and Big Country were also in the running.
 The Mountaineer I bought won on all three factors:
 I started calling some of the RV dealers I’d met with over the past few months — I kept all their cards — to see if they had the same model available. One, in Quartzsite, said he had a 2010. I told him I’d consider driving out to take a look if we could agree to a price over the phone. I told him about the 2009 I were prepared to buy. He asked me to make an offer. I did. He came back with a slightly higher offer that was still below retail. We were there by 2 pm and I had all the papers signed by 4:30 PM.