Construction: The Earth Work

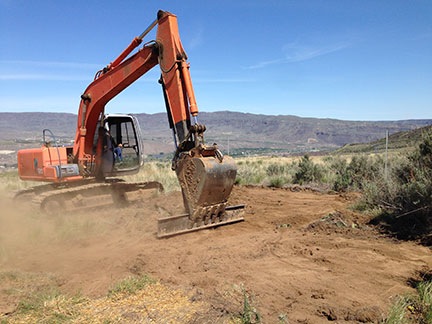
Moving earth to make room for my new home.

On May 20, 2014, I began blogging about the construction of my new home in Malaga, WA. You can read all of these posts — and see the time-lapse movies that go with them — by clicking the new home construction tag.

Yesterday, they finally began construction on what will be my new home.

I blogged about the home here. It’s not a typical home by any means — I’m not the kind of person who really wants to live in a typical house. As an old ex-friend of mine would say, it’s a garage with a house attached. It’s a pole building, which is a type of construction popular here in farm country. Instead of framing from a foundation up, a pole building basically hangs the structure on a series of vertical beams or “poles” and puts a metal (usually) skin over it. They’re cost effective to build, especially for storage, and that’s primarily what this will be, with roughly 1200 square feet on the second floor for me to settle into.

I’d been working with the builder on plans for over a year. The plans themselves didn’t change much at all over that time. But I had a few delays, mostly related to the failure of my wasband to do the right thing. (Seriously: What the hell is wrong with that man?) This spring with money coming in from cherry drying contracts and the promise of a loan from a family member (if needed), I’m ready to move forward. It’s amazing what a person can save up for when she knows how to live within her means.

The earthwork for the project was mostly completed in late April, started almost right after I got home from my California contract. I see from looking at my blog archives that I didn’t blog about it — likely because I was busy with a writing project. I may as well do that now. I know I posted a lot of photos on Facebook. Here are a few of them for the folks wise enough to stay off that time-sucking social network.

First Shovel
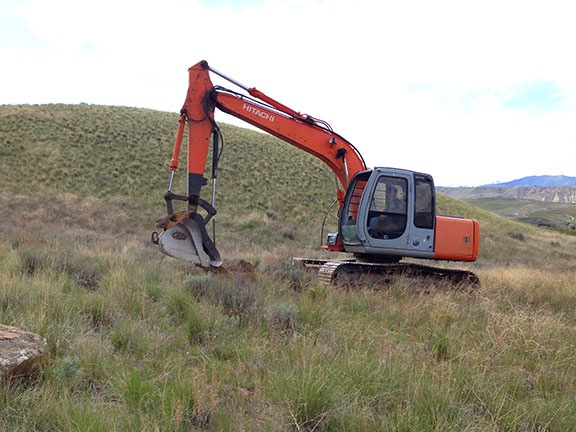
Jeff of Parkway Excavation scooped up the first shovelful of earth on April 24, 2014. I highly recommend Jeff. He knows his stuff, is honest, and is a really great guy to work with.

Time-Lapse Setup
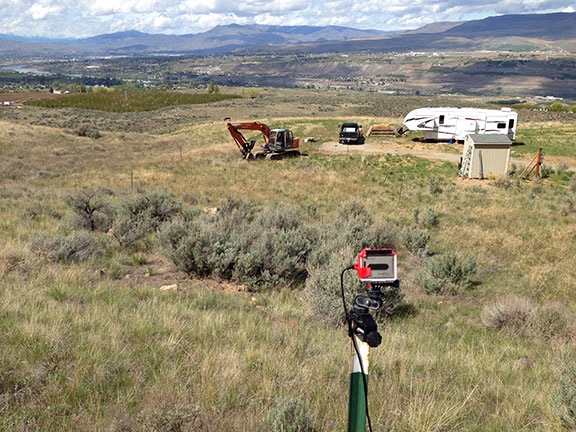
I set up one of my old GoPros as a time-lapse camera far above the action. (Video below.)

Penny Supervises
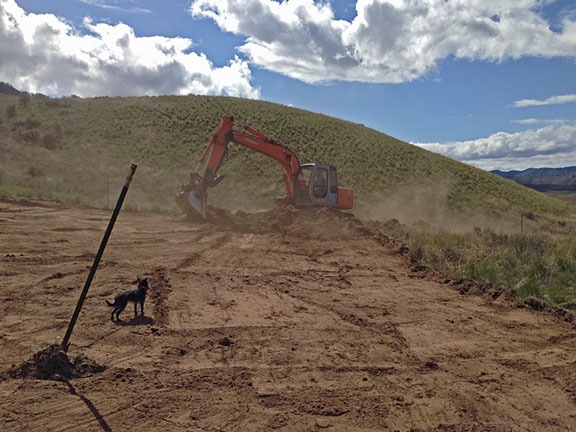
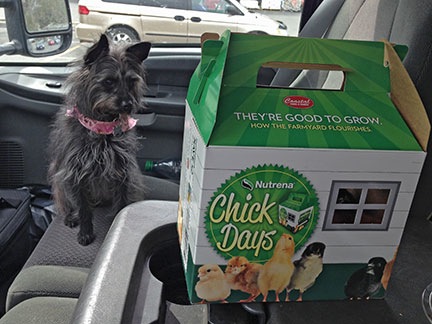
Penny was not afraid of the heavy equipment. She’s fearless! Of course, with all that dust, she got unbelievably dirty every day.

It took Jeff a few days to get the job done. It required him to clear out and level an area roughly 80 x 70 in size. The whole time he worked, I was sort of holding my breath, worried about him hitting rocks. I live on a sort of “shelf” at the base of some basalt cliffs. Over the past 11,000 years (since the Missoula Floods), pieces of those cliffs have tumbled down and embedded themselves in the earth. My neighbors across the road are much closer to all that broken rock and have lots of rock in their earth. But I was pleasantly surprised that I didn’t hit any at all when I dug the trench for my temporary power post in August 2013. Still, on the south side of the building site, Jeff had to dig down more than 5 feet. Would he hit rock? If he did, that would crank up the cost of his work and the cost of getting the poles for my building planted.

But I lucked out. He hit a few rocks on the south side, but nothing worth worrying about. I think even he was surprised at how nice my dirt was.

Dust Control
Dust was a real issue. I had a sprinkler going almost the entire time Jeff was working.

Digging In
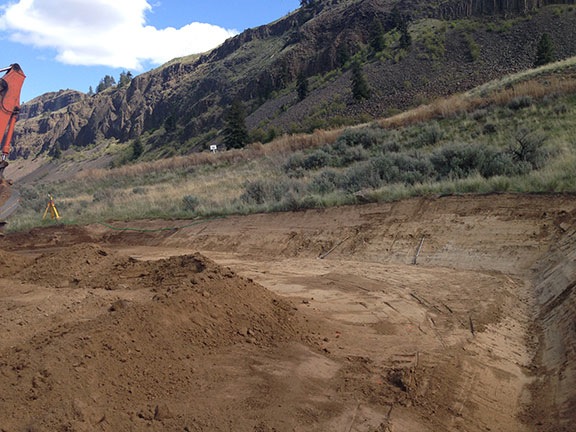
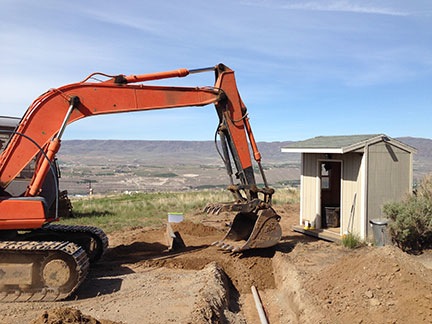
To make a large, level pad, Jeff had to dig into the side of the hill. I also had him dig out a drainage ditch for water off the hillside and roof.

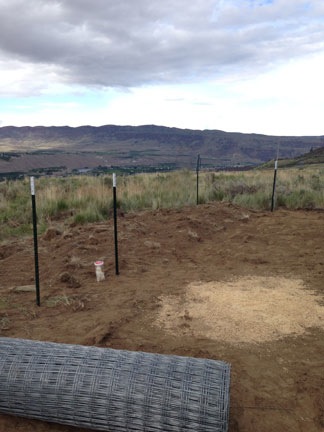
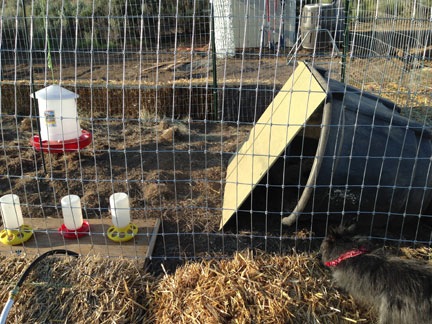
While I had Jeff there, I also had him move my shed, which I’d put in a dumb place. (I usually plan better, but I had lots of distractions when I took delivery of it in November. And I had him clear an area for my garden and chicken yard. And dig a trench across the driveway so I could run my RV power and water in a conduit underground, thus heading off any fears of damage to wires/hoses from construction vehicles. I worked my ass off that day and slept like the dead that night.

Dragging the Shed
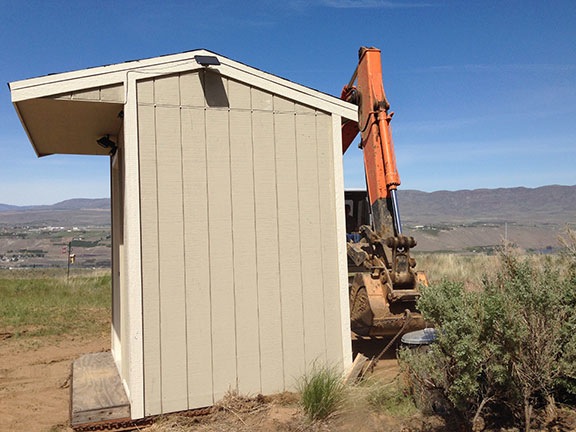
Jeff used his backhoe and a chain to drag the shed into its new position on the other side of the driveway beside the garden. I’d planned to sell the shed when my building was done, but now I think I’ll keep it for garden tools.

Trenching
Jeff dug the trench and I laid in conduit with a water line and 30 amp power line. Then Jeff covered it all back up.

Gravel Delivery
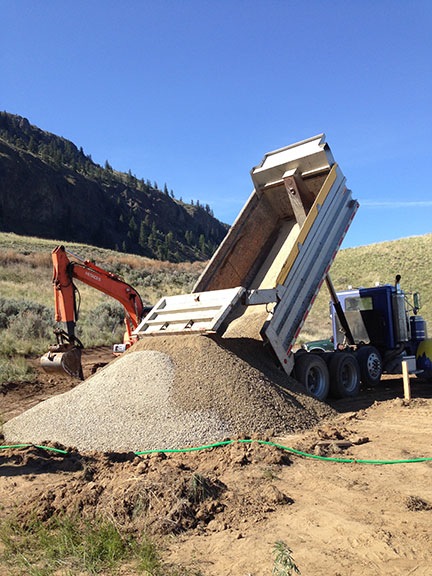
Jeff delivers the second load of gravel.

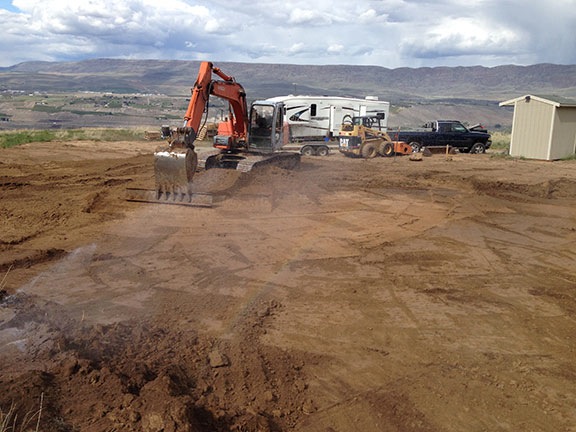
The job required a lot of earth moving — actually taking dirt from the south side of the site to the north end. I’d need a driveway to access the four-car garage on the south side and the earth sloped away a bit there. Jeff fixed that right up. He then came through with a compacter and made a rock-hard surface in the ground.

Jeff finished off the job with three loads of gravel requested by the builder. He dumped them in two places on the cleared out pad. The builder had come by to check out his work earlier in the week and I think he was pleased with what he saw. I know I was.

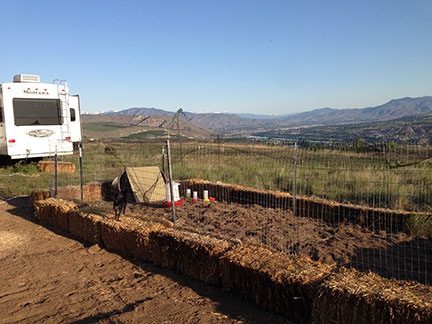
When he was all finished, I had a huge, flat, level pad. A friend came by the next day and parked his motorhome on it for an overnight stay. The day after that, I landed my helicopter on it. Nice!
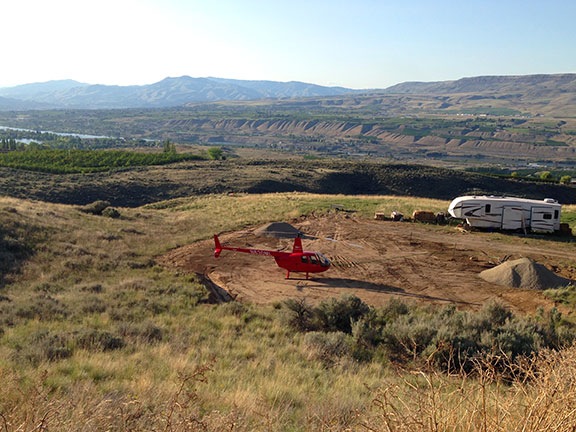
Makeshift Helipad
It fits!

Here’s the promised time-lapse:

Although the builders were supposed to start on April 30, there was a delay in the permits. They needed some sort of drainage plan. What that meant was I needed to pay someone $600 to satisfy the county. This is no real surprise. The delay didn’t really bother me. I had to go to California for a week anyway and wanted to be home when they started work. They got the permit while I was gone and showed up on time yesterday morning.

More on that in another blog post.

Bad Advice Ruins Lives

Sad to see the dreams of a good man destroyed by taking bad advice.

I got some sad news not long ago. A very close former friend of mine sold his airplane.

He’d owned the plane for more than 10 years and had often told me of the role it would play in his retirement: he planned to become a CFI (certified flight instructor) and use the plane to do biennial flight reviews and some flight training. It was a goal I thought suited him and I supported it to the best of my ability — although there was nothing I could do beyond offering moral support and advice to help him achieve it. My advice: fly as often as you can, build time, build experience.

He didn’t take that advice.

I thought he was serious about that dream — like so many of the others he shared with me. But he never moved forward with any of them beyond making some notes on paper and buying domain names he’d never use. Maybe he wasn’t as serious as he led me to believe. I thought aviation, which we’d discovered around the same time, meant something to him. But apparently, it didn’t.

When he pissed off a friend whose hangar he was sharing and got the plane kicked out, the hangar he got in Scottsdale cost him far more each month, making the plane suddenly very costly to keep. (Some people just don’t know a good deal when they have one.) I suspect that was a factor in the plane’s sale in November 2013.

Not long afterward, he sold a condo he’d bought in Phoenix back in 2008. He’d bought as the housing market was falling but hadn’t quite hit bottom. He got what he thought was a good price, but the thing came with outrageous monthly maintenance fees that, when coupled with the mortgage, was a real financial burden on him. And, in all honesty, the place wasn’t very pleasant — its windows looked out onto a courtyard so there was no privacy unless the blinds were closed — which only made it darker and drearier than it already was. Most of the other units were owned by speculators and either empty or inhabited by renters. I’d advised him to buy the other condo he’d been looking at, a bright and airy second floor unit not far away.

He didn’t take that advice.

When he lost his job and got stuck in one he grew to hate, it seemed to me that he was working primarily to make payments on that condo. He was miserable most of the time, living in the condo part-time instead of the house he owned half of and used as his primary address. The house was completely paid off and far more comfortable, and it had a heck of a lot more light and privacy.

In 2011 and early 2012, I advised him to sell the condo, despite the fact that he owed a bit more than the market value. The loss would help on his tax returns and the sale would stop the bleeding of money for mortgage payments and maintenance fees. It would relieve his financial burden so he could live within his means and wouldn’t be a slave to the job he hated.

He didn’t take that advice.

I even offered to buy the place for what he owed. I’d take the loss. (I was a very good friend.)

He didn’t want to do that, either. Instead, he claimed he wanted to keep it as an investment and rent it out. And he expected me to help him.

But I’d already gone through the nightmarish experience of being a landlord and wanted no part of it. My refusal to get involved was one of the things that began the destruction of our friendship.

When I learned in March that he’d sold the condo in December, it made me sad. I knew that if he’d sold it when I advised, before he turned his back on our friendship, we’d still be friends. I don’t think he ever put a tenant in there, but I really don’t know. I can imagine him stubbornly paying the mortgage and taxes and maintenance fees on the place, month after month, before finally giving up.

The sell-off of his assets doesn’t really come as a big surprise. Nearly two years ago, he initiated a costly legal battle to end a long-term partnership and take possession of assets that weren’t his. He misunderstood the law governing the case. The very last time I had a chance to speak to him directly, back in December 2012, I tried to reason with him. I tried to make him understand how the law would be applied. His angry and defiant response proved that he had no idea what the law was. I urged him to talk to his lawyer, to have his lawyer explain it. I urged him to take the counteroffer he’d received from the other party — a counteroffer I know that party’s lawyers thought was far too generous.

But he didn’t take that advice.

It frustrated me. He’d always been so reasonable. He’d always understood the difference between right and wrong. He’d always had morals and principals that I could respect and look up to. But now he was acting unreasonably, doing something stupid and hurtful that was so obviously wrong. What had happened to him?

It didn’t really matter. By that time he was no longer my friend and never would be again.

AdviceInstead, he listened to other, newer friends — including one he’d only recently met — friends who apparently either didn’t know the law or didn’t know the facts of the case. They told him he could get so much more if he just kept fighting. They fed him lies about the other party, convincing him that the other party had been using and manipulating him for years, convincing him that the other party was now an enemy and couldn’t be trusted.

So he kept feeding his lawyers money — tens of thousands of dollars, month after month. (I don’t know why the lawyers didn’t set him straight; maybe he wouldn’t listen to them, either?) And he kept harassing the other party with legal action, hoping that other party would give in to his outrageous demands.

And while all this was going on, my old friend began to take on the financial responsibilities of his new friend, helping her with mortgage payments and the like. He likely justified this by living with her, leaving the condo that was costing him so much money every month empty. She kept urging him to fight, to take one action after another to wear the other party down. She even began directly issuing orders to his lawyers and feeding them incorrect information that she misinterpreted from things she read online. She was rabid in her hatred, insanely jealous — or maybe, by some accounts, just insane.

But the other party in this legal battle was in the right and wasn’t about to give in, especially after investing in a costly legal defense. The other party needed to win. And unlike my friend, the other party was living within their means so there was money to pay lawyers for the fight. And to keep paying as long as necessary to bring an end to the battle and closure to the wounds it had caused.

In the end, my old friend lost his legal battle. The other party was awarded far more than the December 2012 counteroffer would have given. (After all, it really was a generous offer.)

I suspect my friend thought he would pay his legal fees with the proceeds from his win. I suspect he and his new friend looked forward to celebrating their victory over the other party.

But there was no win, there was no big settlement. Even later accounting for other matters proved disappointing. There was no windfall coming. My friend had acted on bad advice and had lost all the money he’d spent on legal fees plus the additional amount he’d have to pay over that original counteroffer.

Ah, if only he had taken my advice!

My former friend’s downfall fills me with pity for him. Not only do I care very much for him and value the years of our friendship, but I’m sad that he remains so close with the people who led him astray, friends and a lover so full of hate and anger and greed that they can’t see facts and listen to reason. I’m sad that they have his ear and are likely, to this day, giving him advice that will only cost him more in the long run. I’m sad that a man I once thought the world of has become a greedy and delusional puppet.

So he sold the airplane that would give him his retirement “job.” And he sold the condo that he claimed he wanted to keep as an investment. And now he’s trying to sell the house he has part ownership of. Liquidating his assets — one can only assume that he has money problems.

Meanwhile, he’s failed to comply with court orders regarding the case and has to defend himself against legal action related to that. More legal fees because he failed to do the right thing. What will happen next? Who knows?

It’ll be interesting to see if the friends who led him astray step up to the plate and help bail him out of the mess he’s in.

I know that I won’t.

Bees: My Second Swarm Capture

Not as easy as my first swarm capture, but just as rewarding.

I started my beekeeping hobby in June 2013 and have been blogging about it periodically. If you’re interested in reading the other posts in this series, follow the Adventures in Beekeeping tag. Keep in mind that the most recent posts always appear first on this blog.

The bees are starting to swarm. They do it every year around this time. They’ve outgrown their homes and their colonies split. The queen and about 2/3 of the workers leave the hive in search of a new home. They’ll gather in tree branches and on building eaves, resting while scouts look for the perfect place to move in. Sometimes it’s a hollow tree; other times, it’s an empty space in the wall of your home or garage, accessed by a hole so small you didn’t even know it was there. I blogged more about swarms here.

Beekeepers like this time of year. It means free bees. But we have to work for it.

I was called out for a swarm capture the other day. Some new beekeepers met me there — the plan was for them to assist and learn. But the bees flew off right as they arrived.

Yesterday I got another call. I grabbed my bee box — that’s a rolling plastic toolbox I store all my beekeeping equipment in — and a cardboard nuc box with six frames in it and jumped in the truck. The bees were up in a pine tree and I was hoping it was near where I could park so I wouldn’t have to deal with a ladder. That’s how I’d handled my first swarm capture last year.

No such luck. The homeowner met me and escorted me to the back yard. The bees were about 12-14 feet up, gathered in two big clumps on the branches of a pine tree. Beneath them were some huge ornamental rocks and a somewhat neglected rock garden. Even if I could back my truck into the yard, I’d never get it close enough to use it as a platform.

Stan, a new beekeeper, and his wife arrived. Stan seemed very knowledgeable — so knowledgeable that I didn’t realize he was new. I suited up while the homeowner fetched a 12-foot orchard ladder. Orchard ladders are the best for outdoor work in trees; with just three legs, they’re really easy to set up and keep balanced. Stan set it up and it was rock solid. That didn’t make me feel any better, though; I don’t like climbing ladders.

But I wanted this swarm so I climbed.

Stan held the ladder while his wife, on the ground, held one of the tree branches away. While most of the bees were clumped together, hundreds of them buzzed around my head while I dealt with the thick pine branches and needles. Bees are not aggressive when swarming. They have very little to protect — just the queen, in fact — and have gorged themselves with honey prior to departure so they’re a bit on the sluggish side.

The idea was to cut the branches the bees were clumped on and lower them into the nuc box. I’d already prepared it by removing four of the six frames. The two frames I left in there contained drawn-out comb made by other bees. I was basically offering them not only a new home, but one that was partially furnished.

Trouble was, the big clump of bees, which was probably the one protecting the queen, was on a big branch — so big, in fact, that I needed a saw to cut it. All I had was my clippers. (Note to self: add saw to bee box.) Fortunately, Stan had a saw. He fetched it and I did what I didn’t think I’d ever do: I released the ladder so I could hold the branch with one hand and saw with the other.

12 feet off the ground. Wearing a bee suit complete with pith helmet and veil.

I must have looked comical.

The branch came free remarkably easily. I was going to walk it down the ladder, but Stan volunteered to take it from me. He wasn’t suited up at all. A brave man who understands bee mentality. (I prefer to feel “invincible” in my bee suit while working closely with bees.) I handed the branch to him. It slipped as he changed his grasp on it, dumping about 1,000 bees onto the ground. But then he pulled another frame out of the nuc box and stuck the branch in.

A crowd of spectators had begun to gather, all keeping their distance.

I turned to the other clump, which was smaller. It was gathered on a pair of much smaller branches that intersected. I’d need to grab the branches together and cut them together. No problem. The clippers made short work of them. I descended the ladder holding a branch with about 3000 bees clinging to it. I lowered it into the box.

By this time, the bees had taken a liking to the box. Bees covered both sides of the frame in the box and were climbing up the outside of the box to move into it. They were abandoning the branch to move into the box. Bees were fanning all over the top of the box, sending the queen’s scent out to the other bees so they could find them. Even the bees on the ground were heading for the box. It was pretty amazing stuff.

Bees on a branch in a box
We started by lowering the branches of bees into the prepared nuc box.

Over the next 20 minutes, we worked to encourage the bees to move into the box. I trimmed away empty branches to make the bee branches smaller. I slid another frame into the box. I lifted the branch and used my bee brush to sweep bees from the branch into the box. Stan slid in another frame. I banged the branch to shake the bees into the box. The whole time, spectators watched, taking photos, getting closer and closer. The bees were completely docile. The ones that knew about the box clearly wanted in.

Eventually, we got them off the branches and into the box. We slid three more frames in for a total of five. I think three of them had drawn out comb and the others were brand new. I left the box open for a while. About 100 bees were still flying around, looking for their friends. They’d never all be in the box. It was time to close it up and head home.

Bees in a Nuc Box
Most of the bees were in the box within about 20 minutes.

I thanked everyone for their help and gave my email address to one spectator who claimed to have video. (I hope she sends it!) I told Stan that now I owed him an assist.

I put the bees and the rest of my gear in the back of my truck and headed out. May 10 and my first swarm capture. It was a good start for the year. Would I have any others? Swarm season ran until the end of June. I have my fingers crossed.

Chickens Again, Part I

Getting started with a new batch of chickens.

Penny with Chicks
Penny suspected trouble when I got into the truck with this little box.

A few weeks ago — just a few days after returning from my 2-month California trip, in fact — I bought 8 chicks. I set them up in my shed, in the stock tank I’d bought last year for my poor man’s hot tub.

Chicks in my Shed
My little chickies, huddled together in their nursery.

I’d had chickens before, in Arizona. They’re a lot of fun and you really can’t beat fresh eggs. Because I knew I’d have chickens again, when I moved to Washington, I took along most of my chicken-rearing equipment: feeders, waterers, and heat lamp. That saved me a bunch of money when it came time to get these started. And the stock tank in the shed really beats the cardboard boxes I used to use in my garage to get the chicks started.

The Chicken Yard

Of course, they couldn’t stay in the shed. Eventually, they’d need a chicken coop and a fenced-in yard. Like Wickenburg, this area has coyotes and I’d have to protect the chickens from them. It also has large hawks, eagles — including Bald Eagles — and owls, so a net across the top would be vital. I wanted the chicken yard to be large enough to accommodate all the chickens and, with the real possibility of free-range egg sales, even more chickens in the future. And although I only wanted to build it once, I didn’t want it to be permanent. (I’ve come to realize that I don’t want anything in my life to be permanent because nothing really is. But that’s a philosophical discussion best saved for another blog post.)

I explored many options. “Hog panels” looked good, but the only ones available in the area were very large and very costly. Someone suggested a dog kennel and even sent me to Costco in search of one that seemed like a good deal. But they were out of stock and I was running out of time. I needed the chickens out of the shed before I headed south for a few days on personal business.

Gardening with a Backhoe
Jeff cleared a space for my shed and garden and left a pile of bunchgrass and weeds in the area just north of the garden patch.

Covering Conduit
After he moved my shed and dug a trench, I ran conduit for my temporary electric and water lines to keep them off the driveway and he covered it back up.

Meanwhile, Jeff, the earth-moving guy, was preparing the pad for my future home. He had a honking huge backhoe and an i-beam that he used to scrape the ground. I wanted a garden and I wanted my shed moved to the other side of the driveway. (Originally, I figured I’d sell the shed when my building was done, but I realized it would make a great place to store garden tools so I decided to keep it.) I realized that Jeff could give me a good head start on my garden prep with that i-beam and I set him to work on a small area near where I wanted the shed. He dug out the few sagebrush there and scraped the ground clear of bunchgrass, leaving it piled up in an area north of the garden. He even dragged my shed to its new position — it was built on skids — and got it level for me. And dug a trench so I could run power and water for my RV and shed under the driveway so the cords and hose would not be run over by construction vehicles this summer.

When he left, I looked at my future garden location and the spread-out, uprooted bunchgrass beside it. The chickens wouldn’t mind all that grass. And it would be nice to have them next to the garden so I could let them in to eat bugs. Without even intending to, Jeff had chosen the spot for my chicken yard.

I wound up buying 150 feet of 5-foot tall “horse fence” at the nearby Coastal Farm and Ranch store. I wanted 6-foot fencing so I’d have plenty of room to walk around under the net, but this was on sale for a good price and it’s not as if I’ll be hanging out in there with the chickens. I also bought a few 6-foot T-posts. I already had a T-post driver and a bunch more T-posts that a friend had given me.

But I began realizing that I’d have a problem when I got the roll of fence home. It was too heavy for me to lift. I couldn’t even push it out of the truck bed. Clearly, I’d need help.

Assembling the Fence

Help came in the form of my friend, Mike. He’d come up from California with his helicopter towed behind his motorhome. After dropping off the helicopter at the airport, he rolled down my driveway and greeted me with a big hug.

Fence Under Construction
Some of the T-posts in the ground around the future chicken yard; the roll of fencing was very heavy.

After getting a tour of the place — building pad, “lookout point,” apiary, chicks in shed — we talked about the things I needed to do. I mentioned the chicken yard and the fence, never even thinking about asking him for help. That’s when he offered to help me.

I’m not an idiot. When someone offers to help me with a difficult task, I say yes! We got to work right then and there.

The work went surprisingly well. Within about 2 hours, we had completely fenced in a 9 x 25 foot area beside my future garden, leaving only a 4-foot wide doorway for a gate. Although it wasn’t perfect, it was a lot better than I expected it to look.

Chicken Yard
The nearly finished chicken yard.

Finishing Up. Almost.

The next day, I bought some bird netting at Coastal. Although it was supposedly 14 x 45 feet in size, the 14 foot width could not span the 9 foot width of the chicken yard. (What was that all about?) But with a little creative cutting and attaching, I was able to fit three pieces across to protect the chickens from aerial predators.

The next morning was warm and sunny with hardly any wind. I decided to try out the chickens in their new yard — I really needed to get them settled in before I went on my trip. I dragged the stock tank out of the shed and into the chicken yard. I closed the makeshift gate I’d made behind me. And then I tilted the stock tank so it was laying on its side, thus freeing the chicks.

They were not happy. And Penny, of course, went nuts. She couldn’t get into the chicken yard and she wanted a piece of those chickens. The chickens ran around and Penny ran around the yard. And that’s when the chickens started squeezing through the fence.

What followed was a comedy routine that involved me and Penny chasing 3-week old chicks. Penny was good at catching them and, for some reason, she didn’t kill them. I managed to get them all back in the stock tank. After putting food and water in there, I went back into the RV, hot, sweaty, and dusty.

The chicks would not be much bigger before I headed out on my trip. That meant that if I wanted them in the yard, I’d have to put something around the bottom edge of the fence to prevent them from squeezing through. What? I had some chicken wire, but I’d bought 4-foot width and that was overkill. It looked as if I’d have to head back to Coastal for some more chicken wire.

Reuse, Recycle

I was back out in the yard, contemplating the situation, when my eyes fell upon the 22 bales of straw I had in two piles in my yard. I’d bought the straw the previous autumn to stack around the base of the RV to winterize it. When I moved the RV out for my California trip in February, I’d stacked the straw neatly to get it out of the way.

If I laid the straw around the base of the chicken yard, right up against the fence, would that prevent the chickens from getting out? It certainly seemed as if it would.

8 WD
Although I bought this little flatbed trailer — a Craig’s List deal — primarily to move my bees around in the future, its size and low bed make it perfect for moving my ATV and straw bales.

So I got to work. I’d brought my ATV home, along with the little cargo trailer I’d bought years ago for yard work up at our vacation property in northern Arizona. The cargo trailer’s tires had been replaced and it was all ready for use. But last week I’d also bought a very small flatbed trailer that was larger than the ATV’s yard trailer. With a ball on the front of my ATV for towing the helicopter, I could tow the little flatbed trailer. It would be perfect for moving all that straw.

A formerly wise man used to say that any job is easy if you have the right tools. How true. I had the straw moved and positioned in less than an hour.

I was thrilled. My solution solved more than just the chicken escape problem. It also temporarily solved the problem of what I was going to do with all that straw.

A while later, I tried again to let the chickens out into the yard. This time, they didn’t escape.

Chicken Yard
The chicken yard this morning. I haven’t done a headcount, but I’m pretty sure all eight of my little girls are in there.

Temporary Coop
The temporary chicken coop is nothing more than a stock tank on its side with a piece of scrap plywood as a lean-to wall.

I set up an automatic waterer that I think might be a bit too big for them. Then I set up their chick feeders and waterer. I left the stock tank on its side against the side of the fence as a makeshift shelter for them; later, I leaned a piece of scrap plywood against it to enclose most of it. My list of things to do includes building a chicken coop, but I’m not sure I’ll get to that before my trip. The chicks are still small and should be okay in the stock tank, at least for a few more weeks.

The sun has just risen as I’m tying this. Seeing movement out the window, I took a closer look. The chicks are out in their little yard, scratching around in the early morning light. They’re exploring their big automatic waterer and, with luck, will soon be using their hanging feeder, too.

It looks like I’m on the road to chicken success. More later, after I’ve built their coop.

Maria’s Amazing Smoked Ribs

Easy to make, too, if you have a thermostatically controlled smoker, like a Traeger.

June 18, 2017 Note:

This post has been on this site for more than three years now and it continues to be my top post every weekend. It deserves it. The recipe, which is adapted from the Amazing Ribs website, is easy to make and use. The instructions are absolutely foolproof. In fact, I made four racks of these ribs on Friday to feed 10 dinner guests and got nothing but rave reviews.

Follow these instructions exactly as written and you won’t be disappointed. Check the comments for a link to buy powdered rosemary (which I have since done; you can get it in bulk on Amazon) and suggestions about spraying with apple juice (which I still haven’t tried).

Enjoy!

I picked up my Traeger the other day. I’d stored it in a friend’s garage while I was in California for two months on a frost contract. I wanted to bring it with me, but I couldn’t figure out how to bring it along without either making a mess inside my RV or disassembling it to fit it into the RV basement.

I was back nearly two weeks before I picked it up. I was busy. But once I had it home, I wasted no time smoking up two racks of baby back ribs. Although I took them with me to a pot luck BBQ down on the river that night, I knew attendance would be low so I gave half a rack to the guy who was doing the earth moving at my place in preparation for building to begin. He’s a nice guy and I figured he and his wife could share them for an appetizer before dinner. The next day, he thanked me, said they were great, and told me his wife wanted to know where I got the ribs.

Fred Meyer, I told him, but they could have just as easily been from Safeway or Costco. The meat isn’t what makes them amazing. It’s the preparation.

If you’re interested in buying a Traeger, you can help support this site by starting with this link.

I’ve made ribs at least twenty times on the Traeger since I bought it for my birthday last summer. I thought I’d shared the recipe here, but I couldn’t seem to find an entry for it. I figured that today was as good a time as any to get the recipe out there. As you’ll see, it’s extremely easy to make if you have a decent smoker.

There are two parts to this recipe. In the first part, you prepare the ribs by removing the membrane on the back side and rub them with a good rib rub. Do yourself a favor and make your own. There are a lot of recipes out there and any of them that includes salt and brown sugar as main ingredients will do the job nicely. A list of ingredients for my preferred recipe is below, but I can’t take credit for it. It’s from the Amazing Ribs website, which I highly recommend, and is called Meathead’s Memphis Dust. You really ought to read the recipe on that page since it has a lot of interesting details and useful tips that I won’t repeat here.

(Note: I do want to mention that this is the original version of that recipe, which Meathead no longer shares. He now thinks it’s better to keep the salt out of the rub and to salt the meat in advance. I’ve tried it his new way and frankly, I don’t like it. The meat always ends up too salty. This rub makes rib preparation error-free. Try it and see for yourself.)

The second part of the recipe is where you smoke the ribs. On a smoker. For a long time.

If you insist on boiling your ribs first, stop reading here. You’ll be wasting your time and, frankly, you’re not worthy of the results you’ll get if you follow the instructions here. Ditto if you think the best way is to roast them in an oven, slathered with barbecue sauce and covered with aluminum foil until they’re a soupy mess. (#YouKnowWhoYouAre) Get your mommy to make you one of her Campbell’s soup casserole recipes and a Cool Whip no-bake pie. You won’t appreciate the results of this recipe.

Still with me? Good! Here’s the recipe and instructions.

Rib Rub

Mix together the following ingredients in a medium bowl:

  • 3/4 cup firmly packed brown sugar. The recipe calls for dark brown sugar but because I don’t like the taste of molasses I usually have light brown sugar around and that’s what I use.
  • 3/4 cup white sugar. The recipe calls for white sugar but I usually have evaporated cane sugar and that’s what I use.
  • 1/2 cup paprika. If you make rubs often, buy the largest container of paprika you can find because you’ll go right through it.
  • 1/4 cup kosher salt. Although the recipe specifies Morton’s Kosher salt and the amazing ribs website tells you why, I think you can use any coarsely ground salt.
  • 1/4 cup garlic powder. But of course!
  • 2 tablespoons ground black pepper
  • 2 tablespoons ground ginger powder. The Amazing Ribs website warns you not to omit this ingredient. Personally, I would not omit any of these ingredients.
  • 2 tablespoons onion powder
  • 2 teaspoons rosemary powder. I was unable to find rosemary powder but I did find some sort of chopped rosemary leaves which I then tried to ground up a little bit to simulate a powder. What you want to avoid is full-sized pieces of rosemary leaves because I don’t think they’ll blend as well.

If you have any of this leftover after rubbing the ribs — and you should because it makes about 3 cups — put it in a jar with a tight lid and stow it with the rest of the spices in your pantry. It usually doesn’t last me more than a month or two before I use it all up. I really like these ribs.

Prepping the Ribs

You need to prep the ribs before you start the smoker. I don’t think it needs to be done the night before. I’ve done it as little as 30 minutes before placing them in the smoker and they always come out fine.

The kind of ribs you buy depends on your taste. I always buy either baby back or St. Louis style ribs. I used to like baby backs better, but I think St. Louis are usually meatier and juicier. They take a little longer to cook, too, so that might be a deciding factor.

  1. Remove the membrane on the back side of the ribs. This is a sort of skin that will prevent the rub from getting into the meat and possibly leave a stringy, chewy bit that really isn’t that good. The best way I’ve found to remove it is to use a butter knife to get the corner started, then grab it with a paper towel (which will give you a good grip with your fingers) and peel it off.
  2. Rinse and dry the rack of ribs.
  3. Sprinkle 1 to 3 tablespoons of rub evenly on each rack and rub it in. I use a lot because I really like it coated — almost to the point that the finished ribs are crusty. Do both sides and the ends and edges. The Amazing Ribs website recommends oiling the ribs first and then rubbing them, but I forgot the first time and they came out fine so I never do now. Why add fat, especially to the St. Louis ribs, which always seem to be fatty enough?
  4. Set the ribs aside until you’re ready to put them in the smoker. If that’s more than 20-30 minutes, put them in the fridge.

Smoking the Ribs

This is the easy part; your smoker does all the work.

  1. Follow the manufacturer’s instructions to get the smoker started and prepped. I always replace the aluminum foil from the drip pan, run the smoker up to a high temperature, and rub down the grill with a wire brush to clean it.
  2. Set the thermostat for around 225°F. You don’t want the temperature below 200°F or above 250°F.
  3. Lay the rack(s) of ribs on the grill surface, bone side down.
  4. Close the smoker cover.
  5. Go do something else. For at least 3 hours.

Amazing RibsThat’s an exaggeration. You might want to check on the grill periodically to make sure the thermostat is keeping it at the right temperature. My Traeger is a Junior and has a small hopper so I usually have to add pellets after a few hours. Don’t let it go out!

And don’t try to rush it by upping the temperature. Ribs need to cook slowly.

As the ribs cook, they’ll form what the Amazing Ribs guys call a “bark.” Yum.

The ribs are done when they pass the “bend test.” That’s when you grasp one half of the ribs with a pair of tongs and use them to lift the other end. The ribs should bend. If the bark cracks, they’re done. Yes, cooking them longer will make the meat fall off the bone, but that isn’t necessarily better. It’s just drier.

Expect 3-4 hours for baby back ribs and 5-6 hours for St. Louis ribs.

This recipe is so good that even though I overcooked the baby backs the other day, every single person who had them said they were “the best ribs” they’d ever had. Everyone. And I screwed up!

The Last Step

If you like barbecue sauce, now is the time to brush it on. Raise the temperature of the smoker or, better yet, thrown them on a direct heat grill. (Yes, it’s true: I don’t currently have a home, but I have two grills. I guess that tells you a bit about my priorities.) Cook on both sides until sizzling, but be careful not to burn them.

And you’re done.

As far as the barbecue sauce goes, you can also make your own. If I get it out of a bottle, it’s usually Jack Daniels original. Otherwise, I really like the honey barbecue sauce I blogged about the other day.

What Do You Think?

If you try these, let me know how they came out. But I warn you now: I won’t listen to any nonsense about boiling before cooking. Seriously: don’t even go there with me.

And if you don’t have a smoker but love ribs, this recipe will give you plenty of reason to go out and buy a smoker. Really.

I do so love my Traeger.

Congratulations! You’ve made it to the end of yet another lengthy blog post here on An Eclectic Mind. If you got this far, you must have gotten something out of what you read. And isn’t it nice to read Web content that isn’t full of annoying ads?

How about doing something to show your appreciation? I’d love it if you’d add a comment at the end of this post to share your feedback with me and others. But I’d really love it if you’d visit my Support page and chip in a few dollars to help cover the cost of hosting this blog and motivate me to keep writing new, interesting content. It’ll only take a moment and I really would appreciate it!