What the hover charts mean, how to read them, and which one to use.
– Flight Planning
– CG
– Weight
– Hover Charts
– Ground School
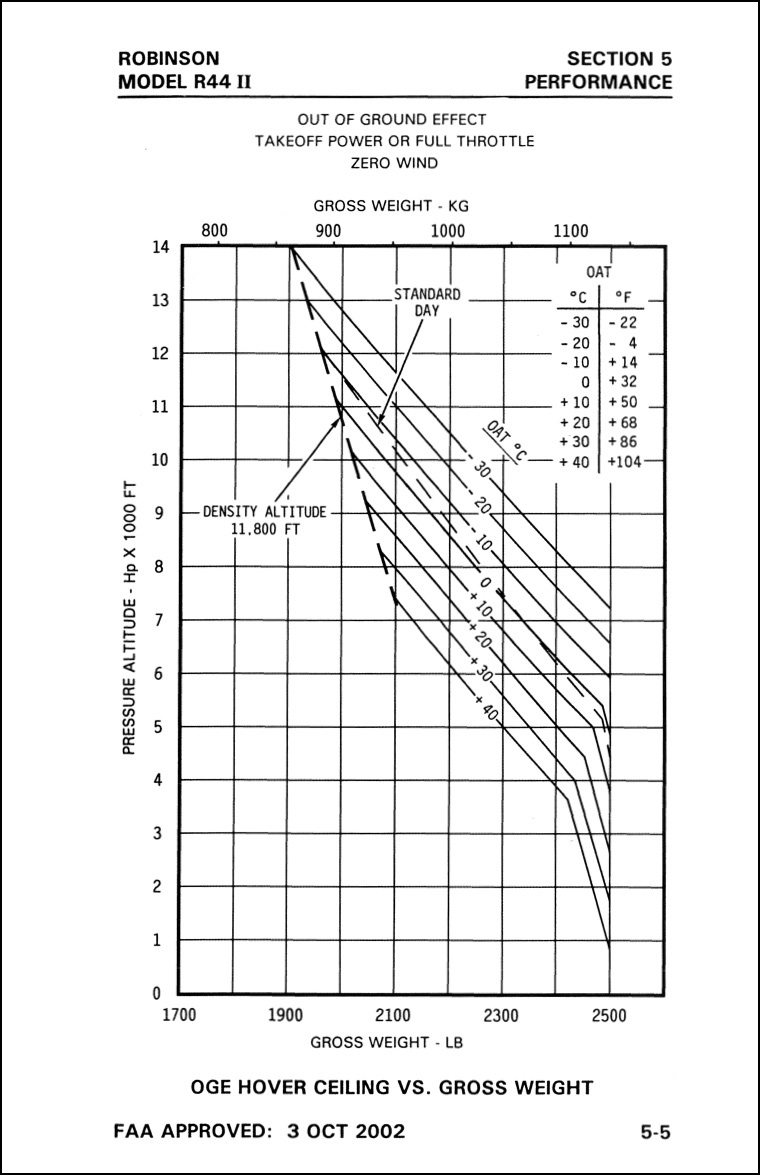
The “Performance” section of a helicopter’s Pilot Operating Handbook (POH) includes two charts related to hover power: IGE Hover Ceiling vs. Gross Weight and OGE Hover Ceiling vs. Gross Weight. (The exact names of these charts may differ by helicopter manual; these are the names in the Robinson R44 Raven II manual I have handy.) These are perhaps the most important charts in the book — they help you understand the amount of power a helicopter will have under specific operating conditions.
What the Charts Mean
The hover charts enable you to plot your operating conditions to see whether performance is possible. The operating conditions include altitude, gross weight, and temperature — all of which you should be familiar with prior to flight time. You should consult the charts before every flight using the information that applies for that flight.
There are two charts and they work much the same way, although they do provide different data:
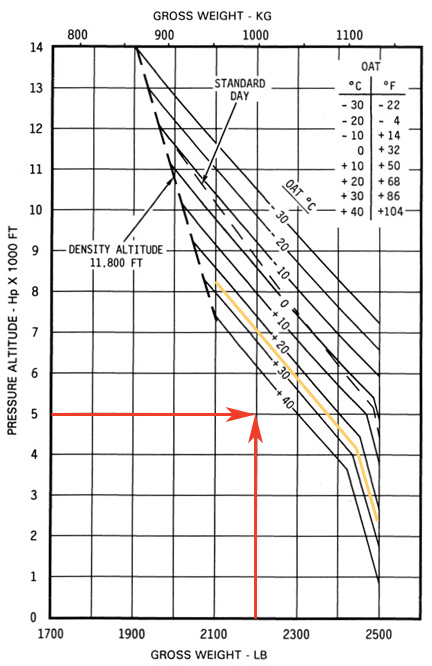
- The IGE Hover Chart (below, left) indicates expected performance in a ground effect hover. A note near the chart should get more specific than that. In the example here, the chart is for a 2 foot skid height with full throttle and zero wind.
- The OGE Hover Chart (below, right) indicates expected performance in an out of ground effect hover. Again, a note gets more specific. In this example, the chart is for takeoff power or full throttle with zero wind.
Generally speaking, the IGE chart is for hover operations very close to the ground while the OGE chart is for all other hover operations.
I’ve provided these two charts side by side here, but you can zoom into either one in separate browser window or tab by clicking it.

If you fly a different helicopter, you might want to pull out the charts for it and consult them while reading this. No sense in learning about my helicopter if your helicopter’s charts are handy.
How to Use the Charts
In order to use the charts, you need three pieces of information:
- Altitude of where you’ll be operating. This should be the pressure altitude, but in most instances the elevation above sea level will be close enough.
- Aircraft weight. This is the weight of the aircraft at the time of the operation.
- Temperature. This builds density altitude into the chart so you don’t have to calculate it.
The best way to explain how to read the charts is to provide a few examples.
IGE Hover Chart
Suppose your local airport is at 2500 feet MSL. It’s a pretty warm day and forecast for flight time is 35°C. You’ve done your weight and balance and you know that with you (the pilot), fuel, two passengers, and some added equipment, your weight at takeoff will be 2300 pounds. You want to make sure you have enough performance to do a regular takeoff from a hover, so you consult the IGE Hover Chart. The first thing you notice is that the chart starts at 5,000 feet. Since your airport is below that level, you’re done; the chart only addresses higher elevations so you’re good to go.
Plotting the altitude and the weight in this example keeps you below and to the left of the temperature line, so you’re okay in these conditions.
Now suppose you’re flying to Flagstaff, AZ, which sits at 7014 feet MSL. It’ll take you an hour to get there and the forecasted temperature there is 30°C for your arrival time. You want to make sure you have enough performance to do a regular landing to a hover and then to the ground, so you consult the IGE Hover Chart. If you burn 16 gallons per hour and each gallon weighs 6 pounds, you’re now nearly 100 pounds lighter or 2200 pounds. You plot the point where the altitude meets the weight. Because you’re still below and to the left of the 30°C temperature line (highlighted in yellow here), you have enough performance. If you follow the 7000 foot line to the 30°C line, you can see that you’d even have enough performance at that temperature and altitude if you were just about max gross weight (2500 pounds).
In this example you have a problem: the plotted point falls above the temperature line. This means you might not have enough performance to hover in ground effect under these conditions.
Now let’s say that when you get to Flagstaff, you’re picking up another passenger and he’s a big guy. You also have to put on some fuel — enough for you to be at max gross weight for takeoff. In addition, takeoff will be at 3 PM when the forecasted temperature is 35°C. Plotting that indicates a problem — the plotted intersection of altitude and weight is above where the 35°C line would be (as estimated in yellow in this example between 30°C and 40°C). This means that under these conditions, the helicopter may not have the performance you need in a ground effect hover.
What could you do about this? A few things:
- Lighten up the aircraft. Take on less fuel (if possible) or leave behind a person or some equipment (good luck with that).
- Wait until the temperature drops. The temperature will likely drop again later in the day. Wait until it drops below 30°C.
- Perform a running takeoff. But is that possible? Because you need less power to fly at speeds in excess of ETL than to hover, it could be. The only way to know for sure is to try. (A serious question here, though: do you really want to take off if you know you don’t have enough performance to even hover in ground effect? Think long and hard about that before doing it.)
OGE Hover Chart
It’s the next day. A photographer wants you to take him and his client around a marina at the lake so he can get video footage of the new dock and some boat races that will be going on. The lake is near Prescott; it sits at 4900 feet and is surrounded by desert mountains. The forecasted temperature in Prescott for the early morning flight is 25°C. You get the passenger and equipment weights and calculate your fuel load for the flight. The total aircraft weight at the time you’ll be on point to start the shoot will be 2200 pounds.
You’ve worked with this videographer before. He likes you to fly very low and slow — usually less than ETL, sometimes only 100 feet off the ground. (You’ve already warned him of the potential danger of this, being sure not to refer to the height velocity diagram as the “deadman’s curve.” But you’re willing to take the risk and he likes flying with you because you’re the only area pilot who will.)
In this example, you’d have enough performance to hover out of ground effect in the plotted conditions.
You pull out the POH and turn to the OGE Hover Chart. Why that chart? Well, you know that you’ll be flying at speeds less than ETL. That’ll likely take at least as much power as hovering out of ground effect. You plot the altitude and weight, as shown here. The resulting point is below and to the left of the temperature line (sketched in yellow). You should be good to go.
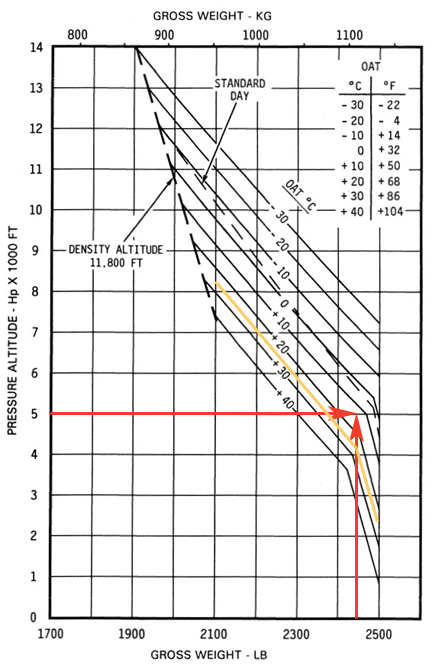
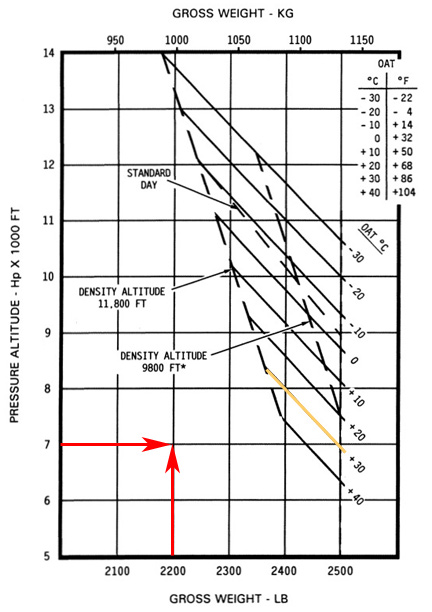
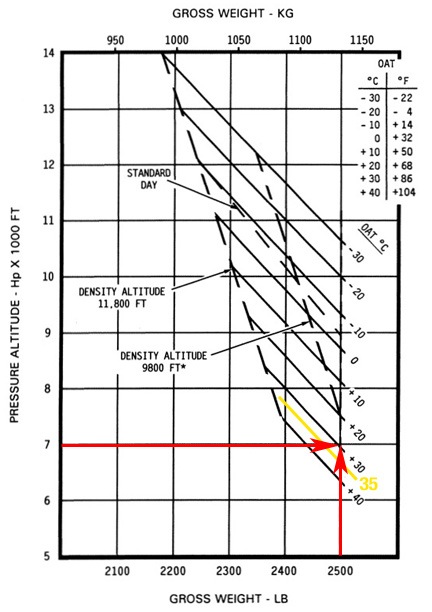
With the fatty client on board, you simply wouldn’t have enough power to hover out of ground effect.
Now let’s say that the photographer calls an hour before the flight. His client wants to come along, supposedly to provide instructions. You ask how much he weighs and the photographer tells you 240 pounds. A big guy. You recalculate the aircraft weight at the time of the flight adding 250 pounds for the client because you know everyone lies about their weight. Now you’re at 2450 pounds, which is pretty darn close to max gross weight. You plot the points and what do you find? With the client on board, you’d be too heavy to hover out of ground effect.
What can you do? A few things:
- Lighten up the aircraft. Assuming you can’t leave the client behind, you might be able to operate with less fuel on board.
- Wait until the temperature drops. Of course, the photographer picked that flight time for a reason and probably won’t take a time change.
- Don’t drop below ETL when out of ground effect during the flight. If you keep your speed above ETL, you should have plenty of power to fly. But will the photographer accept that?
IGE vs. OGE
In these examples, I used both charts. You might be wondering why I used the OGE chart for a flight that didn’t necessarily require hovering. After all, you reason, if you don’t have to hover, you don’t need a hover chart, right?
Wrong.
As I mentioned earlier, operating at speeds less than ETL — which is about 25 knots in an R44 — requires about as much power as hovering. That’s why you need to consult a hover chart. And since you’ll be 100 feet up or higher, you’re not in ground effect so you need the OGE hover chart.
Let’s look at what could happen in the photography example if you conducted the flight when the OGE hover chart told you hovering wasn’t going to be possible.
You get into position for the photographer to start videoing the new dock. You’re about 100 feet off the lake surface, doing 40 knots. “Slower,” the photographer urges. You drop speed little by little. Finally, you’re at about 15 knots. The helicopter starts to settle. You pull up the collective and either you get a low RPM rotor horn (in a piston helicopter like the R44) or you over-torque or over-temp the engine (in a turbine helicopter). Either way, the settling doesn’t stop. You push the cyclic forward, trying to fly out of the vortex ring state you’ve put yourself into, but you’re now less than 100 feet off the lake. Are you wearing floatation devices? I hope so. You might be going swimming.
Think this doesn’t happen? It does. It even killed people in this accident and this accident — both of which were for aerial photography missions. (And yes, the pilot in the second accident was also impaired.)
Throughout this blog I refer over and over to the OGE hover chart. This is why. It gives you worst case scenario performance for your operating conditions. If the OGE hover chart says you can operate, you can operate at any speed. Indeed, if you consult the OGE hover chart first and it says you’re good to go, you don’t even need to consult the IGE hover chart.
Conclusion
My advice: consult the OGE hover chart before every flight. It gives you a good feeling for the kind of power you’ll have available throughout various phases of a flight, even if airspeed drops below ETL.
This can become vitally important, especially if you’re doing an off-airport takeoff or landing in rough terrain. Think about it. Suppose you’re sitting on the ground near that marina in the last example, with the fatty client on board. Maybe that’s where you picked him up. You pick the helicopter up into a hover; it’s possible but perhaps you need nearly full allowable power to do it. You push the cyclic forward only two or three feet off the ground. What happens as you begin to go through ETL? The helicopter’s nose might dip. If you’re close to the ground, you could hook a skid. Add rising terrain and/or a tailwind and you might find yourself in serious trouble. That’s what happened to a pilot in Easton, WA in 2007 and it killed her and her three passengers.
If the OGE hover chart says you don’t have the performance you’ll need for an OGE hover at your expected flight conditions, at the very least you should consult the IGE hover chart to make sure you can hover in ground effect for takeoff and landing. If you don’t have the performance for that, consider what you can do to increase performance before taking off, even if a run-on takeoff is possible and you’re certain you’ll be able to hover when it’s time to land.
These charts are your true performance guides. Operating when they say you can’t is just plain stupid.
 I first made Julia’s cranberry recipe for Thanksgiving dinner in 1996. This was an amazing meal served in my New Jersey home. Our Salvation Army-acquired dining table, expanded to its full length with the help of a homemade leaf fully five feet wide, made it possible for all 15 of us to sit together. Amazing timing with the help of a standard sized oven and the microwave I still own made it possible to serve the entire meal at the same time, fresh and hot. If there is such a thing as miracles, this was one of them. I’ll never be able to top that feat again.


 A look at the performance chart for an R44 (Raven I) makes it pretty clear why the pilot had trouble maintaining altitude at slow speed. At max gross weight on a 30°C day, the helicopter can’t even perform an out of ground effect (OGE) hover at sea level, let alone nearly 5,000 feet. That means it would have to continuously fly above ETL (approximately 25 knots airspeed) to stay in the air. At slow speed, a turn into a tailwind situation would rob the aircraft of airspeed, making it impossible (per the performance data, anyway) to stay airborne.