Yes, I’m firing up the kiln again.
Years ago, in the autumn of 2014, when my building was first built but my home inside it was barely started, I took up yet another hobby to keep me busy while I waited for my wasband to get his head out of his ass and pay me what he owed me from our divorce settlement. That’s when I started doing “warm glass” work — specifically, making things like Christmas tree ornaments and jewelry with melted down, repurposed wine bottle glass.
Some Backstory
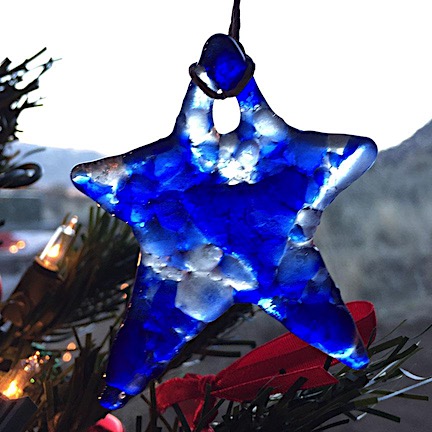
Here is one of the Christmas tree ornaments I created from broken bottle glass in my tabletop kiln back in December 2014. The blue glass is from a sake bottle.
I bought a tiny desktop kiln and tinier molds to fit inside it. I then acquired countless used wine bottles from the wineries in the area, broke them into tiny pieces, and melted down the pieces in the molds. Some of the resulting items — especially the Christmas tree ornaments — came out rather nice. But beyond that, I was disappointed, mostly because of problems with devitrification. Simply described, the rough edges of the broken glass, when melted down, prevented the final product from having a smooth, shiny surface.
I did all kinds of experiments to get rid of the unsightly marks and finally concluded that they’d have to be polished out. I bought a lap grinder as a sort of universal polishing tool — I was also trying to turn wine bottles into drinking glasses and needed to polish the rims — but it never worked the way I needed it to. I got discouraged and, as I usually do, set it aside and picked up another project to keep me busy. In this case, it was wiring my entire home prior to professional installation of plumbing, insulation, and drywall.
That took me through the winter and into the spring of 2015. I moved into my home and continued working on projects there: finishing my deck, trimming out the doors and windows, finishing up the loft. With flying work and an active social life, I didn’t have much time for playing with broken bottles and a kiln, especially since the results were so frustrating. Yet sometime around then, I bought a bigger kiln. I think I was considering larger glass projects, but don’t remember. The kiln arrived, I assembled it on a wheeled platform I built for it so it would be easy to move around my shop, and I promptly forgot about it.
Last autumn, before departing for my winter trip south, I finally got around to trying out the “new” kiln. I was able to set up several molds inside it. It took a few tries to get the firing schedule right and when I did, I was satisfied with the glass fusing of the items I put into the molds. But I hadn’t licked the devitrification problem, so I wondered why I was even bothering.
Of course, devitrification would not be an issue if I purchased glass specifically made for fusing in a kiln. It was available online from a variety of sellers and would make beautiful pieces. But that wasn’t my goal. My goal was to take garbage — wine bottles — and turn it into something desirable. And I was failing — at least to make pieces up to my own standards which, admittedly, are sometimes a bit too high to achieve.
The Jewelry Connection
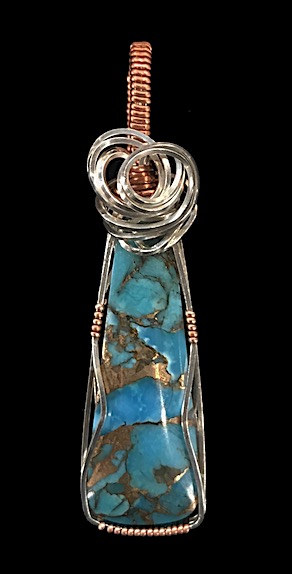
Kingman turquoise with bronze wrapped in sterling silver and copper. I made and sold this pendant last Friday.
In January, I took up wire-wrapping gemstones to make pendants and earrings (so far). I developed a real knack for this and quickly developed my own style. I’ve sold a few dozen pieces so far and haven’t gotten bored with it yet. I think it’s because of the variety of stones and the new techniques I can experiment with. And having people praise me for my work — and actually pay me to own a piece — is a real motivator.
I occasionally set up a vendor table at Pybus Public Market on Fridays or Saturdays. (Last Friday I sold five pieces, including one that I’d just made less than an hour before.) One of the other vendors does art glass work. She uses the kind of glass she buys specifically for fusing and turns out some wonderful bowls and plates and other items. I asked her if she ever makes cabochons — after all, why not wrap a “stone” made of glass? She said she could but even after prodding her a few times, she hasn’t delivered any. I told her about my kiln and how it was nearly brand new and hardly used. She said she might have a friend interested in buying it.
I’ve been shedding a lot of the things I’ve owned for years that I lugged to Washington when I moved. I had too many things taking up space in my garage that I knew, deep down inside, I’d never use. The microwave from my old house was the first to go. An old Sony television, still in its box, went next. Both of those went for free. But I also sold my old desk, curtain rods, luggage, and all kinds of household items I packed from September 2012 to May 2013 while I was waiting for the court date for my divorce. (Honestly, if my wasband hadn’t delayed the court date, I would have had less time to pack and would have left a ton of stuff behind.) My telescope and a set of cast iron cookware were the most recent things to go and they each brought in a surprising amount of money. Maybe it was time to sell the “new” kiln.
Or maybe not. There was still one other thing I wanted to try: bottle slumping.
Bottle Slumping 101
I’ve been to a lot of arts and crafts shows. My good friend Janet is an artist and I’ve visited her at many of the shows where she sells her work. One of the craft items that occasionally appears at these shows is wine bottles that have been flattened in a kiln to make a plate. The technique is referred to as bottle slumping.
While my original kiln is too tiny to slump anything bigger than a shot glass, my new kiln can handle a standard sized wine bottle if I place it diagonally across the floor of the kiln. Yes, that means I can only do one at a time, but it was still worth a try. The way I saw it, if I didn’t use the damn kiln, I should sell it. I needed a reason to keep it. Making something desirable out of garbage was my goal. I still had literally hundreds of wine bottles to work with. (I had actually started disposing them in my recycle bin at the rate of 3 cases every two weeks but with 12 cases gone, I’d barely made a dent in what I had accumulated. When you have a lot of storage space, you find a way to fill it.)
I did research online. Using a kiln isn’t as easy as just turning it on and waiting for it to finish. You have to find and program in an appropriate firing schedule. Schedules vary based on what you’re trying to achieve, what kiln you’re using, and what kind of glass you put in it. So right from the get-go, I knew I’d be doing a lot of experiments.
I should also mention here that there are two ways to slump bottles: with and without a mold. I didn’t have a bottle slumping mold so, by necessity, I’d have to slump without one. That got me worried about glass sticking to the bottom of my kiln. I had Thin Fire paper — it’s a thin sheet of paper that turns to a white powder in the firing process and prevents melted glass from sticking to whatever is under it — but I didn’t know how much the glass would melt and whether it would get into the corners of my kiln. Still, I was ready to give it a go.
First Try
| Seg | Ramp | Temp | Hold |
|---|---|---|---|
| 1 | 500° | 1100° | 10 min |
| 2 | 250° | 1300° | 0 min |
| 3 | 300° | 1425° | 10 min |
Let cool naturally.
So the other day, I programmed in a simple three-segment schedule, leveled the kiln — I use it in my car garage, which is gently sloped toward the door — put a bottle in there, closed the lid, and started it up.
The other thing many folks don’t realize about using a kiln is that it isn’t fast. The schedule I used would ramp up the temperature from my garage temperature to 1420°F over a matter of hours. Cooling would take even longer. I had dinner guests that night and the kiln was still too hot to open before they arrived at 5 PM. Although it might have been ready before I went to bed at 10 PM, I’d forgotten about it. But I remembered in the morning and went down to check it.
And I was pleasantly surprised with the results.
The bottle had melted nearly flat right in place, without seeping into the corners of the kiln. I say “nearly” flat because the bottle’s bottom, which is thicker than the rest of the bottle, had sort of collapsed and folded to make a lump. Although the neck of the bottle had collapsed, there were two air pockets inside. And when I washed the kiln paper power off the bottle, some water got inside along the neck.
The side that had rested on the floor of the kiln would be the top of the plate. It was flat with the texture of the bottom of the kiln, which I rather liked. When I set it on the countertop that way, however, the bulge at the bottom of the bottle lifted that end up, resulting in a plate that wasn’t level.

Here’s my first try. You can clearly see the big air pockets inside the bottle.
So I had three problems to resolve in my next test: get the air pockets out, close up the neck better, and come up with a way to level the resulting plate.
Second Try
I tackled the first two problems first and managed to resolve one of them. I decided that the reason there were air pockets and that the neck allowed water to get in was that I hadn’t melted the glass enough. I’d try again, but this time raise the highest temperature to 1450.
I reprogrammed the kiln, set another clean bottle in there, and got it started.
I do need to mention here that when I say “clean bottle” I mean completely clean and dry glass bottle, inside and out. I had to remove the labels by soaking in hot water for more than an hour, scrape away adhesive residue, and then use 90% rubbing alcohol to get the last little bits of glue off. Then I used hot water and a lot of agitation to rinse the inside of the bottle at least four times. Then I had to stand the bottle up on its neck in a place where the water would drain out and the bottle would eventually dry. This prep work is, quite frankly, a pain in the ass. But I do them two or three at a time so there’s always another bottle ready to slump.
I went about my day, running errands and doing chores around the house.
The schedule took another few hours to run and hours to cool. Finally, by mid afternoon the kiln was down to 200°. I opened it up but wasn’t foolish enough to touch the bottle, which would also be 200°. I did get a good look at it, though and it looked better. One of the air pockets was gone and the neck was nicely closed up, but there was still an air pocket right below the neck.
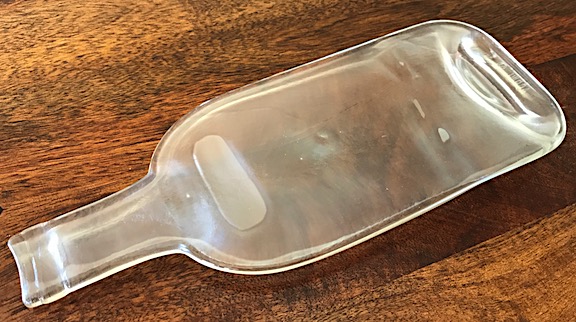
This is my second try. The neck had closed up nicely, but there’s still a good sized air bubble right below the neck. You’re looking at the flat side of the bottle.
When the kiln temperature got down to 90°F, I touched the bottle and found it cool enough to remove. It was better than the first one, but not quite “perfect” yet.
Third Try
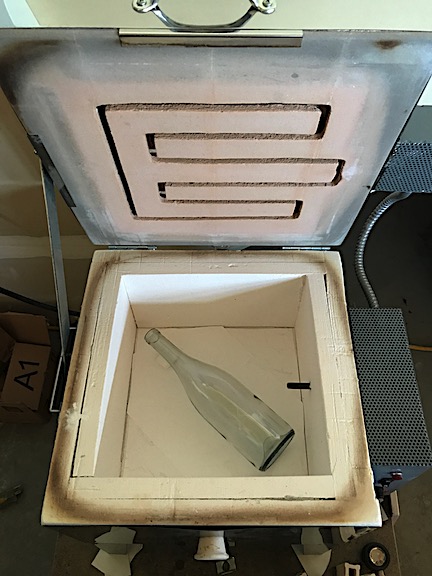
Here’s the third try bottle inside the kiln. Note the tiny piece of shelf leg positioned under the neck. It’s unfortunate that I can only do one bottle at a time; once I get the schedule perfected, it would be nice to do two at a time.
In the meantime, I’d called the art glass lady from Pybus to get some advice. What I really wanted to know is whether I had to keep using the kiln paper or whether I could just use kiln wash at the bottom of my kiln. I would quickly run out of kiln paper if I used a fresh sheet for each firing and it isn’t something I can buy locally. She told me she uses the same stuff I was using and recommended it. She offered to sell me some, but I didn’t want to bother her with that. I also told her what I was doing and mentioned the air bubbles. She suggested ramping up at a slower rate and holding it longer at the 1300° temperature.
So I grabbed another bottle — which happened to be a slightly different style — and stuck it in the kiln. At this point, I’d also decided to try propping up the neck of the bottle so that when it slumped, it would make a raised edge that would (hopefully) balance out the folded ridge of the bottle bottom. The trick was finding something to prop it up on. You can’t use just anything when you’re heating it to 1450°F. I poked around my broken glass fusing supplies, which were all neatly organized in a rolling cart in my shop, and stumbled upon the shelf legs for my tiny desktop kiln. I wrapped one of them in kiln paper, laid it on its side, and stuck it under the bottle’s neck, about 3 inches from the top. Then I reprogrammed the kiln controller again following the glass lady’s advice, closed it up, and got it started.
Finishing a Product
While the kiln did its thing, I played around with my first experiment. I wanted to make a branded cheese plate that local wineries might use or sell. I had some old wine labels from a friend’s winery and stuck it on the bottle. I then mixed up a batch of food-safe clear coat that I’d purchased earlier in the day, leveled the bottle-plate on a work surface, and poured the mixture over the label and flat side of the bottle. I soon realized that I’d mixed up too much and spent some time dealing with drips as the mixture self-leveled, resulting in a thin coat over the top of the plate.
It was tough to resist the urge to touch it, but I managed. According to the package instructions, I’ll need to wait at least 48 hours before I attempt to test the surface for durability. Remember, if this is a cheese plate, it should be able to stand up to the work of a cheese knife on it.

This is my first try bottle with my first try label and coating. This is good enough for me to use, but not good enough for sale. Still, I’m on the right track.
Third Try Results
This morning, after making my coffee — I have my priorities straight — I went down to fetch the third try. I felt a moment of panic when I thought that little piece of kiln shelf leg was stuck but it came loose without much effort. The result was a squared out bump in the neck of the bottle which forms a sort of leg when the bottle is set with the flat side up.
Trouble is, it’s too high. Now the plate tilts down the other way. That’s easy enough to fix; all I need to do is trim the shelf leg — which I think I can do — to make it flatter for the next try.
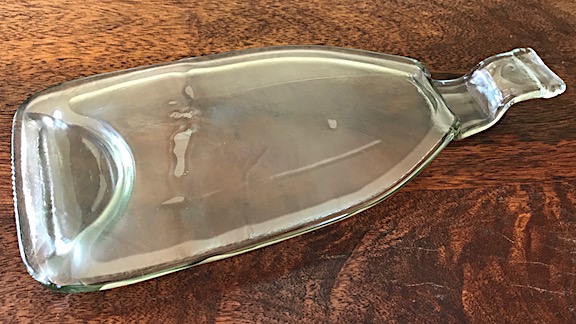
Here’s my third try. There are fewer air bubbles inside the bottle and there’s now a leg to hold up the neck end. Trouble is, the leg is too tall and I really want a bottle with no bubbles.
As for the air pockets in the bottle, they are greatly reduced. But I’m not convinced the firing schedule fixed that. This bottle had a different shape with a more gently angled transition from bottle body to neck. Perhaps that’s why air wasn’t trapped inside the bottle when it melted? The only way to know for sure is to use the same schedule with a bottle shaped like one of the ones I originally used.
Fourth Try
| Seg | Ramp | Temp | Hold |
|---|---|---|---|
| 1 | 500° | 500° | 12 min |
| 2 | 500° | 750° | 12 min |
| 3 | 600° | 1100° | 10 min |
| 4 | 200° | 1300° | 20 min |
| 5 | 250° | 1475° | 10 min |
| 6 | 9999° | 1100° | 60 min |
| 7 | 500° | 970° | 30 min |
| 8 | 120° | 750° | 20 min |
Let cool naturally.
My fourth try is in the kiln right now. I took the same shape bottle (since that’s what was prepped), cut the shelf leg so it would be shorter, and positioned everything in the kiln. And then, rather than modifying the simple schedule I’d been using, I reprogrammed it entirely using the longer, more detailed schedule for bottle slumping that I’d found. My theory is that the slower ramp up and longer hold times will give the air in the bottles a better chance to escape, thus eliminating the pockets of air.
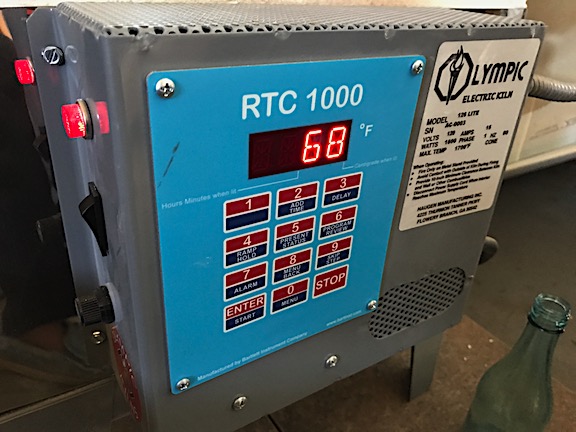
My kiln has a programmable controller which can store up to 6 user schedules.
Timing and Power Use
Keep in mind that each of these trials takes about 10 hours to complete. With only enough space for one bottle, I can only do two bottles a day — and that would require me to put the next one in each time I remove one. That’s not a huge deal for me; I’m here and once the schedule is set up just right, it is as easy as positioning a bottle and pushing a button on the kiln.
As for power usage, my kiln’s controller has the ability to calculate costs for me once I program in my kilowatt hour rate — which I just did. But I already know that the cost will be lower than what most people might think. Chelan County, where I live, supposedly has the second lowest electric rates in the country thanks to hydro and wind power: currently 2.7¢/kilowatt hour. (Compare that to 13.27¢/kilowatt hour where I lived in Arizona and 15.39¢/kilowatt hour where I lived in New Jersey.) The electric bill for my all electric house was only $25 last month. I’m thinking each firing might cost 25¢ to 50¢.
Goals
My final goal is to get a relatively level plate that can be used to serve cheese either as is directly from the kiln or with the application of a local winery label with a food safe clear coat to make it washable. I’d then sell those to local wineries for their use or make a product that they can sell to visitors. I can think of a few wineries that would be all over it once I got the kinks worked out.
Next time I’m at Pybus, I’ll bring a sample with me to see what kind of interest I get. Wish me luck.


