More on “Scud Running”

Clarifying my position on flying in low visibility conditions.

Note: A version of this post originally appeared in AOPA’s Hover Power blog. If you’re a helicopter pilot, you owe it to yourself to check in there regularly to read great articles written by experienced helicopter pilots.

In my post about long cross-country flights for AOPA’s Hover Power blog (which I republished here), I brought up the topic of scud running. Apparently, my account of a flight into low visibility conditions, which I referred to as “scud running,” set off a lot of alarms with readers. One reader seemed to think that I “endorsed” scud running. (I don’t.) Another reader found it necessary to share Accuweather definitions and a video that described “scud clouds.” (I don’t recommend Accuweather as a source of weather information per FAR Part 135.213(a).) Someone called for a “definitive statement from you declaring NO to EVER scud running.”

It’s that last comment that got me thinking about what some readers think about the reality of flying. Fortunately, two other readers who are obviously experienced pilots came forward and offered comments that clarified my position on flying in limited visibility situations. I’d like to elaborate on those comments, provide an example situation for consideration, and review the FARs regarding helicopters and weather minimums.

My Definition of “Scud Running”

Let’s start with exactly what I’m talking about when I use the phrase “scud running.” Reader Dan Schiffer nailed it when he responded to one of the commenters. He said, in part:

It’s a term most pilots use to discuss low visibility conditions that we all are faced with occasionally due to changing weather.

To me, scud running is any situation where low ceilings or low visibility require you to alter your route around weather. And yes, low ceilings are a part of low visibility — after all, if you’re in mountainous terrain, don’t low ceilings obscure your visibility of mountainsides and peaks?

The FAA discusses scud running in its Pilot’s Handbook of Aeronautical Knowledge:

This occurs when a pilot tries to maintain visual contact with the terrain at low altitudes while instrument conditions exist.

I discuss this in more detail later, when I cover weather minimums for helicopter pilots.

Neither my definition nor the FAA’s have anything to do with a so-called “scud clouds.” I can’t find any mention of these clouds in either the Aeronautical Information Manual (AIM) or Pilot’s Handbook of Aeronautical Knowledge. I did find a definition in AC 00-6A, Aviation Weather:

scud – Small detached masses of stratusfractus clouds below a layer of higher clouds, usually nimbostratus.

A Google search brought up a similar, but more detailed Wikipedia definition:

a type of fractus cloud, are low, detached, irregular clouds found beneath nimbostratus or cumulonimbus clouds. These clouds are often ragged or wispy in appearance. When caught in the outflow (downdraft) beneath a thunderstorm, scud clouds will often move faster than the storm clouds themselves. When in an inflow (updraft) area, scud clouds tend to rise and may exhibit lateral movement ranging from very little to substantial.

For the record, I’m definitely not endorsing flying anywhere near a thunderstorm or cumulonimbus cloud. The FAA says to maintain 20 miles separation from thunderstorms and that’s a pretty good rule of thumb.

So, in summary, when a pilot uses the phrase “scud running,” it usually means flying in low visibility conditions and has nothing to do with so-called scud clouds.

A Real-Life Example

I can only assume that readers who expect me to definitively state that a pilot should never ever engage in scud running as defined above either:

  • Haven’t had much time flying.
  • Haven’t gone on many long cross-country trips.
  • Fly in a place where visibility is never an issue.

Flying in low visibility is not something I want to do, but sometimes it’s something I have to do.

A Note about flying in remote areas

I’ve done just about all of my flying in the west: Arizona (where I learned to fly), Nevada, Utah, Colorado, New Mexico, California, Idaho, Oregon, and Washington (where I now live). In the 3,300 hours I’ve logged, I’d say that at least half of them were in relatively remote areas. Because of this, it’s difficult for me to remember that most pilots fly in more populated areas, where they’re seldom out of sight of a town or building.

As difficult as this might be for some people to believe, there are still many places in the U.S. where a helicopter pilot can fly for over an hour and not see a single sign of human life. I’ve flown 90 minutes in a straight line somewhere between Elko, NV and Burns, OR without seeing a building or a vehicle on one of the few dirt roads — just herds of wild horses running at the sound of my approach. I’ve flown over the high desert of the Arizona Strip, crossing just one dirt road over an 85-mile stretch of forest and canyons. I’ve flown the length of Lake Powell from the Glen Canyon Dam to Canyonlands National Park in the winter, passing just three seasonally closed marinas along the lake’s blue water and canyon mouths. I fly with a SPOT personal tracking device for a reason; if I go down out there — even by choice in a precautionary landing — no one would find me without some help.

So while “scud running” might seem like an unreasonable risk when you’re in an area with towns and airports every five or ten miles, it could be a matter of life and death when you’re out in the middle of nowhere and need to get somewhere safe. It’s not a black and white situation with a right or wrong answer.

Let’s look at an example. Suppose you’ve done all your flight planning and believe you can make a 2-hour flight to Point A, which is a rather remote place, without any weather/visibility concerns. You start the flight and things are fine for the first ninety minutes or so. Then the weather starts deteriorating. Maybe the ceiling drops or there are scattered rain showers that lower horizontal visibility in various places along your path. You can see well enough in your general forward direction and easily find paths around those showers that will get you closer to your destination, but things might be worse up ahead. Who knows? Even a call to Flight Service — if you can reach them on the radio in mountainous terrain with low ceilings preventing you from climbing — might not be able to provide adequate weather information if the area is remote enough.

Here’s where experience, judgement, and personal minimums come in. As helicopter pilots, we have three options:

  • Alter your route to completely avoid the weather, possibly ending up at a different destination. This might be the best option if there is an alternative destination and you have enough fuel to get there. But if your intended destination is in a remote place and you’re only 30 minutes out, there might not be an alternative.
  • Land and wait out the weather. Heck, we’re helicopter pilots and can land nearly anywhere. There’s nothing wrong with landing to wait out a storm. Remember, in an emergency situation, you can land if necesary, even in an area where landing is normally prohibited, such as a National Park, National Forest, Wilderness Area. (Again, I’m not recommending that you land in any of these places in non-emergency situations.) Do you have gear on board for an extended or perhaps overnight stay? This is another good reason to bring food on a cross-country flight.
  • Continue toward your intended destination. At the risk of sounding like I’m a proponent of “get-there-itis,” the destination is a known that’s a lot more attractive than the unknowns offered by the first two options.

There are many variables that will determine which option you pick. Here are a few of them:

  • Experience. If you’ve encountered situations like this before, you have a better idea of your comfort level than if you haven’t. You’ve likely also established personal minimums, possibly fine-tuned by real scares. The more experience, the better you’ll be able to deal with the situation and make the right decision.
  • Alternatives. If there is an alternative destination within range that you can safely reach with available fuel plus reserves, why wouldn’t you go for it?
  • Available fuel. There’s a saying in aviation: “The only time you have too much fuel is when you’re on fire.” One of the challenges of planning a long cross-country flight is making sure you have enough fuel on board to deal with unplanned route changes. But when flying to extremely remote areas, you might need almost all the fuel you have on board to get there. That definitely limits your options.
  • Actual weather conditions. If you can see a path ahead of you with potential landing zones and escape routes along the way, you’re far more likely to succeed at moving toward the destination than if the weather is closing in all around you. Never continue flight to the point where you don’t have at least the option to land and wait it out. The trick is to turn back or land before that happens; experience will be your guide. Likewise, if what you’re seeing tells you that the weather is localized and better conditions are just up ahead — perhaps you see sunlight on the ground beyond those heavy showers? — continuing flight might be the best option.

So what’s the answer? There isn’t one. As the pilot in command, you are the decision maker. You need to evaluate and re-evaluate the situation as it develops. You need to make a decision based on your knowledge and experience. If in doubt, choose the safest option.

Clouds
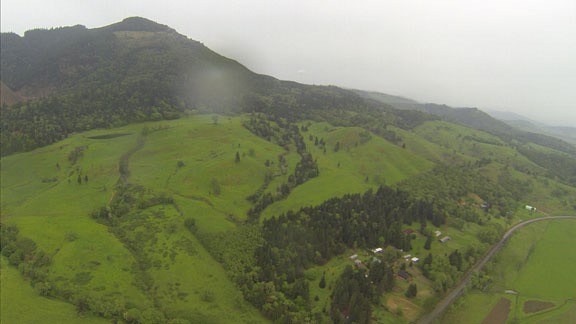
With mist, rain, and low clouds, would you keep flying?

Weather Minimums

Despite the severe clear weather I usually see around my home in Central Washington State, weather minimums are on my mind lately. Why? Mostly because my Part 135 check ride is coming up and I’m always a bit hazy on them. Spending most of my flying career in Arizona didn’t do me any favors when it comes to knowing when it’s legal to fly — or being able to identify different types of fog by name, for that matter.

So let’s look at weather minimums as they apply to helicopters.

FAR 91.155, Basic VFR weather minimums sets forth weather minimums for each type of airspace. I’m going to concentrate on Class G airspace, mostly because that’s the type of airspace I’ve been talking about.

According to the FARs, a helicopter may legally operate under VFR in Class G airspace during the day with a minimum of 1/2 mile visibility clear of clouds. Conditions less than that are technically IMC, thus invoking the FAA’s definition of “scud running” discussed above.

But what if visibility in your desired flight path is 1/4 mile or less but visibility 30° to the right is a mile or more? That is possible with localized showers or very low scattered clouds. Are you allowed to fly? I think that if you asked five different FAA Inspectors, you’d get a bunch of different answers. But if you crashed while flying in those conditions, the NTSB report would claim you were flying VFR in IMC.

What’s the answer? Beats me.

Scud Happens

What I do know is this: If all your preflight planning indicates that weather and visibility will not be an issue during a flight but unexpected weather conditions come up, you need to react to them. As helicopter pilots, we’re lucky in that we have options to avoid flying into clouds and the terrain they obscure. At the same time, we don’t want to push that luck and get into a situation we can’t get out of safely. Experience, skill, and wisdom should guide us.

Scud running is never a good idea, but sometimes it’s the best idea under unforeseen circumstances. It’s your job as a pilot to (1) avoid getting into a dangerous situation and (2) make the best decision and take the best actions to complete a flight safely.

My Weathercam

A picture speaks a thousand words.

A few months ago, I set up a weather station on my shed. I was mostly concerned with getting wind information back home when I was out flying. But the weather station also provides temperature, humidity, barometric pressure, and rain information. This information is uploaded to the Weather Underground website, where anyone who wants current weather information hyperlocalized to my home can get it.

When I shared the weather link with friends on Twitter and Facebook, some wise guy pointed out that the webcam couldn’t be found. Duh. It’s because I didn’t install one.

That’s not to say I didn’t want to install one. I did. I just had trouble justifying another expense for yet another interest that had taken over my wallet.

But I really wanted one. And when I snagged a frost control contract again this year — my fourth consecutive season; amazing what you can do when there’s no one anchoring you to a dreary existence in a dead town — and the contract guaranteed me even more money than the previous year’s contract, I decided to splurge. I ordered an AmbientCamHD outdoor weather camera.

The camera arrived Thursday. I had to drive out to my mailbox to fetch it — it had been snowing all day and I advised the UPS driver (who texts me when I have a package) not to try the road. I’d spent most of the day with two visitors who had helped me with an electrical project in my garage and then stuck around for lunch and half a bottle of Crown Royal. (Never a dull moment here.) It was still light out when I fetched the package (and dropped off another package for a neighbor on my way home) and I really thought I could have it fully installed before it got dark. But my Mac wouldn’t read the installer disk and the downloaded software, when used with my Firefox browser, insisted on installing an unusable EXE file with the required plugins. (How’s that for geek speak?) After leaving a voicemail for tech support, I tried again with Safari and managed to get the plugins I needed. Unfortunately, it was fully dark when I set the camera out on my deck to share a disappointing picture with the world.

On Friday morning, after breakfast, when the snow had stopped and the clouds drifted out — at least for a while — I went outside with my impact driver, the screws provided with the camera mount, and a Philips bit. It took three tries to fasten it in a good spot on one of my deck posts. (The second try ripped the heads off two of the three screws; I used drywall screws on the third try.) I aimed it out toward Wenatchee, at my “big view.” I made sure enough sky would show to give weather watchers a good idea of conditions.

Webcam after Setup
Here’s what the webcam image looked like right after I completed installatioin.

Of course, less than 30 minutes later, the clouds moved back in and obscured the view. With 5 inches of snow already on the ground, a fresh snowfall — unforecasted, mind you — began again. As I type this Friday morning, visibility is only about a mile in a medium snowfall.

The geek that I am, I quickly discovered the URL for my webcam’s images, which are uploaded to the Weather Underground once every 5 minutes. That makes it possible for me to share the current image on my blog. Here’s what it looks like as you’re reading this; keep in mind that if it’s dark or foggy you won’t see much:

Current Webcam image
Here’s the most recent web image. It’s best viewed on during daylight hours on a relatively clear day.

Of course, the webcam image is now available when you click the Webcam tab on the Weather Underground page for my station. It’s also available from the various Weather Underground smartphone weather apps when you look at the weather in my area or at my station, “Malaga Heights.”

Whew. Glad I got this out of my system.

My New Weather Station

Getting the hyper-local weather information I crave.

I’ve always been interested in weather. Yes, I’m the kind of person who’d leave The Weather Channel on all day as background noise — in the days when they actually broadcast live weather information all day. And always know the most up-to-date weather sources. And have multiple weather apps on my mobile devices so I could check one against the other.

My Thirst for Weather Data

Not long after moving into my Arizona home in the late 1990s, I bought a solar powered wireless weather station. My future wasband mounted it on the roof of the shed near the horse corral and it beamed back weather information to a panel at my desk. For a while, I had it connected to a Windows PC I had — the software wasn’t Mac compatible in those days — and put live weather information on a Wickenburg website I ran. In 2003, when I got the fuel manager contract at Wickenburg airport, we moved the weather station there — it was far more reliable than the ancient setup in use. (Wickenburg now — finally — has an AWOS.) When I sold the contract, I included the weather station among the assets of the business. For all I know, it’s still there.

Although I didn’t miss the weather station much as life dragged on in Wickenburg, I definitely wished I had weather stations in Washington where I spent my summers starting in 2008. I get seriously tuned into the weather during cherry season, checking radar throughout the day and always knowing the forecast — from multiple sources — for the next three days. I dreamed of having portable, Internet-connected weather stations with accurate rain gauges and webcams so I could place them at each orchard when it was under contract. You see, I fly when it rains and knowing exactly when and how hard it was raining would benefit not only me, but also my clients. Trouble is, orchards aren’t usually in places where Internet access is available and the cost of a 3G/4G/LTE connection for each station was prohibitive.

Fast-forward to the late summer of 2013. I moved to a 10-acre lot I’d bought at the base of the basalt cliffs in Malaga, WA — a place I like to call Malaga Heights. From my aerie, I could see the weather coming and going from the southwest to northeast. With a new home base, I started thinking seriously about a weather station again.

Weather Station Options

Technology had moved forward in the ten years since I last owned a weather station. The main thing I wanted was the ability to monitor weather from anywhere in the world on my cell phone. I had some practical applications for this, but it was mostly just a desire to get hyperlocal weather information, live, anytime, from anywhere.

I did some research. I discovered that weather stations fell into four categories:

  • Basic home weather stations. These are the ones that put a panel in your house and one or more sensors outside that can broadcast data to the panel. I already had one of these — heck, I’ve had these forever. In 2013, when I was still living in my RV, it became extremely valuable for me to monitor temperatures during the winter at my water source and RV basement. But systems like these are extremely limited, not only in range but also in the available instruments. It’s usually just temperature, humidity, and barometric pressure.
  • Weather stations with limited connectivity. These are weather stations that have a full set of instruments for temperature, humidity, wind speed/direction, and rainfall, but they just send that information to nearby information panel. That’s what I had back in the early 2000s.
  • Weather stations with Internet connectivity. These are weather stations that have a full set of instruments for temperature, humidity, wind speed/direction, and rainfall, and they transmit data via the Internet, through wifi or a direct connection to a router. They often also transmit to a panel where the user can view data locally.
  • Weather stations with Internet connectivity and direct smartphone access. These are weather stations that have a full set of instruments for temperature, humidity, wind speed/direction, and rainfall, and can transmit data directly to the Internet as well as to a smartphone app. Again, they also often transmit to a panel where the user can view data locally.

My main goal was to be able to view current weather conditions for my home on my iPhone. This would make it possible for me to assess conditions for landing my helicopter, which lives in my garage. When I fly home and put it away, I need to land on a 9×9 platform parked on my driveway on the east side of my home. With very strong winds in the area, landing there is difficult — so difficult that I prefer to land at a secondary landing zone on the north side of my home. I can then wait until the wind dies down, fire the helicopter back up, and move it to the platform. I don’t have to do this often — I think I did it just twice in all of 2015 — but it’s nice to know what to expect at home before I arrive. What’s interesting is that when the wind is howling at the airport across the river, it’s often quite calm at my driveway. This is likely because of my home being sheltered on two sides by terrain. That’s one of the reasons I built it where I did.

So at first it looked as if I’d need that last type of weather station — the kind with an app to get the data on my phone. Unfortunately, the stations I found that met that criteria were quite expensive — in the $250+ range. And I really couldn’t justify the expense, especially when I seldom have a real need for that weather data. After all, I only take the helicopter out about 50 times a year and the streamers on poles on my deck offer a decent indication of wind conditions when I get here. (I also have an airport-style windsock, but I positioned it too far from my landing zone to be of any real use to me. Long story there.) Maybe I was just trying to use flying as excuse for a new weather station? Probably.

More research showed me that Internet-compatible weather stations could usually be set up with The Weather Underground website. I started exploring stations already online there. I found one down at Crescent Bar, not far from one of the orchards I provide cherry drying services to. I clicked a link to get more information about the Weather station there and learned that it was an Ambient Weather WS-1400-IP.

WunderMap of my area
The WunderMap of my area shows the personal weather stations (PWSs) in the area. I’ve marked the one in Quincy and mine as well as the official weather station at the airport.

I did some more research and found that two Ambient Weather stations would meet my needs if I went with the Weather Underground: that one and the Ambient Weather WS-1001-WIFI. The difference: the more expensive ($299) WS-1001 had a panel to monitor the weather inside the house and did not require an ethernet connection to my router while the less expensive WE-1400-IP ($159) could only be viewed from a Web page or app and required an ethernet connection to my router. Both had the same basic set of instruments and were equally easy to mount. Both also had a solar panel to keep the station’s batteries charged.

WS-1400-IP
The Ambient Weather WS-1400-IP includes outdoor weather instruments mounted together in one cluster; an indoor temperature, humidity, and pressure sensor; and an ObserverIP receiver that must be connected to a router. The iPad and iPhone in this marketing photo apparently indicate that data can be seen on mobile devices after registering the station with the Weather Underground.

I was fortunate in that I planned to mount the station at my shed, which was about 100 feet from my building. The line-of-sight receiver would go in the window overlooking the shed by my desk, which was less than two feet from my router. So as far as the connection went, requiring an ethernet cable was not an inconvenience. So the question was: Is the viewing panel worth the extra $140? My answer was no. I bought the WS-1400-IP.

Setting It Up

Mast Kit
This mounting kit is perfect for mounting on the side of a building.

I wanted to mount the weather station on the side of my shed, preferably with all instruments above the sprinkler head I’d put up there for fire season protection. That meant I needed some mounting hardware. Rather than trying to rig up my own mount — and likely being frustrated every step of the way — I spent another $44 (with shipping) on the Ambient Weather EZ-30-12 Mounting Kit with Mast.

Assembling the weather station was pretty easy. All I had to do was attach the wind vane at the top and one of the two short mounting poles on the bottom. The crimped pole fit snugly into the top of the mast that came with the mounting kit. I added two batteries to the indoor sensor and set it on a shelf near my desk. I then connected the receiver’s DC adapter to an outlet and ethernet cable to one of the four LAN ports on my router. Done.

The next step was to register my PWS on the Weather Underground. The weather station’s manual provides the URL. I had to create an account and then provide some information about my location and the weather station. At the end of the process, I received a weather station identifier.

Next, I had to use the IPTOOL application on my Mac (a Windows version is also available, of course) to locate the weather station’s receiver on my network and connect. That opened a configuration page in my Web browser. I used that to enter the station ID provided by the Weather Underground, as well as my password on that system. I could use other settings pages to provide the station model number, time zone settings, and units of measure. The Live Data page showed a rather user-unfriendly table of data collected from the station.

Configuration
The Weather Network configuration screen for my weather station lets me put in my Weather Underground ID.

Of course, since the weather station was still inside as I did all this, it registered inside temperatures and wacky wind readings as I moved it around. It was time to install it. I certainly didn’t want bad data going out on the network.

Installed Weather Station
The weather station is positioned just slightly above my fire season sprinkler head. I’ll need to raise it (or lower the sprinkler head) before next fire season.

My timing was good and bad: it had turned kind of nasty and was about to rain. That was good if I wanted to record rain information (which I did) but bad if I didn’t want to be on a ladder in the rain (which I didn’t). Still, I went out to the shed and climbed on the orchard ladder with a drill and impact driver and all the parts I needed. Within 15 minutes it was installed, level and pointed the right way. It’s not quite as tall as I’d hoped; in the future, I’ll likely add a second mast pole to raise it another three feet.

The rain started before I was done. I admit I was tickled to see it registering in the Live Data screen when I got inside. (I am such a weather geek.)

There was one more thing I needed to do — although I didn’t realize it until the next day. I thought the weather station would automatically adjust the pressure reading for my elevation of approximately 1550 feet above sea level. But when I realized that the readings were significantly lower than what they should have been, I did some additional research to see how I could fix it. The answer was to enter a relative pressure offset amount in the Calibration page of the weather stations settings. To do this, I needed an accurate pressure reading. I waited until the automated weather observation system at the airport just three miles away across the river updated and calculated the amount of offset to enter. I plugged that figure into the right box, updated the settings, and was good to go.

Viewing Weather Data

Weather Station Data
Here’s a snapshot of the display for my weather station as I wrote this blog post.

Although the Weather Underground claims it can take up to 24 hours to display a PWS on its site, mine was visible within an hour. It’s got its own page, which can be viewed by anyone at any time; I called it Malaga Heights. Here’s a screenshot of what you might see if you go to that link.

As you can see, there’s a lot of data, including current conditions pulled right from my PWS, sunrise and sunset times, moon information, and a radar map of my area. The current conditions are updated regularly; if you keep watching, you’ll see it change, especially if the wind is variable.

The weather history section summaries and graphs weather information for the day or a period you choose. As you can see, the temperature has been pretty steady on this overcast day, the wind really kicked up a few hours ago, and the pressure is falling. Solar radiation is likely measured for the solar cells on the station; it always rises after sunrise and drops back to zero by sunset.

WunderStation App on iPad
The WunderStation app on my iPad.

All of this information is also available in the various Weather Underground apps you can install on smartphones and tablets. For example, the WunderStation app on my iPad displays rearrangeable tiles of data that update automatically. I can even set up multiple PWSes in the app and switch from one to another with a swipe. Similarly, the Wunderground app on my iPhone displays information about any PWS, including my own. Both apps are free, and if you’re a Weather Underground member — a bargain at only $10/year — they’re also ad-free. (I hate ads).

But wait! There’s more! You can also install a “sticker” or widget on your website or blog. You can see the style I prefer at the top of this blog post; one that fits better in the sidebar appears at the bottom of the sidebar on every page.

What’s Next

Of course, all this is not enough for a true weather geek like me. The Weather Underground supports a PWS webcam.

I’ve had webcams on and off for years and would really like to have one here. After all, not only do I have an amazing view to share, but my view of the sky would clearly show weather conditions that would interest other weather geeks.

AmbientCamHD
There’s always something new to add to a system, isn’t there?

The one that I know will be compatible with the system is the AmbientCamHD Outdoor WiFi WeatherCam. It has a few features I think I could use to create time-lapses. I’ve added it to my Amazon wish list, but I suspect I’ll likely break down and just buy it for myself before Christmas.

Some things I just can’t resist.

Spring Day from My Deck Time-Lapse

A windy spring day.

I set up my GoPro on a tripod on the deck outside my bedroom door for a time-lapse on Monday before dawn. Unfortunately, Monday was a rather ugly day — cloudy and kind of dreary. The resulting time-lapse would not have been share-worthy.

So I left the GoPro running and captured enough images for a 4 AM to 10 PM time-lapse on a much prettier — but windier — day. Can you see the point where the wind blew over my tripod? (I deleted the shot of my deck roof.)

Should have set this to music but I didn’t. Sorry!

I’ll try this again in a few weeks with the image zoomed in a bit. I thought I’d set it right for this one, but apparently I didn’t.

About the Wind Machines

An important part of crop protection.

The economy of this area of Washington State is based primarily on tree fruit production: apples, cherries, pears, and apricots. Indeed, Columbia River Valley around Wenatchee is one of the biggest apple producing regions in the world.

Fruit trees bloom in the spring, are pollinated by migratory bees, and form fruit. Throughout the summer, the fruit develops and grows. Months later, when the fruit ripens, it’s picked, sent to processing plants, and either shipped out immediately, as in the case of cherries, or stored for later shipment, as in the case of apples.

The timing of all this is determined by the weather and can fluctuate by several weeks every year. The trees get a cue from temperature to start budding and once the buds are formed, there isn’t much that can stop the seasonal progression.

Except frost.

Frost can kill flowers and developing fruit. A bad enough deep freeze over the winter months can even kill trees.

And that’s where frost protection comes in. Growers are deeply concerned about frost destroying a crop so they take steps to protect the crop from frost. In this area, they rely on wind machines to circulate the air in parts of an orchard prone to pockets of cold air.


This video shows wind machines in action at a pear orchard in Cashmere, which is near here. It looks to me as if the trees are in bloom. Unfortunately, the sound is turned off so you can’t get the full effect.

Wind machines look like large, two-bladed fans on a tall pole. Usually powered by propane, they’re often thermostatically controlled — in other words, they are set to turn on in the spring when the temperature drops down to a certain point. The blades spin like any other fan and the fan head rotates, sending wind 360° around the machine’s base.

The idea, of course, is that the cold air has settled down into pockets and that warmer air can be found around it and above it. By circulating the air, the warm air is brought around the trees and frost is prevented.

In California, they use helicopters to protect the almond crop from frost. (As a matter of fact, as I type this my helicopter is in California for a frost contract for the third year in a row.) The principle is the same, but the orchards tend to be much larger and I can only assume that it isn’t financially feasible to install and run wind machines in that area. (Hard to believe it’s cheaper to use helicopters, though.)

This year, some unseasonably warm weather has triggered a very early bloom. My clients tell me that their cherry crop is running 2 to 3 weeks early. Right now, cherries are in various stages of bloom throughout the area; apricots are pretty much done with their bloom. (Apples and pears will come next.) And since winter has not let go of its tenuous grip on us, the temperature has been dropping down into the low to mid 30s each night this week.

Well, not at night. It actually starts getting cold around 4 or 5 AM, as you can see in this weather graph:

Weather Graph
The National Weather Service weather graph page for this area shows the forecasted highs and lows over time.

The result: the wind machines kick on automatically when it starts getting cold: around 4 or 5 AM.

Want to hear what a wind machine sounds like close up? This video has full sound as a field man starts and runs up a wind machine. He’s wearing ear protection for a reason. Stick with it to see the spinning head on top.

Wind machines are not quiet. In fact, from a distance, they sound exactly like helicopters. And as they spin, they sound like moving helicopters — so much so that when I first heard them in action back in Quincy in 2009 or 2010, I thought they were helicopters and actually got up to see what was going on. I suspect that to someone on the ground, they sound exactly like a helicopter drying cherries would sound.

Although there aren’t any orchards on my end of the road, my property does look out at quite a few orchards, some of which have wind machines. There are at least 5 within a mile of me — I can see 4 of them from my side deck. I can also see others much farther out into the distance. And when the close ones are running, I know it. It’s not loud enough to wake me up in my snugly insulated home, but it sure did wake me up when I was living in my thin-walled RV outside. And it’s definitely not something you can pretend you don’t hear.

Fortunately, wind machines are a seasonal nuisance — much like other orchards noises: sprayers, tractors, helicopters, and pickers. Although frost season runs through May in this area, the machines only kick on during cold weather. Looking at the forecast, I can expect to hear them tomorrow morning and probably Wednesday morning, but not likely on Monday or Tuesday morning.

Weather ForecastNWS Wenatchee forecast for this week.

In the meantime, I’ve already gotten the heads up from my California client who might need me down there on Monday. After all, they don’t have wind machines.

For a helicopter pilot working in this area, wind machines are one of the obstacles that can be a hazard when drying cherries. They tower higher than the trees and their blades can be “parked” at any angle or direction. Although some growers will try to use wind machines to dry trees while waiting for pilots, my contract states I won’t fly in an orchard with wind machines spinning so they’re usually turned off when I arrive — or right afterwards. But if the blades aren’t parked, they can move. And one pilot I know learned the hard way about what happens when a helicopter’s main rotor blade hits a wind machine. (He’s okay; the helicopter is not.)

To sum up, wind machines are an important crop protection device that can be a bit of a nuisance with predawn operation in the spring. But I don’t mind listening to them. Like so many orchard owners in the area, my livelihood depends on a healthy cherry crop. If that means tolerating some noise 10-20 mornings out of the year, so be it.